Show Us Your Homemade Battery Housing

Here is something a bit different.

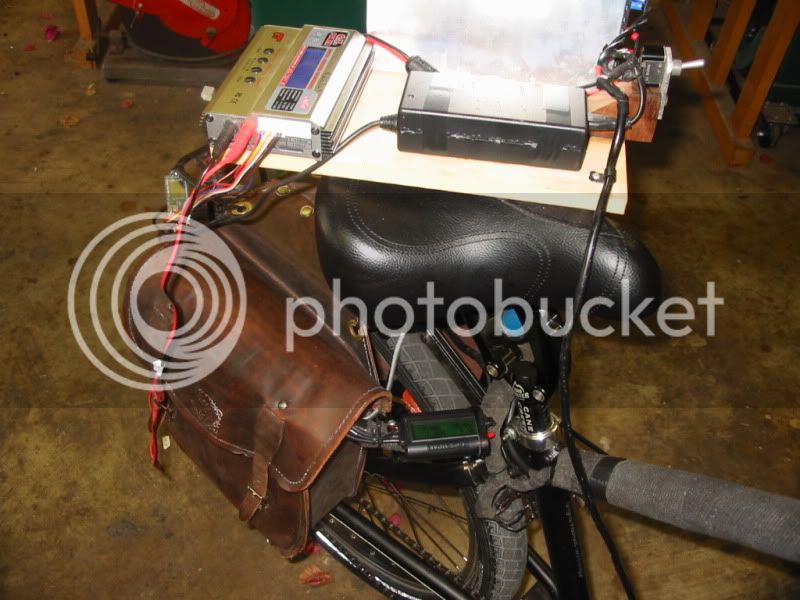
I use leather saddlebags. Inside them I have:

a split 48v/20ah Ping pack
72v Clyte controller with extra heat sinks added
22.2v/10ah lipo
2 dpdt relays (so I can switch from 54v to 75v nom. on the fly)
cheap DMM and assorted tools, wire and stuff

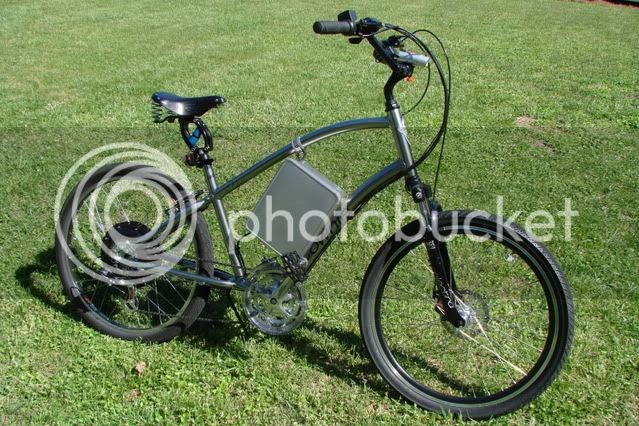
The leather protects the batteries and helps absorb some of the shock. I've got a cable wrapped through the rack to deter theft :wink: . I beefed up the rack so it doesn't sway at all and because the bags are mounted in front of the axle it handles pretty good. Over all it is quite stealthy as you can hardly see the motor or the wires.

The Watts-up and the BM6 are to monitor the lipos cell voltage and Ah used.

002-6.jpg


005-1.jpg
 
Love the look of the lyclist ride. Those hardtails with the straight line on the top are sexy. Nice job fitting batteries in there, not much space to work with.
 
steako, your ping pack should sit flat on the bottom of your box. you don't need so much air circulation around the pack either, but your BMS will melt that plastic it is wrapped in if it hasn't already. but support the entire length, don't have to put it on rubber either. i like the polyethylene foam felt they use for packing stuff like furniture. makes great weatherstripping too.

the section of the BMS where the output FETS are soldered across the end under the blue tape gets so hot it melts the solder. so you need to allow that end of the BMS to breath but keep it dry too.
 
dnmun said:
the section of the BMS where the output FETS are soldered across the end under the blue tape gets so hot it melts the solder. so you need to allow that end of the BMS to breath but keep it dry too.

How hot the BMS gets depends on the motor and controller. With my 48v25amp controller, it just gets a little warm. You guys running the big 530x motors probably need to worry more about keeping it ventilated, but with my 408 it is not a concern.
 
ok, i thought that was steako's BMS wrapped in plastic.

i have signalab BMS here that burned up at 22A. but it was tightly wrapped up in a bag too. all the solder melted and the plastic on the FETs burned too.
 
I edited my original post with a picture of the rack with the batteries mounted. The Ping batteries are in Coroplast boxes, which were slid into the framework. I also shortened up some wires and added a heavier duty switch and fuse holder. The top normally is covered with a black coroplast panel.

My BMS is taped to the top of the battery, between a couple panels or Coroplast. I can vent the box a bit more to provide better ventilation. Has anyone tried adding a heat sink to the FETs on the BMS?

I did my usual 14 mile round trip commute today, and the bike now feels different, but handles much better.
I still need to move the controller from the rear rack to inside the frame triangle, between the batteries.

-Warren.
 
Warren, nice work. Do your knees clear it when you pedal? I'm thinking you could take that flat area at the top and mount a nice hi-tech-looking dashboard for your digital displays, key switch, light switch and such.
 
www.recumbents.com said:
T Also from an earlier question, always use steel pop rivets in weight bearing applications.
-Warren.

Careful about the steel rivets if you are building an aluminum frame for your battery support. The two dissimilar metals set up ideal conditions for galvanic corrosion. Unless the rivets are directly supporting the weight, as opposed to just holding things together, then aluminum rivets should do just fine.
 
Wow, I really like that, j-vtol! It looks factory made, and great detail.
I'm going to try mounting my controller either to the outside of the box like you did, or from the inside through a hole so just the fins stick out, then seal the edge of the hole to controller with silicone for weather and theft proofing.

How about some details on how you built it?
 
Thanks Vim.

Well, basically I just cut the ABS plastic sheets (from local Tap Plastics store) to fit around the battery. The paneling was simply joined with Weld-On #16 solvent cement. It's a pretty strong bond, but who knows how long it will last. :twisted: The side door is hinged and closed with velcro.

Like the other cool housings here in the forum, I wanted to conform the box with the bike frame such as the back end of my current box. I also took advantage of the water bottle cage hard points for mounting. I didn't spend any time on the controller.....maybe later.

Also, use cardboard for a mockup. Once your happy, replace that cardboard with a material of your choice. Looking forward to seeing yours and others.

j-vtol
 
Everyone,

Nice enclosures... I will get some pics of my craft up soon but. For anyone using Chargery BM6... you need to see this:

http://www.designsforbusiness.com/ebikes/videos/BM6-CalibrationIssues/Edited_IMG_0047_BM6_OutOfCalibration_Proof.avi

This video shows the variation and incorrect HVC triggering of the BM6 when testing 4 of them on the same turnigy 6s lipo.

I have edited out the swapping the BM6 units (4 tested and demonstrated on the same 6S pack with nothing connected to it... btw, the fluke and the iCharger show all cells between 4.179 and 4.185 there are .002mv differences between the Fluke and iCharger but that is not of concern... you can see as these 4 BM6 cycle through their various readings they are widly off. You will also hear the HVC beep cut in... look it thinks some of my cells are 4.22+?

The good news here is the error is on the high side, so a cell of 4.18 could read as 4.22+ and trigger HVC alarm... atleast it will prevent overcharge. There are some variations (much more limited scale .010mv) in the LVC detection also... so 3.2 could be 3.21 but... again it's to the side of caution so it's not dangerous but to have finite control and get the most from your packs... you should test / calibrate each BM6 so you know it's offset. This will allow you to select a more appropriate LVC and to determine based on the displayed value if you should ignore the HVC alarm on a particular BM6 unit / cell.

Really, hope this helps!

-Mike


-Mike
 
This is my old 12S2P lipo low profile battery box that doubles as a rear rack and mud guard.
Made using aluminium channel, mesh and second seat post from an old junk pile bike poking horizontally out the back of the seat.

rack1we9.jpg


rack2yv5.jpg


rack3ge0.jpg


It's since been retired and I'm working on a long slim one running 5S lipo packs 2 wide and 3 long along the down tube.
 
j-vtol, thanks for those extra pics of your container. I like how you also attached it to the seatpost tube. That thing isn't going anywhere! The more I look at it, the more I like it. What kind of battery is that? Your whole bike looks really sharp. I'd prefer pedals, but still.. very nice build.

j-vtol said:
Vim, your frame kinda reminds me of an old unpainted aluminum warbird or racecar. 8) That would be sick if your box was contoured.

How would you personally go about making a contoured container? I'm open to ideas. I can see the WWII fighter comparison in these frames too, and I love theme bikes. There seems to be a lack of artistic touch to ebike builds compared to the gas bicycles. I'll have to try and step it up in that direction.
 
I'm posting this stuff a bit prematurely as it has my usual "bever chewed" look but I have had to work with fiberglass and epoxy to make my seat fit my "big butt" so I guess once I work it all out I'll fiberglass the wood Fatpack holders and gelcoat the seat. Prolly get them finished by my local boat guru who can spray everything after I sand for a week.

View attachment 1

100_4093.JPG
 
The battery I use right now is a 36V LiFePO4. This is all new to me so I wanted to make sure the components (from Hi Powered Cycles .com) were pre-wired for plug and play because I have trouble with electronics beyond a TV remote.

Vim said:
How would you personally go about making a contoured container? I'm open to ideas. I can see the WWII fighter comparison in these frames too, and I love theme bikes. There seems to be a lack of artistic touch to ebike builds compared to the gas bicycles. I'll have to try and step it up in that direction.

Here is a quick example mockup made from spray painted foamboard of what you could do if you wanted to try a different housing setup.....

img0979mr.jpg


img0982k.jpg


img0983u.jpg


:lol: You get the idea.

Cutting the side panels to whatever shape should be easy, but bending the inner surrounding shroud might be more difficult.
 
Nice, j-vtol! I really appreciate you doing a mock-up like that. I see what you're talking about now. It reminds me of the extra fuel tank the P40 Warbird or P51 Mustang would carry, or maybe the profile of the wing looking down the end. Or maybe even the cockpit canopy. You've definately got me thinking. I love the idea of looking to classic designs for inspiration.

I'm starting to plan out a second bike build, probably with another one of these Electra Townies and I'm going to use your ideas for sure. My current bike is dialed in and performing so perfect as is that I want to keep it as a back-up and start fresh on a new one. Money is the draw back right now but I'd like to go a lot further this time - custon battery container, custom paint, high quality air shock forks, rear disc, Hookworn tires on wide rims, etc... and of course a lot more powerful battery and controller. Your pics and ideas are super helpful. Oh, and welcome to the forum!
 
Boxy, but good.
View attachment 4

Img_0974.jpg
0.9 mm stainless steel, aluminum corners.
Img_0975.jpg
52x, A123, M1 cells
Img_0976.jpg
Baffles, to support the weight of the cells
Rubber door mat acts as a cushion and as standoff for rivets and bolt heads.
Between the box and the frame is a couple of blocks of polypropylene cut to shape.
The ubolts are a length of threaded rod bent to the correct shape.
The frame is protected from the rods by cloth tape, a strip of aluminum and more cloth tape.

Img_0987.jpg
Switches: key, pre charge, on/off and lights.

Greg
 
:shock: Greg, yours is one of the most impressive battery containers I've seen yet. Not to mention the battery. I love the switches. How long did that take to build?
Very well done! Thanks for posting it.
 
Yes, nice work tailwind. Flush mounted switches, gromets for the cable holes and hidden ubolt nuts etc...etc. 8) I feel really lazy now. :(
 
Back
Top