Show Us Your Homemade Battery Housing

ivanovlev said:
oatnet,

"inspired by builds here" and live visualization at AndreyM ;) My first solution (1200wh in 16s4p hardcase LiPo) for first bike looked like:

.....

Can you show how you have fixed the boxes to the bike? How many mounting points, where are they?
 
two on top and one on bottom


Solution isn't ideal, because support will flex and breaks with time

 
Thanks.

I started going down the same path as you have taken, but got doubts about the strength.

I've already got aluminium sheet (flat, not the footplate type) and the aluminium angle.
I added some strong aluminium bar from the rack down to the frame a little nearer to the axle (only fixed at the top but I have U bolts to mount the bottom firmly in place. This is to give extra support to the rack, as well as a lower mounting position for whatever battery box I end up with.
My thoughts are a little like yours with regard to strength, I really want 4 mounting positions.

I've even got nutserts to mount into battery box, feeling they should give a stronger fit.

My rack is further back on the bike than yours, and I started trying to work out some kind of strong lower 4th mount further back but gave up a while ago with the intention of looking at the whole thing again. I keep looking at threads like this one looking for the elusive 'right answer'. I think it's time to revisit a way of getting that fourth mounting point.
 
Battery housing fiberglass

2.jpg

7-4.jpg

7-3.jpg

7.jpg

10.jpg
 
I like that black case. Snazzy! 8)

Where did you find an enclosure like that? Or did you make it?

Curiously, KF
 
1389195245812.2.jpg1389195311747.3.jpg anyone else have a seat that is also the battery box? This is the most comfortable seat i could find. a "bucket seat" as it sinks down 3 inches so you dont slide around.

also pic with the seat fabric, all 6 ounces of it, folded back for easy access to battery. Seat slips over pins, no fasteners needed, it pops right off in 1 second.
 
My 20 pound work of art.
batterypack.jpg
BatteryPackControllerPanel.jpg
insideofbattery.jpg

Oh, and here's how it sits on my bike (few different versions of shown...latest one is in top left):
Packsitonbike.jpg

Turnigy 6cell 5Ah 20C packs (x12)
(24s3p config.)

Features:
-Anderson connectors for main power outputs (x2)
-Ignition + wheel lock anderson connectors (x2)
-C13 power plug as the main power tap, mainly used for charging.
-Ignition Switch (for controller)
-Wheel lock key switch (for controller)(ignition switch in parallel, so if wheel lock is on.. ignition is also on and bike is not operable)
-4 balance connectors to all paralleled cells are within the battery under the control panel.
-no fuses.
 
building this one for a friend...

about 8 hours of hand blistering work in this (including making templates), not a lot to do to the bag, but much to do to get the bike together....

bag_jim.jpg

bag_jim-o.jpg
 
Don't think my handlebar bag liked the rough stuff much. :(
..

[youtube]x6c1l6kOHr8[/youtube]
 

Attachments

  • 20140215_194434.jpg
    20140215_194434.jpg
    152.1 KB · Views: 6,365
Just finished my latest build and here is my battery box:
image.jpg
image.jpg
image.jpg
My nephew lazer cut it and bent it in a CNC press Brake. It fits the Giant DH large and they now have all the CNC files to pop them out if you want one. Just let me know. Covered it with faux carbon fiber vinyl (after a failed attempt to get it anodized). It works perfectly and covers this:
image.jpg
image.jpg

Cheers, Obiwan
 
Since my bike has two batteries each with it's own case, this is for battery #2. The case build for battery #1 can be seen here...
http://endless-sphere.com/forums/viewtopic.php?f=6&t=45706

On this my second bike conversion, I decided to go with 2 x 36=72 volt LifePo4’s from Cellman. Like everyone else here there was the problem of battery placement. I was inspired by Oatnet's front case attached to the handlebars set-up so once I determined the interior dimensions of the Pelican cases, I looked over Cellman’s battery sizing chart and decided on a square 36 volt 11 ah that would fit. That adventure can be found at the above link. And adventure it was. Strictly kitchen table stuff-as was this as well.

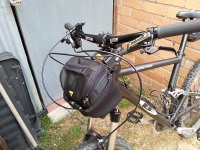
For the second battery, I didn’t want the fast and easy rear rack set-up with all the problems of weight distribution, although this bike doesn't wag its tail, as I wanted the rear rack and the Wald folding baskets to be kept clear as this is a working bike. So taking a tip from a member-I’ve forgotten who (sorry)- I decided to modify a seat post rack to sit in front of the seat. Its notched to fit over the frame.

1. Battery rack (600 x 450).jpg

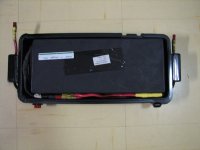
Then I figured what would fit and went ahead and ordered a flat battery-same capacity as the first one as they would be joined in series.
2. Flat battery (600 x 450).jpg

Well after the ordeal of the pelican case with the broken front rack and all the hassle of the wiring-the battery and all did fit-I just wanted something fast and easy for the second one so I had a left over bag from my first build so I just strapped it to the rack, hooked up the wiring and off I went.

3. Battery bag  (600 x 476).jpg

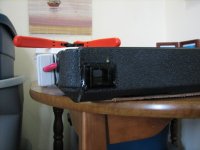
Funky, ghetto setup but it didn’t bother me at the time as I just wanted to ride. But in the back of my mind I wanted something more finished and every time I read a build here where someone executed something outstanding for a battery box, it started to guilt me out that I really needed something better. So reviewing my options, a custom fiberglass unit would be a nice project with maybe a little dashboard like DrBass and Auraslip have done, but being in an apartment I didn’t have the space or the means to fabricate anything with metal or fiberglass. So I started hunting down metal project cases, Pelican type cases, etc but I couldn’t find anything close to that odd size. But finally, after a year, I found one at Sears that was the right width and height but too long.

4.Battery box .jpg

It wasn’t molded like the Pelican case, but it was double wall and fairly sturdy and water tight. So I proceeded to cut it down with my skill saw and epoxied the end back on, drilled and installed grommets for the wires in/out,

5.Measure twice (600 x 450).jpg

glued a pair of Pings blocking diodes at the ends

[ATTACH type="full" alt="6. Ping diode (600 x 450).jpg

And a Anderson exterior port for plugging in my 36 v charger (I wish they made singles)

[attachment=5]7. Charging port (600 x 450).jpg"]6[/ATTACH]

8. Dry time in the bachelor pad (600 x 450).jpg

9.color reminders (600 x 450).jpg

i ended up gluing some foam to the bottom of the case and will finally secure it with a couple of belts. The original hinge got cut. There is still some wiring funk as I am making the transition to another controller with a 3 sp switch, etc.

But the day will come-nice and straight.

View attachment 1

12. The View (600 x 450).jpg
 

Attachments

  • 7. Charging port (600 x 450).jpg
    7. Charging port (600 x 450).jpg
    32.9 KB · Views: 6,208
  • 10. Nice tight fit (600 x 450).jpg
    10. Nice tight fit (600 x 450).jpg
    23.8 KB · Views: 6,208
I'm not sure if this is the right place for this one because it's not quite home-made, but it shows what's coming for us in a few years when prices come down. This one was printed from a large 3-D printer. The quality was superb. There was no sign of the normal layering. It must have had a very high resolution:

 
Kent said:
....... So reviewing my options, a custom fiberglass unit would be a nice project with maybe a little dashboard like DrBass and Auraslip have done, but being in an apartment I didn’t have the space or the means to fabricate anything with metal or fiberglass. So I started hunting down metal project cases, Pelican type cases, etc but I couldn’t find anything close to that odd size. But finally, after a year, I found one at Sears that was the right width and height but too long.

View attachment 8

It wasn’t molded like the Pelican case, but it was double wall and fairly sturdy and water tight. So I proceeded to cut it down with my skill saw and epoxied the end back on, drilled and installed grommets for the wires in/out,

View attachment 7

.....

Do you have a link to the case / sizes? I'm also struggling to find a matching size case for batteries. What material is the casemade from, how is the epoxy holding on, did you only use epoxy or some fixings too?
 
alsmith said:
Kent said:
....... So reviewing my options, a custom fiberglass unit would be a nice project with maybe a little dashboard like DrBass and Auraslip have done, but being in an apartment I didn’t have the space or the means to fabricate anything with metal or fiberglass. So I started hunting down metal project cases, Pelican type cases, etc but I couldn’t find anything close to that odd size. But finally, after a year, I found one at Sears that was the right width and height but too long.

View attachment 9

It wasn’t molded like the Pelican case, but it was double wall and fairly sturdy and water tight. So I proceeded to cut it down with my skill saw and epoxied the end back on, drilled and installed grommets for the wires in/out,

View attachment 8

.....

Do you have a link to the case / sizes? I'm also struggling to find a matching size case for batteries. What material is the casemade from, how is the epoxy holding on, did you only use epoxy or some fixings too?

Hunting down Pelican cases can be challenging as you will find some on Amazon or Ebay and other web sites but not all sizes. But there is a handy chart of sizes at http://www.pelican-case.com/chart.html. Be aware of inside measurements, slopping sides, and how molded in recesses for handles etc takes up space.

For the black box I got at Sears, its 22" long x 7" wide x 4" deep exterior measurements with a 1/2" wall thickness. The wall thickness is not solid, but rather is two 3/32" layers with an airspace and ribbing.

Not bad. No where near as sturdy as a Pelican but it is designed to be a tool box so is fairly rugged. It epoxied ok but as with most shiny plastics, the epoxy needs for the surface to be scuffed up first.

Easily cut with a circular saw but think about how your going to make your butt joints stick if you decide to cut it down. When I glued the end piece back on after cutting out the middle extra material, I thought about overlapping the joint with some metal glued on or reinforced duct tape like Gorilla Tape, but ended up just lay on the epoxy extra thick inside and out.

But give it a couple of days to properly cure. The oven helps the cure time, if the missus isn't watching... :D
 

Attachments

  • Battery box cutoff (600 x 450).jpg
    Battery box cutoff (600 x 450).jpg
    20.6 KB · Views: 6,134
I've looked on the pelican site before- they seem to have families of sizes with big gaps between them, and the size I'd need is in one of the gaps. One of my notebooks has the sizes and variations that would do the job. I found one just too small in one dimension, most often it's the width (too narrow or much too wide but the space wouldn't really be usable) or too log like yours was.
It's a while since I've looked so I'll give it a go again.
Thanks.
 
After seeing all the amazing work you guys do, I have been inspired to up my game a bit. I don't have much skill when it comes to electrical engineering, or metal fabrication, but I can design and craft wood with the best of them.

The Housing will hold 12 - 4S Hardcase packs (~1kwh) of HK LiPo.

Here is my preliminary design. It's a Fuel-tank inspired battery housing for my Kona King Kikapu FS Build.
Fuel Tank 2.JPG

The Sides will be cold-molded Mahogany to form the streamline shell.
Fuel Tank.JPG

And will be made with my favorite wood - African Ribbon Mahogany, and varnished like a Chris Craft to a high gloss.
Mahogany.jpg
 
Just built this rear rack for a 48v golden motor battery limn. Angled perfect to clear the rear wheel even under compression of the rear suspension. The bike is now capable of holding 3 batteries 1 upfront 1 on the down tube and one now in this pic. Just wish they were all fresh ones. :(ImageUploadedByTapatalk1401741357.236548.jpg
 
Back
Top