Swordman
100 mW
- Joined
- Jan 9, 2007
- Messages
- 40
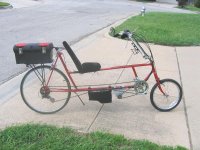
In 2006, I added power assist to my home built recumbent. I ordered a motor, controller, and twist throttle from Oatley Electronics in Australia for $110. I originally used two 12V 17AH lead acid batteries but have recently switched to a single 24V 8AH NiCd battery I got from ebikes.ca for $95. I got some good ideas from the "Bikes & Pedelecs" section of the now-defunct "V Is For Voltage" internet forum in a thread entitled "Bottom Bracket Drive."
This design drives the smallest chain ring for the front pedals. The advantage to this approach is that you have the other gears (10 in my case) to shift through to give you fast speed and decent hill climbing ability. The disadvantage, if you think of it as a disadvantage, is you must pedal along when the motor is engaged.
I tried first to mount the motor above the chain ring on a single bar. This approach proved problematic. When the motor got loaded down, it would slightly turn and the chain would loosen. This was mainly due to the thin metal I built the mount out of and that I could never get the u-bolts tight enough to where they wouldn't turn around the bar. I scrapped the first approach, built a mount out of aluminum angle, and relocated the motor underneath and behind the chain ring. This approach so far has proved to be excellent.
Behind the motor is a battery box containing the 24V 8AH NiCd battery pack. Under the battery box in a black project box that houses the motor controller and a relay to control the power. A kill switch is mounted on the handlebars to control the relay.
Originally, the motor did not freewheel. It was possible to pedal without the motor engaged, but it had a good bit of drag and was not something you wanted to do for very long. I recently added a freewheel to the motor by using a left hand drive, 13-tooth, BMX freewheel and an aluminum motor shaft/freewheel thread adapter made for me by a nice Australian man named Dom. The bike now pedals fine without the motor engaged and I find I pedal more and use the motor only for when I encounter hills or get a bit tired. It also has a higher top speed since the original 9-tooth drive gear has been replaced by the 13-tooth freewheel.
Top speed with this approach is around 30 mph with a range of just over 15 miles assuming moderate pedaling.
")