If you mount the arm without the long piece, and drill a hole in it that matches one of your fender/rack mount screw holes on the dropout top, and use a spacer there, you can bypass the whole cable issue.
You can make your own torque arms or plates with a drill and a small set of flat files. Use as thick a metal as you can, and then just drill the main hole for the axle and slowly file it out till it fits your axle so perfectly you practically have to tap it into place instead of just slipping it on. The tighter it fits the axle flats, the better. If it isn't parallel to the flats on both sides and along the whole surface, then only the parts that touch teh axle flats actually resist torque. So it does take a lot of patience to do this, but it's possible. Lots of ideas here
https://endless-sphere.com/forums/viewtopic.php?f=2&t=26444
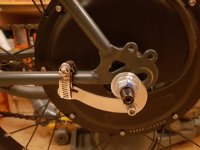
In a pinch you can use a good solid 10mm box wrench; I did this for a long time on Crazybike2's front hubmotor wheel and it worked fine, but open ended wrenches are not as good as closed-hole torque arms, because they can be pried open like dropouts. But if they are thick and hard metal, they're better than nothing and better than thin crappy arms.
")
A pic from the above thread
20160105_182255[1].jpg
and a pic from mine
https://www.endless-sphere.com/forums/viewtopic.php?f=2&t=12500&p=954759&hilit=wrench#p954759
IMG_0068[1].jpg
IMG_0141[1].jpg
a better pic was there but is missing now...thankfully this one was still there, though--Yogi got stuck investigating things....he was such a doofus.
:
IMG_0113[1].jpg
If you don't want to do that, I'd recommend the Grin torque arms that best suit your particular dropout design,
https://ebikes.ca/product-info/grin-products/torque-arms.html
https://ebikes.ca/torqarm-v4.html
https://www.amazon.com/Grin-Technologies-Universal-Electric-ebikes/dp/B00K60C67Y
A big problem with many cheap crappy clones of Grin's arms is that the hole is not fitted to the axle flats, so it's very easy for an axle to rotate enough in it to cut into the arm and keep spinning.
portals said:
As you say when I spun out the rear hub the torque did push the axle so it rotated through the arm metal and rounded it rendering it completely useless :-(
So I think maybe these cheap torque arms are junk and I need to go with a beefier version on non-drive side as you say.
Re drive side, the derailleur cable guide will still get in the way?


![20160105_182255[1].jpg](https://endless-sphere.com/sphere/data/attachments/184/184517-dc94f932c4793f6fb5c9d4f9e0972bec.jpg "20160105_182255[1].jpg")
![IMG_0068[1].jpg](https://endless-sphere.com/sphere/data/attachments/184/184518-6ff48b1b1622a3252f0460988bd43424.jpg "IMG_0068[1].jpg")
![IMG_0141[1].jpg](https://endless-sphere.com/sphere/data/attachments/184/184520-93f62393a4b300e62d6df70a45b7e3cf.jpg "IMG_0141[1].jpg")
![IMG_0113[1].jpg](https://endless-sphere.com/sphere/data/attachments/184/184519-a96afa328ff724403df4d81058fd9075.jpg "IMG_0113[1].jpg")