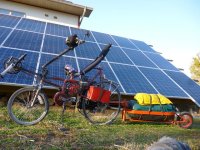
2WD (dual motor, two wheel drive) Trike build.

Clamping Station:

This is a big flat piece of scrap steel that I have had for years. Usually it lives under where I park my car in the garage, so it gets rustier every time I have a wet car. No big deal. I have made a simple system of clamps that I bolt onto the steel. I just drill a hole, tap it real quickly for 1/4-20, and set a bolt wherever I want a clamp to stay put. The whole thing is sitting on wood, so I won't drill into the concrete. The steel plate sits right in front of the welding station, between the drill press and the chopsaw, so I can quickly miter a piece of steel, clamp it in place, and weld it.

I wish I had a three dimentional clamping system, but two-dimensional is good enough. I can use a series of spacers (usually made of wood or conduit) to move things up on the "Z" axis. The flat steel gives a nice surface to use as a datum to measure where parts are.

If you don't clamp tubing before welding, you'll never get it straight. Lot's of people think they can eyeball it, holding one end and spot welding, or sticking a magnet on it. Never comes out straight. I have a buddy who also builds trikes, and he has yeat to build one that has all the wheels perpendicular to the ground the same angle. Very successful, he's used them for years of hevay riding, but they just don't look right.


P1020124.JPG
 
Clamp detail:

I made these out of some cheap C-clamps, and some flat steel. Now I wish I'd used a thicker gauge of flat steel - I can get some bow in the flat part if I clamp too hard. I carefully set two lenghts of angle iron against a tube, then welded the top to the C-Clamp round clamping pad, and the other to the flat steel Voila! A quick and dirty self-centering tube clamp, all consistent heights.

P1020125.JPG
 
Tools! I am using a really low tech set of tools. A lot of this stuff is adapted woodworking tools.

Decent drill press, with a head that can do angles other than 90 degrees. The photo is of a similar type. These are great for drilling odd angles.

Standard woodworking chop saw for mitering tubing. I either fit this with a metal grinding blade, or recently a carbide metal blade I found a Menards. These are great! Labeled for cutting thick metal, they slice through tubing with a lot less arcing and sparking than an abrasive blade. Not cheap - $60 for the blade.

Side grinder - either with a cutting blade, a grinding blade, or a rotary brush. Side grinders are like dremels on steroids. I call the side grinder the "Undo Button". Don't like a weld? Hit the Undo Button.

Welder, of course. You can do this with an oxyecetylene welder, and do a pretty good job, but slow. I have one of those, and a MIG wleder. The mig is fast. The Oxy can be used to heat and bend tubing, burn off stuff, scare your friend by igniting a cloud of acetylene (MWUOA ha ha!) and numerous other tasks.

I'll use the table saw with a metal grinding blade, also a skil saw with a metal grinding blade.

It would be great to have a milling machine or a lathe, but I don't, so I make do with woodworking tools. Has been working OK for years. Of course this is all one-offs. If i ever really needed something machined I could just go have it done I suppose.

Hell, I build my first bike with nothing but a hacksaw and an oxy-acetylene welder. Conduit, dragged out of the trash, instead of tubing. This is high tech compared to those days.
 
Lenox hole saws!

I was agonizing over the hole saw selection in a big box store, and a guy was also there. We got to talking and he said 'Get out of here and go buy some Lenox hole saws. I cut a hole in stainless steel with one."

I bought one, and one of their quick release mandrels, and wow! Cuts Crome Moly like butter! The cheapo hole saw I got at non-name hardware store wouldn't hold a candle to it.

I threw all the other hole saws I have in a bag, and shoved them in a drawer. Maybe I will used them for wind chime bells. Lenox is the only brand I'll buy from now on.
 
corkscrew said:
I've thought about going a similar route.

You might consider these motors? Would look more elegant than the double sided motors in two MTB forks I think.

M406SS.jpg


http://www.ebikes.ca/store/store_motors.php

Also, have you looked into the plans on Atomic Zombie? They have forums over there for building your own trikes.

Cool project btw.

Alas Justin says the single sides hub motors are no longer available. I'm stuck with some kind of fork for the front end.
 
Justin says that a rear Clyte motor, sans freewheel, has several centimeters of beefy bolt that could be used to support a front trike wheel from one side only, given the correct customizing on the frame. We've used 1/2" grade 5 bolts through drilled out bike hubs for this very thing on single side trike front wheels successfully. One-sided front wheel mount, much like a wheelchair wheel, that bolts into a custom aluminum block that is part of the steering axle.

Brake discs can go on a freewheel adapter. The right side motor turns backwards, thus the brake adapter will unscrew unless it is bolted to the motor casing, which Justin says has been done before. This is sounding really tempting, instead of using a tall bike fork for the front end.

The wires come out on the non-supported side, (left side for the left motor) but could be routed around fender stays, since I will use fenders.
 
I am really agonizing over suspension for the front wheels. Rear wheel is no problem - take a sawzall to a suspension mountain bike. Done.

I really think that suspension will be needed for a higher speed bike. One a trike, you get a little bit of relief, since a bump only lifts one tire, and you feel half the bump with your butt. However, at a typical highway bridge around here, there is a big ridge of solidified goo that squeezed out between the concrete and the asphalt in the heat last summer, across the whole road. Whammo! THere is one bridge on my route I can't take at more than 10mph, because of the ridge at the edge. And gravel roads? Forget it. On a three wheeler, one wheel is always in the loose gravel, making progress frustrating. I am hoping some suspension will mitigate that frustration somewhat, at least without so many shocking bumps. THere is a gravel shotrtcut I could take, but it is hell on the hard-sprung skinny tire E-bike I ride now.

Front suspension is complex. At the high end is the double wishbone suspension, which allows the wheel to move only vertically in a parallelogram arrangement. Next down in the swing arm, which has a single hinge point, allowing the wheel to swing in an arc. Finally, there is the springy steel version, using a not-quite-rigid enough frame to pretend that there is some spring on the front wheels. The last one is out.

All have thier pros and cons. Complexity is a con - I can only fabricate things so accurately - but now I have to fabricate two identical things. Tougher problem. The swing arm is tempting just because it would be easy to build, however the wheels traveling in an arc affects cornering. But how much? Will it matter on a leaning bike? Or is this thing just getting too complex? I could always build it simpler at first, planning to modify later if it is too simple. .....
 
My trike-building friend insists that suspension is overcomplicating things. He relies on the fact that his frame, between the front wheels, is a simple piece of tubing that has a little flex in it. I was just flexing a piece of 1" tubing and wondering if it woudl serve.

I could probably calculate the bending moment and such for a tube, but I am not sure how to estimate the forces on it. If I hit a bump, is it 2X the weight on the wheel? 3X? More? What is reasonable?

LATER: Man this was a stupid idea - a flexing frame. What was I smoking?
 
Great ideas on your build llile!
I got the bug too once I switched from tri-bikes to recumbents and ultimately a velo. Give your tires a second look if/when you decide your ride quality needs some fine tuning. Like everything else this is a compromise due to varying road conditions but I found it makes all the difference in the world both in comfort and handling.

Also, coroplast is a good idea to experiment with so make that mother real "slippery". I have a few edges that I've chosen not to "clean-up" but on a flat, I routinely run 315-325 watts to maintain 30 mph (without pedaling).

I have drum brakes (cable activated as you've mentioned) on the front which were fine for the unit in its stock configuration but it now weighs in at 120 lbs. I added an external regen unit that also doubles as an e-brake. Once the velo is down below about 20 mph the drums are more than adequate. I don't know how much yours will finally weigh in at but that's my experience with the drums.

Keep up the good work!

~CrazyJerry
 
llile said:
My trike-building friend insists that suspension is overcomplicating things. He relies on the fact that his frame, between the front wheels, is a simple piece of tubing that has a little flex in it. I was just flexing a piece of 1" tubing and wondering if it woudl serve.

My 2 cents on this: I modified a Rans Tailwind to accept 26" wheels. This recumbent was made to "flex" like you've referred to above. It rides a smooth as anything I've ever ridden (even my springers from the late 40's). 2 things that come to mind:

1) It's hard to ignore the frame / headset / fork flexing while riding on crappy roads. I found the possibility of failure always on my mind. This may be good since it caused me to pay a lot more attention to the road surface than I ever did.

2) Really hard tires add to the minor stuff echoing up through the assembly and in certain instances losing contact with the road.

3) I think I'd make some baseline measurements and then over time, re-measure them just to make sure nothing has bent / moved / cracked. Even if anything did, you would at least be aware of it.

Drive on!
~ CrazyJerry
 
Nice build, Jerry! Maybe you are not as crazy as they say?

315 watts for 30MPH - Pretty good. I am getting about 20MPH on 315 watts on an open recumbent, so the fairing is getting 50% better speed beyond the already-aerodynamic recumbent with the same watt input. Playing around with the Ebikes.ca simulator, you must be achieving a Cda (Coefficient of Drag) of around 0.12, which is pretty darn slippery. The simulator estimates a full recumbent at about 0.25 Cda and a mountain bike at about 0.6 Cda. I probably can't hope to build something that smooth, at least not the first try. I usually end up rebuilding something 3 times before it is as good as I can make it.

I am building the trike so that some of the key parts can be removed easily. Given by propensity to rebuild stuff, or break stuff, this is a good idea. So the first iteration will have a front cross tube between the two front tires that is just a little bit smaller and thinner than I would use if it were meant to be stiff. I was just standing and jumping on it, and it seemed to flex but not bend. i will reinforce it with an inner sleeving tube at the center, where the highest stresses are, and at the ends, where it has to butt-weld onto another tube. That will be my first interation front end, and i am building it so it can be removed and rebuilt later if i need more springiness. It probably won't flex more than 1/4" under actual loads.

Tires also make a difference. All round the tires will be wide, and probably not pumped up as hard as I am used to on a pedal-powered bike. Sacrifice a little efficiency for some bump-eating tire flex.
 
CrazyJerry said:
>>>I am getting about 20MPH on 315 watts on an open recumbent,
---Is this on a 2 wheeler recumbent or a trike?
~CrazyJerry

It's a two wheeler. Here is a photo, complete with trailer, when I was taking off for a bike camping trip. I had the Cycle Analyst dialed down to about 14 watthours per mile, for 36 miles range with a trailer, in hilly country, with a headwind. Can't remember the average speed but it was probably about 15 MPH.
 

Attachments

  • P1020209.resized.JPG
    P1020209.resized.JPG
    119.9 KB · Views: 3,223
Here are a couple of build photos. The bike exists in 3 major pieces as of today, and I was setting them up next to each other in clamps to see how everything would need to fit together. Sorta looks like a trike already:
View attachment 2


Here is a detail of the front axle. The main frame is designed to lean, as you can see here. Although it looks simple, this is one of the most complex weldments I have done. Everything on it is at an angle to everything else, and there are some parts that have to align perfectly with the downhill bike parts I used to make the hinge. It took a while with a die grinder to make it all fit, and I still had to force it a litte.

Lean one way:
P1020344.JPG


Lean the other way:

View attachment 1
 
subscribed
 
Me too :mrgreen:


Nice chatting with you yesterday. Sounds like a pretty cool project! I'm going to make a trike of my own in the next few months with a group of friends. More of an art project than a vehicle for use. My artistic rendition is attached :lol:
 

Attachments

  • mad-machine-1.jpg
    mad-machine-1.jpg
    103 KB · Views: 950
One of the tricky issues on the tadpole trike is the use of disc brakes. They mount onto an adapter which screws onto the Clyte housing - but the left side will unscrew as soon as you apply the brakes!

Here is a sequence of photos of drilling out the cover plate to bolt the adapter straight on. I had to fabricate a little spacer to make the brake actuators fit. I'll tap these holes and use the same size bolt as the original adapter was made for, except this time it will be a stainless steel socket head cap screw.

P1020839.resized.JPG

P1020835.resized.JPG

P1020831.resized.JPG
 
Back
Top