
You are using an out of date browser. It may not display this or other websites correctly.
You should upgrade or use an alternative browser.
You should upgrade or use an alternative browser.
2WD (dual motor, two wheel drive) Trike build.
- Thread starter llile
- Start date
johnrobholmes
10 MW
Thems purty wheels!
I need to get back on that programming project with you and Petey. I'll send an email and start a group document so we can get on it. I did figure out a good control sequence that will work for anything we need.
I need to get back on that programming project with you and Petey. I'll send an email and start a group document so we can get on it. I did figure out a good control sequence that will work for anything we need.
llile said:A couple of photos:
Seems liek they didn't attach....
llile
1 kW
- Joined
- Dec 18, 2010
- Messages
- 457
Here is another try with the photos.
To DO:
Add tie rod and Ackerman steering bars
Cut off long front steering axles and fabricate handlebars
Add a fairing
Rear wheel with internal hub
Chains
Chain guides
Seat Padding and weatherproof seat cover
Brakes
Add motor controllers and Cycle Analyst
Tires (Marathon Big Apple in front, Marathon Plus or Premium in back)
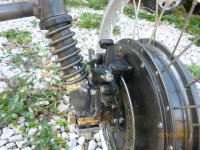
Overall view:

Detail of front hub:
View attachment 1
To DO:
Add tie rod and Ackerman steering bars
Cut off long front steering axles and fabricate handlebars
Add a fairing
Rear wheel with internal hub
Chains
Chain guides
Seat Padding and weatherproof seat cover
Brakes
Add motor controllers and Cycle Analyst
Tires (Marathon Big Apple in front, Marathon Plus or Premium in back)
Overall view:
Detail of front hub:
View attachment 1
Attachments
ions82
100 W
I can't wait to see the YouTube video of this thing goin' down the road at 40.
llile
1 kW
- Joined
- Dec 18, 2010
- Messages
- 457
Working on a number of details now. Working on a wiring harness, have to add some length to some connectors. Luckily Ebikes.ca has a Bag-O-Connectors http://ebikes.ca/store/photos/ConBag.jpg that will help this problem.
It is a trike, the brakes are on the front wheels, and if you hit the brakes while going fast, you may go ass over teacups. I don't have a low center of gravity, because I ride in traffic like my mama told me not to, and I want to be visible. Won't corner well, you say? Does a motorcycle have a low center of gravity? NO, it leans its topheavy self on corners. The trike leans too. But I am locating the heavy batteries low and to the rear, to help with the brake-over-teacups problem. Also, that is where the groceries go, often have some kind of payload. And the gear bag, with the rainsuit, tire patch kit, and a few allen wrenches.
Wiring: one Cycle Analyst, two controllers. The Throttle and the cycle analyst will plug into one of the controllers. The CA gets it's amp-hour info from the shunt in the one controller, but the shunt resistance in the CA will be set to a value that estimates the amp-hours from both shunts. Not exactly twice the one shunt, since the two shunts are different sizes. I may calibrate this reading with an ammeter. The other signal that is needed is a throttle signal, run to both controllers. I have yet to work out how the CA throttle override works into the equation, but Justin assures me this has been done before this way. Also there is an e-brake signal from the brakes. Theoreticaly this isn't needed, but theoretically you will never have a stuck throttle either.
LIGHTS! typical motorcycle headlamps are 1000 - 2000 lumens, and have an efficiency of 20 lumens per watt. Ebikes.ca has a nice 1000 lumen LED headlight, and I could just buy that.http://ebikes.ca/store/photos/Lumen.jpg OK. The Ebikes LED headlamp has an efficiency of about 100 lumens per watt. That is about 5X as efficient as a good halogen headlight. But wait! LEDs are changing so fast, that there is already a better one out there. CREE now makes a MCE LED module that is about 290 lumens per watt http://www.mouser.com/ProductDetail...JE5/?qs=D3QG1iK7FqjFQon8RIPWi8qaYvt5m2vP#spec. That was science fiction two years ago. Literally - nobody thought 300 LPW was even possible just a couple of years back, now you can buy one for 14 bucks. That is a full order of magnitude, and then some, better than a standard headlight. You can also buy optics for these, making a real lens. OK, so I will have to hack in a DC-DC converter, that isn't a big deal. And a dimming circuit, these are blinding headlights. I'll also build some high brightness flashing red LEDs for the taillights. I'll probably add some marker lights on the sides as well. I've built all these kinds of bike lights before, some of them in the previous century, this is just amped up for 21st century technology.
The idea here, is to make something that is NO LONGER a bicycle, but isnt' a car either. Something an ORDER OF MAGNITUDE better efficiency than conventional vehicles. If I can make this thing go 42 WH/Mile, which is squanderously more juice than my current bike uses (18 WH/Mi is typical at 27MPH) this computes to 785 MPG at 33.4 KWH/Gallon of Gas. or an ORDER OF MAGNITUDE better mileage than a Honda Insight (75MPG manual shift) and makes a 50 MPG Prius look sick. Meanwhile, it still has to do a 50 mile commute, hit 40 MPH on the flat, and have a fairing to keep the cold winter winds from freezing my butt off. And carry two sacks of groceries. The math says all of this will work, and the proof is coming soon.
It is a trike, the brakes are on the front wheels, and if you hit the brakes while going fast, you may go ass over teacups. I don't have a low center of gravity, because I ride in traffic like my mama told me not to, and I want to be visible. Won't corner well, you say? Does a motorcycle have a low center of gravity? NO, it leans its topheavy self on corners. The trike leans too. But I am locating the heavy batteries low and to the rear, to help with the brake-over-teacups problem. Also, that is where the groceries go, often have some kind of payload. And the gear bag, with the rainsuit, tire patch kit, and a few allen wrenches.
Wiring: one Cycle Analyst, two controllers. The Throttle and the cycle analyst will plug into one of the controllers. The CA gets it's amp-hour info from the shunt in the one controller, but the shunt resistance in the CA will be set to a value that estimates the amp-hours from both shunts. Not exactly twice the one shunt, since the two shunts are different sizes. I may calibrate this reading with an ammeter. The other signal that is needed is a throttle signal, run to both controllers. I have yet to work out how the CA throttle override works into the equation, but Justin assures me this has been done before this way. Also there is an e-brake signal from the brakes. Theoreticaly this isn't needed, but theoretically you will never have a stuck throttle either.
LIGHTS! typical motorcycle headlamps are 1000 - 2000 lumens, and have an efficiency of 20 lumens per watt. Ebikes.ca has a nice 1000 lumen LED headlight, and I could just buy that.http://ebikes.ca/store/photos/Lumen.jpg OK. The Ebikes LED headlamp has an efficiency of about 100 lumens per watt. That is about 5X as efficient as a good halogen headlight. But wait! LEDs are changing so fast, that there is already a better one out there. CREE now makes a MCE LED module that is about 290 lumens per watt http://www.mouser.com/ProductDetail...JE5/?qs=D3QG1iK7FqjFQon8RIPWi8qaYvt5m2vP#spec. That was science fiction two years ago. Literally - nobody thought 300 LPW was even possible just a couple of years back, now you can buy one for 14 bucks. That is a full order of magnitude, and then some, better than a standard headlight. You can also buy optics for these, making a real lens. OK, so I will have to hack in a DC-DC converter, that isn't a big deal. And a dimming circuit, these are blinding headlights. I'll also build some high brightness flashing red LEDs for the taillights. I'll probably add some marker lights on the sides as well. I've built all these kinds of bike lights before, some of them in the previous century, this is just amped up for 21st century technology.
The idea here, is to make something that is NO LONGER a bicycle, but isnt' a car either. Something an ORDER OF MAGNITUDE better efficiency than conventional vehicles. If I can make this thing go 42 WH/Mile, which is squanderously more juice than my current bike uses (18 WH/Mi is typical at 27MPH) this computes to 785 MPG at 33.4 KWH/Gallon of Gas. or an ORDER OF MAGNITUDE better mileage than a Honda Insight (75MPG manual shift) and makes a 50 MPG Prius look sick.
Trackman417
10 kW
Great build mate!!!  8)
8) 
What is your plan for the wires exiting the hub on the opposite side of where the wires will go? It seems that they might get caught one way or another. :?
I don't know I that comment was brought up before, I was just skimming through the build.
What is your plan for the wires exiting the hub on the opposite side of where the wires will go? It seems that they might get caught one way or another. :?
I don't know I that comment was brought up before, I was just skimming through the build.
llile
1 kW
- Joined
- Dec 18, 2010
- Messages
- 457
I'm not sparing any expense, since this vehicle will be expensive for a bike, but still an ORDER OF MAGNITUDE cheaper than a car. hell, even a used car. It should be AS USEFUL as a car, even in the dark or in bad weather.
All fasteners are metric stainless steel, mostly all socket head cap screws. Lots of tapped screw holes. Three sizes of allen wrenches will fix almost anything on the bike.
Any critical welds are heat treated. This is mostly around the hubs pictured above. This was easy, I brazed the last joint, then wrapped it in insulation and let it cool slowly.
Wiring is going in split duct instead of just running it along a tube with zipties.
Tires are all Schwalbe Marathon Premium or Marathon Big Apple, and they'll be fulla slime. I have yet to see a flat with a slimed Schwalbe tire, after thousands of miles. Genuine Schwalbe tubes, accept no substitutes.
Internal geared rear hub. yes, it still has pedals, so I can work off this blubbery belly I have been growing. The pedals are a joke, but they get me an hour of exercise every time I go to town, why not? Besides, under Missouri Law, it is STILL a motorized bicycle, even with 2000 watts of electric motor.
Terracycle polycarbonate fairings http://www.t-cycle.com/Merchant2/me...tore_Code=T&Product_Code=GX&Category_Code=WWF
Terracycle Idlers, instead of hacking chain idlers out of old derailleurs http://www.t-cycle.com/Merchant2/merchant.mvc?Screen=CTGY&Store_Code=T&Category_Code=IdlersALL This is, remember, a recumbent, and recumbents have chain issues. Idlers are the solution to chain issues, and good ones are the solution to bad idler issues.
And this is the 21st century, where we can build a vehicle an order of magnitude better than the vehicles of the previous century. Detroit outta be ashamed of themselves, bragging about 30MPG. Heck, I had a volkswagon beetle that got better mileage.
So far I have not decided on a paint job, Do I have it powder coated? but I have decided on colors. Red white and blue all the way. This is America, baby, where people invent shit in their garages.
llile
1 kW
- Joined
- Dec 18, 2010
- Messages
- 457
Trackman417 said:Great build mate!!!
What is your plan for the wires exiting the hub on the opposite side of where the wires will go? It seems that they might get caught one way or another. :?
I don't know I that comment was brought up before, I was just skimming through the build.
Yeah, I thotta that. There is now a 1/4" tube bolted tot he outside axle and on the inside to the steering mechanism, that will guide a split tube containing the wiring. Pics coming soon.
docnjoj
1 GW
Subscribed. The idea of 2 front motors on a tadpole seems quite cool! Rock on!
otherDoc
otherDoc
llile
1 kW
- Joined
- Dec 18, 2010
- Messages
- 457
Completed: Front hubs, motors mounted, handlebars (adjustable), Ackerman steering tie-rod, frame, rear wheel with 8 speed internal hub, intermediate tranny hacked out of a Sturmey-Archer 3 speed. A 15 year-old friend called it the Frankenbike when he first saw it, so the name sticks. The Frankenbike 8.0 will have 24 speeds with internal hubs. Gain Ratios 13.19 (high) 2.4 (low) For an explanation see http://sheldonbrown.com/gears/. (R.I.P Sheldon Brown.) It will be able to be pedaled at low speeds, up an incline, but will also be able to be pedaled at a reasonable cadence at 45 mph.Low gears will be OK for pulling away from a stopsign without using up too much juice, however the bike won't be able to climb any kind of steep hill under human power alone. It is too heavy and the gears won't be low enough. Outta juice, yer outta luck.
Remaining: Chain and Chain Idlers, Battery mounts, Cargo mounts, "regular stuff" pack mount including tools, lock, rain gear and extra clothing, Fairing (front), Body sock fairing (Sides and rear), Lights, Mount controllers and other electronics, build an instrument panel at the top edge of the fairing, for the Cycle Analyst, mount up the brakes, gear shifters and a couple of other odds and ends. I am a weekend or two away from having a working bike!
Once I get it working, the plan is to take it all the way apart and paint it. I am still deciding whether to shop-paint it with spray cans or have it painted by a pro. Professional painting is expensive, and I might need to weld on another gizmo later, ruining the paint job. However, it would be cool to have a really snazzy looking paint job for once.
llile
1 kW
- Joined
- Dec 18, 2010
- Messages
- 457
I discovered a really amaqzing welding clamp: A toy magnet called "buckyballs". These are round magnets the size of peas. If you can get two things lined up, and squeeze a wad of these magnetic beads around the joint, it will hold well enough to tack weld it! You can take tubes at essentially any angle or orientation, and still clamp them!
I have some clamps I made for two-wheel frames, which are essentially two-dimensional constructions, and a big sheet of steel that they sit on to line things up. But three wheelers are three-dimensional frames. I am constantly buildign things in space, not on the flat anymore. The magnetic ball toy is perfect for tack-welding these odd-shaped objects.
http://www.getbuckyballs.com/
I've seen those as toys now and then; usually not that powerful. Interesting use for them, though!
You need to tell them about your use, so they can go "neener neener" at Wired, who said:

:lol:
I've used harddisk magnets (and motor magnets and speaker magnets) for welding clamps before, but they never really work well for 3D alignments.
You need to tell them about your use, so they can go "neener neener" at Wired, who said:
:lol:
I've used harddisk magnets (and motor magnets and speaker magnets) for welding clamps before, but they never really work well for 3D alignments.
pkirkll
100 W
I Like The Idea Of Speed For Trikes..... But The Last Thing I Would Try To Be Doing Is Pedaling At 45Mph..
I Rode Mine Down A Hill, At 32And It Was All I Could Do To Focus On Keeping The steering From Going Awry.....I Don't Know How To Explain If. Other Than It Was Very Uncomfortable ......It Felt Like One Little Bobble And I Would Be Rolling Over And Over......maybe A Steering Dampener Would Have Made It Feel Better......I Felt On THe Edge,
I Rode Mine Down A Hill, At 32And It Was All I Could Do To Focus On Keeping The steering From Going Awry.....I Don't Know How To Explain If. Other Than It Was Very Uncomfortable ......It Felt Like One Little Bobble And I Would Be Rolling Over And Over......maybe A Steering Dampener Would Have Made It Feel Better......I Felt On THe Edge,
llile
1 kW
- Joined
- Dec 18, 2010
- Messages
- 457
Battery boxes mounted. Using some durable-looking plastic toolboxes for batt6ery boxes. They shed water pretty well and have stood up to abuse and sunlight on the old bike. Metal reinforcement where they are mounted. I was told by someone here that they would not last, however they've gone a year on my old bike without issues. Standardized batteries between the old and new bikes, to economize on batteries.
llile
1 kW
- Joined
- Dec 18, 2010
- Messages
- 457
pkirkll said:I Like The Idea Of Speed For Trikes..... But The Last Thing I Would Try To Be Doing Is Pedaling At 45Mph..
I Rode Mine Down A Hill, At 32And It Was All I Could Do To Focus On Keeping The steering From Going Awry.....I Don't Know How To Explain If. Other Than It Was Very Uncomfortable ......It Felt Like One Little Bobble And I Would Be Rolling Over And Over......maybe A Steering Dampener Would Have Made It Feel Better......I Felt On THe Edge,
Front end geometry is something I have studied a lot. Go to Dover.com and look for an obscure book called 'bicycle physics". Explains a lot.
Caster, camber, Ackerman tie-rod and toe-in have to be right for the bike to feel stable at speed and on bumpy ground. One a two-wheeler, it is caster and head-tube angle. Subtle changes in these angles can make a difference. One some bikes I have made a crude mock-up out of conduit or scrap tubing to check the head tube angle before building the frame out of chrome moly. My earlier prototypes got this geometry wrong, and they were frustrating to ride, esp at speed. felt twitchy and unstable.
This primer http://www.google.com/url?sa=t&rct=...wICACA&usg=AFQjCNEppWNY8E-4DrS5saln6hu4g8Wc8w goes into trike geometry as well as I have seen anyone do it. If your trike doesn't feel right going fast, there is a reason.
pkirkll
100 W
Yes IBelieve I Had A Little adjustment Problem...
It Felt Very Twitchy...i Like That Word.... That ExplainS The sensation
It Felt Very Twitchy...i Like That Word.... That ExplainS The sensation
llile
1 kW
- Joined
- Dec 18, 2010
- Messages
- 457
User's manual attached, including wiring schematic. The wiring schematic is pretty complex.
1. I am using 4 - 36V PING LiFePO Batteries in series-parallel for a 72 volt system. PING tells me not to use these without he diodes as shown. Sez it will blow up the BMS if they are put in series without the antiparallel diodes. Diodes are Vishay VS-100BGQ100 100A 100V Schottkies, ordered from mouser.com. They have big tabs on either end which makes it easy to bolt on a wire terminal.
2. Fuses are 30A automotive fuses. I am not sure if these are a little light, as they are only rated at 32V. In a 72V system I may need to upgrade, but I haven't found anything that will serve nicely yet.
3. There is a 36V tap for lighting. Why? I can't find or build inexpensive efficient DC-DC converters to get to 12V for lighting that will take an input voltage over 48V. Tail lights will run on 12V, and include a flasher circuit to make them blink all the time. I've made these before, with PICs or 555's, haven't decided how I will make the flasher yet. Taillight LEDS are $6 high brightness 50 Lumen 1 watt on a star board http://www.mouser.com/ProductDetail...s0d9dDaTH%2bLFYC74AbB6lyY5h0wmxzQUmLgugpKMA== Headlights are CREE MCE LEDs, 300 lumens at 1 watt $16 each http://www.mouser.com/new/cree/creexlampmce/. There will be 3 of these, with $1.49 lenses from Jameco https://www.jameco.com/webapp/wcs/stores/servlet/Product_10001__2159859_-1 making the headlights 900 lumens, about the same as a small motorcycle headlight. I might need a DIM setting I'll probably add some running lights along the side of the vehicle, I haven't decided how to make these, probably red LEDs. 12V DC-DC converters are $15 http://www.mouser.com/ProductDetail...7GrC1g1E1nFEAMW3yHE3K1pT9Mfn5Hb3D3cVsv9Ju/g== Drivers for the headlights are going to be built up out of some Maxim LED driver parts. Since the headlights are surface mount, I'll need to etch a circuit board, which will also function as a heat sink. Lights go inside cast aluminum cases (also from jameco) that can function as heat sinks and will repel water. A standard Incad H4 headlamp bulb produces 1100 lumens at 55 watts, this will do almost the same for 3 watts and about the same money.  Why make so much effort for lighting? I intend to ride on some dark country roads at night. In town, I just need to be seen, out here, I need to SEE.
4. Two motors wiring stuff: There is a common throttle signal between the two motor controllers, and a common throttle override signal from the CA to both controllers. I am using E-brake (Not regen, just brake inhibit) so there is a common brake inhibit line. How to measure motor current? Justin sez do it like this: Connect the plug-in CA to one of the two motor controllers. Set the current Rshunt value int he CA setup to half the value (Actually, I will start at half as a guess, and calibrate it with an ammeter). The CA is really only governing one motor, but the same throttle, inhibit, and E-brake signals go to both. Both motors will approximately track at the same power and speed. If one is a little hotter than the other, I'll just turn the steering a little, unless it is grossly imbalanced I probably won't notice it. If there is some kind of imbalance it is likely to be an electrical noise issue. Both motors and controllers are identical, so in all likelihood they will respond identically.
5. Ground issues: If there is a different ground voltage between the two controllers, then the throttle signal will be misread. Those who haven't dealt with electronics before will not appreciate the ghostly and frustrating problems that arise from ground bounce and grounding noise issues. Problems come and go, never show up when you have instruments connected, You'll fix them and they reappear. The two controllers will be mounted very close to one another, the power ground cables will be cut short, so the wire between them is short, and the throttle plugs will have a short ground strap to this same ground bus. The idea will be to use heavy, short wires for the most critical ground connections. Since the throttle is an analog signal 0-5V, any noise on one controller ground vs. the other could create a large error on one throttle signal, making the bike want to steer left or right. I may also make a similar short ground to the CA plug.
1. I am using 4 - 36V PING LiFePO Batteries in series-parallel for a 72 volt system. PING tells me not to use these without he diodes as shown. Sez it will blow up the BMS if they are put in series without the antiparallel diodes. Diodes are Vishay VS-100BGQ100 100A 100V Schottkies, ordered from mouser.com. They have big tabs on either end which makes it easy to bolt on a wire terminal.
2. Fuses are 30A automotive fuses. I am not sure if these are a little light, as they are only rated at 32V. In a 72V system I may need to upgrade, but I haven't found anything that will serve nicely yet.
3. There is a 36V tap for lighting. Why? I can't find or build inexpensive efficient DC-DC converters to get to 12V for lighting that will take an input voltage over 48V. Tail lights will run on 12V, and include a flasher circuit to make them blink all the time. I've made these before, with PICs or 555's, haven't decided how I will make the flasher yet. Taillight LEDS are $6 high brightness 50 Lumen 1 watt on a star board http://www.mouser.com/ProductDetail...s0d9dDaTH%2bLFYC74AbB6lyY5h0wmxzQUmLgugpKMA== Headlights are CREE MCE LEDs, 300 lumens at 1 watt $16 each http://www.mouser.com/new/cree/creexlampmce/. There will be 3 of these, with $1.49 lenses from Jameco https://www.jameco.com/webapp/wcs/stores/servlet/Product_10001__2159859_-1 making the headlights 900 lumens, about the same as a small motorcycle headlight. I might need a DIM setting
4. Two motors wiring stuff: There is a common throttle signal between the two motor controllers, and a common throttle override signal from the CA to both controllers. I am using E-brake (Not regen, just brake inhibit) so there is a common brake inhibit line. How to measure motor current? Justin sez do it like this: Connect the plug-in CA to one of the two motor controllers. Set the current Rshunt value int he CA setup to half the value (Actually, I will start at half as a guess, and calibrate it with an ammeter). The CA is really only governing one motor, but the same throttle, inhibit, and E-brake signals go to both. Both motors will approximately track at the same power and speed. If one is a little hotter than the other, I'll just turn the steering a little, unless it is grossly imbalanced I probably won't notice it. If there is some kind of imbalance it is likely to be an electrical noise issue. Both motors and controllers are identical, so in all likelihood they will respond identically.
5. Ground issues: If there is a different ground voltage between the two controllers, then the throttle signal will be misread. Those who haven't dealt with electronics before will not appreciate the ghostly and frustrating problems that arise from ground bounce and grounding noise issues. Problems come and go, never show up when you have instruments connected, You'll fix them and they reappear. The two controllers will be mounted very close to one another, the power ground cables will be cut short, so the wire between them is short, and the throttle plugs will have a short ground strap to this same ground bus. The idea will be to use heavy, short wires for the most critical ground connections. Since the throttle is an analog signal 0-5V, any noise on one controller ground vs. the other could create a large error on one throttle signal, making the bike want to steer left or right. I may also make a similar short ground to the CA plug.
Attachments
Alan B
100 GW
llile said:I discovered a really amaqzing welding clamp: A toy magnet called "buckyballs". These are round magnets the size of peas. If you can get two things lined up, and squeeze a wad of these magnetic beads around the joint, it will hold well enough to tack weld it! You can take tubes at essentially any angle or orientation, and still clamp them!
I have some clamps I made for two-wheel frames, which are essentially two-dimensional constructions, and a big sheet of steel that they sit on to line things up. But three wheelers are three-dimensional frames. I am constantly buildign things in space, not on the flat anymore. The magnetic ball toy is perfect for tack-welding these odd-shaped objects.
http://www.getbuckyballs.com/
Better get these while you can, they have been declared a danger to children and are being eliminated from the marketplace in the USA. Crazy, but the CPSC doesn't apparently have enough important work to do.
llile
1 kW
- Joined
- Dec 18, 2010
- Messages
- 457
Some wiring changes:
1. Putting all the diodes in a waterproof box, instead of in the battery boxes. This allows the four battery boxes to be compeltely interchangeable, and interchangeable witht he old electric bike. Them things is ixpinsive, better share them among as many uses as possible. Cast aluminum boxes should be quite durable, using them for custom lighting as well as terminal boxes.http://www.jameco.com/webapp/wcs/stores/servlet/Product_10001_10001_11965_-1
2. Lights will come off of two diodes connected to the two lower-voltage batteries, instead of jsut one, to avoid draining one side more than the other. I'd power the lights off the top of the 72V stack, except I had a hard time sourcing DC-DC converters that would take that much input voltage and didn't cost a mint.
3. Struggling with the idea of using stock 30A anderson connectors, vs. heavier 75A andersons. the bigger andersons are bulky, which is not an asset, but John Robert sez they hold up longer. So far, the original e-bike is holding up pretty well with 30A Anderson connectors, so maybe I am overthinking this.
4. Going with 10 Ga conductors for the combined battery power leads, as two batteries can supply a helluva lotta current, and I am worried that 12 Ga would be too light. In house wiring, 12 Ga is only good for 20-25 amps, and we E-bikers seem to push it to 30 amps pretty regularly. I'll use "primary wire" from an auto parts store, as it is flexible with thick insulation that is oil resistant. Eventually all the wires will be covered by split tubing or shrink tubing, to keep them out of the sun and provide double insulation.
5. Found a deal on a DC-DC converter designed to control LEDs! This is an evaluation board from Maxim intergrated circuits (not the Maxim that is a magazine just a tad more decent than playboy!) that can be configured as a 350MA LED driver, hot enough to power a really bright Cree LED headlamp. http://www.maximintegrated.com/datasheet/index.mvp/id/5975 I decided to get the eval board instead of buildign it from scratch, as I have enough interesting things to build right now. Of course I could just buy all this stuff from Ebikes.CA, but I am trying to push the envelope to make a light that is about twice as efficient as their already-miserly 1000 lumen headlamp http://www.ebikes.ca/lights/
In other news, I bought a bunch of chain at a local bike shop, only to realize that the intermediate cogs I used were off an old Sturmey Archer 3 speed, and were 1/8" width cogs instead of 3/32". Regular multispeed derailleur chain won't fit the cogs. I'll eventually buy some new 1/8" chain, but just to put it together I used a bunch of old chain from the Bike Mine in the barn. I found out to my chagrin that it is possible to assemble bike chain into a mobius strip, instead of the standard loop. It would only fit onto the gears in an "X" shape, the front gear having to turn backwards to run the back gear forward. Next time I hit the shop I'll fix it. Recumbents take at least 3 chains to get to the back cogs, its a helluva lotta chain.
Got tires and gears installed, so as soon as I get the chain fixed I can take it out for a people-power-only spin. I'll order good Schwalbe Marathon tires later, right now just running on junk tires from the Bike Mine.
Terracycle http://www.t-cycle.com/Merchant2/merchant.mvc order just came in! I have two return idlers, and a WGX fairing. I may not need but one idler, but this is a part I want to have around, as it is always part of a recumbent design. The fairing is sweet - Flexible clear polycarbonate, molded into an aerodynamic shape, pre-drilled for mounting. I declined to buy their expensive mounting bracket, since I already built a frame the mounting bracket didn't seem like a good value. I may have to design a swinging mount for the fairing, as it may be hard to get into the bike without a "door". I'll probably fake one up out of conduit and zip ties to get the fit right. Part of the mounting bracket will include a dashboard (handlebar-sized tubing right up in my face) for the Cycle Analyst, and other instruments. There will at least be an old digital watch clamped around the handlebar, as I always want to know what time it is when I am riding somewhere, maybe a way to hold a music player or something. It would be easy to add a cell phone charger, and I will need buttons to turn lights on and off. It would be nice to have a horn. It would be even nicer to have a horn that plays the song"Electric Slide" by Nevile Livingston http://www.youtube.com/watch?v=JFMtBibwrgY Yes, that is possible in the 21st century. Welcome to the future. Although the song is just as bad as Rick Aston's "never Gonna Give You Up", I still like it, I am embarrased to say.
1. Putting all the diodes in a waterproof box, instead of in the battery boxes. This allows the four battery boxes to be compeltely interchangeable, and interchangeable witht he old electric bike. Them things is ixpinsive, better share them among as many uses as possible. Cast aluminum boxes should be quite durable, using them for custom lighting as well as terminal boxes.http://www.jameco.com/webapp/wcs/stores/servlet/Product_10001_10001_11965_-1
2. Lights will come off of two diodes connected to the two lower-voltage batteries, instead of jsut one, to avoid draining one side more than the other. I'd power the lights off the top of the 72V stack, except I had a hard time sourcing DC-DC converters that would take that much input voltage and didn't cost a mint.
3. Struggling with the idea of using stock 30A anderson connectors, vs. heavier 75A andersons. the bigger andersons are bulky, which is not an asset, but John Robert sez they hold up longer. So far, the original e-bike is holding up pretty well with 30A Anderson connectors, so maybe I am overthinking this.
4. Going with 10 Ga conductors for the combined battery power leads, as two batteries can supply a helluva lotta current, and I am worried that 12 Ga would be too light. In house wiring, 12 Ga is only good for 20-25 amps, and we E-bikers seem to push it to 30 amps pretty regularly. I'll use "primary wire" from an auto parts store, as it is flexible with thick insulation that is oil resistant. Eventually all the wires will be covered by split tubing or shrink tubing, to keep them out of the sun and provide double insulation.
5. Found a deal on a DC-DC converter designed to control LEDs! This is an evaluation board from Maxim intergrated circuits (not the Maxim that is a magazine just a tad more decent than playboy!) that can be configured as a 350MA LED driver, hot enough to power a really bright Cree LED headlamp. http://www.maximintegrated.com/datasheet/index.mvp/id/5975 I decided to get the eval board instead of buildign it from scratch, as I have enough interesting things to build right now. Of course I could just buy all this stuff from Ebikes.CA, but I am trying to push the envelope to make a light that is about twice as efficient as their already-miserly 1000 lumen headlamp http://www.ebikes.ca/lights/
In other news, I bought a bunch of chain at a local bike shop, only to realize that the intermediate cogs I used were off an old Sturmey Archer 3 speed, and were 1/8" width cogs instead of 3/32". Regular multispeed derailleur chain won't fit the cogs. I'll eventually buy some new 1/8" chain, but just to put it together I used a bunch of old chain from the Bike Mine in the barn. I found out to my chagrin that it is possible to assemble bike chain into a mobius strip, instead of the standard loop. It would only fit onto the gears in an "X" shape, the front gear having to turn backwards to run the back gear forward. Next time I hit the shop I'll fix it. Recumbents take at least 3 chains to get to the back cogs, its a helluva lotta chain.
Got tires and gears installed, so as soon as I get the chain fixed I can take it out for a people-power-only spin. I'll order good Schwalbe Marathon tires later, right now just running on junk tires from the Bike Mine.
Terracycle http://www.t-cycle.com/Merchant2/merchant.mvc order just came in! I have two return idlers, and a WGX fairing. I may not need but one idler, but this is a part I want to have around, as it is always part of a recumbent design. The fairing is sweet - Flexible clear polycarbonate, molded into an aerodynamic shape, pre-drilled for mounting. I declined to buy their expensive mounting bracket, since I already built a frame the mounting bracket didn't seem like a good value. I may have to design a swinging mount for the fairing, as it may be hard to get into the bike without a "door". I'll probably fake one up out of conduit and zip ties to get the fit right. Part of the mounting bracket will include a dashboard (handlebar-sized tubing right up in my face) for the Cycle Analyst, and other instruments. There will at least be an old digital watch clamped around the handlebar, as I always want to know what time it is when I am riding somewhere, maybe a way to hold a music player or something. It would be easy to add a cell phone charger, and I will need buttons to turn lights on and off. It would be nice to have a horn. It would be even nicer to have a horn that plays the song"Electric Slide" by Nevile Livingston http://www.youtube.com/watch?v=JFMtBibwrgY
llile
1 kW
- Joined
- Dec 18, 2010
- Messages
- 457
Frankenbike is a functional bicycle now - pedals, chains and gears working. Brakes work. Seat is just a slab of uphostery foam, no cover. Steering functional. It's a Saturday away from being electrified. Quite a ways from complete functionality though.
llile
1 kW
- Joined
- Dec 18, 2010
- Messages
- 457
Here are a couple of photos

1 = 1/4" steel to guide motor wires around tot he other side of the tire - could be fender supports later
2 = dual controllers, still to be hooked up
3. intermediate transmission, hacked out of a sturmey archer 3 speed hub. Brazed a gear onto the spoke flange, to it drives that gear just like a normal one would drive the wheel. Hope there wasn't much plastic inside - it go pretty hot.
4. Battery racks, welded out of 1/4" steel
You can jsut see the Terracycle return chain idler. To tension the chain, it needed to be on a slotted mount. I used a piece of a rear dropout as the slot, and then the 8mm bolt that fits the idler slides in this slot. To tighten it, I used two of the nuts that go ont he end of a bottom bracket to hold the cranks, as washers. They don't thread onto the 8mm, they slide over it, but they come with teeth on the backside like a lock washer. Tightens up on the dropout perfectly. Anytime I can hack something out of existing bike components, keep with the same threads, and parts, I'll do that. Not only is it handy, since I have a Bike Mine, but also means the replacement parts are readily available - vs. machining a custom part at great effort.
Front view:

Front Hub:

1 = 1/4" steel to guide motor wires around tot he other side of the tire - could be fender supports later
2 = dual controllers, still to be hooked up
3. intermediate transmission, hacked out of a sturmey archer 3 speed hub. Brazed a gear onto the spoke flange, to it drives that gear just like a normal one would drive the wheel. Hope there wasn't much plastic inside - it go pretty hot.
4. Battery racks, welded out of 1/4" steel
You can jsut see the Terracycle return chain idler. To tension the chain, it needed to be on a slotted mount. I used a piece of a rear dropout as the slot, and then the 8mm bolt that fits the idler slides in this slot. To tighten it, I used two of the nuts that go ont he end of a bottom bracket to hold the cranks, as washers. They don't thread onto the 8mm, they slide over it, but they come with teeth on the backside like a lock washer. Tightens up on the dropout perfectly. Anytime I can hack something out of existing bike components, keep with the same threads, and parts, I'll do that. Not only is it handy, since I have a Bike Mine, but also means the replacement parts are readily available - vs. machining a custom part at great effort.
Front view:
Front Hub:
llile
1 kW
- Joined
- Dec 18, 2010
- Messages
- 457
Bike Mine:
When I was a kid, and taking apart bicycles to see how they worked, there was a rumor that there was this old, old, guy, like 100 years old, that had a huge pile of bicycles in his back yard, any kind of bike you could imagine, and if you stopped by, he'd fix your bike for free if you were nice to him. Well, 50 years later, I am that guy.
One section of the Bike Mine. there are probably 5 or 6 whole bikes, 10 or 20 frames in various stages of destruction, more wheels than I need, and a few boxes of random seats, hubs, plus several bags each containing a set of brakes, a set of bottom bracket parts, etc. I tend to not have anything under 10 years old, and not the highest end quality bikes. In many cases, quality in bikes is associated with light weight, and therefore flimsy, I need something that won't break. Occasionally the University auctions off impounded bicycles, there are usually 300-400 to choose from. I also dig them out of the trash, and there is a bike shop that throws them out. I'll take pretty much anything, as sometimes there are parts on even simple bikes that are useful. Seat clamps, for instance, if one needs an adjustable thingamabob. Some are good quality, others are junkers. 3 speeds, 12 speeds, mountain bikes, kids bikes, fixty bomber cruiser bikes, you name it. There are a couple of really nice bomber-cruiser bikes that I'd like to put a sanely-sized motor on and give to my daughter or neice. Paint them up nice and put a big wicker basket on them, like an old time 50's bike. Probably need to start throwing out old wheels, I really am getting too many of those around. But you never know - IT MIGHT COME IN HANDY SOME DAY!
Similar threads
- Replies
- 26
- Views
- 848
- Replies
- 21
- Views
- 2,593
- Replies
- 25
- Views
- 3,147
- Replies
- 44
- Views
- 2,269
- Replies
- 36
- Views
- 9,508