5 Bafang BBS02 Conversions

hie2kolob said:
Yet another BBS02 Cannondale conversion. This time we used a Cannondale SL2 Trail 29er. We have found the hard tail frame to be a good choice for our off road riding along the Wasatch front.

One of your books caught my eye. Can I borrow that sometime? :)

bafangs for dummies2.jpg
 
Hello hie2kolob,
Probably you have best experiences with suiting BBS for heavy ascent. I would like to ask you few questions to clarify my point of view.
- you are currently running 36t chainring and 11-42 cassette?
- most of your climbing is done on PAS level 1 or 2, it means 50%-60% of your 750W kit power?
- if you are using mostly only 50% of power, wouldn't you prefer lower wattage kit, maybe 350W?
- you were trying to adopt two chainrings, was it so bad with chainline because of motor gearbox placed on drive side of bottom bracket?

I'm planning to build similar configuration like yours but with only 350W version. Currently I am using 500W controller with only PAS support and when cycling longer track, over 50km, I am using up to 200W to save my light battery, 36V/12Ah.
I have two chainrings, 22t and 38t, and I trying to find proper single chainring configuration for my needs, probably 34t chainring and 11-42 cassette.
My opinion and experiences are, I don't need more than 300W when properly geared, also I am not hooked on top speed, rather to sacrifice it for lower consumption and in emergency, climbing without motor support.
Thanks
 
dusan said:
Hello hie2kolob,
Probably you have best experiences with suiting BBS for heavy ascent. I would like to ask you few questions to clarify my point of view.
- you are currently running 36t chainring and 11-42 cassette?
- most of your climbing is done on PAS level 1 or 2, it means 50%-60% of your 750W kit power?
- if you are using mostly only 50% of power, wouldn't you prefer lower wattage kit, maybe 350W?
- you were trying to adopt two chainrings, was it so bad with chainline because of motor gearbox placed on drive side of bottom bracket?

Good questions...

I find that when doing elevation that the motor can warm up quickly. Best to have a larger motor.
 
dusan said:
Hello hie2kolob,
Probably you have best experiences with suiting BBS for heavy ascent. I would like to ask you few questions to clarify my point of view.
- you are currently running 36t chainring and 11-42 cassette?
- most of your climbing is done on PAS level 1 or 2, it means 50%-60% of your 750W kit power?
- if you are using mostly only 50% of power, wouldn't you prefer lower wattage kit, maybe 350W?
- you were trying to adopt two chainrings, was it so bad with chainline because of motor gearbox placed on drive side of bottom bracket?

I'm planning to build similar configuration like yours but with only 350W version. Currently I am using 500W controller with only PAS support and when cycling longer track, over 50km, I am using up to 200W to save my light battery, 36V/12Ah.
I have two chainrings, 22t and 38t, and I trying to find proper single chainring configuration for my needs, probably 34t chainring and 11-42 cassette.
My opinion and experiences are, I don't need more than 300W when properly geared, also I am not hooked on top speed, rather to sacrifice it for lower consumption and in emergency, climbing without motor support.
Thanks


Hi dusan,

It's great to hear that you are doing another mid drive build!

"- you are currently running 36t chainring and 11-42 cassette? "
You are correct, I have a 36t front chain ring and a 11-42 rear cassette.

"- most of your climbing is done on PAS level 1 or 2, it means 50%-60% of your 750W kit power?"
A few months ago a good friend darth_elevator helped me reprogram my controller so the way I utilize my PAS level has changed. PAS level 1 now equals 20%, level 2 is 30%, and so forth in 10% graduations up to PAS level 9 which equals 100%. After going through a couple controllers we thought it best to reprogram things this way. I now use PAS2 through PAS4 most of the time while climbing and haven't had any controller issues in over 500 miles (most of those miles being climbing miles).

"- if you are using mostly only 50% of power, wouldn't you prefer lower wattage kit, maybe 350W?"
Now that I am using 30% to 50% motor while climbing I am glad that I have the 750W kit. I fear that anything smaller might over heat faster thus causing a greater potential of motor/controller problems.

"- you were trying to adopt two chainrings, was it so bad with chainline because of motor gearbox placed on drive side of bottom bracket?"
I'm not sure I understand your question. The reason I added two front chain rings had nothing to do with chain line. When I installed the 36t chain ring I realized an amazing improvement in hill climbing torque - which is what I do most of the time. However the 36t chain ring drastically decreased my maximum speed on the paved road down to 20MPH whereas the stock chain ring allows for 30MPH travel. So I used one chain ring for off road travel and the other for on road.

"My opinion and experiences are, I don't need more than 300W when properly geared, also I am not hooked on top speed, rather to sacrifice it for lower consumption and in emergency, climbing without motor support."
It sounds like you have some great athletic abilities! I also try to stay in shape by cycling on my road bike without motor several time a week. With this in mind when riding one of my BBS02s I try to assist in getting my bike up the hill as much as possible so I can get a good physical workout. As I sometimes climb as much as 5000 feet I am glad I have the 750W kit.

Hope this helps... :)
Jeff
 
hie2kolob said:
I don't know if this has been tried before...


As you can see I have two gear rings installed on my BBS02. The outside is the stock bafang gear ring and the inside is the Italian 42T ring. There is no front derailleur so the chain is moved by hand. I use the larger ring for travel on the pavement to the mountains about 2 miles away and shift to the 42T Italian gear ring when I am off road.

The chain-line is not an issue because I only need the higher gears on the rear cassette on the road. That being said I can still use all nine gears on the rear cassette. Mounting both gear rings proved to be quite simple as well. All I did was purchase 5 longer hex headed screws and put a small lock washer for spacing between the rings on each screw. This way I seem to have the best of both worlds on road or off road.
I'm thinking about a 2 right now setup as well.
Maybe you have some extra picture(s), possibly a view of how the bolts are mounted?
I don't have the Italian ring so I'm trying to picture what it could look like.
 
opperpanter said:
hie2kolob said:
I don't know if this has been tried before...

View attachment 1
As you can see I have two gear rings installed on my BBS02. The outside is the stock bafang gear ring and the inside is the Italian 42T ring. There is no front derailleur so the chain is moved by hand. I use the larger ring for travel on the pavement to the mountains about 2 miles away and shift to the 42T Italian gear ring when I am off road.

The chain-line is not an issue because I only need the higher gears on the rear cassette on the road. That being said I can still use all nine gears on the rear cassette. Mounting both gear rings proved to be quite simple as well. All I did was purchase 5 longer hex headed screws and put a small lock washer for spacing between the rings on each screw. This way I seem to have the best of both worlds on road or off road.
I'm thinking about a 2 right now setup as well.
Maybe you have some extra picture(s), possibly a view of how the bolts are mounted?
I don't have the Italian ring so I'm trying to picture what it could look like.

The Italian ring with it's offset looks like this:img_5693b.jpg

You simply put the Italian ring on first, then a washer or lock washed on each bolt hole as a spacer, then the stock chain ring and finally the bolts. You may need to buy some longer bolts that are 4-5mm longer.
 
opperpanter said:
In your picture you have the 36t on the inside, so put that on first?

This picture shows this same 42t Italian chain ring (on the inside) with the stock BBS02 ring: IMG_2085c.jpg

After 200 miles with the Italian chain ring I had some issues with chain suck so I changed it for the 36t ring that you see here:IMG_2196b.jpg

With the elimination of the Italian ring I no long run two rings.

If I was going to make another dual configuration I would buy an off set 42t ring from EM3ev that has a more competitive price and looks like this:
lekkie_ring-500x500.jpg
 
Ah OK, thought you had 36t and 42t together. I have a 44t default ring, so not much to gain by going 42t. Better go 36t or 32t, possibly combined with 44t.
 
Hie2kolob, what's BCD of inner bolts for adapter or in general stock Bafang chainring BCD?
Are there 5mm bolts?
Thanks
 
dusan said:
Hie2kolob, what's BCD of inner bolts for adapter or in general stock Bafang chainring BCD?
Are there 5mm bolts?
Thanks

The stock Bafang chain ring that I was using with the dual ring set up was the 48t. If I recall correctly I believe the bolts are 5mm.
 
Yes, I still run 12s lipos at 50-51v. You are right, the efficiency could be increased with 14s however the BBS02 will only handle up to 53v. So a 13s could still work and be more efficient if care was taken in charging. I find that the 12s combination to be simple to configure and the most cost effective.
 
After five BBS02 conversions over a period of eighteen months I have finally come up with what I believe to be a suitable and somewhat stealthy way to carry a LIPO battery pack on my bike. At $175.00 this battery pack also happens to be the “best bang for your buck!”

bp9.jpg

This 10AH battery pack is made using six 5000mAh 4S1P hard case LIPO packs from Hobby King. By placing four batteries as a base and stacking two batteries on top a nice angular configuration can be made.

But what material would best be used for the enclosure? I thought about bending aluminum or possibly sewing something out of canvas or maybe Kydex or some other kind of plastic. But in the end I decided to try remolding PVC pipe. A mold was made by cutting a wood block to the desired size. After measuring the perimeter of the block I found the size to be close to the circumference of a 4” PVC drain pipe. Be aware that this is the thin walled stuff that is used for drainage not the schedule 40 high-pressure PVC.

bp2.jpg

I preheated the oven to 350 degrees Fahrenheit and placed a 14” length of 4” thin walled PVC pipe on a cookie sheet. (Note: this is best done when the wife is out shopping and it is a good idea to open any nearby windows as PVC can release toxic fumes when heated.) When the oven reached temperature I warmed the PVC pipe for only three to three and a half minutes. Then wearing leather gloves I transformed the PVC pipe by pushing it over the wood block mold. In order to make this process easier I rounded off the sharp edges on one end of the block. After allowing the PVC to cool it was removed from the wood mold by placing the bottom edge of the PVC against the edge of a table and tapping the center of the wood block with a hammer.

View attachment 7

Next the end caps. I wanted one end to be solid and immovable so I took a scrap of 6” schedule 40 PVC pipe and cut it lengthwise so when it was heated in the oven it would lay flat. After five to six minutes in the oven at 350 degrees it was laid on a flat surface and a cookie sheet was placed on top of it with some weight. When it was cool I traced the shape of the molded PVC case on the thicker piece of flat PVC. This was cut out and attached using PVC primer and glue to weld it into place. Since the other end cap needs to be removable for servicing and balancing it was cut from ½ plywood. The plywood end cap was then drilled with a ½ inch bit to accommodate the battery cable and two smaller holes drilled on the top and the bottom for nylon pins to hold the end cap in place. The two nylon pins were purchased from an automotive store. These are the type of pins that are used to hold the automotive plastic upholstery in place.

bp3.jpg

Can PVC be painted? Yes, but it needs to be prepped using acetone. Before painting apply a little acetone by rag. This will temporarily soften the PVC and allow the paint to be embedded in the plastic.

bp4.jpg

Now how to connect this thin PVC battery case to a bike frame in a way where it won’t be shattered apart when the first bump in the road is hit? This can be achieved by constructing a lightweight mount using sheet aluminum. This was made with the aid of a local aluminum siding contractor. The sheet aluminum can be purchased for less that $5 and in my case they allowed free access to their metal brake to bend the one-inch sides. This lightweight mount was then attached to the water bottle mounts by drilling two holes and screwed to the bike frame.

A thin layer of foam rubber is placed in the sheet metal mount before inserting the molded battery pack in order to absorb shock. And finally the battery pack is held in place using a single 15” rubber bungee cord that is bolted eyelet to eyelet after the S hooks have been removed. The bungee cord is wrapped around the bike frame, the mount and the battery pack.

bp5.jpg

Approx. total cost of the 10Ah pack:
$150.00 6 – 5000mAh 4S1P hard pack Hobby King batteries
$5.00 wire and connectors from Hobby King
$2.00 wood mold made from 6”x 6”x18”
$1.50 4”pipe 24” long thin wall drain PVC
.50 6” pipe 5” long scrap schedule 40 PVC
$5.00 6 ¼” x 14 3/4” sheet aluminum
.50 2 – 5mm counter sunk screws
.80 2 – nylon auto pins
$2.00 15” bungee
$175.00 Total with Shipping

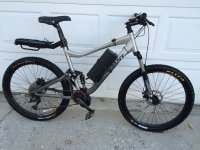
As you can see there is also a lightweight aluminum Schwinn rack mounted to the seat post that can carry another 20AH pack if required. This rack can be purchased at Walmart for $15.00 and the canvas battery case was acquired on eBay for around $10 with shipping.

http://www.walmart.com/ip/Schwinn-Deluxe-Alloy-Rear-Rack/17248454

http://www.ebay.com/itm/SALE-E-Bike-Battery-Case-Nylon-Bag-Wilderness-Energy-Electric-Bike-Kit-eBike-/301854955371?hash=item4647f5176b

View attachment 3

Trek Full Suspension Fuel with a total of 30AH. It is not recommended that any more that 10AH be carried on the back rack when biking off road. The weight may fracture the bike frame at the seat post or break the bike rack.

bp7.jpg

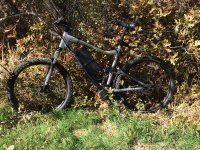
Cannondale SL1 Trail 29er

bp8.jpg
 
That' looks really slick and tidy. Nice Job! A word of caution though, PVC releases poisonous gasses when it's heated up. So make sure your kitchen is well ventilated when you put it in the oven.
 
That' looks really slick and tidy. Nice Job! A word of caution though, PVC releases poisonous gasses when it's heated up. So make sure your kitchen is well ventilated when you put it in the oven.
 
StinkyGoalieGuy said:
That' looks really slick and tidy. Nice Job! A word of caution though, PVC releases poisonous gasses when it's heated up. So make sure your kitchen is well ventilated when you put it in the oven.

Yes, good idea, PVC puts off a distinct odor when heated.
 
14490018_zpszw74xowd.jpg


My Cannondale 29er with room to carry 64Ah of Multistar Lipos.
The EM3EV bag will take one pair and the Additive bag can carry another 6 so good for up to 200 miles range :shock:
I usually carry 48Ah for on road trips and just use the triangle bag when off road.
 
KINNINVIEKID said:
14490018_zpszw74xowd.jpg


My Cannondale 29er with room to carry 64Ah of Multistar Lipos.
The EM3EV bag will take one pair and the Additive bag can carry another 6 so good for up to 200 miles range :shock:
I usually carry 48Ah for on road trips and just use the triangle bag when off road.

Wow 64AH, amazing! Nicely concealed, Great build! What kind of bike is that? I don't see where you haul all of that power! The battery pack alone would weight close to 50 pounds - is that right?

What is your longest trip?

I believe my longest ride to be just over 50 miles off road along the Wasatch mountain range where there is beautiful breathtaking scenery overlooking the Great Salt Lake!

View attachment 1 23.jpg

I'll bet that the sites you see in England can easily compete with anything we have here in the western US!
 
hie2kolob said:
KINNINVIEKID said:
14490018_zpszw74xowd.jpg


My Cannondale 29er with room to carry 64Ah of Multistar Lipos.
The EM3EV bag will take one pair and the Additive bag can carry another 6 so good for up to 200 miles range :shock:
I usually carry 48Ah for on road trips and just use the triangle bag when off road.

Wow 64AH, amazing! Nicely concealed, Great build! What kind of bike is that? I don't see where you haul all of that power! The battery pack alone would weight close to 50 pounds - is that right?

What is your longest trip?

I believe my longest ride to be just over 50 miles off road along the Wasatch mountain range where there is beautiful breathtaking scenery overlooking the Great Salt Lake!

View attachment 1

I'll bet that the sites you see in England can easily compete with anything we have here in the western US!

8 batteries wheighs in at just under 35lbs.
The bike is a Cannondale Trail 6 29er https://www.evanscycles.com/cannondale-trail-6-29er-2014-mountain-bike-EV193019

My longest trip so far is 101.2 miles on a lovely,sunny summers day.
s_zpsrzn0rpeq.jpg


I live up in the moors of Teesdale and am surrounded by lots of big hills and moorland including the highest pub in England.
14460012_zpsshkyhkiw.jpg


I weigh 250lbs at the moment so the all up weight is probably around 300lbs+ but the bike copes without complaint and I have over 2000 miles on it now.
 
Nice bike and a beautiful country KINNINVIEKID! Looks like you put in lots of mileage!

Here along the Wasatch mountain range the weather is beginning to warm up again.

bikes.jpg

I must admit that mountain riding can be so addictive that we have a hard time waiting for spring!

333.jpg
 
One more BBS02 build.
 

Attachments

  • IMG_4188c.jpg
    IMG_4188c.jpg
    221.2 KB · Views: 3,671
Having seen that new build in person, and seeing the huge smile on your face while you were riding it, I predict that bike will give you many miles of smiles.

And I love all the quotes in your signature. Brilliant! Sorry I never noticed them before.
 
darth_elevator said:
Having seen that new build in person, and seeing the huge smile on your face while you were riding it, I predict that bike will give you many miles of smiles.

And I love all the quotes in your signature. Brilliant! Sorry I never noticed them before.

Yes, the first ride on this bike or should I say swim with darth_elevator ended up being a doozy!
 

Attachments

  • IMG_4181b.jpg
    IMG_4181b.jpg
    259.6 KB · Views: 3,635
  • IMG_4179b.jpg
    IMG_4179b.jpg
    281.8 KB · Views: 3,635
Back
Top