kfong said:
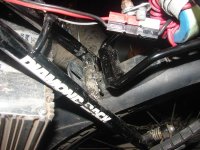
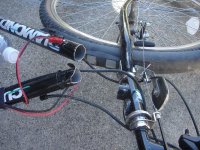
Amberwolf, I had it bolted on rather tight, so I don’t think it had any movement.
I bet there is more movement than you think, although you might not notice it. Can you physically grab the rear end of the rack and make it sway even a tiny little bit side to side (vs the bike frame position)? I'd bet this is possible with almost any rack out there, even of welded construction.
In many cases I don't think it makes a great deal of difference, but in extreme-use cases like yours, it can't be helping any.
")
I'd love to see someone do that camera test with racks like this. I have two bolt-together premade racks I'll see if I can test, plus one crappy welded rack I made. I have to build a camera mount first, and see if I can borrow a camera that does not have any extendable mechanical-focus mechanism for the lens like mine does (otherwise the vibration I intend to force during the pothole tests might damage the camera).
Steel flexes; it's one reason why it doesn't just break like aluminum does, which tends not to flex as much. But repeated tiny flexings still induce fatigue and eventually cracking. Depending on the metal type and structure it can happen quickly, too.
I also used a fiber lock nut to secure it. The plate is steel; the whole rear rack is steel. The fall that I had could have done most of the damage. In reality, most of my breakdowns have come about due to me jumping.
I don't doubt that major failures can be caused by that kind of stress, but I do think that other stresses are contributing. I just see too many rack failures posted up on the web that don't look like they should be happening based on the rack design, unless there is some sort of sidesway that is causing fatigue--the rack should not move in order to break otherwise, based on the way they are made. I'm no materials guy or mechanical engineer, so I don't know any of this for sure--it's just an intuition thing, which is often wrong.
I’ll try to see if I can beef up the rack even more. Since I don’t do any welding there might not be much that I can do for bracing.
You can make a reasonably stiff bolt-on X-member, if you can take steel tubing and hammer down the ends flat, then bend them to conform to the shape of the tubes you're connecting to at the angle they'll be connected at. Then make a matching piece for the other side to clamp it with, or even a flat plate.
To connect them at the middle of the X, dent the tubing in where they meet so they'll be inset against each other and can't easily rotate when bolted together, then drill a hole thru both at that point and bolt them tightly.
You could also machine something out of a solid bar to do this, too.
Neither of those is as sturdy as welding, but it might help if the X goes far enough down the rear brace to the dropout mounting point. That would mean an X that has short top arms and very long bottom arms, a little like a chromosome (but in a pure X shape rather than with any bends in the arms). The idea is to make as long a base for a triangle as possible, to give the stiffest shape over the longest possible portion of the frame.