GT's Curious Custom build

gtadmin said:
Able to spray it today, one coat only. The really bright, shiny red look "pink" in these pics :?: Guess you have to see it in the flesh 8)

View attachment 1


(Never mind the Whyalla lawn in the background)


The black and red look great together, black red polished ali/chrome go well
together, this bike will look trick when shes back together ...good job

KiM
 
amberwolf said:
I like that girder-over-panel look...you are REALLY tempting me to make my new bike actually look nice instead of the usual ratbike look. ;)
Hi AW, I like my "stuff" nice, but I don't have to worry that it will be knocked off either :shock:
AussieJester said:
...
The black and red look great together, black red polished ali/chrome go well
together, this bike will look trick when shes back together ...good job

KiM
Thanks mate, but there won't be too much polished ali or chrome. I'm thinking of painting the handlebars and head stem satin black too (not committed though :) )
Oh, and black and red always goes together (and black and orange, and black and gold, and black and .... )
 
izeman said:
can't wait for the next pictures. what a nice job done! congratulations from austria (where there are no kangaroos ;) )
:lol: Thanks mate, I can hardly wait myself (cause that means the bike will be closer to being finished), but all in good time - can't rush the painting process else I won't get the finish I'm looking for
 
A few photos, hope you find them enjoyable :D
20111029_3.jpg


20111029_6.jpg


20111029_8.jpg


Size comparison to the 26" Aprilia
20111029_5.jpg


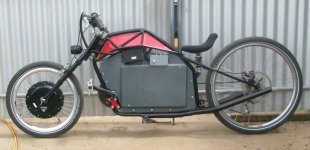
Bike assembled this morning and ridden around to get the mechanical bugs eradicated. I think I may have assembled the bottom bracket incorrectly - does the bearing cage face outwards or inwards (it's been a long time since I disassembled and can't remember and can't find a reference on the net). There is some motor drag, but the battery box still needs another coat of paint so it will be a little while until it's electrically ready. The colour chosen for the battery box is dark graphite grey, which will be "flaked" and clear coated.

I don't know which way to jump as far as the seat goes either:

1. Pad it, and find some way to upholster it;
2. Paint it as it is, either in red or black (my preference at the moment);

I'm open to suggestions here

Cheers,
GT
 
I have a heap of black vinyl suitable for seat upholstery, happy to cut you some roll it up and post it
your way, the foam howerver i can't help with.. Lookin' good anywayz, some ride video
when you have it all sorted would also be great!

That Aprila frame looks nuts! Any plans to pimp/mod/non frock :p that puppy?!

KiM
 
gtadmin said:
I think I may have assembled the bottom bracket incorrectly - does the bearing cage face outwards or inwards (it's been a long time since I disassembled and can't remember and can't find a reference on the net).

AFAIK the cage has to face inwards, or else it rubs on the bearing face of the BB races. If you hold the parts together outside of the BB, you'll see what I mean. I tried to find a photo reference on the web real quick, but didn't. For adjusting the BB, you might want to go to Sheldon Brown's site and go thru his and Jobst's articles on it.

FWIW, I usually take bearings out of the cages and just stick them to the races with grease, since half the time the cages are all twisted up or rusted when i get the bikes they come from. :lol:


I'd pad and upholster the seat, but that's just my comfort side talking. It would probably *look* jsut as good bare painted. :)

I like the bike so far; the red/black makes me think of batwings for some reason; I'm sure it'll be a very different look once batteries and stuff are installed in the frame.
 
AussieJester said:
I have a heap of black vinyl suitable for seat upholstery, happy to cut you some roll it up and post it
your way, the foam howerver i can't help with.. Lookin' good anywayz, some ride video
when you have it all sorted would also be great!

That Aprila frame looks nuts! Any plans to pimp/mod/non frock :p that puppy?!

KiM
Thanks for the offer KiM but I have all the materials, it's the"doing" that I'm not confident about :oops: The Aprilia already has a bottom bracket driven motor running 8S LiPo, the only one with the frock is my custom :?

amberwolf said:
...
AFAIK the cage has to face inwards, or else it rubs on the bearing face of the BB races. If you hold the parts together outside of the BB, you'll see what I mean. I tried to find a photo reference on the web real quick, but didn't. For adjusting the BB, you might want to go to Sheldon Brown's site and go thru his and Jobst's articles on it.

I looked it up there first, but found no reference. It did show the cages going outwards for the head tube, so I copied that for the BB (which means I disassembled it and changed it over). I found I couldn't adjust it correctly, so disassembled it again and put it back the way I had it :oops: Cages go inwards!

I'd pad and upholster the seat, but that's just my comfort side talking. It would probably *look* jsut as good bare painted. :)

Quite comfortable as it is, so I'm going to paint it and if I don't like the "look" of it, I'll deal with upholstering it later. Might put some "speed" holes in it first :D

Thanks for your input guys, I appreciate it.

GT
 
gtadmin said:
It did show the cages going outwards for the head tube, so I copied that for the BB (which means I disassembled it and changed it over). I found I couldn't adjust it correctly, so disassembled it again and put it back the way I had it :oops: Cages go inwards!
Basically the cages have to go on the cone side of any cone/cup bearing race setup.
 
Amazing looking bike and some lovely work there, with amazing attention to detail. but one thing that has me puzzled...why did you go for front wheel drive rahter than rear wheel.

I have only ridden two electric bikes...my 55mph 100volt 5304 powered rear wheel drive mongoose,and a 300 Watt front wheel drive bike I built for the girlfriend.
And oh...how much do I dislike front wheel drive...even at with a low power 300 watt motor the front wheel always spins out on gravel, and is terrible on a wet road...so much power seems to get lost with front wheel drive and cornering in the wet or loose surfaces is positively dangerous...
so why front wheel drive when rear would make the handling so much better?
 
I don't know which way to jump as far as the seat goes either:

1. Pad it, and find some way to upholster it;
2. Paint it as it is, either in red or black (my preference at the moment);

I'm open to suggestions here

Might i suggest a "tooled" leather style..
http://www.bikersaddles.com/shop/index.php?act=viewCat&catId=2
br_flame_web.JPG
antredtoolembossnubnosecompress.JPG


Or, how about this simple but unique idea ...?
Looks easy to replicate
clear_powdercoat_holes_web.JPG
 
AW said:
Basically the cages have to go on the cone side of any cone/cup bearing race setup.
Thanks mate. That's what I thought but I had a chain misalignment issue with the BB and I mistakenly attributed it to the assembly. All good now but.

NeilP said:
Amazing looking bike and some lovely work there, with amazing attention to detail. but one thing that has me puzzled...why did you go for front wheel drive rahter than rear wheel.

I have only ridden two electric bikes...my 55mph 100volt 5304 powered rear wheel drive mongoose,and a 300 Watt front wheel drive bike I built for the girlfriend.
And oh...how much do I dislike front wheel drive...even at with a low power 300 watt motor the front wheel always spins out on gravel, and is terrible on a wet road...so much power seems to get lost with front wheel drive and cornering in the wet or loose surfaces is positively dangerous...
so why front wheel drive when rear would make the handling so much better?

Thanks for the appreciation, I really enjoy this hobby and don't mind the time spent creating something unique (even if strange at times :lol:).

I believe that FWD is superior in the handling department when designed that way and weather conditions permit.

-- The bike is designed to have approx ~45% of downforce on the front wheel, much more than your usual upright bike.
-- Whyalla has 304 days of sunshine a year, and I never ride on gravel. In the recent past (since 2006), I have only been caught in rain twice.

It was cheap 120USD on sale at Ebike-kit (although the USPS shipping cost about 170USD :eek: )

If I was using a 100V 5304 capable of 55mph, I'd being using RWD too :shock: But I'm running low power (only 200W due to the amazing powers of Hyena Industries stickons) and I have a backup plan (a disk-braked rear 9C)

HH said:
Might i suggest a "tooled" leather style
...
Or, how about this simple but unique idea ...?
Looks easy to replicate
...
How to Make your own tooled leather seat
...
I want to make everything myself that I possibly can so I wouldn't buy one, but they do look inviting don't they. I'll need to look at that you tube later when I'm not at work.


Cheers guys
 
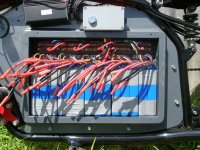
How do you connect 84 wires (14 batteries x6 wires each) in the correct combination?
20111113_bare.jpg


And this with all the batteries loaded and wires connected (using 3mm coraplast, these are a very tight fit)
20111113_full.jpg


This is with the batteries removed to show:
1. the jumper wires from each 3S3P pack to the next
2. the battery charge wires for each 3S pack
3. the main leads connected (this +ve is for testing using 10A inline fuse), with the correct +ve with inline 60A fuse below
20111113_wires.jpg

The keyswitch is 200W mode on/off, the switch at the top of the little box is the precharge resistors (8x1k5 1W resistors in parallel = 187ohm 8W), the plug on the right hand side is the full current isolation for both motor and lights (and makes a handy key - how many people are going to have 4 Anderson plugs looped the correct way?)

Note the graphite grey of the battery box, and although a little hard to see, the "sparkles" (it's very small flake, but larger than metallic would be).
Next job is to wire the balancing wires to the D25 plug (a job I'm dreading BTW) and once that's done, assembly time :D

Cheers guys :wink:
 
Hi guys, a couple of updates

Firstly, I made some elastic straps with zipzap on the ends (velcro) to hold the phase and hall cable to the fork. The elastic is about 20mm wide, and provides a cleaner look than using cable ties. There is a drip loop at the cable entrance to the axle. Also, I miscalculated on the amount of resistance of the battery wires to bending (in bulk), and had to make a cutout to get the cover to sit. I'll make a smaller cover for this from fibreglass or plywood (haven't decided yet).
20111201_a_front_straps.jpg


I was pondering earlier on how to cover the seat, well I painted it black and with the aluminium pop rivets it looked very cool, but my wife pointed out it would get pretty hot in our summer and burn those things us males hold in high regard, so I made a cover from stubby holder material, shoved the high density foam inside, and voila!
20111201_b_seat.jpg


To make it legal, I installed a $4.50 warning device (in black of course). Also, the thick cable on the left bar holds the throttle cable, the brake cutout cable, and the rear brake cable itself. It splits at the fork so the motor cables then enter so there is only one cable back to the controller.
20111201_c_front.jpg


After riding the bike, I reckon the chain will scrape on the battery box in the lower gears, so I have found some teflon cutting board (3mm thick) from Coles at $3, and have made a scrape plate from it (haven't quite finished that yet so no piccie)

I have connected the D25 to the balance leads, but had a helleva time soldering the cables to the D25 and I'm not happy with the way they turned out. I used 20AWG wire from HobbyKing and it's just too big. What do you guys use, 24AWG? Also, living in the donga it takes time to get some things so a new D25 is 1 or 2 weeks away.

Finally, a couple of other pics. This is just to show how the reflective sidewalls on the Big Apples really stand out at night.
20111201_c_night.jpg


These show the relative size of the bike. The first is with my daughter standing behind it. She is 5'6". The second shows the riding position.
20111201_d_standing.jpg

20111201_e_sitting.jpg


Just a note on riding impressions. Very comfortable position (I know it doesn't look it but it is). The bike has a tendency to fall into a corner, a product of the extreme-ish head angle. As an aside, it gets a few WTF, with the first encounter with a car resulting in the driver almost crashing into the kerb because he was so busy looking at the bike he forgot to watch where he was going :lol: At least it means that people will see me, not ignore me :)

Cheers,
GT
 
If I haven't already said so, I just want to say that your project kicks arse. That's so @#$@#$ awesome. At first I just wished it wasn't so big, but then I saw the comparison pic with your daughter and I think it's sorta cool that it's small. I love the proportions - perfect actually. The red part's kinda neat too and I love how you made the whole thing yourself. All this coming from an architecture grad. Hope that means something. Anyway, loving it. Can't wait to see your next project.
 
Wow, the pic with your girl sitting on it brings it in to scale. It is just way smaller than I imagined. It is tiny. I was looking at it thinking it was a much bigger machine..legss fully stretched forward, arms right out..
Still amazing work, BTW, but totally different to how I imagined it
 
kmxtornado and NeilP (and all those that have viewed this), thanks guys :) This is my first build, so there is room for improvement. It's my experience (as a software writer) than the second build is over the top so I'll try and reign that in for my next one :lol:

The problems that I had with the charge port was traced back to the tracks on the balance lead parallel boards lifting (sorta rusted ?) so I built a new one, pulled the other 4 off to check them, and then cleaned and coated all boards with a clear coat. Batteries have now had a balance charge with no problems 8)

Also, the squirrely front end turned out to be the front tyre only having 15psi in it :oops: Handles really well now, with no noticable flop.

Post of some bikes from Warren's build here
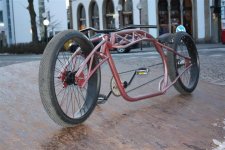
If you look at bike 92 you will see this

cool bikes092.jpg

This looks to me like the motorbike I got my inspiration from for this build - the only real difference that I can see (other than missing a Harley motor etc) is that the motorbike had clip-ons!

Happy new year guys (and happy birthday Karin),
GT
 
Back
Top