Keyne's DH Comp Build - now with liquid cooled HX35! :)

Yeah, you actually want the spokes to be weaker than the hub flange...it's much easier to replace a spoke :wink:

9 Gauge....CRIKEY!!
 
Yeah, I know, in hindsight it was a bit silly. :oops: I'd just broken three crystalyte 12 gauge spokes on one particular big rock and wanted to try something stronger, but all I could find on Ebay was 9 gauge spokes! They are really hard to deal with! I could only just bend them by hand! Not recommended :!:
 
Great work so far those torque arms will be great for power and especially regen. Also a really good frame for packing a battery into. With 100v you should be flying! Have you run swbluto's simulator to see what sort of speed, range etc you could be expecting? I found it's predictions to be very close to my real world figures.

You'll probably find you hardly use any of your gears, on my bike I hardly ever change out of top gear, and you'll have much more power!

From the sounds of things this can't be your first build, but I never found another build thread for you. Just curious to see what else you've done.
 
I don't expect to use too many of the gears :wink: But I have some pretty steep off road terrain around where I live that I will be using it on.
I've done a few builds before, but the only one I documented was one done in a big rush with/for a friend : http://www.endless-sphere.com/forums/viewtopic.php?f=6&t=25563

Tried to download the simulator, but the file seems to be corrupted.
 
I just received confirmation that my HT3525 is on it's way :) I quickly changed my (delayed) order to a sensorless version after reading the 35mm/30mm problem Methods was having with his sensored motors. I'm sure I can find a way to install the hall sensors! :mrgreen:
 
this is an awesome build!
keyne said:
A while ago I managed to lace it into a DMR Blackline rim with 9 gauge motorcycle spokes
did you have to drill out the eyelets?
keyne said:
But in order to use a 9 speed freewheel I have to be able to dish it as much as possible. So I took out half the spokes and swapped them over to the other side
What in the world do you need a 9speed freewheel for!?
 
Yes I had to drill out the eyelets, and enlarge the holes on the motor flange by 0.5mm.

I've been working on the fiberglass side panels this weekend, I'll post photos once I think they look good enough :D
 
Next Task: Bike Side Panels

Ok, so I know almost nothing about making composites and this really is an unconventional way of making a mould, but it works well for simple prototypes like this. It doesn't make really strong, light components, but it makes it good enough for this purpose. These are the steps I followed - they may be wrong - buyer beware! :mrgreen:

The frame is a complex shape and to make a panel to fit it exactly is quite difficult, making the mold for the panel would be the hardest part. So instead of making a mold, I used the frame as the mold! :D

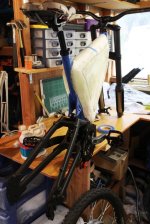
Step 1: Lie the frame and it's eventaly contents (battery pack) down on a table and put shims under the frame so the battery pack is centered. Put cling film (gladwrap in NZ) over everything.
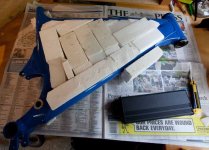
fakeBatteries.jpg
Step 2: Next to make the mould look a nice shape go and mix up a big batch of play-doh! :D Yup you read that right, a great cheap, dense maliable thing to make your mould out of.

Step 3: Lay out and mould the playdoh over the frame and battery pack until you have the shape you are looking for. Play-doh is very easy to work with, even kids can do it! :) Remember to allow raised areas for things like cable entrance holes, brake cables etc. Once you have the shape you want put another layer of gladwrap over the top and make sure everything is nice smooth. Obviously It isn't a hard mould, in fact it is really soft, so you're not going to be making top quality fiberglass with it (you'll have to put on a few more layers than if you were doing it with a propper mold), but it is easy and painless (and kinda reminicent of ones childhood:)

View attachment 4

Step 4: Next cut pieces of your favourite composite material (fiberglass/carbonfiber - I used 3-4 layers of 200g woven fiberglass cloth) to a bit bigger than the size you need.

By the way, don't be put off trying this fiberglass stuff just because you've never done it before, this was only my third time doing anything with it. I just bought a fiberglass kit from a boat shop for about US$60 and gave it a go. It is really just like adults pape mache!

Step 5: Basically, just mix up some epoxy don a gasmask and rubber gloves and carefully lay up your side cover, one layer at a time making sure that each layer is well wetted with epoxy. I found it easiest to spread the epoxy around just using my hands (with silicon gloves on) It only takes about 30mins. Make sure the windows are open and wear a propper gas mask, this stuff can really make you light headed!
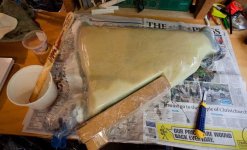
layup.jpg
Step 6:Obviously with this molding technique you can only do one side at a time, but you can even reuse the play-doh. The gladwrap under the fiberglass will inevitably become stuck to the inside, but that doesn't matter because no one sees that bit! I managed to re-use my playdoh after over a week sitting in the mould (with a bit of TLC) and after I was done I put it out with the compost! :)

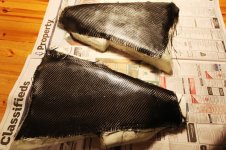
Step 7: Leave to cure for 48 hrs and then trim, sand and admire your handywork.
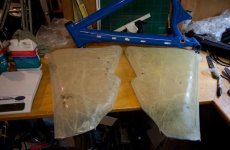
trimmedPanels.jpg

{b}Step 8: [/b] Identify any high/low points (all the pen marks in the previous photo) that you don't like and add bog as appropriate (on the outside or inside depending) It is kind of like icing a cake. (follows on well from all that kneeding with the playdoh! :D ) After it has cured, sand it till you're happy with it.
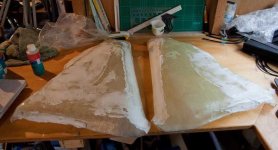
icingTheCake.jpg

Step 9:(Optional) You may want to heat cure the panels it in a large cardboard box lined with aluminium foil and heated by lightbulbs - a makeshift low temp (100-120deg C) oven for about 12 hours if you want good heat resistance and added stiffness, but for most applications room temp curing should be ok. If you want to heat cure the part, you just need to raise the temp slowly over a period of a couple of hours, eg. start with one bulb on and the box open, then after half an hour close the box, after another half hour turn another bulb on, half an hour later the third bulb goes on and then after another half hour insulate the box with a towel. (A multimeter temp probe is handy) Leave it for 9-12 hours, then reverse the process to cool it down again. (you'll need to do this somewhere where the smell of hot epoxy doesn't bother anyone! Believe me, you don't use the oven in your kitchen!)
Basically with heat curing fiberglass the deal is that it'll start to get softish at about 30deg C higher than the temp at which it was cured at, so if you don't intend having hot batteries or using it in the desert, then room temp curing should be ok, but heat curing seems to make the panels a bit stiffer though, which is a good thing. You'll need to sand the panels again after heat curing because somehow the grain of the fiberglass cloth shows through more afterwards.

Step 10: Paint the panels. Definately only do this after heat treatment (if you choose the heat treatment option) as heat treatment will change the surface of the fiberglass. I found that epoxy spraypaint works pretty well on fiberglass.
 
That's quite a neat tutorial. I thought about that before I built my plastic box, but I have other projects in mind that could use that. Did you find a good site with details that helped you learn how?
 
I read a few bits on this forum and a bit on a boat building forum regarding the heat treatment process. Basically I just tried it and it worked out pretty well.
 
What brand of epoxy did you use? I have used a variety of boat epoxies and the West System products have a range of catalysts to allow curing in hot and cold conditions.
 
I've tried the CRC Ados range and Epiglass. Those are the only two in the shop I went to. Both seem to work similarly. They both seem to cure at any temp given enough time, but seem stiffer/stronger if allowed to cure at higher temps. They shouldn't go "soft" if exposed to higher temps later on.
 
My Crystalyte HT3525 motor arrived today! :D It's sensorless, so I'll need to install sensors - does anyone have a link to appropriate Hall sensors that are in stock somewhere?
 
ebike .ca has them. or you could go with digikey or mouser, they prbly both have them too.
 
Not much work been done recently - had to go rock climbing with my wife last weekend so couldn't do anything on the bike :( :wink:

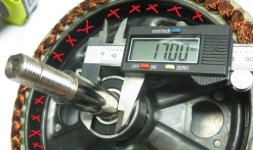
If I was going to liquid cool this motor would cooling this part here (red "X"s - ignore callipers -lifted from Justin's photos) would that be sufficient to cool the rest of the stator - anyone know how well it is thermally coupled to the rest of the stator and windings?
17mm Axle.jpg

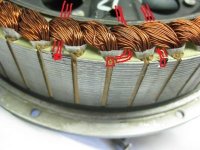
Also regarding installing hall sensors to a sensorless motor - any fundamental reason why I couldn't feed the three thin wires through these gaps here - there is plenty of room.
Space for Halls.jpg
 
Ok, update: After a lot of sanding the panels are looking quite nice. I reconstructed the bike after my painting efforts and I'm really happy with the way it looks.
panel_on.JPG Final width between the knees will be about 118mm :D
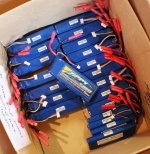
The rest of my Lipo arrived last week, so I've got no excuses nowlipo.JPG

I put on a "marketing layer" of carbon fiber - (two layers actually) which I think looks cool and makes the panels nice and stiff panels.JPG

I built a make-shift oven with some cardpoard boxes, three 100W lightbulbs and lots of aluminium foil and tape oven.JPG
I managed to ramp up the temperature over a few hours to 120deg C. Kept it there for 7 hours then ramped it back down over a few hours. The panel are now super stiff! I've got a lot of sanding to do this week to make it look how I want.

Anyone have any comments on my water cooling questions earlier?
 
Looking good!

Going to be one hell of an bike :)

Re: water cooling - not sure if its worth it, unless you want to empty your pack in minutes. Riding in bursts extends the range and keeps the motor in the safe zone. Just a thought..
 
What?? NO!! You didn't?? F**K!!! You had a original Manitou dorado in good condition , and you PAINTED it?? There's some downhillers here crying right now.
Man , oh man, I've would paid top dollars for that fork in mint condition.

That fork was taken back into production last year because people wanted it so bad. I envy you! (but wouldn't painted it, no way!
That fork is the closest you get to a moto-x fork for putting on a bike. Off course , you got the fox 40now , but those egg-shell thin lowers and a oil-change every 30 hours makes it a no-go for me. The new dorado is to expensive for me.

I'm in the planning stages of a DH-Team build , myself (http://endless-sphere.com/forums/viewtopic.php?f=3&t=27043) but I'll settle for a Marzocchi fork. It's not at all a bad fork , but without the upside-down fork this frame is designed for , I'll have to settle for 170-180mm (7") travel on the forks not to upset the geometry.

Those dropouts looks nice , Is there any more of them available?

I'll be watching this build thread for shure!

.manitu
 
Oh , I notice now. :oops: Since the DH-team was delivered with a Dorado, I asumed it was one.
One thing anyway , inverted forks usually go a inch deeper in travel compared to normal forks , for a given axle/crown length. You might have troubble mounting anything under the downtube. open the top-caps , like you do to change oil. Then let the fork sit fully compressed with the springs sticking out of the tubes to check clearance. This is something everybody with a big tire in a inverted fork should do , to check that the tire clears the lower clamp.

.manitu
 
keyne said:
Not much work been done recently - had to go rock climbing with my wife last weekend so couldn't do anything on the bike :( :wink:

LOL, had to go? I wish my wife would tell me to go rock climbing. I should be doing lots of it owning a climbing gym. Had to go... *shakes head*

Where are in NZ? I'm in Wanaka.

The bike looks awesome, nice work.

Clay
 
manitu said:
What?? NO!! You didn't?? F**K!!! You had a original Manitou dorado in good condition , and you PAINTED it?? There's some downhillers here crying right now.
Man , oh man, I've would paid top dollars for that fork in mint condition.

Yeah, they're DC Shivers - still nice, but not that nice. I figured if they were good enough for the original SE Bomber they're good enough for this build.

manitu said:
One thing anyway , inverted forks usually go a inch deeper in travel compared to normal forks , for a given axle/crown length. You might have troubble mounting anything under the downtube. open the top-caps , like you do to change oil. Then let the fork sit fully compressed with the springs sticking out of the tubes to check clearance. This is something everybody with a big tire in a inverted fork should do , to check that the tire clears the lower clamp.
Thanks for the tip, I'll be running 24x3.0" tyres, so it is unlikely to be a problem.


flyinmonkie said:
LOL, had to go? I wish my wife would tell me to go rock climbing. I should be doing lots of it owning a climbing gym. Had to go... *shakes head*

Where are in NZ? I'm in Wanaka.

Yeah, she's training to become a mountain guide, so often needs a climbing partner. We're in Tekapo, so not far away. You have a climbing gym?!
 
keyne said:
Yeah, she's training to become a mountain guide, so often needs a climbing partner. We're in Tekapo, so not far away. You have a climbing gym?!

Nice. Yup, I own Basecamp Wanaka. Pop in if you are down this way, if you haven't already. It's funny how the world seems to get smaller every day.

Clay
 
Back
Top