Knoxies got some new toys

Awesome!
I happen to have one of these guys: http://www.rapidonline.com/sku/Electrical-Power/Power-Supplies/Bench-PSUs/25A-40A-Switch-mode-power-supplies/65063/85-1828

- I got it in a sale, it's been very useful (although not radio grade) and hopefully will run the lipo charger/balancer as well.
 
Wow, thats a nice one. I would love to pick up something like that! I'm running a weak old supply with an sla to buffer.
 
Nice unit... versatility is King :wink:. That should be plenty to run one of those new high end -- high output balancing chargers if you ever choose to go that route. Looking forward to your seeing your 37 pin D connector hookup in action too. 8)
 
Hi

Yes its more than enough juice so shouldnt run too hot and cut out all the time like the old one, I didnt check my charger but I think it must pull more amps than it puts out to the battery, this supply has a built in ammeter so I can see exactly what it is doing.
Yes looking forward to getting the D connectors in place, also have to make the cellog interface as well, weather just too nice at the moment will get it all together soon.

Knoxie
 
I assume the 6/8 cell chargers have a boost converter. Power out = power in - losses, so if it gives 30V 5A out it must take at least 10A at 15V (for example).
Can't wait for all the bits to arrive. Did you say you had videos of your BMX in action knoxie?
 
Hi Evan


Yes the chargers must have some form of DC conversion going on in there somewhere, the manuals are terrible with all these chargers, I went for quite an expensive charger as I didnt see the point in spending all that money on the batteries and charging them will some iffy ebay knock off, also my charger came from a UK model shop so I at least can get an easy swap if I have issues.

I shot a video of the BMX, it was doing about 25mph although it doesnt look that fast? it felt it though about half way through I spin the camera round to shoot backwards that looks kind of cool ,the split screen intro doesnt really work just tried it for a laugh.

I plan on infiltrating a local cycling time trial next week on the big bike, I am going to grab that one in HD should be fun, dont know whether to tail them and film them trying to get away or film them from behind trying to catch me up, got a lot of respect for those guys some of the times they put in are amazing.

Heres the video

Hope your bits come soon the weather is so nice...i got this week off :)

[youtube]P9i7hT6VwZM[/youtube]
 
Hi

Well want rid of those pesky JST connectors, so got to do a bit more soldering today, fitted the 37PIN D plugs so much better now, the socket on the battery side will also interface with a plug thats connected to the cellogs during discharge, thats the next job for the soldering iron, then I will get the cells in some kind of box make it look a bit tidier.

Some pics.
 

Attachments

  • lead2.JPG
    lead2.JPG
    35.6 KB · Views: 2,698
  • lead4.JPG
    lead4.JPG
    26.7 KB · Views: 2,716
  • lead5.JPG
    lead5.JPG
    26.7 KB · Views: 2,716
  • lead6.JPG
    lead6.JPG
    30.5 KB · Views: 2,716
  • lead7.JPG
    lead7.JPG
    40.9 KB · Views: 2,698
  • lead8.JPG
    lead8.JPG
    34.1 KB · Views: 2,698
  • lead9.JPG
    lead9.JPG
    36.2 KB · Views: 2,698
  • lead10.JPG
    lead10.JPG
    30.2 KB · Views: 2,716
  • lead11.JPG
    lead11.JPG
    30.6 KB · Views: 2,716
  • lead12.JPG
    lead12.JPG
    29.7 KB · Views: 2,698
  • lead13.JPG
    lead13.JPG
    31.6 KB · Views: 2,698
  • lead14.JPG
    lead14.JPG
    27.2 KB · Views: 2,716
Nicely done Knoxie , very slick :)

KiM
 
Cheers guys :)

Yes those pesky JST connectors were doing my nails no good! ha ha and its so quick and simple to to just have 1 x plug, on the battery side I may put the socket in to the side of the box instead of a flying lead, need to get the cellog plug sorted so I can be happy that I have LVC capability whilst I am out on the bike although in theory I should never hit it as i will always stop before I got to 80% DOD, this pack may even get another pair of cells to take me up to 60+V 10AH we shall see.

This is a great hobby 8)

Knoxie
 
Hi Evan

Yes the BMX is so much fun...the new batteries bring it back to life totally :) well they have sparked up all the bikes, I have 4 bikes, the BMX the KMX the Trek and the Raleigh as I can only ride 1 at a time I have made this pack so it can be dropped on to any one quickly and easily, I also want to get a cycle analyst but want to make that hot swappable as well as cant really justify spending 600 quid on equipping all 4 rides :?

Hope you get your packs soon M8, I used to check in to the HK site 2-3 times a day 8) to check on the progress of my order, well it did get held up in the last Lipo crack down sadly. Glad I got the JST extensions from HK they were so cheap :) I just got 2 more leads to make, they will be 1 for each cellog alarm, the packs will be paralleled inside the plug, the alarm output from the cellog switching back to a tiny little box that will house 4 x optos allowing any 4 cellogs to switch the brake inhibit on the controller. allowing for some expansion you see :) been using the buzzers whilst I cycle the packs but ultimately want it to cut the controller.

Knoxie
 
Cool project. Love the 37pin connector.

If you are using regen, you may want to just pull the throttle down to 0v, instead of activating ebrake line. This way you wont "hit the brakes(regen) " when hitting LVC (which as you said before, is improbable, when equipped with proper controller level LVC.) See another cellog thread for details.

Looking forward to seeing your opto setup, i have never worked with them, but have some on order from ebay for an almost identical setup to yours, my cellogs will be mounted perm. and switched on with a relay on the pin1(-). the relay will turned on with the master switch which is a switch/walwart dc/dc/relay combo.

Keep going forward!!

mike
 
Hi Mike

Good point about the regen, all my controllers are analogue early Xlyte controllers without any regen capability so should be fine, yes the D plugs save a lot of time, just need to find a box or make something to get it all in, the D socket from the batteries will most likely then be fixed in to the side of the box to take the strain off the battery balance leads, it will look neater. I did have an idea to mount the andersons through the side of the box as well.

Anyway going to get the opto chips in the box this afternoon and test it out to make sure that it works ok, doing it 1 step at a time here as the weather has been so nice I have been out riding when ever I can.

Good luck with your project also.

Knoxie
 
In simple terms its an isolated switch or an electronic relay, the cellog output turn on a diode inside the opto this light signal is picked up inside the opto and the output switches on, the nice thing is that the input and the output signals are isolated. I will take some pictures and do a video showing it controlling the brake signal.

My new PSU is rocking :D :D charged the pack from half full in 40 mins!! it was putting out a nice steady 16A! this setup is going to be so nice once it is all in the box, I am going to make an identical pack to take my capacity up to 45V 20AH then I am going to make 2 x more modular bricks so I can up the voltage on t X5 to 66V as it buzzes along nicely at that voltage.

Knoxie
 
Right

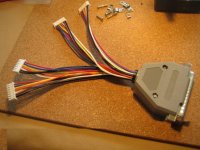
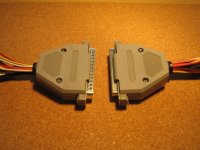
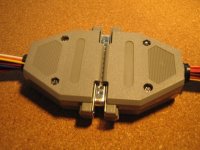
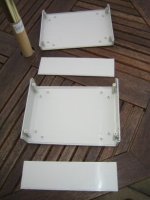
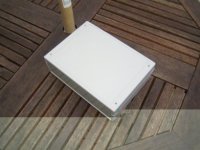
Got busy tonight...popped in to my local Maplins and picked up a nice little plastic box big enough for the board and the socket, its about the ideal size, I cut the socket hole out for the D connector and slotted the board in, it all went together really well!! I hooked it up outside and tested it by selecting normally closed from the alarm output and each opto channel switched perfectly, I will video this in action on the bike tomorrow with it hooked up directly to the controller.

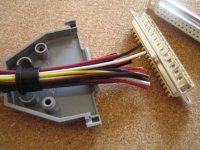
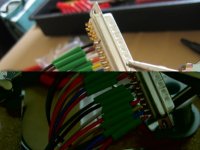
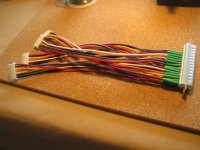
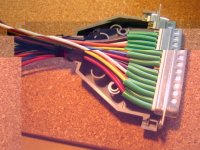
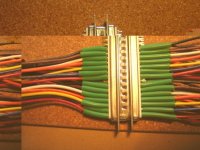
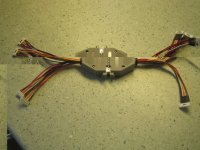
I am really pleased with the way that this has come out, I can ride with a bit more piece of mind although I wont be complacent about it!! the hardest part about the whole job was linking the wires and sleeving them on the back of the D plug, I checked and double checked it afterwards with my meter.

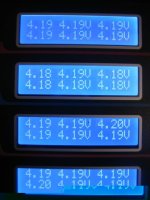
Now time to play with the cellog to make sure I am happy with the default settings, they look nice and easy to use, I think that out of the box they are set a little over sensitive, I will have a play and make sure that it is set up to match my pack.

The 2 core white wire is the brake inhibit connection to the xlyte controller, will post a video to show that working.


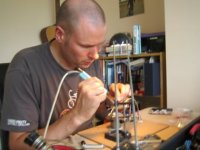
Right some pictures, this took a lot longer than I thought it would so respect to everyone on here that has had a go themselves!!

Knoxie
 

Attachments

  • IMG_3604.jpg
    102.9 KB · Views: 2,066
  • IMG_3605.jpg
    90.2 KB · Views: 2,066
  • IMG_3609.jpg
    101.1 KB · Views: 2,066
  • IMG_3612.jpg
    117 KB · Views: 2,066
  • IMG_3615.jpg
    98.9 KB · Views: 2,066
  • IMG_3616.jpg
    83.9 KB · Views: 2,066
  • IMG_3617.jpg
    72.5 KB · Views: 2,066
  • IMG_3619.jpg
    70.7 KB · Views: 2,066
  • IMG_3621.jpg
    98.9 KB · Views: 2,066
  • IMG_3622.jpg
    90.2 KB · Views: 2,066
Thats pimp Knoxie!!! I think you might have a few copying this idea. I had planned to use very similar
plugs mounted externally on my fiberglass battery enclosure all connected internally neatly...never happened though haha...

Well done mate

KiM
 
Cheers Kim!

Yes it has worked out nice, there is easy enough room in my Topeak bag to accomodate this and the batteries, I will have a play with the alarms to make sure that I am happy with them then get using it, I use 4 little buzzers at the moment which work fine but I am not sure wether I would hear them at speed, I also want to balance tap the parallel pairs to keep them in balance which is something you cant do and run 4 buzzers.

This is nice as I simply unplug the charger and plug this box in, this box will sit in the topeak bag all the time, I am charging the batteries indoors where I can keep an eye on them although in time I will most likely just leave them charging outside in the garage.

Knoxie
 
Knoxie,

Very slick! Are the Andersons for the brake line?

Thanks!
 
Hi

Yes thats right, I have a couple of Andersons coming from the controller, i Also run a kill switch in parallel with that as well found a nice box for my batteries tonight as well, its actually an instrument case but its the perfect size for my batteries.

Cheers

Knoxie
 

Attachments

  • box 1.jpg
    box 1.jpg
    25.5 KB · Views: 2,950
  • box 2.jpg
    box 2.jpg
    28.7 KB · Views: 2,929
Right

Got some nice rubber sheet and a good strong roll of Duck tape and got to work, I cut a nice slot in the top of the case for the cables, getting some spiroband tomorrow to protect the balance wires.

I also made a cross shape piece of rubber that sits on the top of the pack, this fits together so snugly now it doest move at all! I chamfered the slot in the box also to protect the cables, its added a little weight to it as whole but its so worth it to protect them properly, they will always sit upright as it is shown with the odd exception when I am on the KMX.

I am very pleased with how this came together, going to fit the 4 x alarm buzzers in to a small box so I can use that incase there are any issues with the LV alarm system.

Some pictures.

I am also going to keep an eye on the battery temps now I have enclosed them, I am going to use a small logging temp alarm, Ebay special, they should be fine as I only every pull 15A from each pack.
 

Attachments

  • IMG_3630.jpg
    73 KB · Views: 2,197
  • IMG_3634.jpg
    62 KB · Views: 2,197
  • IMG_3637.jpg
    59.9 KB · Views: 2,197
  • IMG_3638.jpg
    72.3 KB · Views: 2,197
  • IMG_3639.jpg
    70.7 KB · Views: 2,197
  • IMG_3641.jpg
    57.7 KB · Views: 2,197
Hi Knoxie. Looks very professional indeed, well done!

Do you still intend to go do an in-depth description of how you made your CellLog 8s alarm circuit? I would like to use the concept you came up with, if you would be so kind as to make a 'Beginners Guide to Building a CellLog Alarm Circuit'. I believe a few other members are waiting also.

Many thanks!

TJG
 
Hi

Well its actually Garys cellog circuit, I used different optos as I wanted to get them local, I have posted bits on it on another link, I will post up a proper connection diagram showing it hooked up, vero board is nice and simple to use although to be honest you could cut the legs off short and just solder all those bits in to some heat shrink :) I just like vero board...i am old school :lol:

Cheers

Knoxie
 
Back
Top