Lipo Double Harness for Charging and Power

majornelson

100 W
Joined
Jun 29, 2013
Messages
277
Location
Bethesda, MD
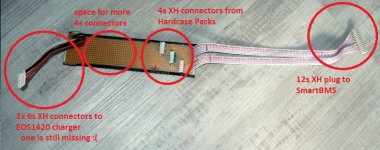
I'd like to be able to charge my HK Lipo batteries (12S - two 6S 5 AH batteries in series) without disconnecting them from the controller.

My thought was to create a double wiring harness, with one set of connectors going to the controller in series. I'd split the harness and have another set ready for the charger but in parallel. So if I'm charging, I charge at 22v, 6S (times two) as I do now. But I want to leave the battery connected to the controller.

As an aside, since I only use two batteries I always balance charge and I would continue to do so...

Is there any issue with this approach?

Thx!
 
you should use the Bestekpower D122 12S BMS and then you can just bulk charge it with the BMS to 50.4V. that will allow you to charge the pack without having to swap out the wiring harness constantly until it fails and it will allow you to balance the pack and have short circuit protection on the output. it should handle your 25A controller fine and that would be 5C discharge on the turnigy packs.
 
any idea of any place that sells their stuff?

i looked at their site, but can't see any buy/ checkout links


http://www.bestekpower.com/74v20spcmbmspcbforli-ionli-polymerbatterypack/
 
dnmun,

Thanks. I had planned on the dual wiring as a temporary solution until the BMS arrived... but just got home and it came today! Much faster than anticipated and much appreciated.

Are there any wiring instructions available on the web? Did a brief search of the Bestekpower site and didn't see any. Although I have decent mechanical chops with bikes (and I can solder), my electrical experience is pretty limited.

The D122 looks great, btw. Just the right size for my battery. I now need to figure out how to wire it up and some tips on placement (can I tape fasten it to a battery pack?) would be great. I'll search the forums here in case it's been discussed before...

Thx.

Lee
 
there are 13 sense wires. the lowest one is next to the end that says B-. you connect that one to the bottom of the first cell, the bottom of the battery, so they call it B-.

the second sense wire goes to the top of the first cell, the third sense wire goes to the top of the second cell, ...and so on up to the top of #12.

do this before you connect the sense wire plug to the BMS. then after all the cells are soldered to the sense wires, use the voltmeter and verify that each cell is in series, that the voltage steps up by 3.7V or so for each sense wire as you probe the sense wire plug all the way to the top from the bottom. you have to be certain than none of the sense wires has the cell voltage reversed, this is critical. if it is not the BMS will be ruined when you plug in the sense wire plug.

if you peel back the plastic over the end of the 6S pack then there is a white plastic strip that covers the end, and if you don't plan to remove the shrink wrap then you cut across the white plastic piece to expose the top of the cells. then solder directly to the solder on top of each cell to put them in series.

i like to take the shrink wrap and that plastic wrap piece off and put hardboard end plates on each end after i remove that white plastic wrap, then i solder the top of #6 to the bottom of #7 and solder the sense wires to the top of the cells. i removed the JST plugs on these packs.
 
NeilP said:
any idea of any place that sells their stuff?

i looked at their site, but can't see any buy/ checkout links


http://www.bestekpower.com/74v20spcmbmspcbforli-ionli-polymerbatterypack/

Send them an email and tell them what you want and they will send a quote.
 
I get the idea... of course, my Zippy looks a little different. I've a attached a picture of my battery end and labeled where I think that I would start and so on (is this correct?). I'm confused by the count. There are 11 white sense wires on the board plus two more in a smaller connector. I count 7 places to solder on one battery, which with two batteries would equal 14. I'm guessing that a battery contact is bridged and uses only one sense wire.

Not to sound like a complete n00b (but I am with this), I don't know how to wire up the four poles on the other end. I assume two go to the charger and then two connect to the red and black 12 ga wires from the batteries.

I wouldn't be so worried if connecting them wrong wouldn't blow the board and risk a fire.. Just sayin'. :?

Here is my battery:
Lipo Battery for BMS.jpg

Many, many thanks.

Edit:
It's hard to see in the picture but the main black negative 12 ga wire is soldered to the area at label 1. Positive red wire 12 ga is at label 7.
 
Backing up to post one, you CANNOT parallel some packs while they are still connected in series to the controller. Just want to be clear about that, since many are reading this.

So if you wish to do that, you do have to unplug from the controller.

Ice Cube 57 designed a wire harness rig for switching back and forth from parallel to series very quick and easy. It works for bulk charging. Not balancing. I have one, and it's pretty nice. But recently, I just went to bulk charging at 14s. Occasionally and only as needed, I remove packs for balancing. I balance only the pack that is out of balance.
 
Thanks. I have Ice Cube 57's harness also. It works well but I was trying to eliminate the unplugging from the controller. I'm only using 44v and have already chipped up/had to replace one of the Anderson connectors from the sparking (in a little over a month).

I'm going to start a new thread on building out this BMS system with my two 6s packs of 5 AH Lipo. The discussion doesn't belong here and I have *a lot* of questions. ;)

Lee
 
I use the Ecitypower 400W and 900W chargers for bulk charging with SmartBMS. Sometimes I also connect my packs to the Hyperion EOS1420i charger, for example to check/calibrate the BMS. Made 8 of these 12s Packs already. Next one will be 12s6p using 18x 4s 5ah Turnigy Hardcase packs.

For connecting all of the balancer plugs I use a Stripboard. The backside is isolated with ducktape.


Not a good pic, had no completely soldered board at hand, they are all in the batteries. Note the 4s XH plugs are colored blue(lower packs, connected to B-) green (middle packs) and red (upper packs, connected to B+) with a permanent marker. The balancer plugs of the hardcase packs are marked the same way. This makes it unlikely to mix them up during assembly.
 

Attachments

  • balancer board_2.jpg
    balancer board_2.jpg
    71.9 KB · Views: 1,140
999zip999,

Thanks. I have a pre-charge resistor on my em3ev 18.5 ah battery and kit. It works great.

I'm attempting to install a BMS which should fix the spark issue and provide better battery protection and ease of charging. But I did pick up some parts to assemble a pre-charge wire for my backup battery.
 
Fails to grok how you could possibly series connect, plug into controller, then parallel to charge while still series connected without KFF.


Charging at series connected voltage can be done many ways, from bareback smart chargers to bms equipped use of smart chargers.

I'm charging bareback nowdays, but only after removing the pack to a safe place to have a big fire.
 
Back
Top