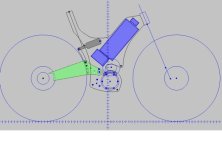
My current Ebike build from scratch

dbaker said:
lots of leverage on the seat post :eek:

Yes and no. I too was concerned with the seat post. The shock mounts just under the seat. Even though it looks like the seat post is out on a limb, it’s not. At least not from the weight of the rider. I’ve ridden the bike for a few months and it’s been fine.
 
My frame is out for powder coating and I have had some time to neaten up a few parts. This weekend I re-built my click free, freewheel. Based on an Internet search the CSK30PP one way clutch can take 73.76# of torque. I imagined that a cyclist would not exceed that torque while in a rolling state. In the real world I have felt my crank slip briefly on hard takeoffs. However, going up steep hills I have never detected any type of slippage.

My project for this weekend is to lighten and refine the freewheel setup. I am re-using the bearing as I feel there is no need to replace it. What I did was redesign the spider. For the most part I lined up both bolt patterns instead of having them 90º apart like before. The first one I built in the wrong offset. This forced me to mount it backwards to correct the issue. So the pretty side was facing in and the ugly side facing out. This type of thing drives me nuts. Now that I have 20 20 vision, I corrected the issue. Both sides are pretty. :mrgreen:
 

Attachments

  • Untitled.gif
    Untitled.gif
    504.2 KB · Views: 3,389
  • DSCF4784 (Medium).jpg
    DSCF4784 (Medium).jpg
    63.2 KB · Views: 3,389
  • DSCF4783 (Medium).jpg
    DSCF4783 (Medium).jpg
    57.6 KB · Views: 3,389
I had to add some Bling! The plastic dust shield was broken so I made an aluminum one out of some scrap from the swing arm. I thought about leaving it off but you can see the controller through the spokes so to speak. Looks like mud or other objects could get in and jam something up. I'm probably going to add a dust cap in the center as well.

Warm weather better hurry up!
 

Attachments

  • Dust shield.jpg
    Dust shield.jpg
    63.2 KB · Views: 3,376
I got the frame back from the powder coater today. The plan was to have it done in camouflage. They couldn't get the powder to form shapes and patterns so they gave up at green. I'm out of time so I will get it together like it is for now.
 

Attachments

  • photo 2.JPG
    photo 2.JPG
    39.6 KB · Views: 3,313
The lower frame beginning to take shape. I had it powder coated all together. The frame design allows me to install the motor with out having to separate the motor plates from the upper half. This works our nicer then my original plan which would have required me to build the bike from the motor out.
 

Attachments

  • PDR_0106 (Medium).JPG
    PDR_0106 (Medium).JPG
    74.3 KB · Views: 3,313
My other assembly pictures cam out blurry so I will skip to the finished bike. As usual it is cold and rainy today so I don't think I will get any riding in. Looking forward to a fun 2014.
 

Attachments

  • Millitary Green.JPG
    Millitary Green.JPG
    46.9 KB · Views: 3,314
I’ve been riding just about every chance I get. I get about 22 miles per charge if I only use low gear under heavy power. If I use the motor for speed through the trails and basically work the battery hard I get 18 miles per charge. All my riding is power assist to my pedaling. Top speed on level ground has been 27 MPH on motor only. This is only in 7th gear as higher gears will hot hold the chain. I have seen 30+ with me helping out.

Since building my new rear swing arm the frame has had a few issues. I have had to re-weld and brace the frame in a few areas that seemed to be holding up very well before the update. Apparently the swing arm is no longer the weak link and this moved my problems to a different area.

Otherwise the bike has been great.
 
Hey your bike looks great in that finished pic Joe, great build and I love the paint job, thanks for contributing! :D

-JD
 
2014 was an awesome year for bike riding. I had just a few failures. Nothing that kept me on the sidelines for more then an afternoon. The driveline was fair. 4 belts, two sprockets and the drive chain.

I decided to upgrade the bike with some LightningRods parts. Wide belt and 219 chain. As I suspected the new parts will not directly bolt on to my bike. So a new frame is in order.

When I built the bike my goal was for it to be a hill climber. One of the problems that surfaced had nothing to do with going up hills. However going down hills did expose some shortcomings. To correct this I plan to move the seat back about 2" and give the front fork 4 more degrees of rake. Also if room allows I want the seat to be lower, or at least be made lower for steep downhills.

My last frame was modular which functioned well but it was noisy. All the joints would creek and crackle as I powered up hills. I had good results with the swing arm and my new frame will start life as two halves and be welded together when finished.
2015 bike sketch.jpg
 
I've been pondering the construction of this frame since getting my new parts. Getting all the pieces inside I would be working blind. I should be able to bolt the bike together during the construction phase. I'm thinking one side plate will have the track that the battery slides onto as well as the controller box. I can bolt it together and make sure I can actually put it together after it is welded. My current bike the battery needs to be removed for charging. This was no big deal as it slid in from the top. The new design will have the battery completely inside with an access hole for the key and the charge port. To remove it will require removal of the rear suspension but I don't see that as a big deal. I expect to have all the cables and wires inside as well for a clean look.

I'll post pictures as the parts take form.
 
I have a great friend who hooked me up with some .120" aluminum plate AND cut it out to boot! Next I will drill some index holes that I will use to locate all the mounting holes for the motor and other gizmos. I plotted out some key locations for temporally fastening the two halves together. This will allow me to test out all the features before making things permanent.
 

Attachments

  • Frame side plates.jpg
    Frame side plates.jpg
    49.6 KB · Views: 2,943
  • Battery postion.jpg
    Battery postion.jpg
    50.1 KB · Views: 2,943
I milled out the mounting holes and drilled any hole I could with the setup I had. Things are already taking shape. Next I will make the slide for the battery to mount on. This will incorporate the locking pin that was designed in the battery. When the key is in the on or off position the lock pin engages the tab. When you turn the key all the way off the pin retracts allowing the battery to be removed.
 

Attachments

  • right side.jpg
    right side.jpg
    50 KB · Views: 2,930
Today I made a new spider for the 219 chain wheel. I was able to re-use one half of the original from last year which was nice. After mocking up the sprockets I was able to cut the chain to the right length.

This time around there will be no chain or belt tensioners. Both belt and chain can be adjusted similar to an alternator on a car. First the belt tension is set and then the chain can be set. While setting the chain the belt is not changed.
 
I made the shock mounts today as well as the head tube section. The upper shock mount has 4 bolts that will fasten it to the frame. I will add a slot that will allow me to set the ride height by moving the mount forward or back.
 

Attachments

  • emocartoon.jpeg
    emocartoon.jpeg
    71.1 KB · Views: 2,869
Today I added the shock adjustment and seat mount. I also added some teeth :evil: . Next I will figure out the cable routing for the brakes and shifter. The swing arm is hollow. My first time around I wished I routed the cables inside the arms. I'm going to explore that this time. There is room inside the frame for the cables. It should be a nice clean look.
 

Attachments

  • jaws.jpg
    jaws.jpg
    52.7 KB · Views: 2,848
Things are taking shape. Today I welded the head tube to the frame halves. There is no turning back now. I mocked it up and things are landing right about where they are supposed to be. The wheel base is 45". My calculations put it at 44, so, about right. The bottom bracket looks to be at 13". Not sure what to do about the seat. I would really like to make one of those dropper seat posts. This thing goes up hills that are difficult to go back down. A dropper seat post would help things.
 

Attachments

  • Bike2015(1).JPG
    Bike2015(1).JPG
    54.2 KB · Views: 2,841
  • Bike2015(0).JPG
    Bike2015(0).JPG
    59.3 KB · Views: 2,841
The bike is now rolling and driving under power. I had some belt slip problems. Not sure how tight I need to make the belt. I redesigned my tensioner so it can be accessed from the front. We had a big snow storm so I will have to test it after it clears up. I have yet to build the seat mount. Here are some pics from this week.
 

Attachments

  • Sat(0).jpg
    Sat(0).jpg
    61.7 KB · Views: 2,848
  • Sat(1).jpg
    Sat(1).jpg
    47.3 KB · Views: 2,847
  • Sat(2).jpg
    Sat(2).jpg
    54.7 KB · Views: 2,847
  • Sat(3).jpg
    Sat(3).jpg
    60.4 KB · Views: 2,847
  • Sat(4).jpg
    Sat(4).jpg
    69.7 KB · Views: 2,848
  • Sat(5).jpg
    Sat(5).jpg
    64.7 KB · Views: 2,848
I between snow storms and work I got some test riding in. With the new LightningRods wide belt and 219 chain upgrade my 1st gear top speed dropped from 15 MPH to just 8. Just about a 50% reduction from what I had. I was looking to drop some ratio but not that much. Also the reduction has created some violent chain skip. My cogs are all old and more than due to be replaced. I hope that solves this particular issue. Looking at my options I should be able to go from 32 to 36 teeth on my front chain ring. I have a 44 that can be bolted on but there is interference with my swing arm that prevented me from testing it out.
Looking forward to warm weather!
 
I picked up a new cassette and 36 tooth crank sprocket today. This seemed to solve my chain skipping problem. :mrgreen:
Going from a 32 to a 36 crack sprocket made my low gear top speed 12 MPH. This is up from 8 MPH from the 32 tooth sprocket. I think this will get me about where I wanted to be with this bike. The old setup was 15 MPH in low gear and I wanted just a touch more gear for the hills than that.
Now all I need is warm weather.
 
Hi Joe, Looking good!
I like the "one-piece" frame incorporating the motor mounts, and the two stage adjustment of the belt and chain.. it all make good sense.

I had been thinking of something similar for my next build.. trouble is I can't even find time at the moment to finish my current build.. so I will be following yours with great interest!
Re dropper seatposts: I had been thinking of getting one for my regular mountainbike, then sold my bike and bought one that already had a dropper post with a handlebar mounted remote control. It is a HUGE improvement, and I would never want to go back to having to stop and get off to adjust the seat height.
Not only am I riding faster and more efficiently with the dropper post, I feel a lot safer because I can "get rid of" the seat quickly if I come across a gnarly patch or sudden drop and I want to be able to move round freely on the bike.

Good luck with the build,
Dave
 
izeman said:
thats a really nice work. have you decided on color yet? i think something shiny would suit well. yellow or orange? it will bring out the details better. or just plain black. ;)

For now the plan is to just paint flat black in the milled out sections. The rest will be as is.
 
Drum said:
Hi Joe, Looking good!
Re dropper seatposts: I had been thinking of getting one for my regular mountainbike, then sold my bike and bought one that already had a dropper post with a handlebar mounted remote control. It is a HUGE improvement, and I would never want to go back to having to stop and get off to adjust the seat height.
Not only am I riding faster and more efficiently with the dropper post, I feel a lot safer because I can "get rid of" the seat quickly if I come across a gnarly patch or sudden drop and I want to be able to move round freely on the bike.

Good luck with the build,
Dave

I went over the bars last year going down a steep rock. For some reason I didn't see it coming but regardless my seat was as low as it could have gone with the frame. With the new frame I can get the seat out of the way if need be. I have a simple tube and plate in there now so I can get some testing in. I have some thinking to do if I want to create a dropper post.
 
I added a center stand to make life easy. I have the lower cover all drawn up but just can't get in the mood to build it. It snowed again today which is not helping. The seat post is also very uninspired. Just something quick while I wait for my dropper seat post design to pop into my head. With the shock under and perpendicular to the seat post, my drop down length is limited. I don't think much more can be done until I hit some trails.
 

Attachments

  • Center stand.jpg
    Center stand.jpg
    84 KB · Views: 2,491
Back
Top