Nishik-E Road Bike Build (TongXin MidDrive)

Still working on bracket ideas with the parts I have around here, nothign super-great yet that i think would actually work. Also still working out how to make the repalcement plate/"axle" on the output end, to secure the clutch to the motor and seal the planetary/grease/etc all in. Haven't gone back and flipped the clutch drive ring around yet, either. That's gonna be a PITA--wish I'd just paid attention when installing it. :(

But today at Goodwill I found a triangle bag for a dollar:
DSC06042.JPG

It's actually a "messenger bag", or single-shoulder bag, and a thin one at that. But on the shelf it looked like it would be about the right size, and lo and behold, it is:
DSC06043.JPG

Above is the bag with zipper up, and below with zipper down. I'll probably just use a black marker to cover the logos.
DSC06044.JPG


It'll hold at least 6x 6s 5Ah RC LiPo packs like the Turnigy or Zippy:
DSC06047.JPG

Same packs sitting on top of it. They're all ones that need repair, except for two 5s zippys playing placeholder for the 6s that could fit there.


All I'd need to do is remove the shoulder strap, and sew on straps to the top edge and rear edge to secure it to the top bar and seattube, and add a plate inside the bottom edge to clamp the packs to and to bolt to the four water bottle mounts.
 

Attachments

  • DSC06048.JPG
    DSC06048.JPG
    53.1 KB · Views: 2,503
Back to the handlebar bag, I did a bit of velcro strapping using a pair of pant leg straps and a large doublesided velcro strap that I used to use for a pantleg strap before I found those, and got a decent solution to securing the bag to the bars without any kind of brackets or anything. I would still want a fastened-on metal bracket to secure it all, especially with any load in there (like batteries), but it will work like this if it has to.
View attachment 17

DSC06061.JPG

View attachment 15

DSC06074.JPG

View attachment 5


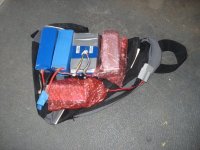
Then, with the bag secured, I started stuffing it with RC LiPo packs. It's a mix of 5 and 6s packs, some under repair, etc., but I can get 6 of them in there easy,
DSC06064.JPG


plus one more on the top (two, actually, but not with the bubble wrap around this one).
DSC06068.JPG


There's still room in the top compartment too, for maybe a 6s pack.
DSC06066.JPG


The front pouch, still empty, is at least big eonough for two more packs.
DSC06067.JPG


Two 2s packs that might be used for lighting, or might simply be more in series, easily fit into two little pockets in the front pouch.
View attachment 10


I could probably put two 5s or *maybe* 6s packs in there instead, but if I use only 2s, I can fit a 6FET or 9FET controller in there easy. (though this 9FET still needs to be fixed)
DSC06071.JPG

Or I can stick up to a 12FET in the top compartment, instead. (and this 12FET doesn't yet work either)
DSC06072.JPG

I'd probably have to leave the compartment unzipped while in use, so at least a little air can flow thru, but I don't expect this bike would be using a ton of power to move, with the little TongXin motor, especially since it's thru the chain drive.

With all that stuff in there, it is about 14-15lbs. So unless I needed the range, I would probably not put it all in there.
DSC06073.JPG


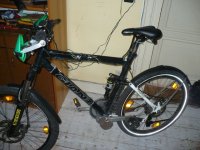
Even with all that weight, and just the strap for support, it stil clears the tire by an inch or more. If i had the fender on there (it's on CrazyBike2 right now) it would probably be resting on the fender top.
DSC06076.JPG


On the frame bag, which will more likely be used for cargo (like tools, a work uniform, or similar) rather than batteries, I cut the carry strap. I left a short piece that I can later use to attach a buckle or velcro to, that will then connect to another piece of strap I'll sew into the bag.
DSC06078.JPG


I can use a velcro strap or more likely pair of them to secure to the bottom bracket area, for the bottom corner of the bag, and keep it from wiggling into the cranks or chainrings.
DSC06077.JPG


I'll need to sew in a strap at the other corner for the top rear, and likely at least one or two more across the top middle. Then if I decide to put batteries in there, I would probably make a plate for the bottom of it that screws to the bottle mounts, so there would be something to strap them down to. (rather like I did with The Velcro Eclipse's battery bag).
DSC06079.JPG


Overall the bags would look about like this:


But if I did decide to pack all the bags with RC LiPo packs, I could easily put at least 12 6s 5Ah packs in there. I think 14 or even 16 packs would fit if packed in tight. Those would mostly be paralleled, because I would really want only 12s at most to run that little motor, and even then I would probably not be using full throttle pretty much ever. Maybe 2/3 or less, since this was (I think) originally from a 24V system, and I don't really need it to go very fast. And I don't want it to drive the cranks faster than about 90RPM or so, 100 max.

Depends on how I can gear the motor to the cranks. If I get more reduction, I can run the motor really fast and have less torque load on it at startups and such, even if I end up in a higher gear than I meant to be.


But anyway, if I do it as 12s, with 6s packs, and I wanted a super-long-range system, I'd parallel 6 or 7 or 8 of them in the front bag, and then do the same with the ones in the frame bag. Then I would series those two bags, to run to the controller. That means only two wires out of each bag (or rather, out of the one without the controller). The one with the controller would have one power wire to the other bag, and the throttle wires and ebrake wires, and the motor wires (hopefully just phase as I would like to run this thing sensorless to save some wiring and potential trouble later on).


I got the kickstand off to play around with motor bracket ideas, but I'm still not sure exactly what the bracket will look like. Still working on finding that "just right" piece of metal to make the bracket from, now that I have the welder to do it up with. Figuring out how to do it so it will easily and securely clamp to the chainstays and not shift is the tougher part. But I think I know what I want to do for that--I have to sketch it up, though.
 
dnmun said:
is the hub motor too wide to fit in the rear dropouts? it is pretty flat there so you should be able to use it straight, imo.
Sure, but where's the fun in that? :p If I did things the easy way, I might actually *finish* some of my projects. :lol:

It is AFAIK the right size for this bike's dropouts/frame...but:

One issue with directly using the motor in the wheel is that I don't have spokes that will quite fit in any typical lacing of a 26" rim to this. I have a few different lengths off of old wheels of various sizes that I might get to work in some 3x or 4x lacings, and one set that might work in a 5x :shock:. One set off a 24" wheel might work in a 2x but I would probably have to trim the extra threaded part that would stick thru the rim inside, so it doesn't damage the tube even thru the rim tape. I had that problem using a similar set lacing the Fusin into a 24" wheel for CrazyBike2; even with a 3x lacing, I think it was. I'd have to go look at the wheel.


I also specifically want to use the original Araya rims (well, really, all the original parts where possible, which so far is everything but the tires) on this, as they happen to be the best rims I have here, light doublewalls. But I also would rather not unlace those already-well-built wheels....


Really, though, I want to try out a middrive with this bike anyway. Thru the gears to use the least power for my starts-from-stopped and whatnot and yet still be able to go at least 20MPH. That was the original plan with CrazyBike2 (and with it's unfinished precursor ReCycle), which was more or less realized, but not reliably.


This motor is the smallest simplest way to do that, out of what I have here. Next best would be a Fusin's motor core, but not as easy to use because it's planetary requires an outer gear ring that's just pressed into the hub shell, and I'd have to make something that contained that gear ring, and used it to drive the chains. And I don't think it's axle bolts on, so I'd wind up cutting it to make it fit, instead of being able to completley reuse the axle/etc on some other project, or be able to restore it to it's original state to use it as a regular hubmotor should this project fail.

After that, the next best is my radiator fan motor, but A) it's brushed and designed for low voltage (12V) so to get good power out of it I have to run it at really high RPM, and B) it's pretty large (if thin) and C) it requires a separate double planetary reduction (which fortunatley I already have most of).


One more thing is that AFAICT no one else has tried to use one of these TongXin motors like this without it's shell--all the drives using it use it as if it were a hub but not in a wheel, either driving the rear wheel thru a left side chain or thru the regular rightside drivetrain from one point or another. Basically they just bolt its' axles into a bracket, and attach a sprocket or belt pulley to teh hub body one way or another.

The way I want to do it isnt' as simple, but it's significantly smaller and a little lighter. Probably louder, too, since it will not have the hub body to muffle the sounds. But it also should allow for higher continuous power outputs because the motor heat isn't trapped inside the hub shell. :)

So hopefully it will lead to something others can also then use for their bikes, where they are space-limited and power-limited (like in the UK and EU and Australia). AFAIK these TongXin motors are still made the same basic way today, and are still avaialble

Anyway, that's my usual long-winded way of saying I'd rather try it this way first. :)
 
amberwolf said:
One issue with directly using the motor in the wheel is that I don't have spokes that will quite fit in any typical lacing of a 26" rim to this.

Got coat hangers? Got duct tape? You got spokes! :roll:
 
I've considered doing the lacing by bending and twisting the ends of extra-long spokes out of old ten speed wheels, as someone did here on ES a while back. :) Since this bike wouldn't be seeing the extreme loads that most of mine do, it might actually survive. :lol:

But mostly I just want to try this as a mid-drive. :)
 
Since I haven't yet built the mounting bracket for the motor, or the retaining ring for the clutch/etc., I'll be using this bike as a normal pedal-only one for a trip down to the light rail at this end, then take the bike on the rail to the other end of the line to meet a friend. Normally I'd ride CrazyBIke2 for that and skip the light rail, but since we'll be coming back up this way by truck, it's way easier not to have to lift a really heavy bike up into the truck, especially since it has to be laid on it's side for truck transport, where the wheels can't have any side-loading on them (or the rims will be destroyed).

I was going to temporarily put one of the Fusin kits I fixed a couple days ago on the bike, but I hand-weighed the battery, motor, controller, etc., and it is almost twice the bike's weight, perhaps even a bit more. That would make it too hard for me to lift up into the bike-wheel hooks they have on the rail cars, which are overhead. So I'll just pedal. At least it is not super-hot yet, like it will be in a month or two, but it is already 93F in the sun in my front yard. :( I'll just go slow.


So I definitely need to get this middrive working on here, for trips like this, as it is not very heavy. The battery will probably weigh more than the motor and mounts. :lol:
 
Trip went fine, though I did wish for the motor a couple of times with a headwind kicking up. LIght rail drivers finally have figured out how to drive the things without accelerating and braking so hard that people are knocked down and jerked out of seats, etc. Still crowded and noisy and smelly, though. :( Don't wanna ride it if I don't have to.


We stopped at a Goodwill before heading to the discount grocery place, and I got another pair of automotive taillight/signal housings for a couple bucks that should help visibilty/etc on the new bike (or *a* bike, anyway). At the grocery place, I got what would have probably cost 35-50 bucks at regular grocery stores for just under $8. I didn't really have enough time to shop in detail, though, as there is a LOT of stuff there, and I probably need to get there early enough to have at least 2-3 hours to look around to really find all the stuff I want, cheap.
 
I finally got together with a friend that does a lot of sewing (often for costumes for various poeple and events, frequently SCA outfits and the like), and got some test ideas done up for the frame bag conversion, as well as straps for the handlebar bag.

The handlebar bag was done by him simply adding D-rings salvaged from old belts and whatnot, to the exsiting strap holders, and adding one more strap holder at the bottom (for the stem or headtube or fork crown), and then sewing double-D-rings into some standalone straps that then go thru the first D-rings, and around the handlebars left and right, and the stem/etc. They work like many motorcycle helmet straps do, by pinching the strap between the rings.
DSC06990.JPG

DSC06991.JPG

Then, running out of matching pairs (required to function) of D-rings, he made some O-rings out of old metal coat hangers wrapped around some EMT conduit as a mandrel (same way you can make chain mail). Happesn to be greenish-plastic-coated wire, so it even kinda matches the bike's colors. :)
DSC06995.JPG

DSC06996.JPG

DSC06998.JPG

DSC06999.JPG

DSC06997.JPG

DSC06992.JPG

DSC06993.JPG


But the second hanger used wasn't nearly as stiff as the first, and rings made from it stretched out easily, so I will have to make new rings for those out of something else, or salvage some D-rings off old dog collars or whatever, if I have any matching sets, or if there are any of the 10-cent dog collars/harnesses left at work in teh clearance bin tomorrow I could harvest them from those.


He sewed the straps out of some bulk strap he had, as the original stuff I thought we might use off the bag itself is too wide for the D-rings and stuff.

At each stage we test-fit it to the bike frame, to be sure straps were long enough, etc., and all was well except for one strap that somehow got sewn all the way to the other side of the bag. :lol: Easy to fix, for him at least.
DSC06994.JPG


All I need to do at this point is to replace the not-so-stiff coat-hanger-wire O-rings with either steel D-rings or new O-rings of stiffer wire, or with split-rings the size of a typical keyring or larger. I may have some of the latter; I know I have stiffer wire, and I probably have good steel D-rings the right size on old chewed-up dog collars and the like.


The finished bags on teh frame. At least one of his cats approves.

View attachment 15

DSC07001.JPG

DSC07002.JPG

DSC07003.JPG


DSC07004.JPG.
 
Nice work. It looks like a working crank drive can be made at a reasonable price. That little hub motor is probably more powerful and reliable than the flock of crank drive motors that are on the r Martin and similar bikes.
I love working with what is at hand too.
 
That bike does look an awful lot like this one---the Nishiki version is probably based on that.

My hope ATM is to stick a small controller down there with the motor just behind/between the cranks where the kickstand would go, and then the batteries up in the handlebar bag, leaving the framebag for whatever else I might need to carry (like work clothes and stuff), for a short-range commuter, or for a bike just to go to/from the bus or light rail stops and my house and destination, using the bus/LR for the long part of the trip, with a biek light enough for me to lift and put on the rack (possibly with help if needed).

This framebag is probalby not tough enough to hold batteries; I doubt that even the handlebar bag will last long at it, but they are a beginning, usable for tests, and then something custom-made for the purpose can replace them once I know what is needed.
 
Oh, I forgot to add: Apparently when I was taking the wheels off the frame to put it on the trailer to take over to the friend the other night for the bag work, I left the rear wheel just laying in the front yard next to the porch.

Then I was so tired and oblivious that I did not notice it was still there when I got home that night, nor did I notice it when I left for work the next day nor when I came home from work that night.

Today I walked out there to water stuff and other yard work, and there it was, right on top of the mess of garden hose I was about to need to use. I thought: "what the heck is a bike wheel doing in my front yard--am I now getting bike parts as gifts?" and then I recognized the greenish Araya rim and suddenly remembered, and was aghast that not only had I left it outside, but that no one had taken it!

Maybe they're more afraid of my big dogs than I thought. :lol:
 
Nice work. It looks like a working crank drive can be made at a reasonable price. That little hub motor is probably more powerful and reliable than the flock of crank drive motors that are on the r Martin and similar bikes.
I love working with what is at hand too.

I don't think so, mybe it's less expensive than a RMartin, but not more powerfull. At 25amps every tongxin/weifeng starts to slip, that's why I recommend using 15amps max. The voltage does not matter, I tested the weifeng with 60V @ 12amps and it ran fine without slippage.

I build such a drive a couple of mounths ago, I have had some issues in the meantime, but it runs nice and silent once it is "done". I use 10s Lipo 10ah and the Weifeng 36V 190Watt Version which looks almost the same as the tongxin, I already compared them with amberwolf's posts. The weifeng uses a threaded hub housing and blue grease, that's most of the difference. The bike runs 31km/h without pedaling with a hot battery. I run 13T on the tongxin and 32T on the crank, #35 chain, at 37 Volts it fits my cadence just perfect. See related: http://endless-sphere.com/forums/viewtopic.php?f=3&t=34146 My weifeng has about 6000km on the clock now and still runs fine.

@amberwolf: don't forget the distance-keeping bars between bottom bracket and your tongxin, it pulls harder on the chain then one might think ;) Good luck with your build; feel free to contact me. Maybe if'got some parts left over you might have use for (like the freewheel adapter, 90mm housing tube etc. if shipping to US is not too expensive).

here's a pic of my build, it shows the tongxin is so small it even fits below the bottom bracket:
 

Attachments

  • P1020712.jpg
    P1020712.jpg
    86.9 KB · Views: 2,669
crossbreak said:
@amberwolf: don't forget the distance-keeping bars between bottom bracket and your tongxin, it pulls harder on the chain then one might think ;) Good luck with your build; feel free to contact me. Maybe if'got some parts left over you might have use for (like the freewheel adapter, 90mm housing tube etc. if shipping to US is not too expensive).

here's a pic of my build, it shows the tongxin is so small it even fits below the bottom bracket:
I like the reflector placement, too--looks like how I did mine on DGA and CB2 from some reflectors Spinningmagnets sent me.

Yeah, I found the torque of my powerchair motors on CB2 pulled the motor off the mounting plate, sliding it along the slotted boltholes. Wouldn't surrpise me a bit if the TX did the same thing; I've been pondering ways to prevent that and I have a good idea of maiking the mountplates fit over the BB itself as well as run under the stays.

Have to wait and see how I will mount mine before I see if the extra parts would be useful.
 
I guess we both can't use a sprocket adapter because of space issues. I already use a ~125mm BB, but the space is still limited. The 90mm inner dia housing tube was very usefull for me, this way the mounting plate has it's own center of force, and can be positioned independently. The tongxin has 90.5mm outer dia i think. You can press fit the motor into this housing (with a puller tool or bench wise) if you grind it a tiny bit down, screw it on a mounting plate which can be mounted at the BB and a second link ( I used a piece of green plastic at the rear side and a alloy-tube in front as second link, which really sucks :? , a bracket would be better). The left side of the BB can be additionally screwed on a second mounting plate, which can be screwed on the end of the 90mm tube. By pushing the motor deeper into the tube, it can be aligned to the chainring on the BB. I made a larger distance tube for my BB. This way, the counter-clockwise-threaded-lock-screw of the BB sticks up. On this stick up thread a 2mm mounting plate can be fitted, fixed by a counter-clockwise-threaded-lockring (this is a bis special, got none yet). Using both sides of the BB-threads makes the mount stiffer.

the other option would be, mount the tongxin on it's axle. but this inlcudes space issues as well, at least with my setup. I wait keen to see your mount ;) I'd like to rework mine, if I'd hav time for this. Running the tongxin with larger reduction 5:1 to the crank @ 74Volts and 12 amps max.

the last idea I had, was a chain drive to a freewheel-sprocket that directly drives the final drive chain, between BB and the rear wheel.This sprocket is then driven by a chain that goes to the tongxin. A bit complicated, but this way, the 5:1 reduction wouldn't be a problem.
 

Attachments

  • BB_drive.jpg
    BB_drive.jpg
    52.4 KB · Views: 2,655
I'm still pondering the mounting and how to make it with what I have (and still digging thru my stuff for the bits).

In the meantime, just to have a little power assist for trips I have to have a regular (or at least relatively light so it fits on bus or light rail racks, or easily disassembled to fit in someone's car) bike, so I can do trips that are impractical with the current version of CrazyBike2 or DayGlo Avenger, I'm going to install a (mk I?) Kepler Eboost drive Bikefanatic sent me onto this bike.
file.php


It needed a bit of repair, in that insulation on one phase wire was damaged on the motor, and I had to figure out how to put the motor back onto the hardware as it came disassembled and without a manual, but there are enough pics of this type of drive on the forum that I coudl figure it out from that. I didnt' see a manual on the eboo.st website, but I could've missed it. Seems like there is a fair bit of pages on that site that havent' ever been completed.

Bikefanatic was also having some issues with sync and whatnot with it, and I may have those too once I get it on the bike and running, so might need to do some troubleshooting. It does include the Castle-Link to reprogram the controller,

First thing I'll have to do is find and cut some tubing of the right diameters to make clamp-spacers so it can be securely mounted to the seatpost or seattube.

I don't like the full-grip the Magura throttle has, so I am pondering taking it apart and replacing the grip tube with a different one that has a thumb tab instead. If I can't replace it I can still cut it off and install a thumb tab on it. I'm just not a fan of grip throttles, partly because they make my wrists hurt or hands go numb, and partly because it's much easier to accidentally trigger a wallclimb with a grip throttle vs a thumb. :lol:


Off to dig for tubing I can cut to make shims....
 
see if you can trade the magura to someone for a thumb throttle.

i had never known that the axles are bolted to the motor like that. mine has really long axles and i bet that is how they did it.

ann is like the most generous person around. saves old good stuff to share with the person that needs it.

way cool, youdaman!
 
dnmun said:
see if you can trade the magura to someone for a thumb throttle.
I already have thumb throttles, but they are not directly interfaceable to the RC controller as they are hall-based. Since they start out with a voltage on them the controller will think it shoudl always have some power going to the motor; I'd have to figure out the throttle interface board and fix that. Its' easier to physically modify the throttle. :) I do like the feel of the Magura compared to the cheap hall throttles, too.


i had never known that the axles are bolted to the motor like that. mine has really long axles and i bet that is how they did it.
You mean on the TongXin? yeah, that's a neat feature and enables some interesting possibilities.

This particular RC motor on the eboost also bolts an "axle" on one end, but it is really a prop mount and rotates with the can, as does the integral shaft on the other end.


ann is like the most generous person around. saves old good stuff to share with the person that needs it.
Agreed; I think I would not even have thought of some of my projects if it werent' for her, and I wouldn't likely ahve tried to race at the Undead race either, as I would have only had SLA at the time without the NiMH she sent me. (and others here, too, of course :))


Installing this drive is more problematic than I thought it would be. Some pics of why:
DSC07203.JPG

DSC07205.JPG

DSC07207.JPG


I tested out a possible mounting,
DSC07209.JPG

but there just isn't enough clamping force to hold the drive in place and give enough friction to actually drive the wheel under any load, even just the bike sitting there without me on it. If I pedal up to a few MPH, then slowly engage the throttle, I can slightly feel a difference in coastdown, but it doesn't stop the process or speed me up. I put the black stem clamp on there to try to keep the drive from rolling off the wheel, which worked, but dind't push down ahrd enough. I might be able to put spacers in there to make that happen, but it wouldn't be the best way to do it, and interferes with the rear brake cables.

I will have to grind some tubing and some spacer pieces to go around that oval tubing above the seatstays where the brake cable stop is, to make a round place for the clamp to go onto.

For the test, I made up a Y-cable for combining two 6s 5Ah packs for 22V(24V) 10Ah, and topped up the two packs with these Accucel 6 chargers also from Bikefanatic:
file.php


and put the packs in the front handlebar bag just loose for this quick test.
DSC07211.JPG


Peak current was around 15A, 360W or so; not sure at what point it was at that peak as I didn't use the CA, just a Turnigy Watt meter between the y-cable and the drive's power connectors, around the rear third of the toptube. .


I may well just dig out the Schwinn Sierra frame, or the old Velcro Eclipse bike, and see if it will mount better on one of those.
 
Since I had to move a bunch of stuff to find the airless "tube" I want to put on CrazyBike2's rear wheel (as I am more than tired of the flats and wierd tube failures), I took the opportunity to dig out the Schwinn Sierra and a Trek 800 bare frame to check out; didn't get the Velcro Eclipse out yet.

Neither one will let me put the Eboost on the way it is supposed to go. The Trek is closest, but the seat ends up higher than I need it to be; I could live with it but pedalling would be a lot harder on my knees/ankles. The Schwinn won't work for the same reason as the Nishiki Pinnacle--it cant' reach the tire from the seatpost. But it doesnt' even have the option to put it on the frame between seattube and stays, like the Nishiki does. :(

I thought I took a pic of teh Sierra but I guess not; here's the trek:

DSC07212.JPG

I *might* get the seat height I want and still have it reach the tire if I use a 24" rear wheel (but I'd probably have to use 24" front, too, and thus have A) no brakes unless I add studs to the fork for 24" or create disc brake mounts, etc., and B) the pedals will probably hit the ground in even slight turns. The good news is I would be able to use the tires I really like, and I could use those airless "tubes" in them to prevent flats...but then the bike would be a lot heavier and that's the opposite of the point of this bike.


Still pondering.....
 
Hi AW,
You got that together quick. I hope you get that drive running, it is so much fun zipping around on it. You won't pedal much. It is perfect for a quick run to the store or to meet someone, I had it so that I could remove the seat and drive togeter and bring the thing in the store with me, good theft prevention.

good luck
 
I've finally found all (I think) of the pieces in the sheds for the eboost drive, and I stuck it all with the bike itself (Nishik-E) till I can get around to dealing with making the spacers/adapters to hold it on.

I have *not* found the TongXin stuff yet; it's possible it was in one of the many project boxes in the room that burned in the housefire almost two years ago; if so, it's gone. :( I hope not, cuz I still wanna try that out as a middrive. I do know that my notebooks with sketches, ideas, etc for that project are gone, so other than whatever I uploaded to this thread, then whatever's in my failing memory is all that's left, and I'll have to re-figure-out exactly what I was going to do with it, if I still have it.
 
My first Mountain bike was a Nishiki Colorado back in the late 80's, when I was a kid. It was super fast w/ awesome brakes & it had a weird shaped Shimano crank & sprocket that added torque when you pedaled. This made it easy to pull up the front wheel and wheelie for blocks. Great bikes, Nishiki. Is your sprocket oval shaped?
 
Back
Top