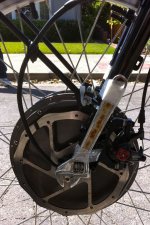
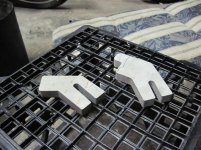
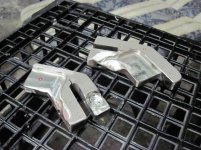
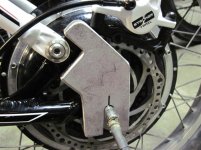
torque arm picture thread

I've had suprisingly good results using chemical metal over a torque arm in the weird dip in my Cannondale Gemini swinging arm. The torque arm originally just sat in the middle of this big space so I put duct tape over the swinging arm and made a mold using the chemical metal with the torque arm in place on the axle.

Once it set is was very strong and comes away very easily due to the duct tape not sticking to the chemical metal. The fit is very tight althoug the actual torque arm whilst thick enough has a bit of play in the axle slot as it is a tiny bit too big, so I don't use regen at the moment.

I am dumping 40 amps 66v of hard acceleration using the new HS3540 motors that pull a lot harder than the 9C 2807 that was on there.
 
http://endless-sphere.com/forums/viewtopic.php?f=2&t=26581&start=30#p393794
file.php
 
5673897233_2a5822999a_b.jpg


10mm wrench, bent into shape. One on each side, along with a strong bike mount is hopefully good enough for 4-5KW.
 
If it's a good hardened wrench, maybe it would hold under that power...but: was the wrench bent by heating it? If so, was it then re-hardened afterward?

If not, you may end up with wiggle of the axle (especially if using regen and if you're hard on the throttle from stops), back and forth rocking that spreads the wrench out, eventually allowing spinout.

Cheap wrenches will also do this (as I found even with only 1200W on a Fusin geared motor on DayGlo Avenger) just under hard startup loads.
 
The hope is that it will hold the axle in the dropout, and it shouldn't be turning. I was running over 2KW into the motor for two years, with no torque arms.

They were heated to be bent, and somewhat hardened afterwards. Its more or less there for a one time failsafe, rather than a set it and forget it type of deal. I do a inspection on my bike very often, and check the dropouts and wheel nuts.
 
Great thread. Is it customary to have torque arms on both sides or is one side enough? I suppose it may depend on how much power you are pushing. For my new HS3540 build with a 48v25A (~2200 W) controller.
 
If you have any shiny parts such as the axle bolt, washer, etc... it's not a bad idea to use something like a red permanent marker on those. Should anything shift or twist it may provide a good initial visual clue. Outlining the edges of the torque arm may even show if there's been any movement..
- CrazyJerry

http://diesel-bike.com/Aurora/aurora_files/drive_arm1_650x488.jpg
http://diesel-bike.com/Aurora/aurora_files/non-drive_arm1a_650x488.jpg
 
Gehtto axle arm..........but it worked SWIMINGLY!

View attachment 1

.....and for the other side?
IMG_1547  gehtto axle arm-other side.jpg

My first rides today were solid 25MPH'ers with a couple 31MPH highs too! (all way too fast for this unsuspended rig-and my comfort zone)!
 
New dropout protection... This is some high grade stainless I got from a friend, and was BRUTAL to cut. Its a little thicker than the bike, and surrounds the axle, so it should ensure the thing never falls off the bike.

5874927357_dac7550b9a_b.jpg


I destroyed most of my drill bits, files, hacksaw blades, and dremmel cut off discs doing this side. The other side will be done eventually. This should be enough to hold back my 6KW and regen, given that the bike was taking it for months with no torque arm. Its bolted with a single bolt into the frame, and then another into the derailer mount.
 
SANY0090.jpg

Cut from /4" plate with a hacksaw. I cut the slots with a hacksaw and then welded in a piece to complete the circle. That way only involved minimal filing.
 
thewmatusmoloki,

16mm of stainless clamping torque arms...now that's what I'm talking about. Why'd you paint those stainless beauties? I'd want to show them off, and find a torx head bolt so nobody steals them.
 
This is working great, after a half a year of hard riding. Like I said, let me design it, and it will be simple cheap bombproof and heavy.
It only works because the bike has steel rear swingarms I bould easily bolt an angle iorn too though. Saving the magudaman plates for something later with alloy frame.

 
What about this?

fmJ8X.png


Made out of aluminum.

The rear side has to be made 1/4" thin or the derailuer needs to be removed.
M5 pinch bolts
M4 bolts for the arms.

What grade bolts should I use? What about for the aluminum?
 
auraslip said:
What about this?...Made out of aluminum...

Find a hubmotor with an aluminum axle, then yes, until then, no.

Be patient for a week. I have an idea brewing for a fits-all clamping torque arm.
 
Your past advice was to use aluminum (or maybe it was soft steel) because the axles are not that hard to begin with. No sense in wasting your tools cutting tough steel. What changed?

Edit: I'll wait to see your new design. Mine could be made universal if the arms could be adjusted. Probably with a a star pattern like the amped bikes torque arm, or maybe just by drilling enough holes in it.

Can't wait to see yours though.
 
If I ever mentioned AL for torque arms, then it was a mistake. It's true that I don't see much benefit in using anything more than mild steel, because we want the torque arm to deform before the axle deforms, and it's so easy to just use thicker steel. I'm sure that viewpoint isn't technically optimum, but it's easier to fabricate, easier on the tools, and a nice thickness makes holes for clamping easy and neat.

One member did have a good design using AL, but he used small steel inserts at the axle flats to effectively "harden" the soft aluminum by spreading the forces on the aluminum itself over a far greater area. Torque arms are easy enough that I'd prefer to stay away from such complications.

If someone is so weak that a few extra ounces of steel makes their ebike too heavy to pick up (It certainly won't affect the ebike's performance.), then they should be riding the bus, not riding or driving anything.
 
Soft, easy to cut steel is fine, once it's thick enough. My first attempt at the pinch dropout failed because the angle iorn was too thin, and bent easily. The current one is thick, but was still easy to cut and drill. I used 10 mm grade 8 bolts.
There is just a regular nut on the other side, where the derailur is.

Looks to me like you are designing something headed towards fastening to the bike frame with hose clamps. Fail.
 
Back
Top