Approximate cost of materials to build a basic chromoly MTB bike frame?

neptronix

Administrator
Staff member
Joined
Jun 15, 2010
Messages
18,164
Location
Utah, USA
Howdy, i searched the 'net already for a bit and could not find information on this.

I see that on a site like this: https://framebuildersupply.com/collections/main-tubes
I could buy the materials to make a basic hardtail chromoly MTB frame for somewhere around $300. Since i don't know anything about frame-building, i'm going to add a buffer to that for dropouts, cable guides, etc and call it $400.

Also there exist complete kits.
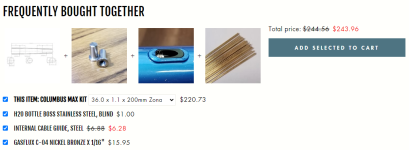
1715365713485.png

Paintwise, what am i looking at? $100 of paint/clear coat?

I'm estimating a total cost of approximately $500 if i use mid grade chromoly parts all around.
How close am i to reality?
 
If it's cheaper to get seamless aircraft straight gauge tubing rather than bike frame tubes (and now that Dillsburg Aeroplane is gone, I can't say whether that's true), then you could use such tubing instead. The weight difference between a butted .035"/.028"/.035" tube and a straight gauge .035" tube is minuscule, and the indefinite lengths of aircraft tubing allow you a lot more design freedom. Check Aircraft Spruce, Wicks Aircraft, and of course the usual online nests of Chinese hustlers.

I'm currently working up the gumption to make a frame for myself out of 1.375" x .049" wall round tubing, so I can check all my desired boxes for a fast dual motor street 29er. I might rather use 1.500" x .035", but the former size is something I already have available in quantity.
 
Hm! that would make the build simpler for sure.

Isn't the idea of using more expensive butted tubing, not only based around the idea of saving weight, but also providing some intentional wobbliness in the frame to help it soak up bumps etc without sacrificing strength where you need it? ( the ends of the tube )

Interesting thought about aircraft tubing actually; i see that i can buy these big 1.5-3 inch tubes with quite thin walls and reproduce some of the design qualities of Klein and Cannondale bikes if i wanted to.

Pricing of aircraft tubes seems to be a bit lower, so maybe my projected cost to build a basic hardtail is more like $400-$450.
 
I'm looking for a cost of materials *after* all tools have been purchased and the appropriate skills learned.
In that cost of materials we should also include welding and painting supplies used, and maybe throw in the cost of a rotary tool cutting disc while you're at it.

An approximate per frame construction cost for a basic hardtail bike minus labor is what i'm looking for.
 
Last edited:
Please read the first post for the answer to this question too.
 
I called framebuilder supply, they were extremely helpful and even pointed me to some framebuilding forums.

They say to build a basic hardtail MTB with their parts would cost $200-$250 typically.
This sound about right based on my n00b parts spec out.

Hoping to get a second opinion on the costs; that's just one vendor's quote ^_^
 
Isn't the idea of using more expensive butted tubing, not only based around the idea of saving weight, but also providing some intentional wobbliness in the frame to help it soak up bumps etc without sacrificing strength where you need it? ( the ends of the tube )

Not really. It's about having enough strength in the heat affected zone near the welds, and enough strength in the unaffected zone in the middle. Flexibility is easier and more effective to tune with diameter rather than gauge.
 
Brazing is a fine method for steel in general terms as the brazing temperature for the procedure is lower than the melting point of the base material meaning the base metal's grain structure is not altered.
Brazing stainless (bottle bosses) to steel is a little more of a practiced procedure, probably should stick to all steel construction.
Start with some flux coated brass rod on mild steel tube for practice.
Bare rod for use with a gas fluxer is a big first step in investment alone.
In the early days of mountain biking there were several small California builders making cro/mo frames with common flux coated red brass.
They were doing extra wide fillets.
Not really a wise move but they were having good success.
Filler material really should match the strength of the base material.
Brazing is a capillary procedure meaning the brass is flowing into the opened pores of the steel.
Good fits and surface prep super important.
However
If the brazing gets so hot that it sizzles, boils into fumes then the joint strength can be severely weakened.
Tube notcher program = Tube Joint Pattern Generator
Print the profile, fasten the paper pattern to the tube and then file / grind to the line.
There must be plenty of YouTube videos to learn from.
Your welcome to bounce questions off me.
After your comfortable with the brazing and before buying frame supplies . . . I have plenty of small parts . . . not much tubing.
 
Thanks for your knowledge!

Do you think brazing would be adequate for working with various kind of chromoly, and maybe relatively large diameter/thin wall ( imagine a 2-2.5 inch diameter main tube for a recumbent )?

How would it compare with tig welding terms of 'pain in the ass' factor to 'nice results' ratio?

I'm self taught at soldering but i have never used a welder.
 
Do you think brazing would be adequate for working with various kind of chromoly, and maybe relatively large diameter/thin wall ( imagine a 2-2.5 inch diameter main tube for a recumbent )?

How would it compare with tig welding terms of 'pain in the ass' factor to 'nice results' ratio?

Brazing is an excellent method for DIY bike frame building. It requires less equipment and skill/experience than welding thin tubing, and it's plenty strong for the application. Back when silver was relatively cheap, 45% silver wire was my preferred filler for frame joints, but I've also gotten very good results from silicon bronze and low fuming brass. 56% silver is what I've used for attaching brazeons, because of its lower viscosity and smaller meniscus than other fillers. That's what what you might use for lugged construction, though I don't think lugged is as good a first choice for a custom project.

Between surface prep, flux management, and finish work, fillet brazing takes quite a bit longer than welding, which is why you don't see too many commercial frames that use it. But for a hobby craftsman working on his own frames, I think it's an obvious choice unless you're already a capable TIG welder.

Although oxyacetylene is the usual heat source for brazing bikes, the modest metal thicknesses involved also allow the use of oxy-propane, acetylene-air, or even MAPP-air torches.
 
Thanks for your knowledge!

Do you think brazing would be adequate for working with various kind of chromoly, and maybe relatively large diameter/thin wall ( imagine a 2-2.5 inch diameter main tube for a recumbent )?

How would it compare with tig welding terms of 'pain in the ass' factor to 'nice results' ratio?

I'm self taught at soldering but i have never used a welder.
Brazing is absolutely fine.
Rotator bikes (me) built hundreds of recumbent frames with the method.
For a stick frame the main tube size of 2" X .049 and 1" x .058 for the rear fork covered 95% of customers.
Heavier or lighter riders there sometimes were adjustments in diameters or wall thickness.
Filler material was Welco 17 or when that was out of stock Allstate 11.
For Brazing, once a tip size is selected the heat control at the melting zone is done by lift and point.
In production, with a gas fluxer in line with the acetylene, it is significantly faster process over TIG.
When using flux coated filler rod, clean up afterwards is time consuming and tedious.
TIG welding requires more investment.
Needs more coordination as now you have torch in one hand, filler rod in the other, precise torch distance to the material that somewhat blocks vision of the weld puddle, foot operated heat control and a bulky welder hood.
Creates a heat affected zone.

Customers expect to see production frames done with TIG . . . I wouldn't say it's structurally better . . . it sells better.

Example of a brazed frame.

Solar-Cat-600dpi.jpg
 
Last edited:
Filler material really should match the strength of the base material.

My rule of thumb is the thickness of the filler material in a joint should match or exceed the strength of the tubing. Bigger fillet for lower tensile filler. Bigger fillet for thicker tubing.
 
Guys i really appreciate this advice!

TIG welding requires more investment.
Needs more coordination as now you have torch in one hand, filler rod in the other, precise torch distance to the material that somewhat blocks vision of the weld puddle, foot operated heat control and a bulky welder hood.

I can see this, the bulk and visibility problem would ultimately annoy me, big selling point for brazing.

I read around on the net a little and it seems like most say TIG has better strength because the weld has equivalent strength to the metal, but with brazing, you typically have a metal that's a bit softer... true?

..but..

We can make up for this lack of strength by putting on more material during brazing, can't we?
Maybe we've got a bit more weight as a result.. but.. that's minimal and OK because i'm building an ebike frame, not something for a weight weenie.

I'm also thinking that in the context of building a recumbent bike that's essentially a long tube with stuff attached to it and using 2 inch tubes ( maybe bigger ), the larger joins on the frame will benefit from a large brazed area.. and a larger join is stronger, ya?

I imagine that it's small structural parts like the dropouts that you have to worry about.
 
Last edited:
4130 cro/mo condition N = 90,000 psi tensile
Welco 17 brazing filler rod = 95,000 psi tensile
 
As tubing is drawn through forming dies grain direction is form along the length.
A visual example is comparing to wood grain.
Fusion welding "TIG, MIG" alters the grain next to the weld creating a weak area.
Benefit of brazing is the grain structure of the base metal is not altered, although some softening does occur.

maxresdefault.jpg
 
Interesting!

Would Welco 17 brazing filler rod melt at a lower temperature than chromoly, therefore preventing heat damage?

I've been reading a ton about brazing and i hear that silver is often used ( even though it's weaker ) because the melting point is very low, and this results in less damage to the frame tubes.

I can't seem to find a melting point for Welco 17 on the net.
 
Brazing is a capillary procedure meaning the base material is warmed enough to open the surface pores allowing the filler material to flow in.
This underscores the reason why surface prep is important.
Basically, brazing is hot glue.
 
basic hardtail chromoly MTB frame
Curious? Could you buy a complete bicycle or a frame like what you want to build?

My thoughts on just about everything. Easier and cheaper to buy then to build it.

Before you start wasting expensive bicycle / airplane tubing with welding experiments. Start with something cheaper. I like coat hangers. Go to any Dry Cleaners and ask for used coat hangers. Bring a truck because you might get a boat load. Clean finish off with sand paper and START BRAZING!
H21499-L205507479.jpg
I use a MAPP torch for soldering copper pipes.
 
Walt Wehner, in Park City (AIR), has (had?) a framebuilding class and you get to keep the product. This might be of interest if you just hit the lottery.
 
My rule of thumb is the thickness of the filler material in a joint should match or exceed the strength of the tubing. Bigger fillet for lower tensile filler. Bigger fillet for thicker tubing.

Interesting!

Would Welco 17 brazing filler rod melt at a lower temperature than chromoly, therefore preventing heat damage?

I've been reading a ton about brazing and i hear that silver is often used ( even though it's weaker ) because the melting point is very low, and this results in less damage to the frame tubes.

All brazing fillers flow before the metal being attached melts. That's what makes it brazing. The lower the flow temperature of the filler, the less heat affected/annealed the steel tubing will be, and potentially the smaller the heat affected zone.

Skill, speed, and heat control by the workman are more significant than the brazing filler alloy in keeping heat affected areas to a minimum.

Viscosity, flow qualities, and "wetness" are all more important to me than low flow temperature. I can't remember whether Welco 17 is one of the rods I've used before, but I'm certainly going to look for it on PaPaSteve's recommendation.
 
I think the easiest way to start is fillet brazing with LFB Low Fuming Bronze (which is actually brass). I've built a few frames with nickel silver (similar to Welco 17), and its harder to build up a fillet due to lower viscosity, and higher melting point.
Once you've got a bunch of practice, it's worth looking into, though. Keep in mind that the fatigue strength of these fillers is generally not as good a 4130, even if the ultimate strength is really high. Oversize the fillets to compensate.
 
Curious? Could you buy a complete bicycle or a frame like what you want to build?

Nope. That's why i'm here. If successful, i may also chose to build and sell bike frames.


Anyway, I spent a number of hours at a hardware store and welding shops.
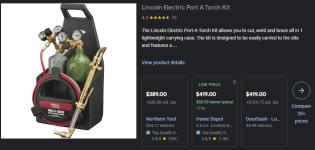
I was told this would be an adequate starter kit for brazing. But i'm thinking it's overkill.

1715624768779.png

What's the cheapest i could get a TIG welder from a decent company that will also work on 120v with the option to move to 240v later?

I did a lot of research and found this small unit that uses IGBTs. The machine also comes with a 5 year warranty.

I called their sales line and they think it would be more than adequate. Called a bike tube place and they also gave it the thumbs up.

1715625738052.png

Here's the 'minimum-maximum' information for this welder

TIG*:
120V:

  • 20 gauge
  • 1/8" (Single Pass) 1/4" (Multi-pass, practical limit)
240V:
  • 20 gauge
  • 1/8" (Single Pass) 3/8" (Multi-pass, practical limit)

1/8" is 3.175mm, which seems pretty thick for cromoly bike tubing. framebuildersupply.com's chromoly headtubes are listed as being 1.1-1.2mm thick. I called them and they say the thickest their bottom brackets / headtubes get is 1-2.5mm.

It sounds like even this relatively wimpy machine would be good for bike frame welding. Am i missing anything?
 
Maybe you should take a welding class at a local Maker Space before buying the equipment. We have free use MIG and TIG machines at work and scrap material to practice with. I've taken the MIG class, and I can MIG weld basic things like thick sheet metal with simple profiles like overlaps, inside and outside 90 degree angles and the like.

It's not easy and takes a lot of practice to get good. There's a tiny glowing dot in your welding mask and you have to move the equipment in a precise hover over the workpiece, adjusting the distance from it as you go, and remembering your work piece is getting hotter the entire time. If you do burn through you have to then go back and fix it, depositing a bunch of material through the same process as tack welds, basically.

MIG is basically a hot glue gun for liquid metal and is considered quite easy. TIG is a whole step more difficult because you have to control the input of the filler material separately. Then welding something thin like bicycle frame tubes where you can burn through easily is another whole step more difficult. Then welding a round tube instead of easy flat and ninety degree joints is another step more difficult. Then welding at the speed needed to not damage the temper is another step more difficult. I think it would take me a year of practice to make all those steps up from where I am right now.
 
Back
Top