A123 20AHr Pouch Cell Battery Build & Info Thread

circuit said:
:)
Thats my creation in flathill's post.
Any feedback is very welcome.


Fantastic!

So you monitor the temp of all individual cells?.. where are located the thermistor?

I also noticed that the inductor of the PSU seem to have some modifications? did you changed teh winding ratio? to modify the voltage? if so did you needed to modify the feedback voltage sense circuit ?

Wich language it is?.. i would relaly like to translate this page to understand! :wink:

Doc
 
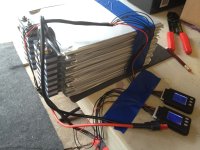
The Android app was originally written for my company's BMS, which is distributed and has separate modules on each cell.
This BMS version has up to three temperature sensors per 12 cells, but I only use 1. Kinda can't see a point in measuring each cell, when anyway they are well thermally connected.

The PSU was heavily modified to increase voltage: rewound a couple of transformers, changed feedback circuitry, output caps, transistors, current measuring shunt.
The language is Lithuanian. Google translate should detect it automatically.
 
Does anyone have any idea about what the surface pressure/compression should be on these cells when creating a stack of these aligned together? A123 states their modules meet some compliance spec for uniform compression of these cells in their module. Quoting from one of these A123 modules, *perhaps* used for the Chevy Volt (according to Doctorbass) or other vehicles such as $107,000 Fisker Karma model, it states the module has: "• Uniform compliant compression system"

According to Luke Pouches need support:
LFP: When these pouches get warm (and they might never get warm if used in a go-kart), they become very soft, almost cooked pasta soft, and require good structural support to keep them from collapsing on themselves.

Obviously, no doubt, A123 does have a specification for using a "• Uniform compliant compression system" to support & protect the cells in stacks.
 
Is the Linear Tech digital comm interface Opto-Isolated on that BMS? It doesn't look like it to me, it would be a shame to have something take out everything it is connected to rather than just the LT chip/board.
 
velias said:
Is the Linear Tech digital comm interface Opto-Isolated on that BMS? It doesn't look like it to me, it would be a shame to have something take out everything it is connected to rather than just the LT chip/board.
If ground wire is secure, the isolation is not needed.
Please note that this is an over-night prototype for personal use. I will not be selling these, or at least in this shape.
 
When you (anyone) get the pack building figured out let me know. :D and how much you will charge me to build me a pack!!! :wink: My time is very limitied till july.
 
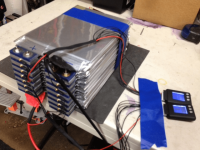
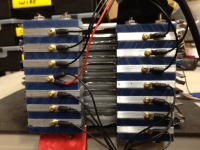
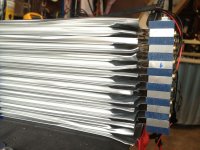
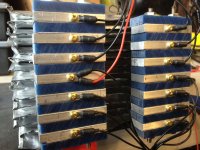
Ok so here's my first attempt at an A123 pouch setup. These cells are from the Midwest group buy of the VicPower cells. It's pretty much what a lot of people were talking about: stainless steel rods with plastic standoffs covering them for insulation threaded through holes drilled into the tabs. I tapped threads into the tops of the 1/4" aluminum for the balance leads. It's a 15S1P setup. If anybody has some specific questions I'd be glad to provide more insight into what I gleaned from this attempt. I can give you my McMaster-Carr shopping list if you want.

A few questions of my own though:
- some people are talking about putting paper in between each cell. Is this to prevent chaffing in case of movement or as an insulator believing that the pouches can leak some voltage.
- compression. When placed in larger vehicles these are put under compression. In my limited charging/discharging I haven't noticed any softening or swelling in the cells. I'm charging at less than 1C and discharging at maybe 2C. Is the compression needed for higher C rates only and bike guys like me can get by with just a good tape job?
- this is my first time playing with lifepo. When I charge with my 600w charger, three of the cells really take off from the rest. They quickly get upwards of 100 mv ahead. When taken of charge they slowly come back to within 10mv but I'm afraid what would happen if I kept them on the charger and walked away for too long. Is this normal? Bad cells? I thought I read somewhere here that lifepo had some more range when being broken in. I was also thinking that perhaps my late at night job of cleaning the goop residue from those darn tab stickers might not have been so great. Maybe this is causing some problems?

image-1222562336.png


image-1505454569.png

Sent using Endless-Sphere Mobile app
 

Attachments

  • image-1222562336.png
    image-1222562336.png
    157.3 KB · Views: 10,523
  • image-1505454569.png
    image-1505454569.png
    163.4 KB · Views: 10,523
drutledge: this is a wonderful job. looking super clean and professional!
i'd love to see that in it's own build thread. i think in case of battery builing you can't take too much precaution to do everything right. and this looks like the real thing!
i'd like to see more sharp and high res piuctures and of course the promised shopping cart (even though i have different sources here in austria to buy from, so no part# or thing are needed, just the material itself).

thanks!

ps. for the charging: i have the very same behaviour with my 12s2p lipo pack. they are all discharged down to let's say 3.6v, and are in balance (10-20mv). then i connect the charge and 2 cells (or 4 cells - 2 parallel) run away with 80mv, and until the end of the charge they don't take any more charge and the other cells catch up. if i let the pack sit for some time (an hour?) all cells are within the 10mv range, sometimes even below 5mv).
i think this is caused be a slightly different internal resistance of those 2 cells, and is nothing to worry about.
 
Nice build! Certainly one of the best so far.

With regards to compression.....I reckon you could go with 2 rigid end plates with some packing strap around the whole pack. It would work the same as the stainless straps on the A123 modules. By packing strap I mean the nylon (or similar) strap that can be ratcheted tight and then crimped. Packing material used on cartons, pallets, etc...... :?:
 
Very neat build, drutledge! Yes the paper is for insulation and I am planning to use parchiment paper for cooking. slippery and high heat able. I do like the simplicity of your attachments. Perhaps you could show more details as the insulating standoffs would be good to see? Thanks and great job!
otherDoc
 
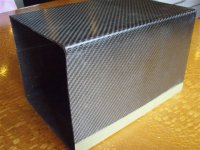
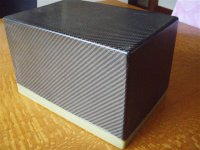
Here are some pics of the battery terminals and structual box for my downhill bike. The terminals are 1mm thick copper bent over and flattened in vice with a 1mm strip of aluminium as temporary spacer in between. there are 3 M3mm S.S bolts with nyloc nuts and washers, cells have a very thin streak of silicon as in between cell glue. and 8 AWG wires coming off a pair of 10 cells charged with a 1000w mean well and 10s Icharger.
I really crippled myself with this pack build. Last time for toolman2's 24s pack we just wet layed up the carbon and it was a bit rough and ready(2years of abuse). This time i made a plug then a mould and prepped that, then vacuum infused with a .3mm fiberglass insulating layer inside than all carbon with a couple of layers of kevlar for a very strong intergral bashplate (30% epoxy resin by weight thats better than aerospace standard 32%!) Composites are my trade. I have a mould now. Also because the cells were not available a while back or were $50-$60 i bought these cut down terminals cells for $17 but had to grind back into the pouch to get usable terminals. A gamble that paid off.
I think a very important detail is to use silver grease between terminals and bolt heads for long term low resistance and to limit corrosion between copper and ally terminals. The teminals are very light and compact but have maximium surface area. They have been tested to 320amps and the 8awg turnigy wire got hotter. I regularly pull 180amps off this pack into my magic pie. These are great cells.

Zappy
 

Attachments

  • carbon battery box 2.JPG
    carbon battery box 2.JPG
    67.3 KB · Views: 10,444
  • carbon battery box with intergral kevlar bash.JPG
    carbon battery box with intergral kevlar bash.JPG
    65.2 KB · Views: 10,444
Sutho said:
By packing strap I mean the nylon (or similar) strap that can be ratcheted tight and then crimped. Packing material used on cartons, pallets, etc...... :?:


I've used these to hold my 30ish pound ping onto my rear rack. They are very strong and after multiple wrecks, with my bike hitting the ground, they never broke.

http://www.uline.com/Product/Detail/S-5695/Cable-Ties-Tools/24-250-lb-Jumbo-Natural-Nylon-Cable-Ties
 
Yea drutledge I would like to see that shopping list.

I have to many of these cells just sitting around waiting for my liking.

Would love to see your own thread as well nice looking pack.
 
zappy I want to thank you for posting your set up. I knew that joining these cells didn't have to be complicated to work and you proved it. Just a simple sheet of copper, bolts, washers and nuts. The silver grease is a nice detail to remember. Thank you very much.
 
Really nice work Zappy! Another method of connecting pouches! Did you just solder the interconnects of 8 ga. wire to make the series cells?
otherDoc
Edit: Oh Duh! You probably have the cells oriented +/-. Sorry for the slow thinking!
 
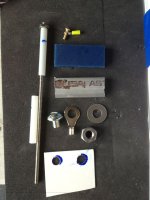
A few people have asked here and by PM for the parts list so here it is along with a few more photos and some random thoughts about the build. -> Zappy, I love your box. I've never worked with CF but that makes me want to try.

Part numbers are for McMaster-Carr. http://www.mcmaster.com

Bars
8975K27 1 Each Multipurpose Aluminum (alloy 6061), 1/4" Thick X 3/4" Width X 6' Length
9329K12 1 Each Abrasion-resistant Uhmw Polyethylene Rect Bar, 1/4" Thick X 3/4" Width X 5' Length
Notes: The Polyethylene was rated an 'Excellent' Resistor' plus I really like the blue color, I admit it.

Joining Bolts
95412A821 1 Pack 18-8 Stainless Steel Fully Threaded Stud, 8-32 Thread, 6" Length
94639A751 3 Packs Nylon Unthreaded Spacer, 1/4" Od, 1-3/4" Length, #8 Screw Size
91841A009 1 Pack 18-8 Stainless Steel Machine Screw Hex Nut, 8-32 Thread Size, 11/32" Width, 1/8" Height
Notes: I would have preferred fully threaded nylon standoffs instead of multiple spacers which could move during the build process. I couldn't find the right product though so I added a bit of silicone adhesive on the threads of the bolts to keep things stable while I was putting it together, just in case

Main terminals
90498A030 1 Pack Plain Grade 2 Steel Heavy Hex Nut, 5/16"-18 Thread Size, 9/16" Width, 19/64" Height
90276A576 1 Pack Znc-pltd Stl Round Head Slotted Machine Screw, 5/16"-18 Thread, 3/8" Length
69405K76 1 Pack High-temperature Crimp-on Ring Terminal, 900 Deg F, Noninsulated, 12-10 Awg, 5/16"stud
Notes: These screws and nuts are really big. Too big. I think I could find something less obtrusive to use. Also, I put them in-line with the compression bolts which means they get in the way. I needed to drill the tab hole in the last + and - in the center of the tab so it would be in between the joining rods.

Balance Wires
25995A145 1 Each Carbon Steel Hand Tap 4-40, 3 Flute, Plug
94070A108 1 Each Brass Pan Head Phillips Machine Screw 4-40 Thread, 3/8" Length, packs of 100
7113K264 1 Each Standard Crimp-on Ring Terminal Nylon Insulated, 26-22 Wire Gauge, #4 Stud, packs of 50
Notes: The brass screws are very easy to snap at this small size. I might switch them to some sort of steel though, I admit it, I like the look of the brass. Also, 3/8" length is really longer than necessary. 3/32" drill bit used to make pilot holes for tap.

If something isn't listed, it's something I already had on hand such as heat shrink, 22 gauge wire, washers, etc. Also some of the quantities you'll get are way more than needed but extras are always good to have on hand.

I think the build is pretty straight forward and obvious but here are a few things to maybe think about:

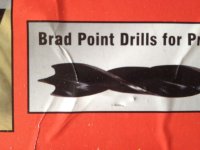
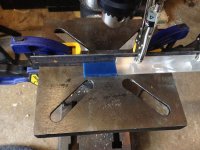
Getting holes into the tabs: I bought a punch meant for thin metals but didn't like wildly swinging a hammer toward my A123s and it was really not easy to align. I then tried a 'normal' drill bit on my tiny drill press. This did not produce a very neat hole since the bit grabbed the thin tab and started to shred it if you weren't careful. I went to the brad point drill bit pictured and it worked perfectly. The center point held everything centered and the outer edge cut the hole from the outside making perfect holes. I also placed a piece of wood underneath the tabs when drilling to support the rest of the tab so it wouldn't deform. To place the tab holes I cut a piece of thin cardboard the size of the tabs then placed it under an extra bar with the holes already in it and drilled out the holes. Placing the thin cardboard on the tabs and marking the holes with marker was more accurate and easier than trying to do it through a 1/4" bar or by manually measuring it out. I made the holes 1/32" larger than the standoff/spacer diameter.

Holes in bars: I made a jig to make sure all of the holes were in exactly the same place. It made everything much faster as well.

Tapping holes for balance wires: I might be the only guy who didn't know to do this before I saw a YouTube video but… I put the tap into my hand drill and set the drill's clutch torque setting down to 3. When the drill started to ratchet, I backed the tap out cleaning out debris and then went back in, repeating as needed. So much faster than doing it by hand with that little T wrench they give you!

Hope bits of this info helps someone else in making their pack. Good Luck!
 

Attachments

  • IMG_2242.jpg
    IMG_2242.jpg
    115.9 KB · Views: 9,827
  • IMG_2243.jpg
    IMG_2243.jpg
    126.4 KB · Views: 5,485
  • IMG_2244.jpg
    IMG_2244.jpg
    137.6 KB · Views: 5,486
  • IMG_2246.jpg
    IMG_2246.jpg
    112.4 KB · Views: 5,486
  • IMG_2249.jpg
    IMG_2249.jpg
    73.2 KB · Views: 5,485
  • IMG_2250.jpg
    IMG_2250.jpg
    123.4 KB · Views: 5,485
DeVries asked a question via PM about cost of carbon box etc. I will post reply here to add to prismatic pack build info.

Hi deVries, I pay around $12kg for the epoxy mixed price when bought in 50kg kits. I used off cuts, so free to me. The carbon twill on the out side is nice to use (pretty) but is a bit expensive per kg. +/- 45 deg 450g double biaxs and straight uni's are cheaper thicker and quicker and saves resin weight because it has less interstitial space for excess resin to fill between the weave. I used vacuum infusion to save weight and minimise fiber bridging problems in the very tight internal corners of the box. It probably makes more sense and is easier to pop a battery box off a male plug as where the batteries go in is a mold surface and an accurate fit around our delicate cells and it could be wet layed up very easily. But it dosn't have the nice moulded surface on the outside but is functional. To save money just use glass instead only $6 sq/m instead of $50 but you need a little more to do the same structural job. Use a thin layer of glass (200g/m) next to the cells, carbon conducts to well!! To make a very rapaid prototype box i would make a mdf or chipboard plug of the internal of the box needed (make it deeper and trim up part to length later) with 1-2mm of draft or taper so you can remove it and a 5-6mm radius on the edges. Cover neatly with browm packing tape(mylar) as a release film(this saves HEAPS of time sanding,spraypainting, polishing of mold surface). Wet layup glass/carbon. Use some peel ply on the outside to help neaten up the dags while still wet. Make sure it is properly cured, epoxy is very slow before it reaches its full glass transtional temp. Use very gentle heat over a long period. You will probably destroy the plug removing it but you will be ready to ride next day.
Hope this helps.

Zappy
 
Just wanted to add my 2 cents as I'm wanting to build a pack myself.

After seeing j3tch1u 's build with these nicely machined end caps which hold cells and provide good simple termination
http://endless-sphere.com/forums/viewtopic.php?f=28&t=15233&start=270

Could anyone design a similar end cap/holder and upload the design to a 3D printing site such as http://www.shapeways.com/

with maybe different sizes from to hold 2- 8 cells, we could just order what we needed and no need for a production run.

I wish I had the time and skills to do this myself but I will probably end up reaching for the gaffer tape :)
 
That's my battery. I use split pins to connect cells, 3mm aluminium plates to constrict it.
36v 20Ah, 260x180x92mm, 7.5kg

 
what is a split pin to you? is it what some would call a cotter key? or a roll pin? have close ups?

neat idea with the diamond plate, very clean, you could even have wooden sides and just use wood screws down into the wood to hold the plate along the sides.

also what is the BMS you have there? pictures inside?
 
Back
Top