AliExpress battery pack unboxing (for my eZuma project)

THere's two pack halves, right?

I'd put one in the core of each half, at minimum.

Then wherever else might get hot during charge or discharge that you would want to shut things down for (or whatever the BMS does when it senses overtemp).
 
Got a lot done in the last 24hrs:

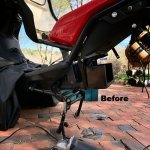
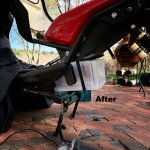
  • roughed out a new semi-clear polycarbonate battery box to protect the new battery
  • removed the old (rusting) battery box
  • test fitted the new battery box into the space vacated by the old battery box

Here are some before and afters:


IMG_7854.1280.jpg

IMG_7855.1280.jpg
 
Awesome thread to read.
Learned a lot.
We need more of these.
Cheers and looking absolutely awesome.
:bigthumb:
 
You might consider putting a metal plate under the battery box. The cellular polycarbonate stuff is pretty flexible and you don't want the bending stresses transmitted to the pack. Imagine hitting a pot hole etc. Repeated bending stress could cause metal fatigue and weld failure.
 
fechter said:
You might consider putting a metal plate under the battery box. The cellular polycarbonate stuff is pretty flexible and you don't want the bending stresses transmitted to the pack. Imagine hitting a pot hole etc. Repeated bending stress could cause metal fatigue and weld failure.

Agreed. Coincidentally, I'm working on it as we speak...
 
Just finished my battery box and mounting/support frame. Waiting on some stainless steel M6 8mm long set screws as a finishing touch instead of the hex head bolts. But it is now ready to bolt into my bike. Note that I've incorporated several 1/4" neoprene rubber bumper strips both inside and out to reduce any jarring. This pack ain't going anywhere -- it's solid as a rock.


IMG_7949.jpg
 
fechter said:
What's that black aluminum looking stuff on the edges?

It's black aluminum stuff! :p

Actually, it is just standard black anodized aluminum picture frame channel that has been reinforced by me with internal 1/8" x 1.5" aluminum bar stock, with M6 taps at each corner.

M
 
MJSfoto1956 said:
Actually, it is just standard black anodized aluminum picture frame channel that has been reinforced by me with internal 1/8" x 1.5" aluminum bar stock, with M6 taps at each corner.

M

Picture frame, OK. Looks like handy stuff. The motor looks adequate. You shouldn't have any overheating issues. With enough amps should be capable of doing wheelies.
 
how much power are you planning on putting into that motor?
i am wanting to get that one for my demo scooter and do some dragracing and showing those 2 strokers how the future looks.
but i am planning on running 100+ volts into that thing with as many amps as i can find.

how are you going to prevent the axle form spinning if you are going to put down max amps?
 
999zip999 said:
Ha that wheel is coming off the ground. The powervolicity bt controller is so ez.
P.S. wheel coming oof the ground is not always fun.

PV allows you to dial the launch way down.
I'm just looking for a fun reliable ride not some tire-smoking bad boy.

M
 
flippy said:
how much power are you planning on putting into that motor?
With my Version #1 battery, I'm planning on limiting things to just 83A (battery) and 230A (Phase).
With my next battery, I'll probably use 120+ battery Amps.

flippy said:
how are you going to prevent the axle form spinning if you are going to put down max amps?

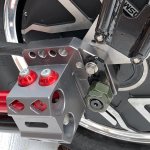
Does the following photo answer your question?

IMG_7964.jpg

Note: that is 1/2" thick aluminum with 1/4" steel drop out on both sides.
 
nice machining. is that cheese grater aluminium or the proper stuff?
i assume the axle hole is also slotted instead of round?
 
i am planning on putting a hardend steel pin right tru the axle as a extra security to prevent any wiggle.

i noticed even on my smaller 4kW 205 and many cheap chinese ones that once it gets even the slightest wiggle it will destroy the mount, axle and finally jank the phase wires.
 
flippy said:
i noticed even on my ... 4kW 205 ... that once it gets even the slightest wiggle it will destroy the mount, axle and finally jank [sic] the phase wires.

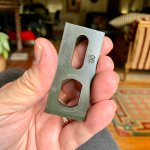
  • So what were the dimensions of your anti-torque dropout?
  • Was it the "standard" QSmotor steel mount (like the attached photo)?
  • Or was it something else?

M

P.S. on the QS V4 it is much more flexible wrt drilling through the axle as the phase wires are OUTSIDE of the shaft and you are free to make modifications anywhere you want.


IMG_7966.jpg
 
Back
Top