You are using an out of date browser. It may not display this or other websites correctly.
You should upgrade or use an alternative browser.
You should upgrade or use an alternative browser.
Automatic Servo Controlled Derailleur and internal gear hub
- Thread starter crossbreak
- Start date
Telemachus
10 W
iperov said:can anyone please tell me, what I need to buy and to do to get electric rear shifter?
If you don't want to spend close to $1000 for one of the commercial versions, then essentially you need the following:
1) A way securely attach a high-torque servo the the derailleur. The spring in the derailleur should be removed, and the servo horn will connect one portion of the parallelogram to the other, usually from the spot where the shifter wire comes in to the spot that the wire is bolted onto (more on this below).
2) A microcontroller based controller board that can control the servo positions using a PWM. You will have pre-set servo positions for each of the gears. Of note, it will take a little more "umph" to get the chain to move from the smaller sprockets up to the larger ones than going in reverse, and the controller should compensate for this.
Here is a great synopsis on Servo control using JAL on PIC microcontrollers that I relied on for my build:
http://justanotherlanguage.org/content/jallib/tutorials/tutorial_servo_rc_master
3) A power source. 4.8V RC receiver batteries work great, 6.0 volts would work as well if your uC can take that voltage. If the servo is turned off in between shifts, will last a LONG time.
http://hobbyking.com/hobbyking/store/__25029__Turnigy_LSD_4_8V_2300mAh_Ni_MH_Flat_Receiver_Pack.html
4) Push buttons to control the shifting. Here is a nice, cheap option:
https://www.performancebike.com/bikes/Product_10052_10551_1063043_-1___400128
and here is a much more expensive TT bar option: http://www.digikey.com/product-detail/en/MTG72AD2
The microcontroller is not too difficult at all, and as my code progresses, will have tuning options and values stored in the EEPROM. Later I will post my source code for anyone who wants to leave Arduino land for the CHEAP avenue of PIC mictrocontrollers.
Mounting the servo with minimal modifications to an expensive derailleur is something I would like to come up with a good solution for. I think that mounting the servo close to the limit screws on the derailleur is a great idea. Something along these lines has been discussed:

I think the Servocity prefabbed solitions could be the key to not having to machine your own parts.
Telemachus
10 W
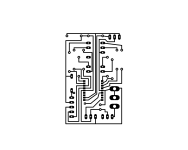
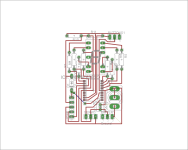
Anyone who wants to play along, download the free JALLIB compiler and try this code. Schematics and components below.
Code:
-- ------------------------------------------------------
-- Title: KiDi2 electronic derailleur control
--
-- Author: Telemachus, 2013.
--
-- Adapted-from: Highschoolrobots.com, jallib Yahoo groups supporters, like Matt
--
-- Compiler: jaledit 6.2
--
-- For pinout, do google image search for "16F628a pinout"

-- Description:
-- 6 geared electronic servo control
--
-- ------------------------------------------------------
--
include 16f628a                    -- target PICmicro
--
-- This program uses the 4 MHz internal timer
pragma target clock 4_000_000     -- oscillator frequency
-- configuration memory settings (fuses)
pragma target OSC  INTOSC_NOCLKOUT -- Internal clock
pragma target WDT  disabled        -- no watchdog
pragma target LVP  disabled        -- no Low Voltage Programming
pragma target MCLR internal        -- internal makes developing easier, but best external

-- setup all the pins and alias for them

-- servo control pins

alias servo_1             is pin_a2     -- only 1 servo used for now
;alias servo_2 is pin_a3
;alias servo_3 is pin_a1
alias servo_1_direction   is pin_a2_direction
;alias servo_2_direction is pin_a2_direction
;alias servo_3_direction is pin_a1_direction
servo_1_direction = output
;servo_2_direction = output
;servo_3_direction = output

--input pins
alias gear_up is pin_a1                            -- Button to increase gear
pin_a1_direction = input

alias gear_down is pin_a0                          -- Button to decrease gear
pin_a0_direction = input

enable_digital_io()    -- turn off analog

include seven_segment                              -- Include 7 segment lib

portb_direction = all_output


-- Setup the Servo controlling library

;const byte SERVO_AMOUNT = 1       -- set number of servos
;const byte SERVO_RESOLUTION = 10  -- set movement resolution
const byte SERVO_USE_TIMER  = 0
-----------------------------------------------------------
-- Adjust the following to control servo throw from center.
const byte SERVO_MIN   = 50     -- set min throw of servo
const byte SERVO_MAX   = 255     -- set max throw of servo
-----------------------------------------------------------
;const byte SERVO_CLOCK_BITS = 8
include servo_rc_master                      -- include the servo library
servo_init()                      --  Turn on the servo movements

var byte servo_value1 = 80    -- Servo Value for Gear 1
var byte servo_value2 = 109  -- Servo Value for Gear 2
var byte servo_value3 = 119  -- Servo Value for Gear 3
var byte servo_value4 = 130 -- Servo Value for Gear 4
var byte servo_value5 = 145 -- Servo Value for Gear 5
var byte servo_value6 = 165  -- Servo Value for Gear 6

var byte gear_value  = 4     -- Default gear upon power up
var byte gear_dif

var byte i                           -- variable for the 7 segment display


forever loop                             -- begin main program
i = gear_value
portb = seven_from_digit(i) -- display char

if !gear_up then
_usec_delay(1_000)                       -- slight delay to assure button press
if !gear_up & gear_value < 6 then
gear_value = gear_value+1
gear_dif = 5
_usec_delay(750_000)            -- delay in between shifts

elsif !gear_up & gear_value == 6 then
gear_value = 6
gear_dif = 8
end if
end if

if !gear_down then
_usec_delay(1_000)                       -- slight delay to assure button press
if !gear_down & gear_value > 1 then
gear_value = gear_value-1
gear_dif = -5
  _usec_delay(750_000)                      -- delay in between shifts

elsif !gear_down & gear_value == 1 then
gear_value = 1
gear_dif = -8
end if
end if


if gear_value==1 then       			-- when gear is at 1, move to servo value 1
      servo_move(servo_value1+gear_dif,1)
;      for 1 loop
;      led = on
;      _usec_delay(250_000)
;      led = off
;      _usec_delay(250_000)
;      end loop
;      _usec_delay(1_000_000)


  elsif gear_value==2 then                     	 -- if gear is at 2, move to servo value 2
      servo_move(servo_value2+gear_dif,1)
;      for 2 loop
;      led = on
;      _usec_delay(250_000)
;      led = off
;      _usec_delay(250_000)
;      end loop
;      _usec_delay(1_000_000)


  elsif gear_value==3 then                     	 -- if gear is at 3, move to servo value 3
      servo_move(servo_value3+gear_dif,1)
      ;for 3 loop
;      led = on
;      _usec_delay(250_000)
;      led = off
;      _usec_delay(250_000)
;      end loop
;      _usec_delay(1_000_000)

  elsif gear_value==4 then                     	 -- if gear is at 4, move to servo value 4
      servo_move(servo_value4+gear_dif,1)
      ;for 4 loop
;      led = on
;      _usec_delay(250_000)
;      led = off
;      _usec_delay(250_000)
;      end loop
;      _usec_delay(1_000_000)


  elsif gear_value==5 then                     	 -- if gear is at 5, move to servo value 5
      servo_move(servo_value5+gear_dif,1)
     ; for 5 loop
;      led = on
;      _usec_delay(250_000)
;      led = off
;      _usec_delay(250_000)
;      end loop
;      _usec_delay(1_000_000)


  elsif gear_value==6 then                     	 -- if gear is at 6, move to servo value 6
  servo_move(servo_value6+gear_dif,1)
 ; for 6 loop
;      led = on
;      _usec_delay(250_000)
;      led = off
;      _usec_delay(250_000)
;      end loop
;      _usec_delay(1_000_000)

  end if

;  _usec_delay(250_000)


end loop          -- end of main program