Bafang BBSxx - fault finding and fixes

fechter said:
The board layout on yours looks significantly different than the ones I have. Is that a really old one?

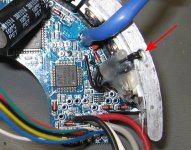
Yes, I bought it in 2014. The photo It's a little blurry, the resistor pair I'm after are 122 and 512. The missing resistor is the 512 one which I'm going to order. Thanks for the info.

You previously mentioned the FET driver IC FAN7388M could blow as well, do you know if it can be fault tested in situ?
 
fechter said:
The board layout on yours looks significantly different than the ones I have. Is that a really old one?

BBSHD voltage regulator area.jpg

BBS02:

BBS02 voltage regulator area.jpg
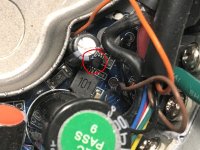
Please could you identify the IC component name that I've marked with the red circle.
My Paint Instant.jpg
 
spockie said:
Please could you identify the IC component name that I've marked with the red circle.

That's the votlage regulator. From my notes, I show a LM5007, but that's not the number I see in the picture, so may be just similar.

View attachment lm5007.pdf

This part may have changed over time also.


It's hard to do a good test of the gate driver, but after removing all the FETs, I would try measuring resistance from the gates to ground and gates to 12v and see if they all look the same. If one is shorted, it's bad.
 
fechter said:
That's the votlage regulator. From my notes, I show a LM5007, but that's not the number I see in the picture, so may be just similar.
lm5007.pdf
This part may have changed over time also.
Thank you again for the info on that voltage regulator. I have the same but thought yours may be different as I'm confused why they have chosen different resistor values (5.1K and 1K) compared to the datasheets which recommends 3.1K and 1K respectively. I've ordered both values and will try 5.1K first. I hope it works first time as it looks difficult to solder due to its size


fechter said:
It's hard to do a good test of the gate driver, but after removing all the FETs, I would try measuring resistance from the gates to ground and gates to 12v and see if they all look the same. If one is shorted, it's bad.
Just to be sure, you mean measuring from the PCB through holes for the FET gate pin (and not the FET itself).
 
spockie said:
Just to be sure, you mean measuring from the PCB through holes for the FET gate pin (and not the FET itself).
Right. The idea is to measure the gate driver outputs. If all 3 look the same, it's probably good. Also good to measure in both directions (swap the meter probes). Finding the ground is easy. The 12v will be coming off one of the smaller electrolytic caps but not sure which one. It will be feeding the gate driver chip. Measure with power off. If your meter has a diode check function, that is probably the best, otherwise just measure resistance.
 
fechter said:
spockie said:
Just to be sure, you mean measuring from the PCB through holes for the FET gate pin (and not the FET itself).
Right. The idea is to measure the gate driver outputs. If all 3 look the same, it's probably good. Also good to measure in both directions (swap the meter probes). Finding the ground is easy. The 12v will be coming off one of the smaller electrolytic caps but not sure which one. It will be feeding the gate driver chip. Measure with power off. If your meter has a diode check function, that is probably the best, otherwise just measure resistance.

Thanks again for the useful information you have provided to date. :bigthumb:

I've ordered the components from Ebay and hopefully be delivered by end of the week. Fingers crossed that it'll work out well. I'll post again with outcome.
 
I've nearly completed the repair of my controller. There's one more loose end that I need help on.

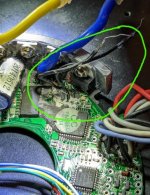
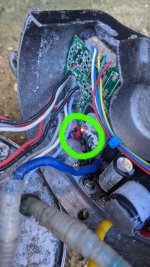
Photo below circled in green are a couple of black wires which the bare ends were embedded in a ball of silicone. They were not soldered to anything! I think when I was removing the potting material they were stuck onto the large heatsink at the back of the photo, but not absolutely sure.

Are these meant to be stuck to the heatsink for grounding purposes?
PXL_20220317_200214664.MP (1).jpg
 
I'm pretty sure that's a temperature sensor. It's a tiny little thermistor bead on the end. If you broke it off, you may need to replace it.

Thermistor location.jpg

For testing purposes, you might be able to get away with just using a resistor to make the software happy, but I don't know what value of thermistor it is. My guess is you could just short the wires to make the software happy. If the software is unhappy, you will get an error code 10 or 11 on the display and the motor won't run.
 
fechter said:
I'm pretty sure that's a temperature sensor. It's a tiny little thermistor bead on the end. If you broke it off, you may need to replace it.

Thanks for that. I had hot glued those wires into that tiny hole on top of the heatsink to try it out. Display shows no error.

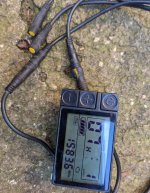
Is not been a fruitful repair job, but at least I didn't see any magic smoke. The display shows the motor icon (see photo) but the using the throttle control, motor still dead.
display.jpg

Inside the controller I see a red flashing LED, see photo. It seems to be blinking every 2 secs continuously.
led.jpg

I hope my memory serves me right, the brake sensor does not need to be connected nor the speed sensor and motor can be started by the throttle control, right?

Beforehand I checked the Mosfet with meter in diode mode and all read the same (one had a short before). Also checked the FET driver on the faulty Mosfet position and no short found.

Any idea what to check next?
 
I’m thinking the early version did require speed sensor. There were more than one firmware versions. I’m pretty sure I went in circles trying to get my first build in 2014 working. I remember it being speed sensor related. But post stroke some memories and details are gone.BArake sensors were critical with some firmware. I clearly remember my frustration at not mmediately catching that on my first BBSHD build. That’s Bafang...
 
I'm not familiar with that display. If "07" is a fault code, manual says Overvoltage protection. Maybe try a lower battery voltage?

Without the speed sensor, the controller will go to sleep after some period of time but will be on long enough for testing. It takes a few minutes to go to sleep.

The blinking light is normal. It tells you the MCU is alive.

You should be able to make the motor run without connecting the brake or speed sensors.
 
fechter said:
You should be able to make the motor run without connecting the brake or speed sensors.
I guarantee there are firmware versions that prevent running without brake cutouts and/or speed sensors.
6-7 years of providing support for resellers have shown me that to be the case. Experienced with personal 4 BBSHD's and 6 BBS01, BBS02B, and BBS02.
 
I'm puzzled why I now got a error 7 (over voltage) on display. Battery (36V) has not been changed. I've tested it with the brake sensor connected without any change. Is there a circuit diagram available for this controller so I can work out which point to test.

I'll probably order another controller but would like to get this working if possible.
 
Hi, I have a problem with my BBS02B. I drove 230 km and there were sounds like in the attached video. I know that there have already been a few topics related to this, but I can't quite match the sound of the fault to my case.
I am asking for advice on what to do with it.

VIDEO -> https://photos.app.goo.gl/xZe4ikMrujQXcpNN6
 
I got a reply from Bafang (I sent them the same video):
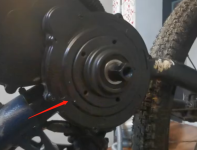
Got feedback from our engineer, the sound is normal, just open the cover on the red indicator and lubricate, let the gear lubricate a little and there will be no sound.
 

Attachments

  • 3784B8AF-E2DD-440c-94FE-0DF21799F2DA.png
    3784B8AF-E2DD-440c-94FE-0DF21799F2DA.png
    382.9 KB · Views: 738
Hi everyone. I've read through most of the pages, but haven't been able to pinpoint which solution might be suitable for me. I'm hoping that describing my problem might help pointing out viable solutions for you experienced people :)

My system:
Bafang BBS02B 750W. Runtime about 8500km.

Symptoms:
Loud clicking and grinding noise when motor is engaged (sometimes goes away for no apparent reason). Can clearly feel the vibration from the clicks though the pedals. Similar feel to a busted clank bearing on a manual bike, but no symptom/clicking at all when only pedaling without motor assist (leads me to believe crank bearings are ok?)

What I've tried:
I've lubricated the large reduction gears behind the plastic dust cover, this didn't help on the clicking. Last year I disassembled everything and used locktite on the pinion inside the bearing (where the o-ring is) as other people have advised. Don't know if it matters.
 
Sounds almost like a magnet came off the rotor. Otherwise, the plastic gear is going. You'll probably have to take it apart further and look inside. The gear is by far the most common. I think the newer models have internal magnets that can't come off.
 
Thanks @fechter, that does make sense unfortunately, there was quite a bit of corrosion on the rotor when I opened it last time because of the paper gasket they used wasn't water tight. Sounds like I should order a new rotor then. Do you or anyone here have a recommended online store on where to get the parts quick and not too expensive? I'm in Norway, so EU or Asia is probably similar with regards to shipping and taxes to me (we're not part of EU.)
 
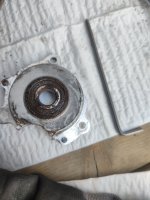
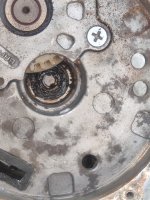
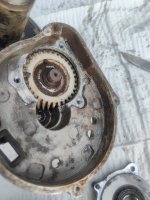
I opened it up, and it's luckily not the rotor poles/magnets. It is this bearing
IMG_20220429_140127.jpg

Is it worth replacing only the bearing, or should I get the whole part? Any other parts I should replace while I'm at it?

Some more photos of the carnage.

IMG_20220429_135045.jpgIMG_20220429_140123.jpg
 
Wow, that's really ugly. Looks like a lot of water got in there.

If you wipe the grease off, you should see a number on the bearing. Typically, you can press the bearing out and replace it. Just a bearing is fairly inexpensive and can be sourced from many places. I'm not sure if you can get the whole plate part with the bearing.

There's a freewheel clutch inside the white gear. You might want to take that all apart and clean it up and put some new grease on it.
 
Yeah, the gasket on these motors are quite unimpressive. This happened after the first winter here with some salt and snow on he roads.

I removed the lock ring, but the shaft inside the nylon gear didn't seem to move, however I didn't use excessive force.

Had to put everything back together (don't have enough space to leave it all in pieces) so I didn't manage to get the numbers off the bearing. Does anyone happen to know the specs? I see there are two sold on alixpress; https://www.aliexpress.com/item/1005003747914570.html and https://www.aliexpress.com/item/1005003747931811.html. The description says
"This bearing can be found on the Bafang BBSHD, BBS01 and BBS02 (B model) axle between PAS disc and clutch" for the first and "This bearing can be found on the Bafang BBSHD, BBS01 and BBS02 (B model) axle". I'm not familiar enough with the terminologies to understand which one (if any) is the one I need?
 
I ALWAYS work a high quality black rtv silicone into all exterior mating components. Only after the use of a liquid gasket. The wire entry grommet sucks too. Again RTV to the rescue.

In 6 years of monitoring orders and answering support requests for kit resellers the plastic gears were the slowest selling parts. My 2014 BBS01 were treated and are as new. ACF50 or Boeshield are my favorite for connections and extererial treatment around the crank.
 
I'm not sure which bearing on the Ali page you would use, but it lists the exact dimensions so you can measure the old bearing.

The white gear has a roller clutch that grabs the shaft. You may need to spin the gear a little to release the rollers. Looks like a little oil wouldn't hurt to help get it off too. Once you slide it off, you can clean it up and apply new grease.
 
Since most aren’t prepared to press out the the and press in new the replacement pinion bearing usually sells as a complete pinion plate. I’m thinking I had the bearing number. It’s not proprietary but I seem to have deleted many of my support files when California eBike shop was sold and I joined Doug in retirement.

green bike kit has rubber replacement kits. Searching pinion plate bearing on AliExpress ought to find sellers with replacements. Complete plates run around $32.
 
Back
Top