Controller burned or on its way?

medusa569

100 W
Joined
Sep 17, 2010
Messages
161
Location
Washington DC
My bike conked out again yesterday and my I decided to take a look at the controller thinking something may have burned or I need to beef up the shunt. I saw some dark discoloration which looks like a burned mofset perhaps. If one mofset burns out will this kill the controller or can discoloration appear in a functioning controller?
My bike was normally cutting out on me when going uphill despite my pedaling assistance but it would usually start up again....this time it died for good. thank you for your input.


claire
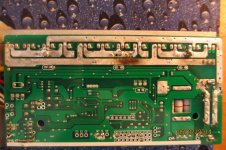
controller back.JPG
 
This is a good place to start troubleshooting: http://www.endless-sphere.com/w/index.php/FET_troubleshooting
Use this electric vacuum thingy to remove the old mosfets (7.5€):
47090-5638-3.jpg

, or cut them first and then pull them out using traditional vacuum tool.

Good replacements (to-220 package) are:
1. TI CSD19536 100V rated
2. IRFB4110pbf 100V rated
3. TI CSD19506 80V rated
4. IRFB3077 75V rated

In my case, 68V rated mosfets died without visible damage at 54.6V peak battery voltage. After replacing everything worked. YMMW.
 
One thing for sure, the main traces are not strong enough. The burn marks are the trace,not the components. You need to beef up all those wide traces by adding more solder to make them thicker. You can reinforce them with wire too. Normally, the traces are reinforced at the factory, but on yours, somebody has been cutting corners. I've had two like yours, and they blew at exactly the position where yours is brown. I always check and modify them now before installing in a bike.

I'm looking at your phase connection "U". Is it a dry joint? It looks a bit burnt.

It should be like this:

http://www.linushelgesson.se/wp-content/uploads/2011/12/power_traces.jpg
 
Forgive my ignorance but where or what is the phase connection? As for the traces thanks so much for the photo...its gives me a good idea of what I need to do and hopefully I can revive this controller. For a cheapie it's done very well. Do I need to try and burn/scrape off or wipe down with alcohol the burnt section?


d8veh said:
One thing for sure, the main traces are not strong enough. The burn marks are the trace,not the components. You need to beef up all those wide traces by adding more solder to make them thicker. You can reinforce them with wire too. Normally, the traces are reinforced at the factory, but on yours, somebody has been cutting corners. I've had two like yours, and they blew at exactly the position where yours is brown. I always check and modify them now before installing in a bike.

I'm looking at your phase connection "U". Is it a dry joint? It looks a bit burnt.

It should be like this:

http://www.linushelgesson.se/wp-content/uploads/2011/12/power_traces.jpg
 
fellow said:
This is a good place to start troubleshooting: http://www.endless-sphere.com/w/index.php/FET_troubleshooting
Use this electric vacuum thingy to remove the old mosfets (7.5€):
47090-5638-3.jpg

, or cut them first and then pull them out using traditional vacuum tool.

Good replacements (to-220 package) are:
1. TI CSD19536 100V rated
2. IRFB4110pbf 100V rated
3. TI CSD19506 80V rated
4. IRFB3077 75V rated

In my case, 68V rated mosfets died without visible damage at 54.6V peak battery voltage. After replacing everything worked. YMMW.

Off Topic
I just had to do a some desoldering and kind of struggled with my years old spring loaded sucker only- the piston crawls up the cylinder now cleaning didn't help. I saw these and wondered what they are like to use? Anyone use them? They must be better than the no heat suck only ones? Worth the cost? I'm also considering a more expensive desolder station but that will need a sucker/braid.
 
Alsmith: I own one of those delsoldering "hot-pens", here are pros and cons:
+It's possible to remove mosfets without any damage on them
+It's much easier to hold one tool than two at the same time
+Sometimes it's the only option.
+They work well if you have the patience to wait at cold start.
-30W is pathetic. It really took ages for it to achieve working temperature.
-You can't use it for soldering anything as it's much bulkier than the normal "penn" type tool. Desoldering only.

About soldering stations (not desoldering): I'm a bit against bulky solder stations, prefer the simple cheap and light pen-style iron. Solder stations are temperature regulated, and will probably last longer. What irritates me it too many options (I found myself playing to much with the temperature range), I prefer simple things. Pen-type cheapo solder iron costs 7.5€ and are notorious to self destruct if leaved forgotten for 1 hour or used a lot without alowing it to cool down. For simple jobs as soldering batteries or changing mosfet controllers cheapo stuff works. My favorite is this type (not this manufacturer but this type of tool):
20140312162808_51448.jpg

Unfortunatly the watt ratings on my favorite one are worn out, im gessing it's in the 40W-45W range. 60W are too bulky and 30W are frustrating.
 
medusa569 said:
Forgive my ignorance but where or what is the phase connection? As for the traces thanks so much for the photo...its gives me a good idea of what I need to do and hopefully I can revive this controller. For a cheapie it's done very well. Do I need to try and burn/scrape off or wipe down with alcohol the burnt section?
The phase wires are the main wires to the motor. If you look at top right of your photo, there's a "U" printed on the PCB where it's soldered.

Adding extra solder is the minimum you should do, but it's easy and quick. It's better to solder on a piece of copper wire, but it's a bit more awkward.

You should try and clean the burnt bit first if you can. Try and scrape it clean.
 
fellow said:

Thanks. Looking at the desolder station type it seems like there isn't much advantage over an iron, you still need a sucker or wick. Also it seems like you'd be putting a lot of heat over a lot of the board and components, it's not directly onto the part you're working on.
 
Back
Top