glenn0010
100 W
Hey Lads,
Before I start a bit of a background. I am an Electronics and Plant Process Control Engineering Student finalizing my degree. For my Higher national Diploma I made my own Brushless motor controller and it worked. It can be seen here: https://endless-sphere.com/forums/viewtopic.php?f=3&t=70870&start=50
Having said that it was very expensive and bulky to make because I took to much advice from my mentor. This time however I want to do it right, cheap and compact which would make it suitable for mass production.
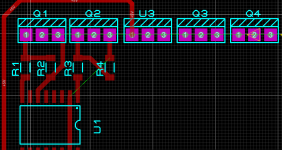
I have already designed some circuits and need some feedback on my plan.
Supply to controller:
I plan to use the following DC/DC converter to supply the power to the contorller:
http://www.mouser.tw/pdfdocs/BD9G341-ad.pdf
I plan to use 2 of these DC/DC converters. 1 to step down battery pack voltage to 12V to drive the Mosfets and another one to step down from battery pack voltage to 5V to supply the micocontroller and hall sensors. I could use and LM7805 with the 12V DC/DC converter but I am trying to keep efficiency at a maximum.
Also would anyone be interested in buying standalone versions of this DC/DC converter as it is very versatile since it can handle 76V and supply 3A!? I could make this circuit and sell it to any one who wants one")
Mosfet Drivers
I plan to use the following Mosfet Drivers:
http://www.infineon.com/dgdl/ir2104.pdf?fileId=5546d462533600a4015355c7c1c31671
The one thing I am not sure about is whether my calculations for the bootstrap capacitor size are correct. I have used this application note to make my calculations: http://www.infineon.com/dgdl/an-978.pdf?fileId=5546d462533600a40153559f7cf21200
As seen on page 6 there is an equation to calculate the boot strap capacitor.
Here are the parameters I have.
Qg = 88nC (this can be seen from the mosfets chosen below)
Frequency of operation = 32kHz in my case
ICbs (leak) = bootstrap capacitor leakage current I am ignoring this one since I will use cermaic capacitors as staed in the application note
Iqbs (max) = Maximum VBS quiescent current = 55uA found from gate driver datasheet
VCC = Logic section voltage source = 12V from DC/DC converter
Vf = Forward voltage drop across the bootstrap diode = 0.39V from the diode I chose
VLS = Voltage drop across the low-side FET or load = 0.15V Calculated this by using I squared R
VMin = Minimum voltage between VB and VS. = 11V not too sure about this parameter
Qls = level shift charge required per cycle (typically 5 nC for 500 V/600 V MGDs and 20 nC for
1200 V MGDs) = 5nC
Using the Values above,it was determined that the bootstrap capacitor needs to be 0.8uF. is this correct?
Also in the application note on page 14 it is stated that mosfet modules require more current to be driven and the gate driver may not be sufficient do you think this will be a problem for me?
Power Stage
For the power stage I want to keep things as simple as possible regarding soldering heatsinking and size. Therefore I have opted to use this Mosfet Module. The MTI85W100GC: http://ixapps.ixys.com/Datasheet/MTI85W100GC.pdf
This will make the controller to be very compact and the power stage should have low inductance correct?
I also plan to add things such as current sensing and temperature sensing but first I want to finalize my supply and mosfet drivers.
Aslo I need to calculate Snubbers etc but this will come soon.
If any one read this all I respect you haha and any feed back would be appreciated!
Regards Glenn
Before I start a bit of a background. I am an Electronics and Plant Process Control Engineering Student finalizing my degree. For my Higher national Diploma I made my own Brushless motor controller and it worked. It can be seen here: https://endless-sphere.com/forums/viewtopic.php?f=3&t=70870&start=50
Having said that it was very expensive and bulky to make because I took to much advice from my mentor. This time however I want to do it right, cheap and compact which would make it suitable for mass production.
I have already designed some circuits and need some feedback on my plan.
Supply to controller:
I plan to use the following DC/DC converter to supply the power to the contorller:
http://www.mouser.tw/pdfdocs/BD9G341-ad.pdf
I plan to use 2 of these DC/DC converters. 1 to step down battery pack voltage to 12V to drive the Mosfets and another one to step down from battery pack voltage to 5V to supply the micocontroller and hall sensors. I could use and LM7805 with the 12V DC/DC converter but I am trying to keep efficiency at a maximum.
Also would anyone be interested in buying standalone versions of this DC/DC converter as it is very versatile since it can handle 76V and supply 3A!? I could make this circuit and sell it to any one who wants one
Mosfet Drivers
I plan to use the following Mosfet Drivers:
http://www.infineon.com/dgdl/ir2104.pdf?fileId=5546d462533600a4015355c7c1c31671
The one thing I am not sure about is whether my calculations for the bootstrap capacitor size are correct. I have used this application note to make my calculations: http://www.infineon.com/dgdl/an-978.pdf?fileId=5546d462533600a40153559f7cf21200
As seen on page 6 there is an equation to calculate the boot strap capacitor.
Here are the parameters I have.
Qg = 88nC (this can be seen from the mosfets chosen below)
Frequency of operation = 32kHz in my case
ICbs (leak) = bootstrap capacitor leakage current I am ignoring this one since I will use cermaic capacitors as staed in the application note
Iqbs (max) = Maximum VBS quiescent current = 55uA found from gate driver datasheet
VCC = Logic section voltage source = 12V from DC/DC converter
Vf = Forward voltage drop across the bootstrap diode = 0.39V from the diode I chose
VLS = Voltage drop across the low-side FET or load = 0.15V Calculated this by using I squared R
VMin = Minimum voltage between VB and VS. = 11V not too sure about this parameter
Qls = level shift charge required per cycle (typically 5 nC for 500 V/600 V MGDs and 20 nC for
1200 V MGDs) = 5nC
Using the Values above,it was determined that the bootstrap capacitor needs to be 0.8uF. is this correct?
Also in the application note on page 14 it is stated that mosfet modules require more current to be driven and the gate driver may not be sufficient do you think this will be a problem for me?
Power Stage
For the power stage I want to keep things as simple as possible regarding soldering heatsinking and size. Therefore I have opted to use this Mosfet Module. The MTI85W100GC: http://ixapps.ixys.com/Datasheet/MTI85W100GC.pdf
This will make the controller to be very compact and the power stage should have low inductance correct?
I also plan to add things such as current sensing and temperature sensing but first I want to finalize my supply and mosfet drivers.
Aslo I need to calculate Snubbers etc but this will come soon.
If any one read this all I respect you haha and any feed back would be appreciated!
Regards Glenn