
I guess I should start by telling you how I got into this...... 
I'm an artist/sculptor/custom fabricator with a shop in L.A. I concentrate on one offs, or one of a kind problem solving. Clients come to me with an idea of something they want to make, but that they can't figure out how to build, and I make the thing, often coming up with a unique process to do it. I can fab in variety of materials but what I really like is metal and one of my favorite materials is aluminum which I both TIG and MIG. I'm one of those crazy/lucky people that kind of does exactly what they are supposed to do. I build things for money and when I get free time I build my own things for fun, or make things for my friends. In this case I'm building for my freind Gary so it's really kind of a collaboration. Gary is a hunter. I'm not talking about a guy who wears orange gear and rides around in a truck looking for something to shoot at. I'm talking more a mountain man who goes out into the wilderness for weeks at a time miles away from the nearest roads or help, and then packs out meat when he's done. He doesn't just want a electric bike, he wants a mule to get him out to the wilderness and back extending his range. So this build has a very specific purpose. Kind of a dual sport motorized mountain bike. I've never messed with electric bikes before but I'm good with power and have played around with bikes in general. In L.A. there is a art bike scene where people build crazy bicycles then ride them around at huge events. One of the main co-ops used to rent a space next to me and they got me into it. Since I weld aluminum I get to play with aluminum frames that no-one else can work on, so I'm pretty used to playing with aluminum bikes with various funky configurations.
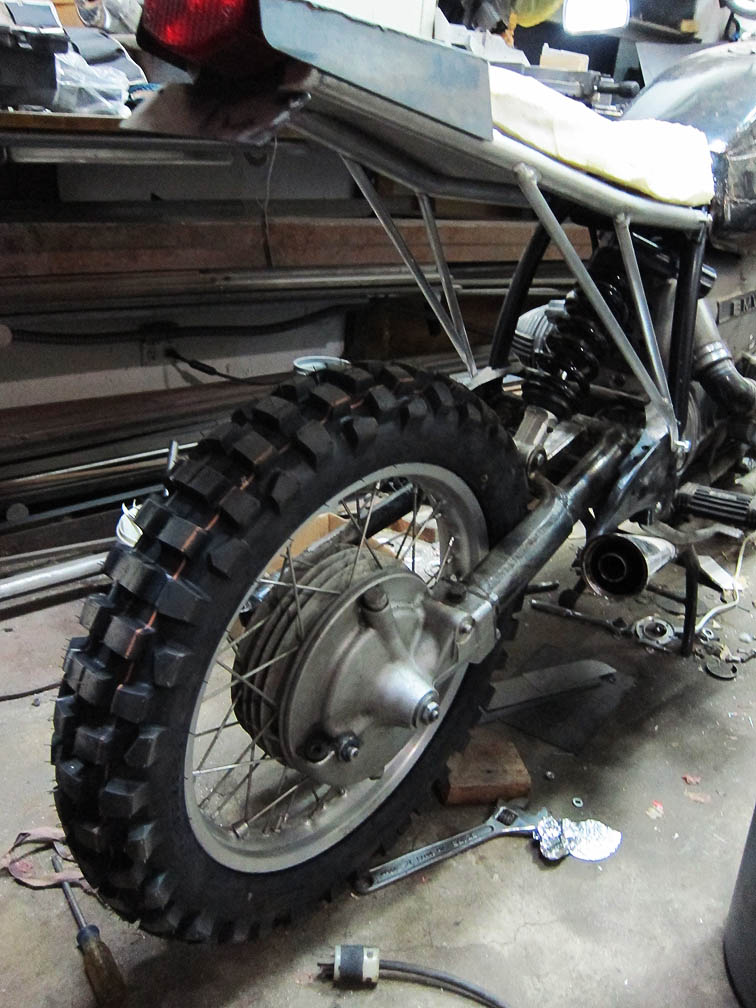
I also dual sport motorcycle mods. My current build is a rally style dirt bike for vintage offroad racing.
So basically there is nothing more interesting to me then inventing my own suspensions or doing frame mods.
When Gary came to me with the idea of his electric bike mule I initially wanted to design him an electric motorcycle with my own suspension design from the frame up. He wanted a bike that still could pass as a touring mountain bike at least from distance, and wanted to play with a standard build kit. So it was a compromise. It needed to be built with the standard stuff but it needed to get him out there, and not fail him if he dropped it or crashed back in the back country. I like the idea of the mid motor but was afraid he'd destroy the gear motor under the frame mount on rocks. So we bought a kit from Luna, but I moved the motor up where I could protect it.
Madness ensued
Part 1 Aluminum.
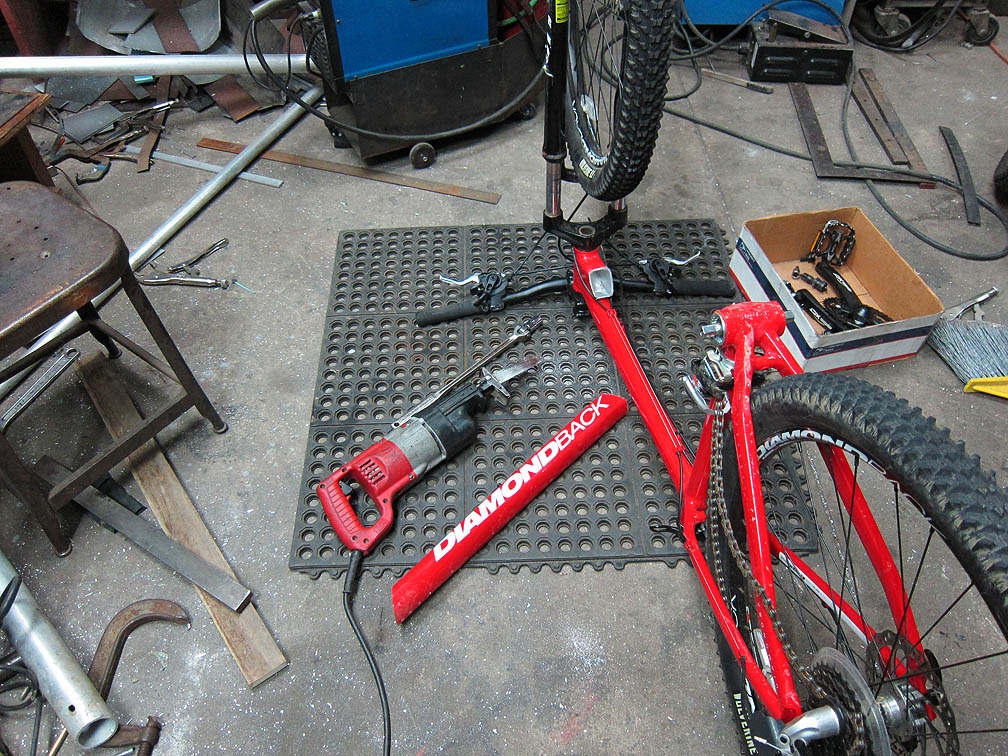
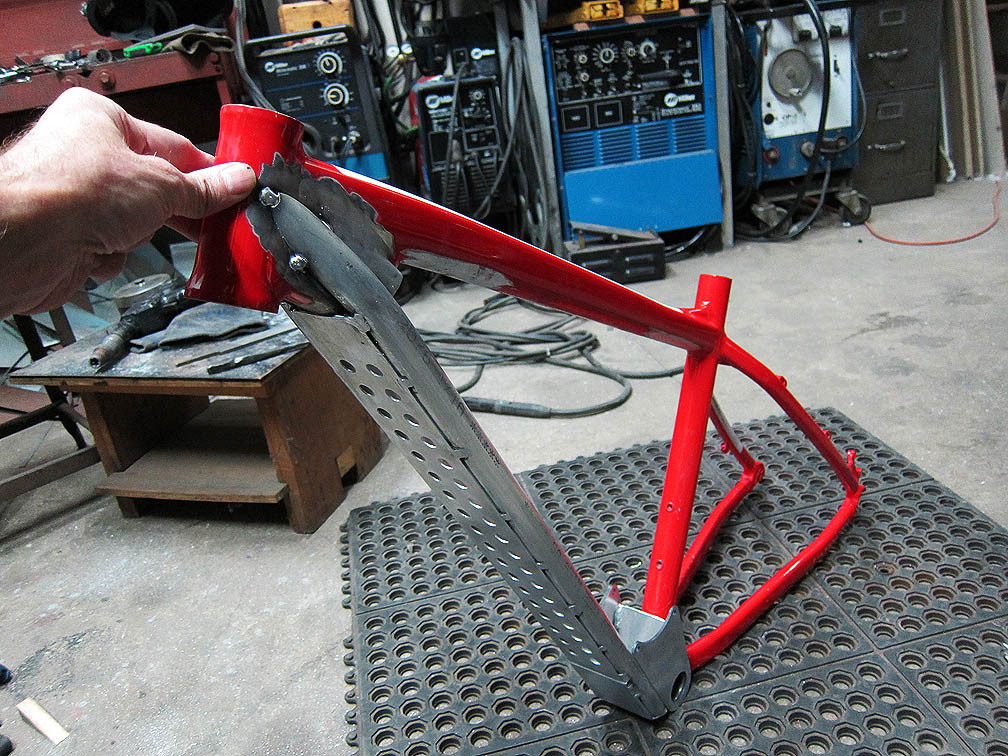
Gary brought by his donor Diamond back and like with all the best bike mods this started with a sawsall. :lol:
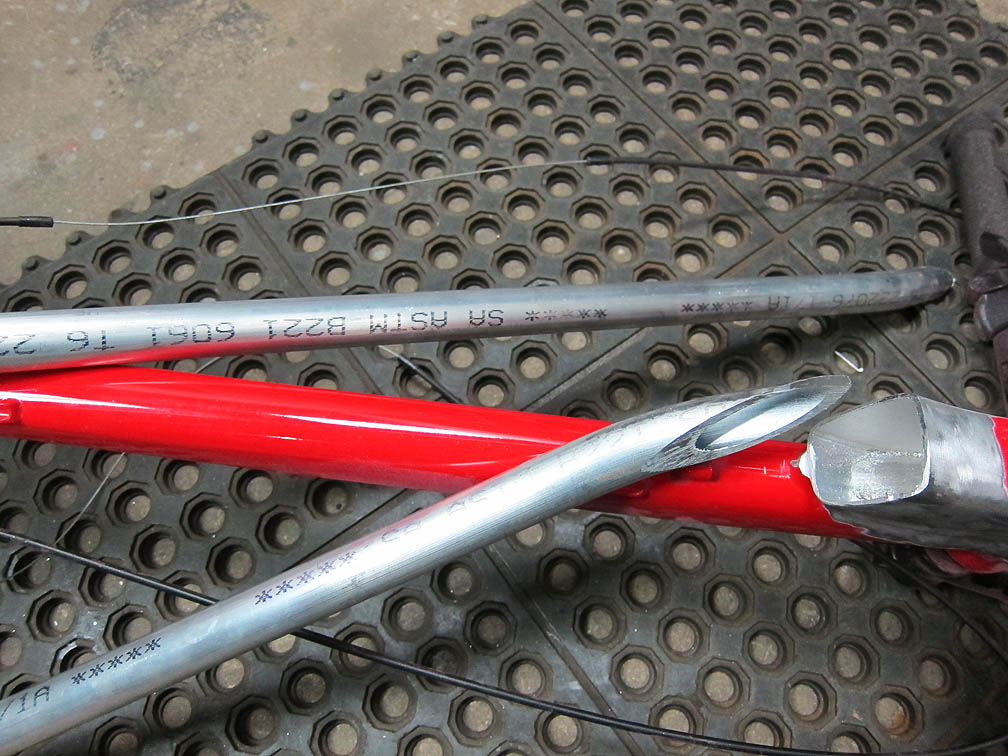
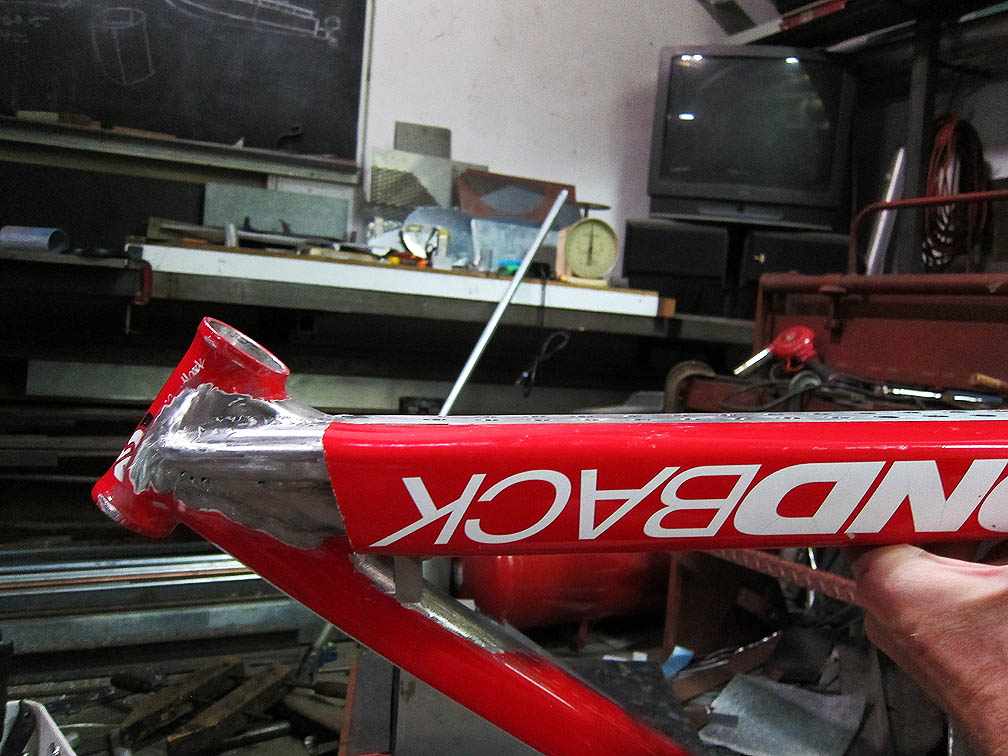
The idea here was to replace the downtube with twin tubes like a MX motorcycle frame. I'd connect to the front at the headtube, and run the rear down to the bottom bracket moving the connection slightly forward to make room for the motor. Since I was using only 6011 T6 aluminum and MIG welding it (lower heat exchange) I could weld it up without blowing the temper or having to heat treat it afterwards. The first thing was to get the forward transition to look right, which meant I had to bend the tubes. T6 can't be bent cold untreated you have to heat it to temporarily remove the temper. I always do this on the stove. You start by marking the tubes with a black marker then heat them.
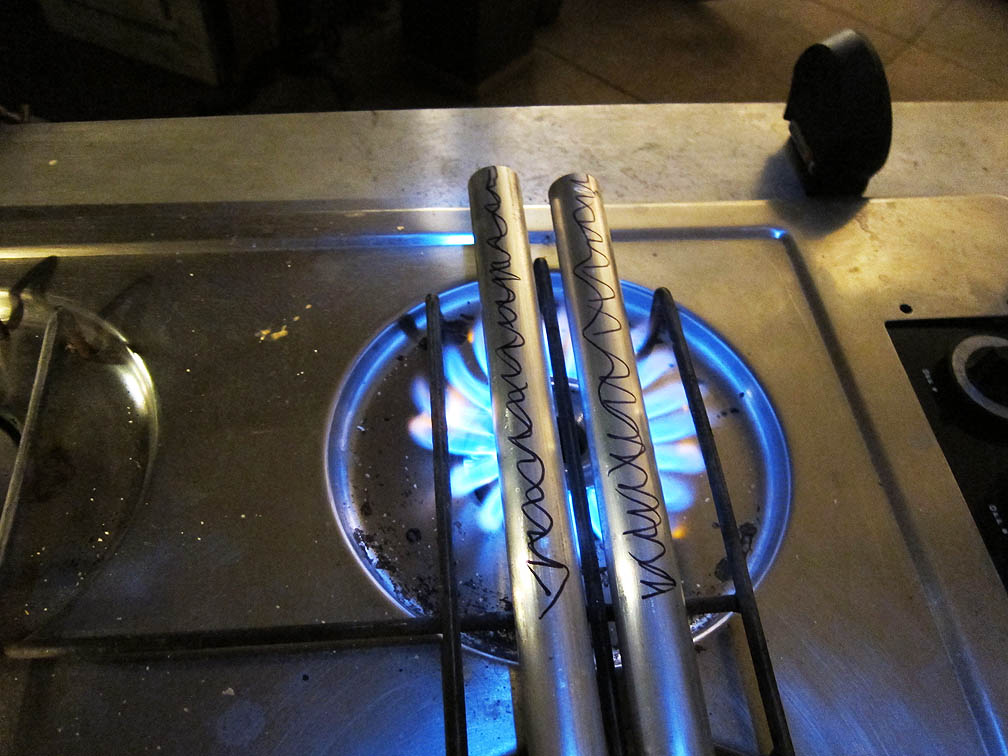
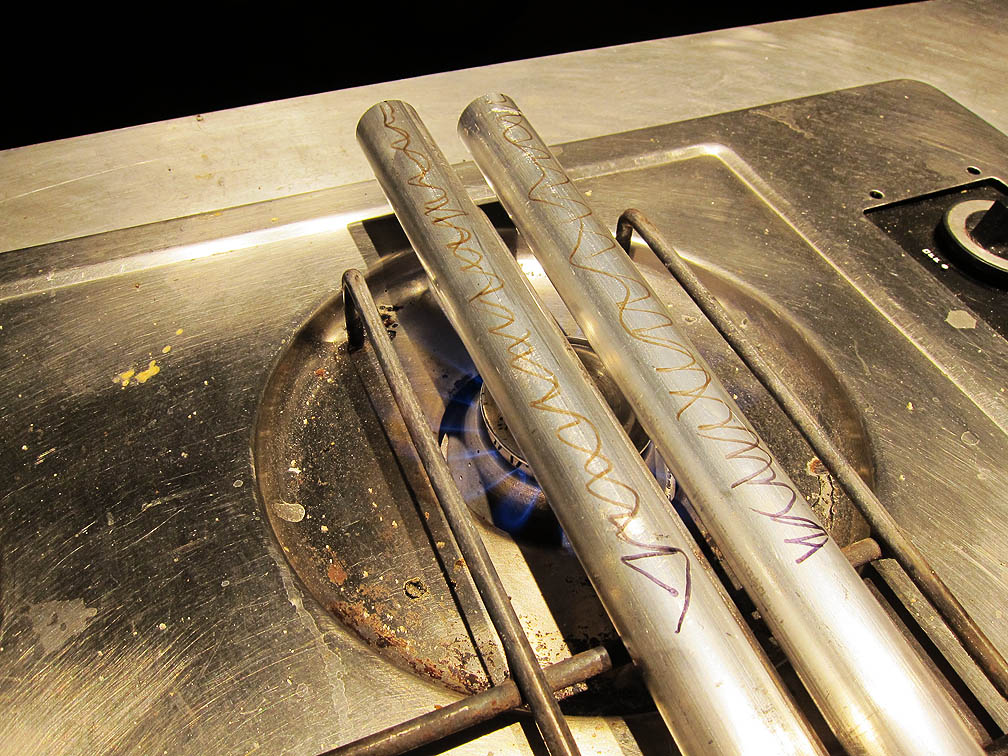
When the black marker has transitions from dark to brownish gold. That metal is 350+ or temporarily T4 (it re-hardens with time) so it's ready to bend. This is the oldest trick in the book, but I still think it's cool every time I do it. 8)
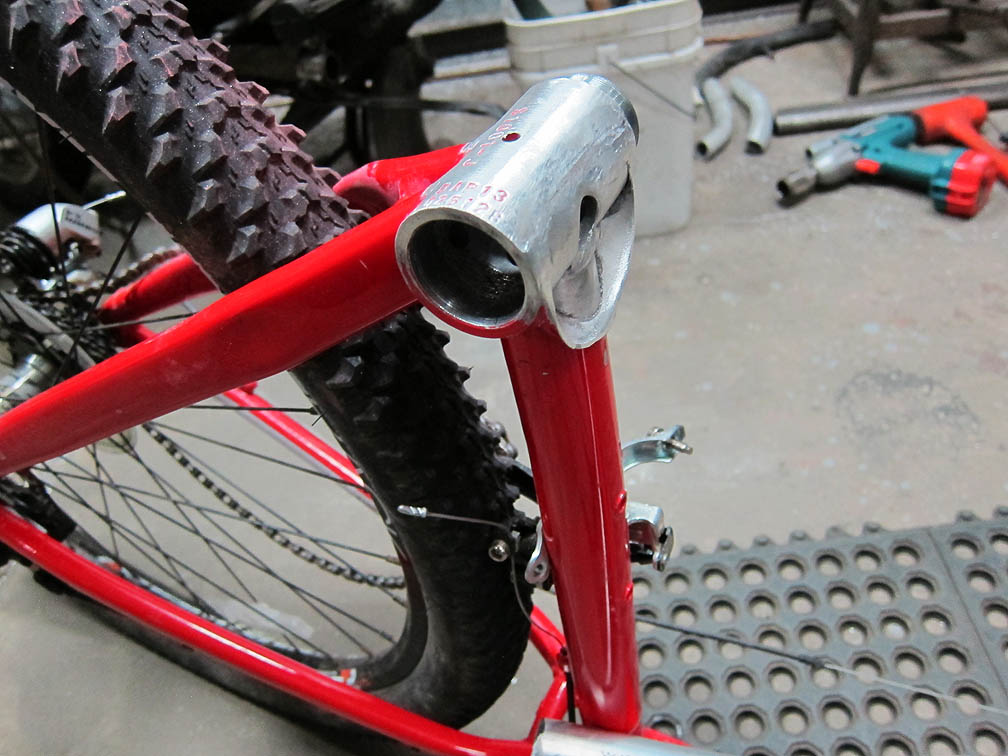
So I threw that metal in my bender, put a radius in it then cut the ends to make a even transition to the head tube.
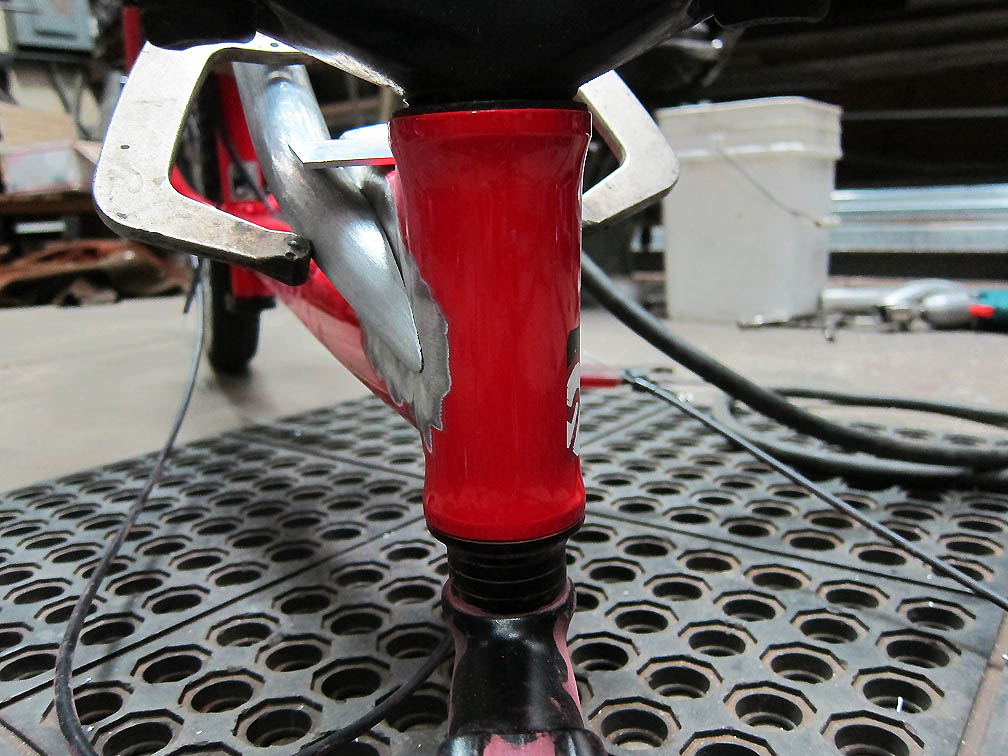
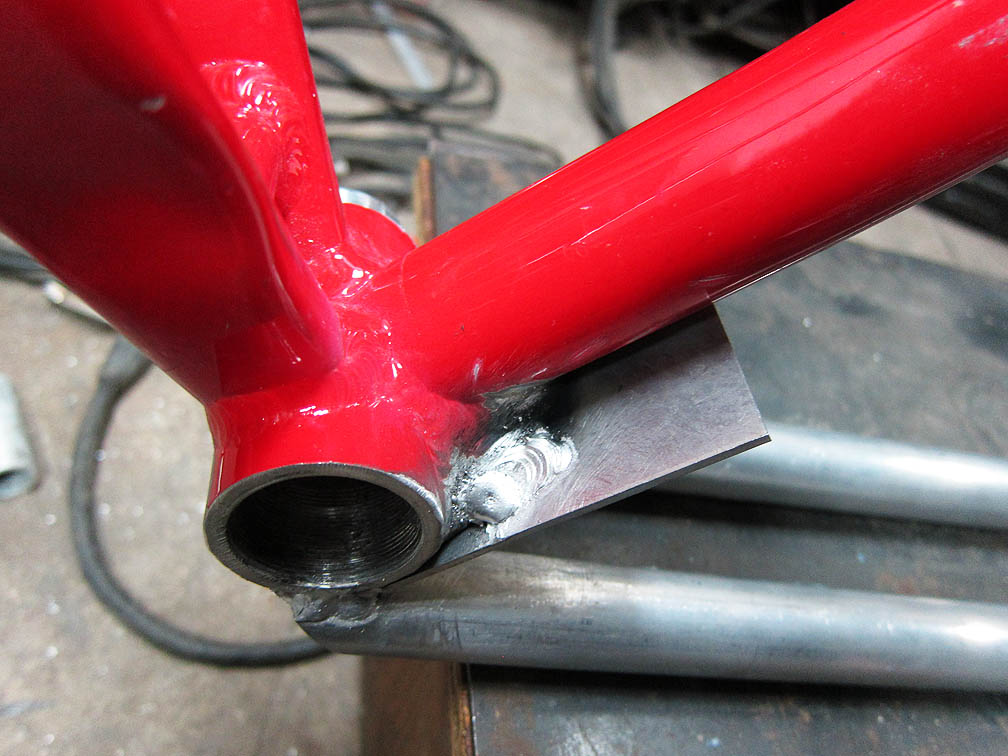
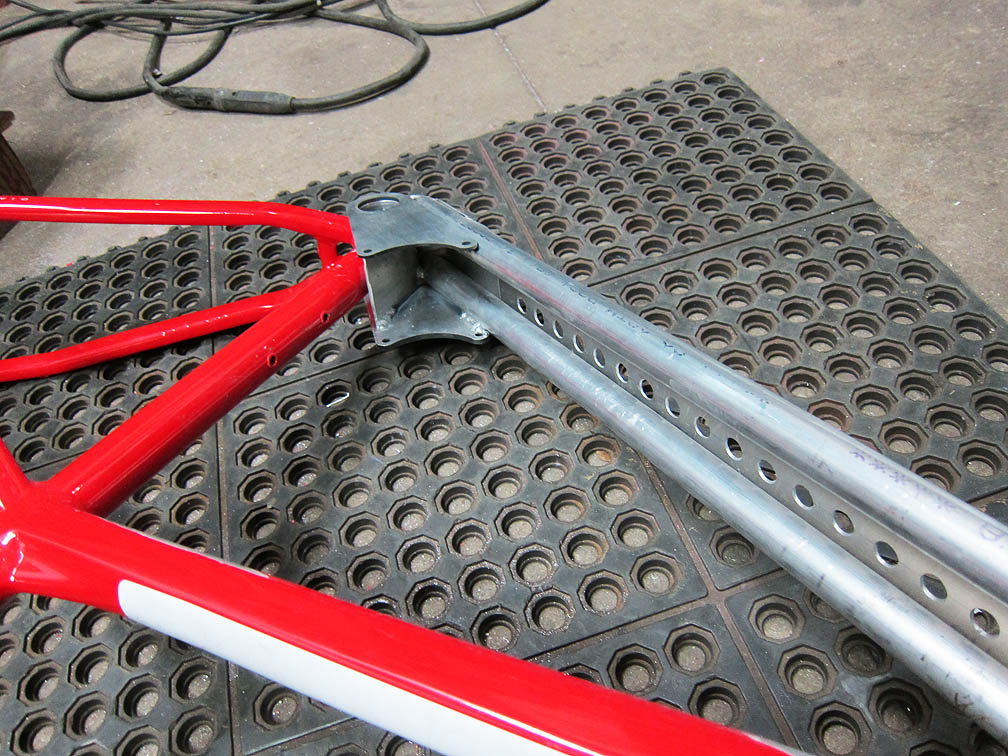
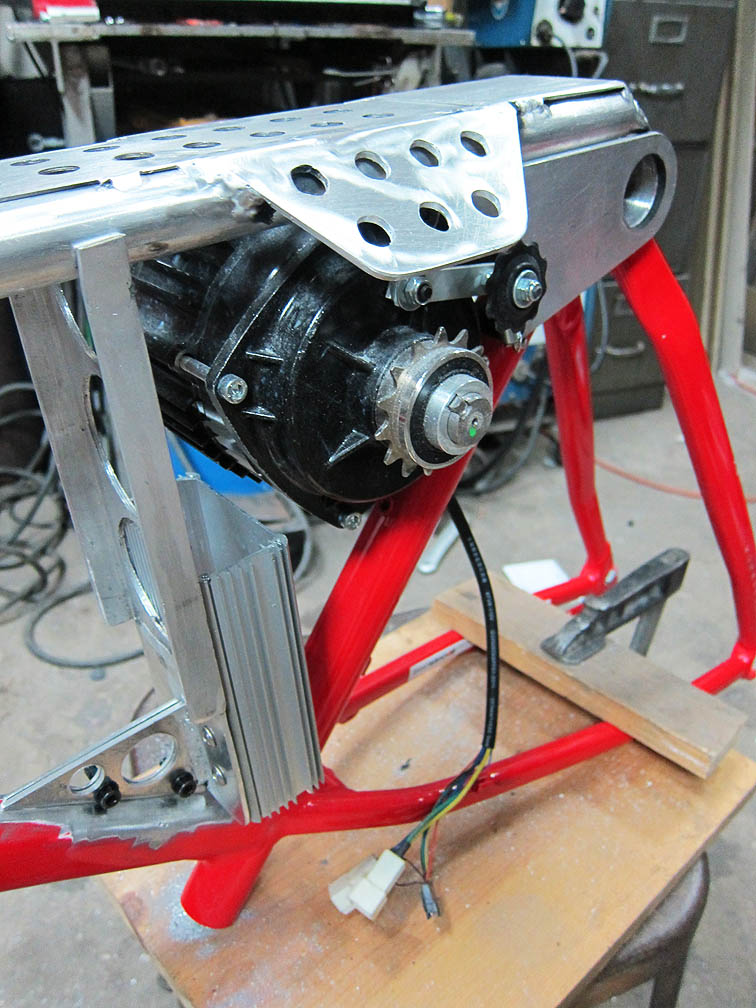
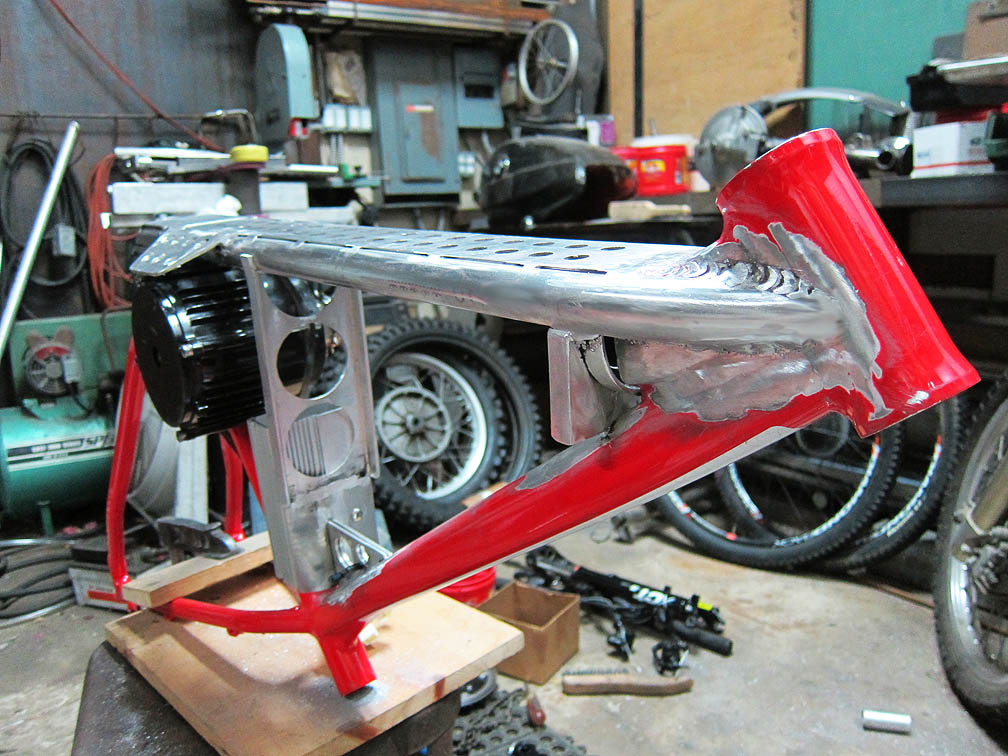
Once that was fitted I cleaned up the bottom bracket and then welded the tubes to the front of it then added additional bracing.
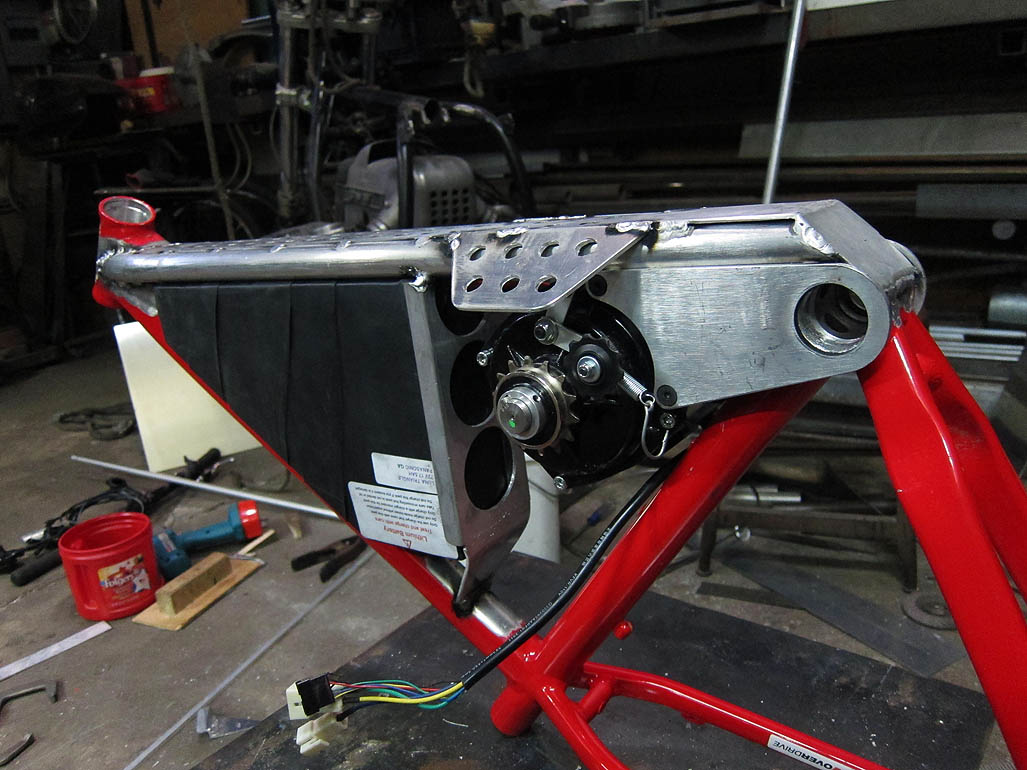
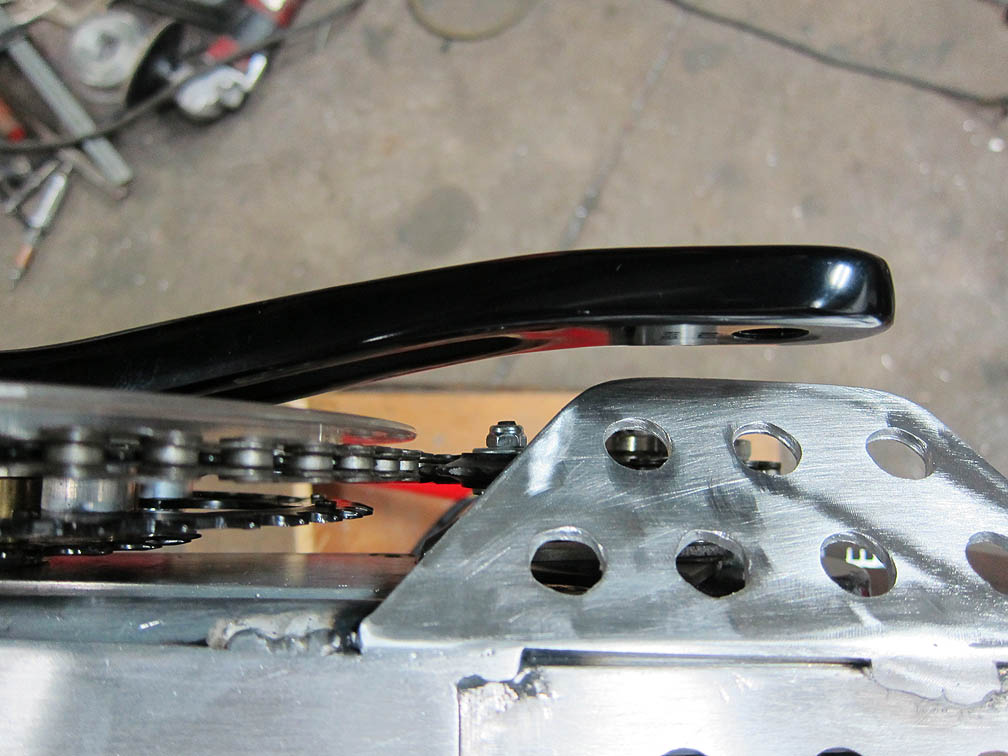
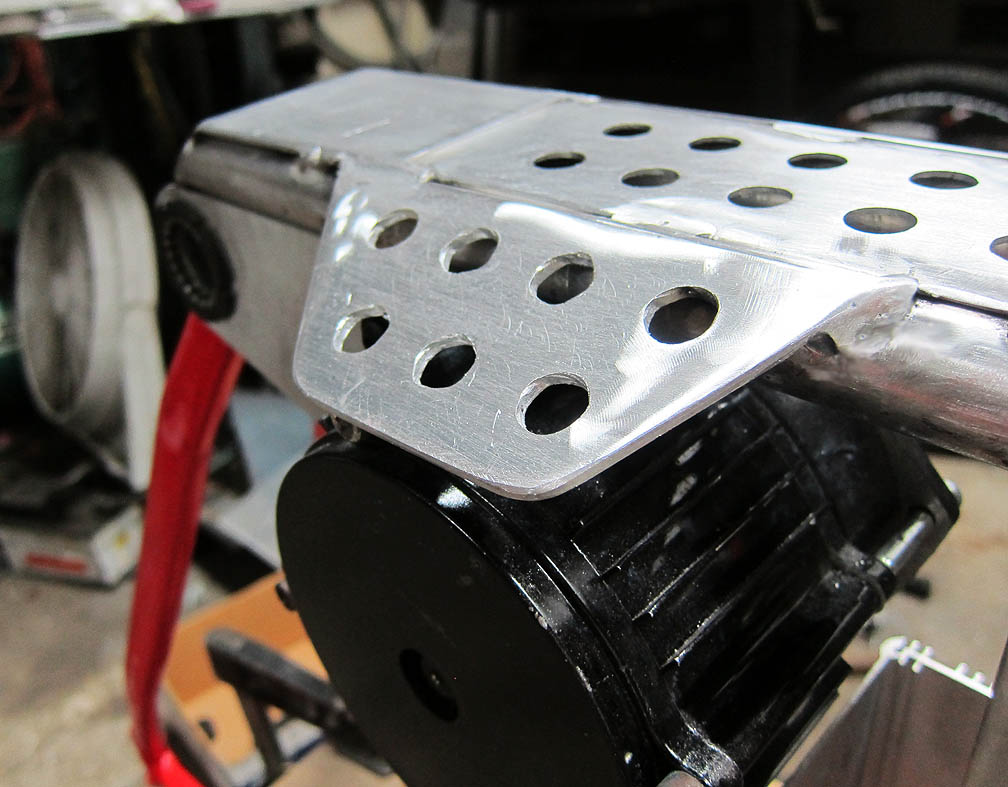
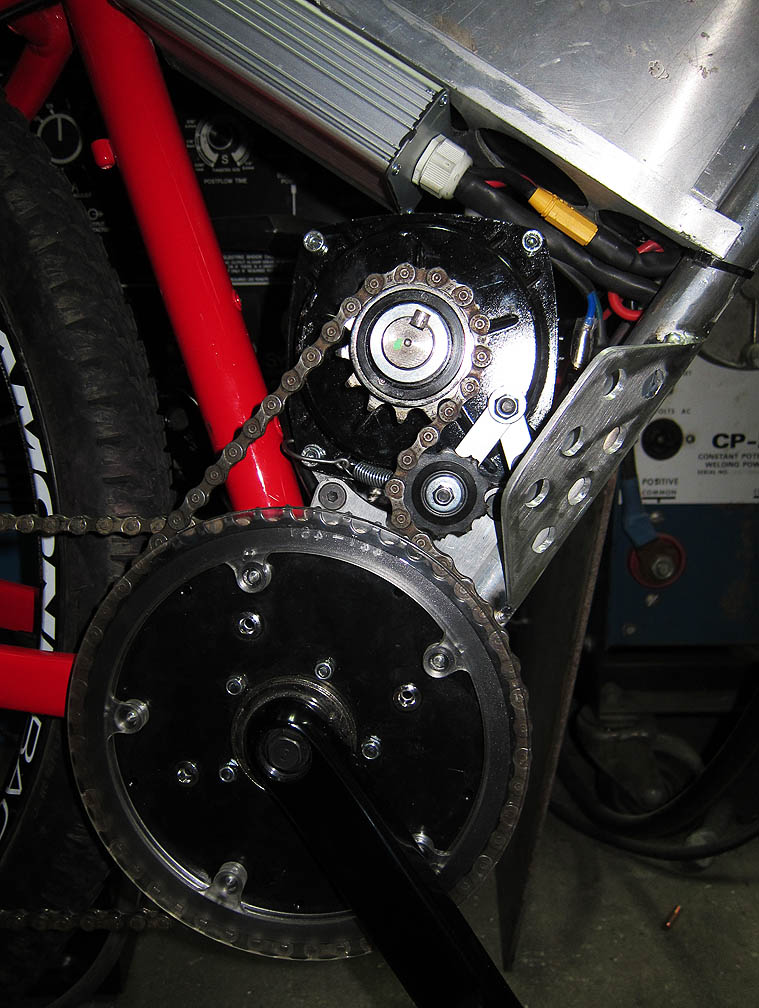
Here you can see the added back plate stiffener for the motor mounts.
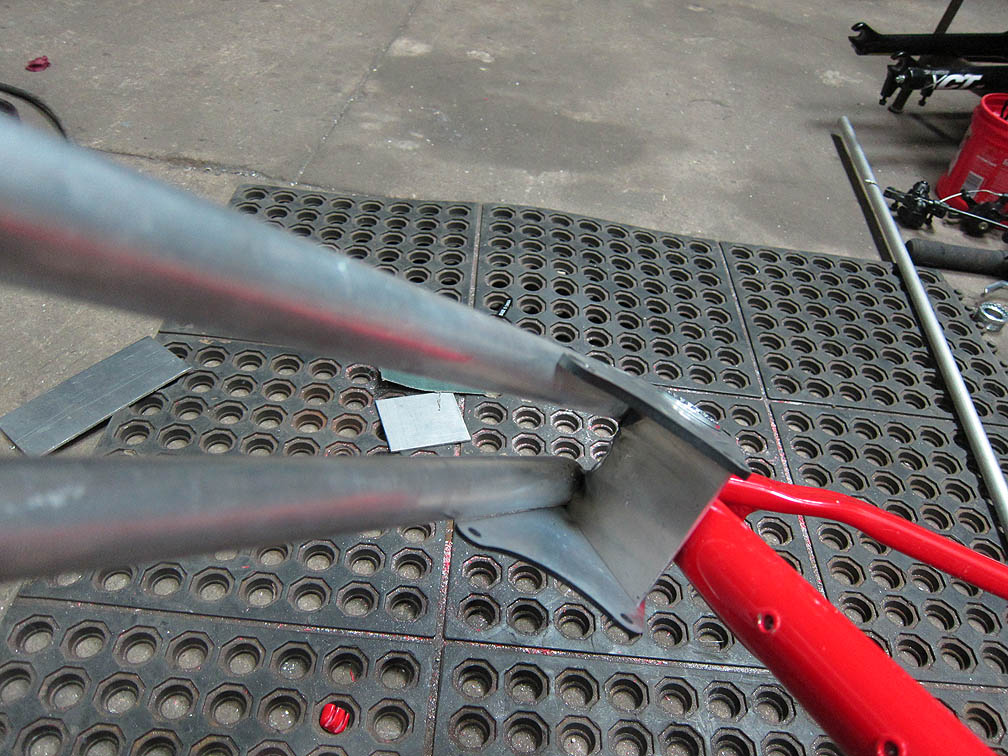
I considered making my own motor mounts but used theirs out of expediency. As you can see I beefed them up a bit.
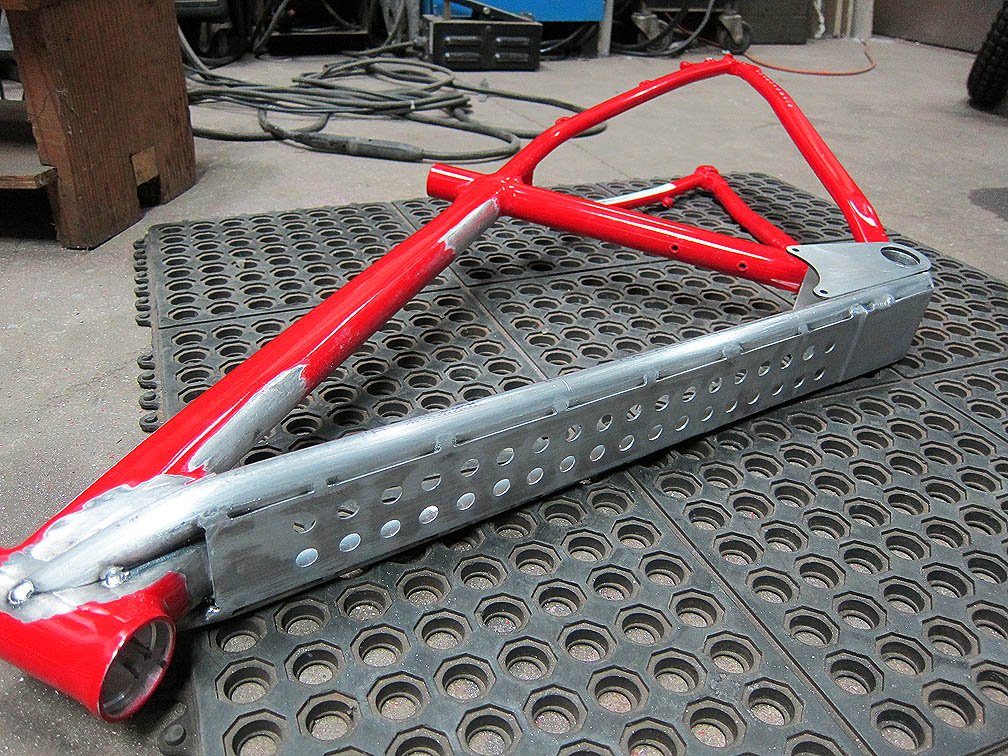
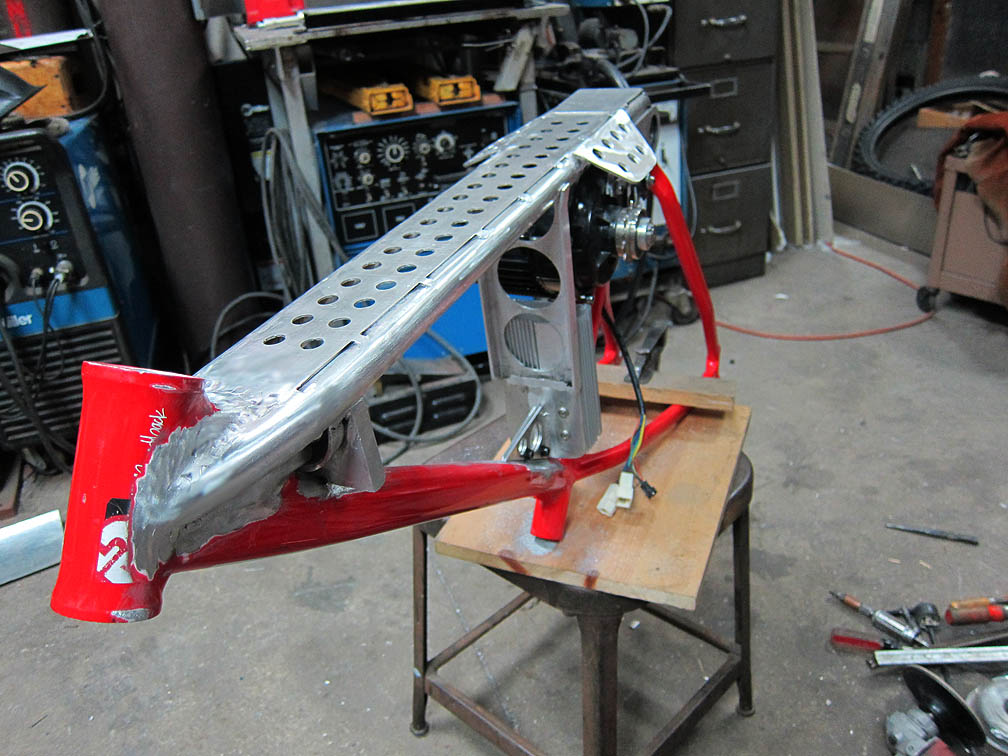
With the added bash plates you can see where this is going.
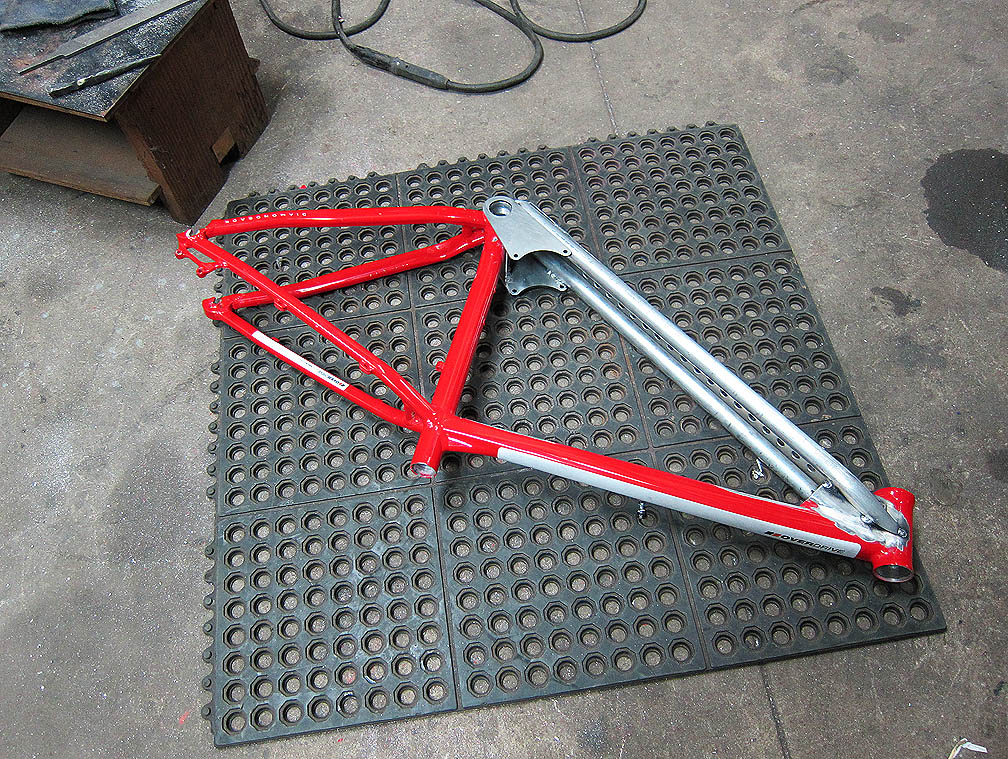
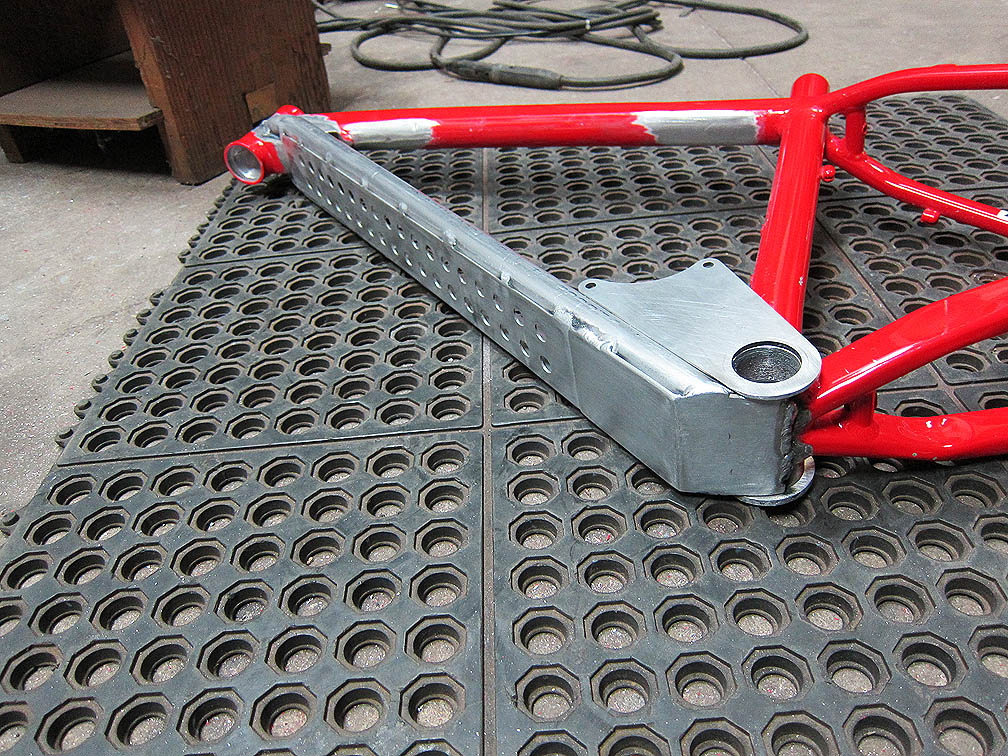
So that is the basic frame, weighing in at mighty 6 pounds.
Part 2 Dubious additions.
Next step was to add the side bash plates to protect the motor and my initial try at a battery mount.
The idea there was the battery would twist in and out and be held by a removable bracket in the front. Unfortunately the battery got stuck. While fighting with it I decided I wanted to cover the battery with metal to protect it anyway so that mount was scrapped though the bash plates remain.
Part 3 the war of the bottom bracket.
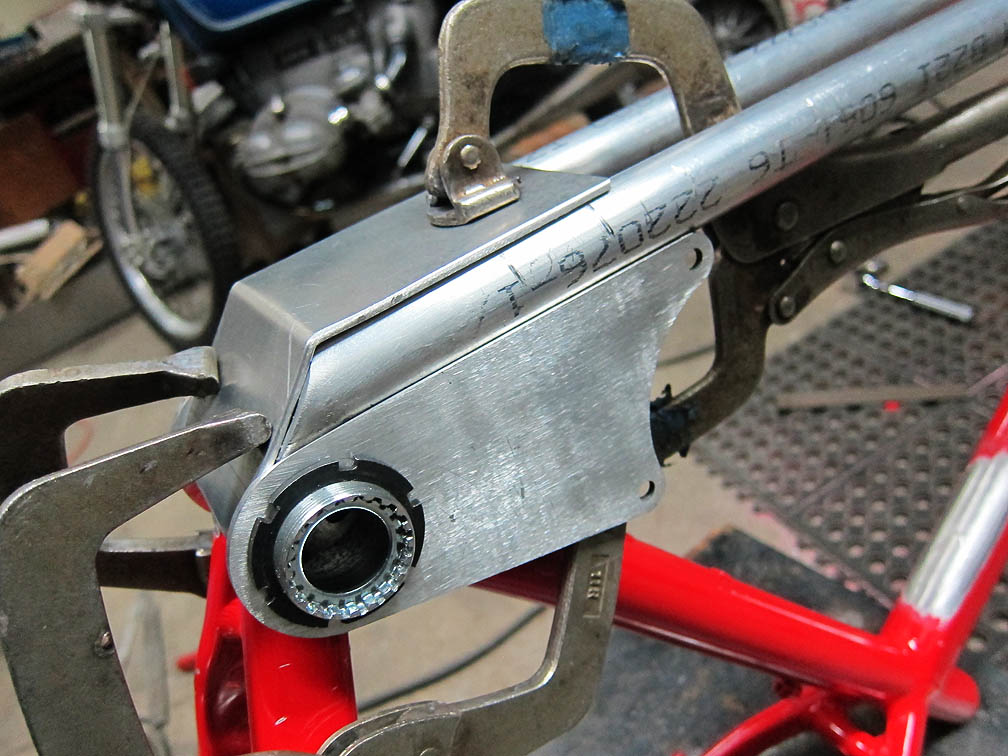
I hate to bash people's stuff, but I'll be straight up I had some real problems with the standard cyclone kits ]replacement tapered 68-83mm BB. The right side tried to cross thread every single time I attempted put it in. Both cups were shallow and the left cup was also not deep enough to correctly catch the bearing, and the bearing spacing was not correct to line up the crank arms properly with the motor. Just not cool. The first mod I made was a bearing spacer to get the bearing over.
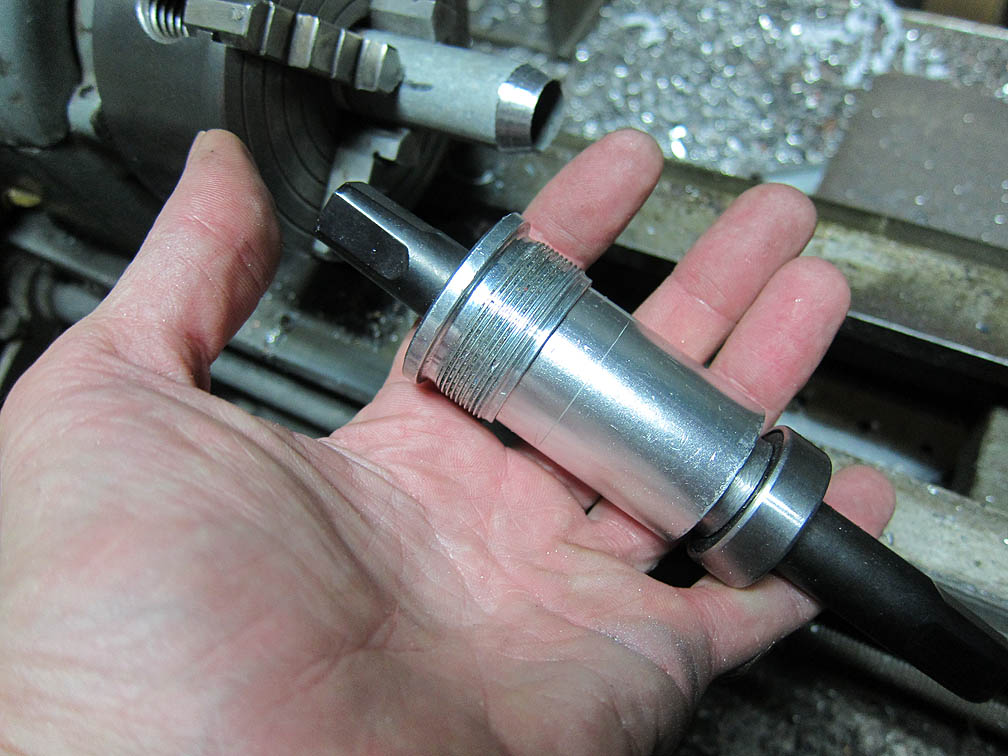
Even with the bearing moved over the cup still would not thread. After fighting with it the better part of a afternoon, and re-cutting the threads with a die, I gave up and threw a pair of used Shimano cups on the lathe and machined them to the exact tolerances I needed.
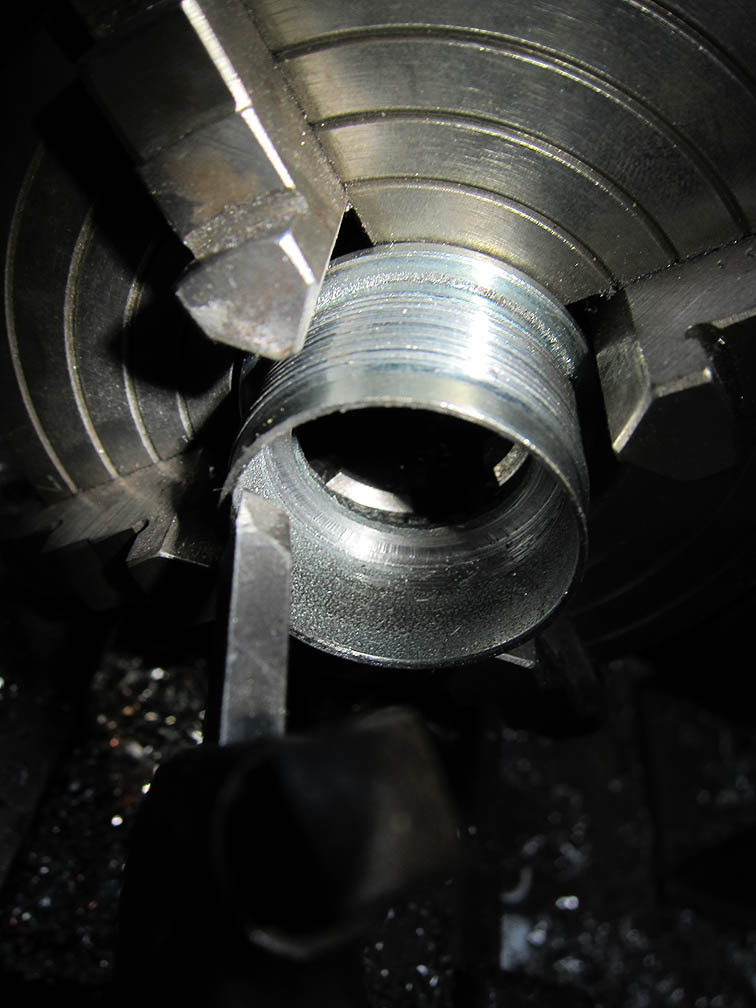
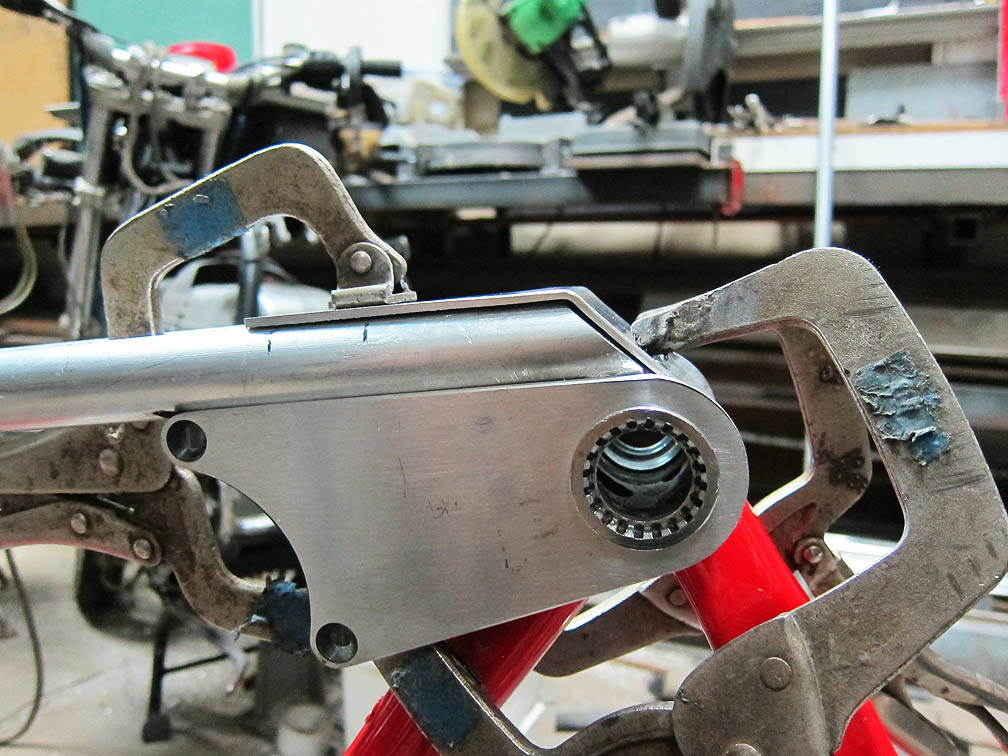
That threaded up nice fine but once in place I realized the right cyclone kit bearing was bad. It had a bind or catch in it, so I took the whole thing back apart and replaced the right bearing with a Shimano sealed bearing of the same size.
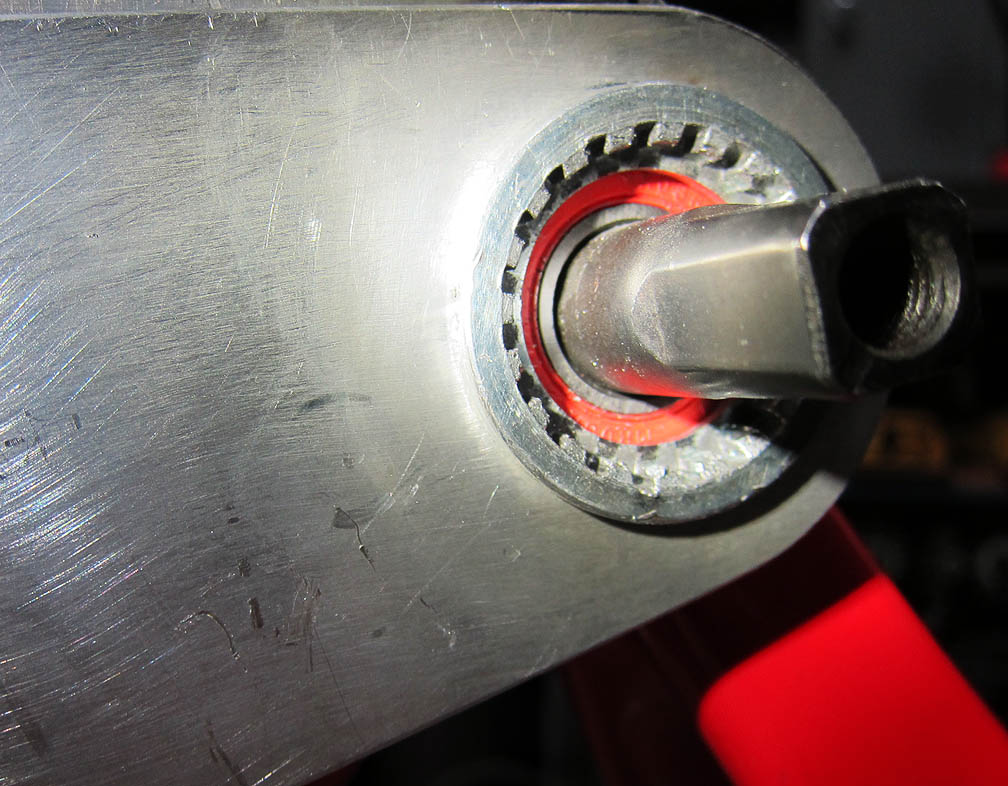
All Shimano goodness right there.
Since the right side gets the most force and the left bearing seemed fine I just used the left bearing that came with the BB on that side. Hopefully that won't come back to haunt me.
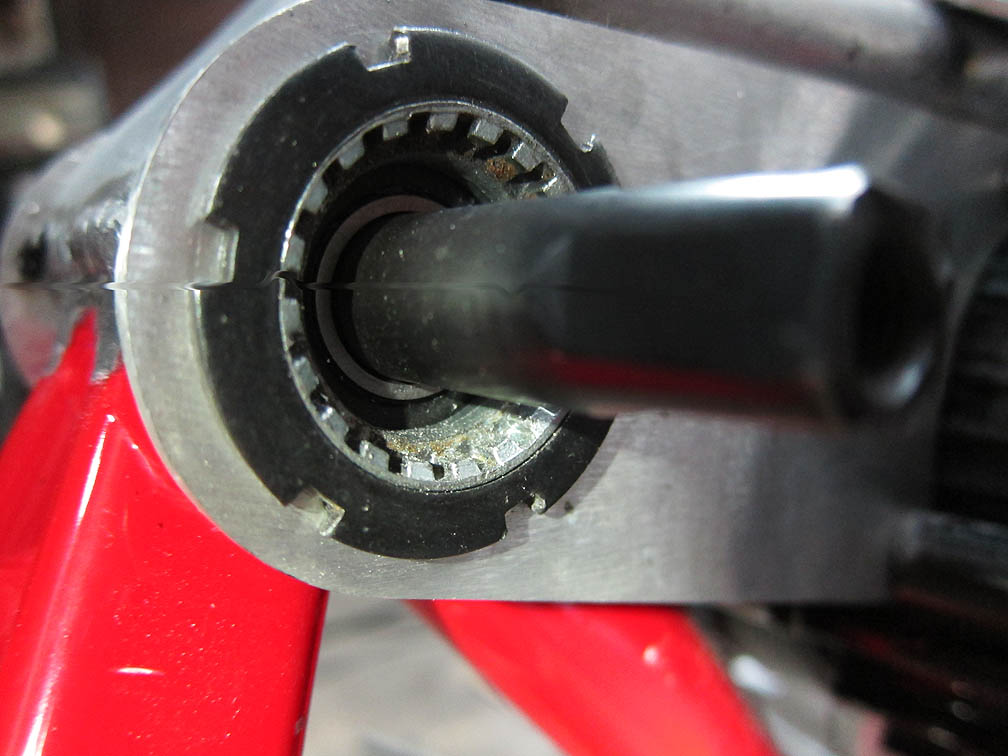
This got me the exact alignment I needed one the crank and drive chain rings.
The crank arms had the proper spacing as well.

Part 4 General refinements and the battery and controller mounts.
Now I needed a way to hold the battery in place, so I modified the first bracket I made.
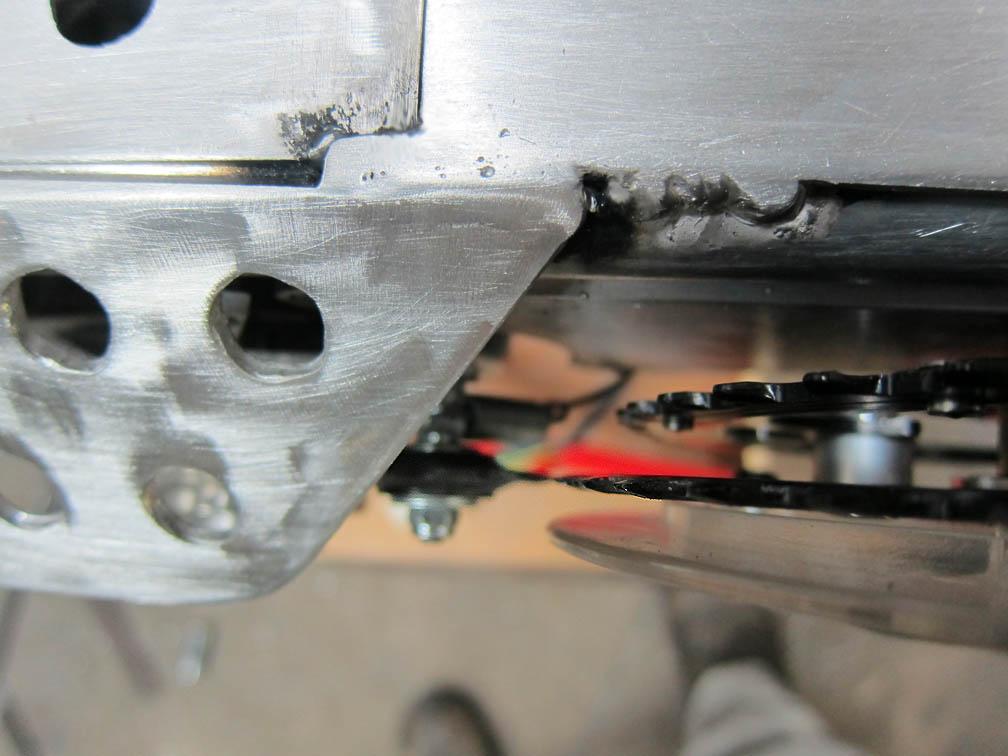
Chain ring side bash plate, rear battery support, and controller position.
Down tube Bash plate right side full length.
Motor bash plate left side.
Bash plate and down tube left (note the opening for power cable routeing in front of the forward battery stop, all wires from the front will run under the battery.)
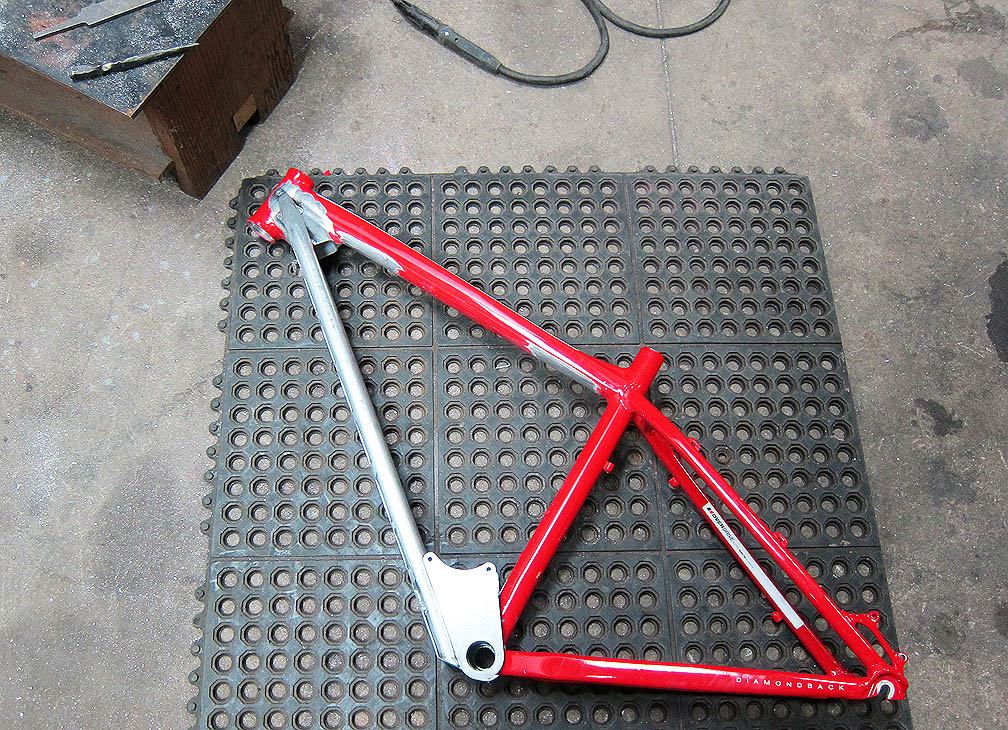
Here you can see how the twin tubes line up compared to the original.
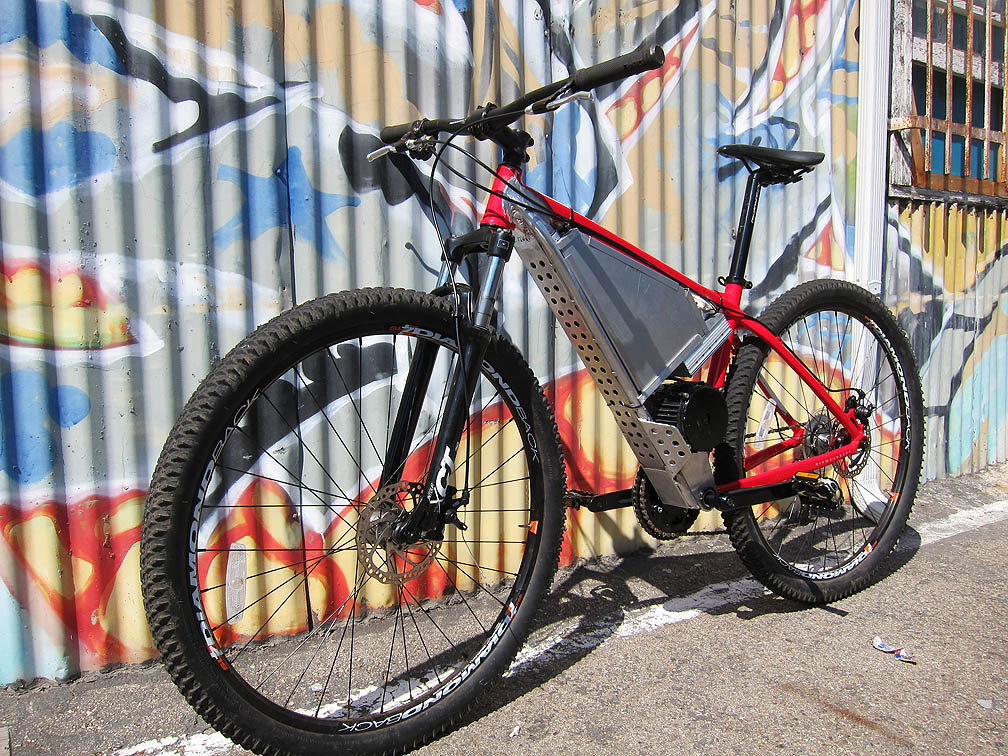
Here's the battery position with my initial enclosure (there are still some minor refinements I'll be doing to the enclosure)
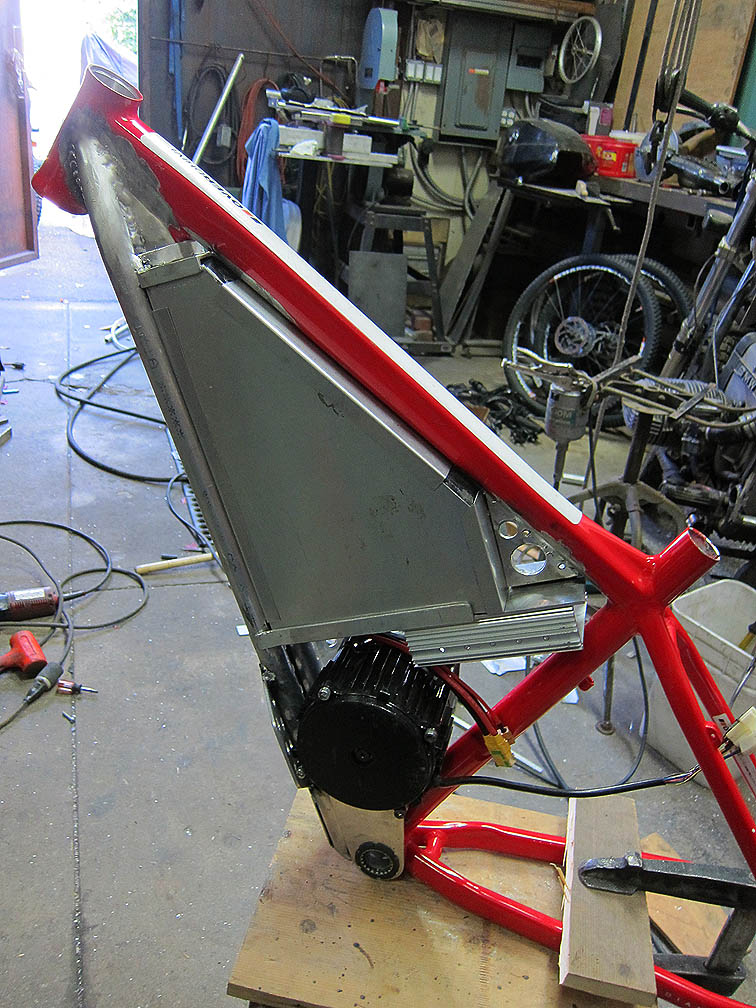
As you can see the down tube has been converted twin arm motocross type to give him more protection but also more space for the battery and motor. It also allows space under the battery for routing excess wiring. Best of all it keeps the frames original size with the profile of the frame the remaining same. (stealth factor) The new structure connects at the two fixed (non flexible) points of the frame, but leaves the rest of the frame to flex under load like a normal frame. So the bike itself still feels like a normal bike even with it's gear and power load.
Part 5 ride tests no power.
At this point I decided to assemble it all and check the ride. My take was that if it did not ride well, I needed to know as soon as possible. We are talking the battery and motor in there for weight but not wired, with the rear derailleur installed and working, and the brakes are set up and adjusted. I first tried it with only the motor and it felt like a decent well balanced mountain bike. I could ride it like that all day and never think twice about it being anything but a normal bike. The battery increased the weight, and it alters the center of gravity forward but the bike still rides decent. Straight up no bullshit assessment. Bike rides a lot better without power then I thought it would.
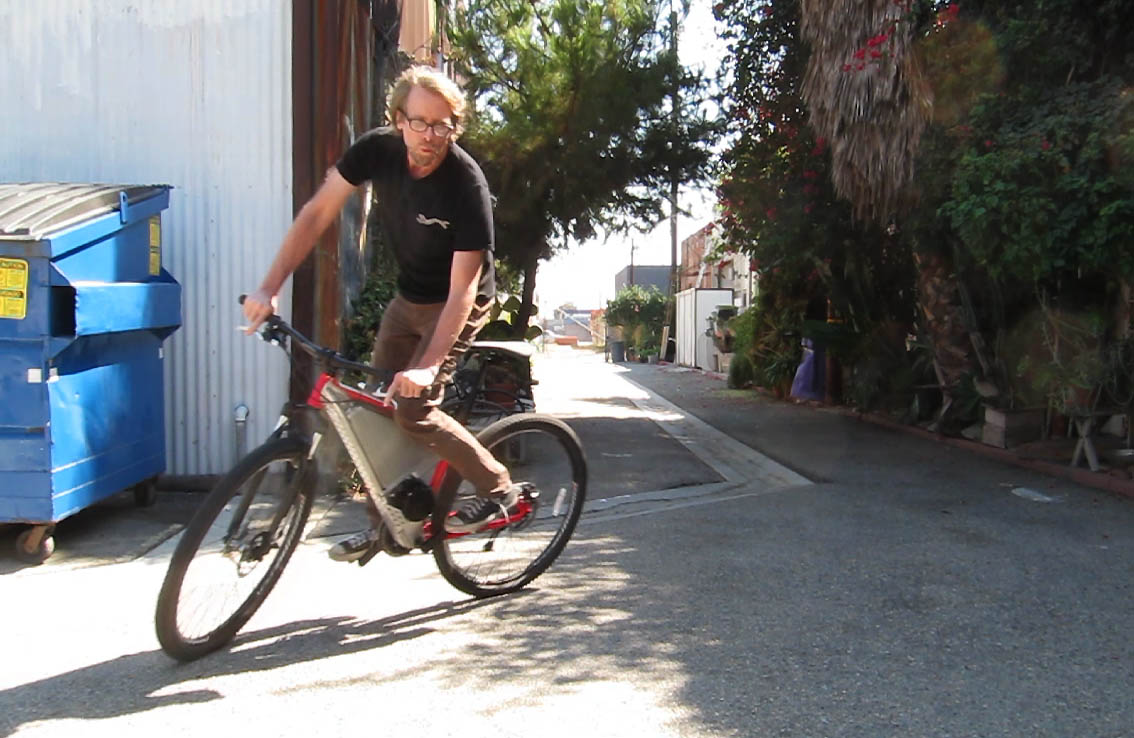
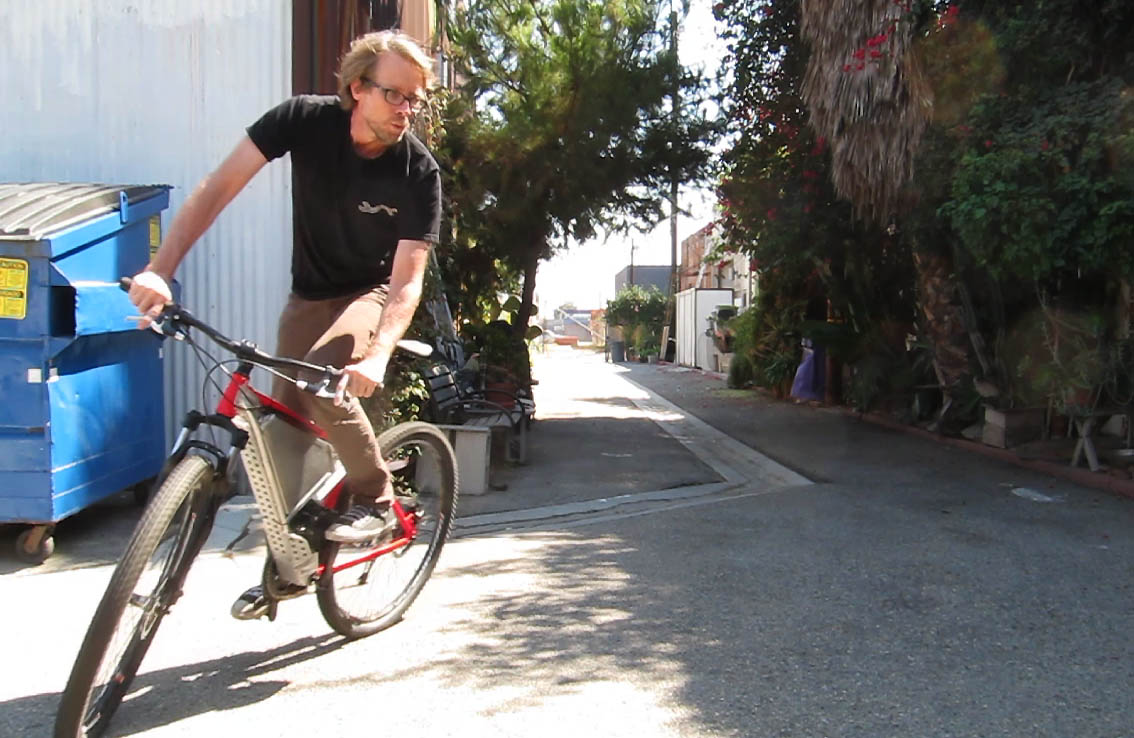
Assembled pics.
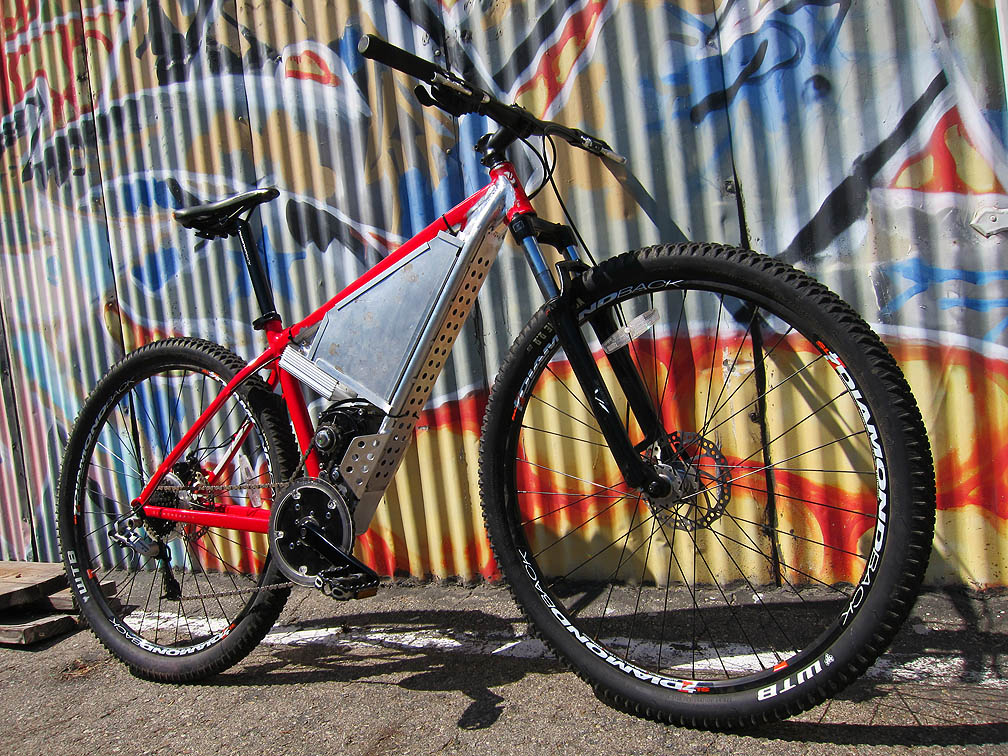
Here's a couple of pics my neighbor took of my while test riding it. They are good for scale but you can also see how relaxed I am riding it. Even in tight circles in a confined space behind my shop it felt good. Great low speed stability, bike felt great, very comfortable to me.
Part 6 Wiring the controller.
So I could not find much information about wiring the controller, but gave it a hard look over and basically figured out what I needed. I kinda decided to remove everything else, but then was afraid to do it :lol:
Friday after a long night I took the plunge. I cut off all the wires that I did not need, and heat shrinked them clear with their respective labels inside the controller for further reference.
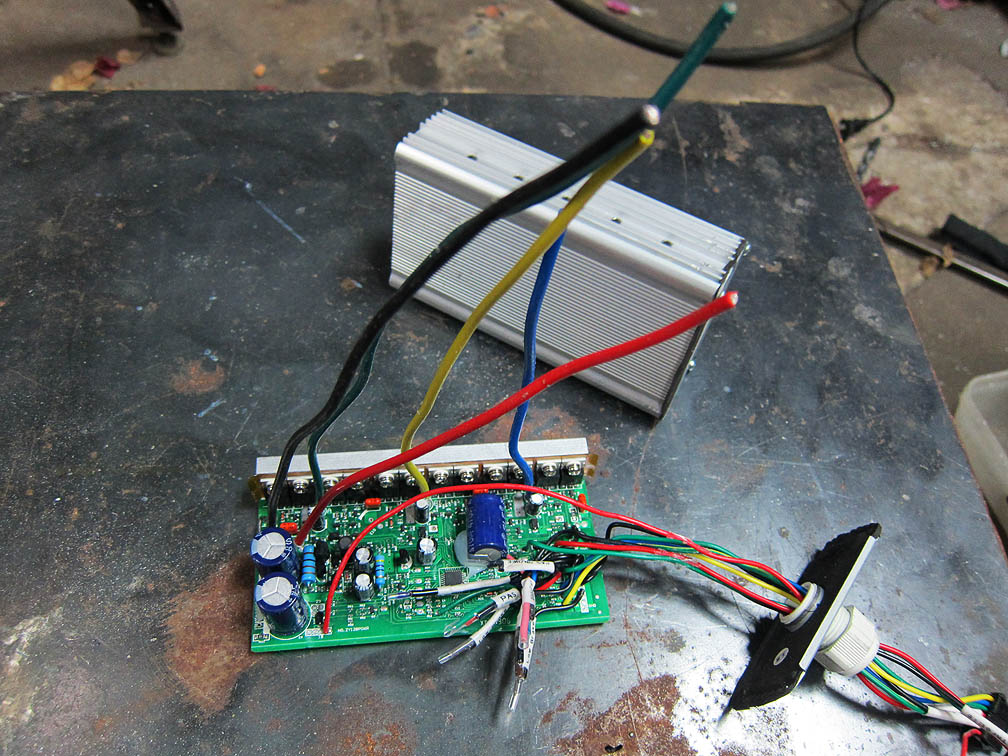
I then spliced in a new power feed wire for one of the connectors so I could solder it in inside the box.
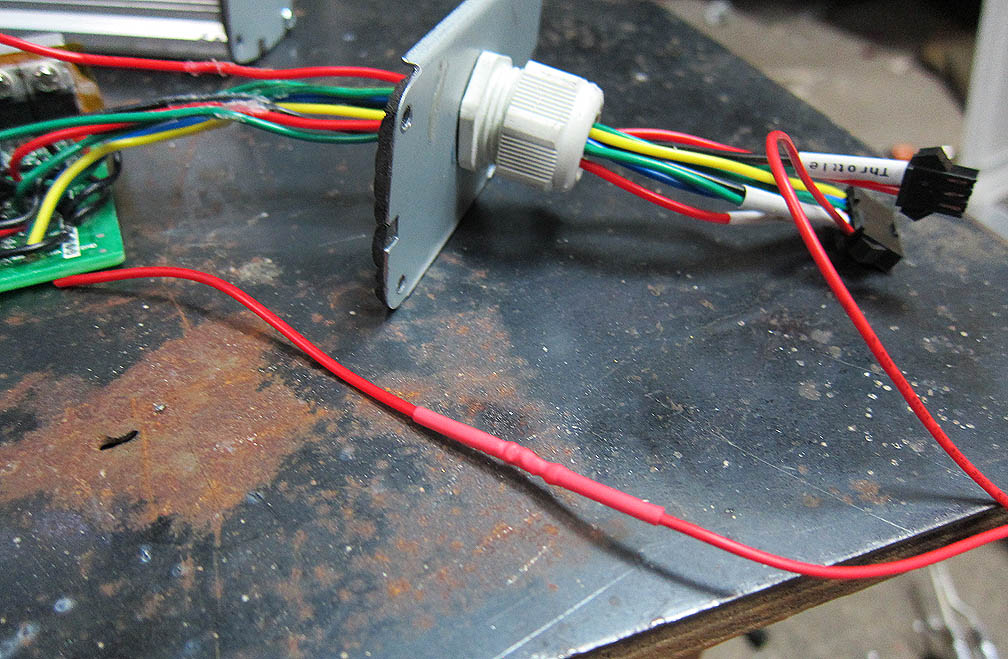
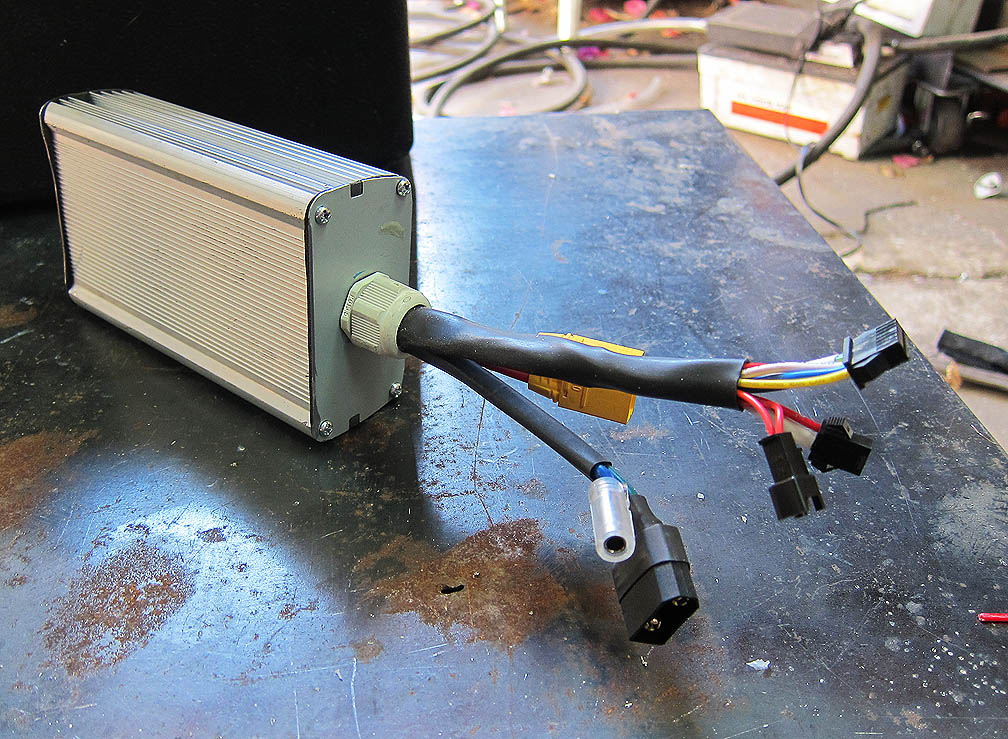
Connected that wire in when I wired the new power leads, with XT90 connectors.
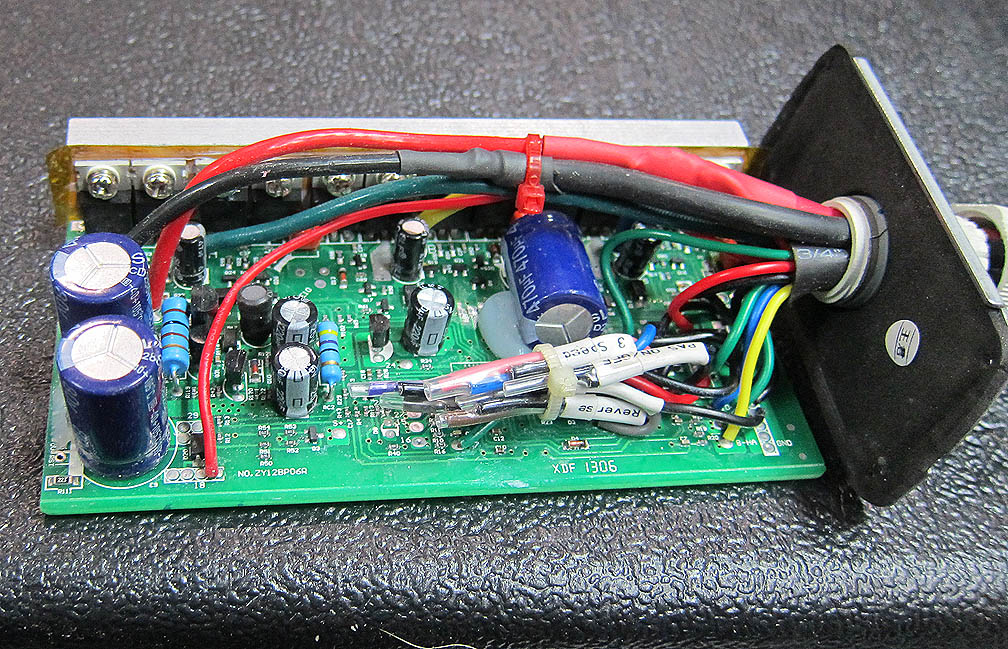
....and this is the result.

Now there is a mistake there. I used a quick connect for the blue wire underestimating the power that was running through it. It functions but it's overheats. What I really need is a single XT90 connector to solder in there (fixed that last night).
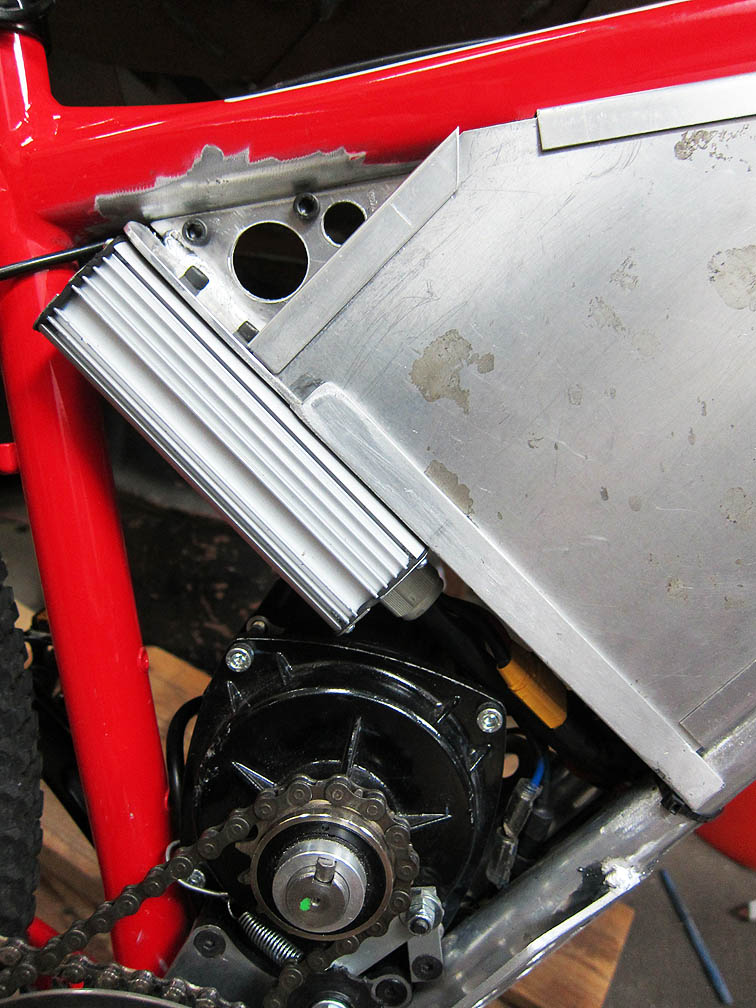
Here's everything in the bike.
I'll post some better pictures later
Part 6 first powered ride test.
Gary showed up a on Saturday and I hooked everything up. Amazingly it all worked the first time. I swear the last thing I said before I plugged it in was: "How much are those control units" :lol:
Road good.
[video=youtube_share;Pl0usfLqOkA]https://youtu.be/Pl0usfLqOkA[/video]
I was pretty impressed. Very fast but very stable even I'd say comfortable at all speeds.
That's not even it's top speed. I was testing it with the 46 chain ring forward, and in the middle of a 11/34 mountain bike cassette rear so probably about a 18 rear. I later made some faster runs with higher gears but started getting nervous when the speeds topped well over 40+. The bike felt fine but I didn't feel comfortable riding at those speeds on something I just built without a helmet. Since I ride both motorcycles and bikes it's almost too accessible. It's not really a bike anymore but does not feel like a motorcycle, it's something in between. What really surprised me was the high speed stopping distance. The disc brakes had plenty of grab but the issue was traction. It's under sixty pounds so it wants to skid when you brake hard. I'm just not used to braking a bicycle at those speeds. It's probably going to eat tires.
So that is where it's at now. I still have a few refinements to do, and it's going to get painted, so I'll be adding more later. You guys are all more experienced then I am. Questions, comments, criticisms or sage advice the time is now :lol:
I'm an artist/sculptor/custom fabricator with a shop in L.A. I concentrate on one offs, or one of a kind problem solving. Clients come to me with an idea of something they want to make, but that they can't figure out how to build, and I make the thing, often coming up with a unique process to do it. I can fab in variety of materials but what I really like is metal and one of my favorite materials is aluminum which I both TIG and MIG. I'm one of those crazy/lucky people that kind of does exactly what they are supposed to do. I build things for money and when I get free time I build my own things for fun, or make things for my friends. In this case I'm building for my freind Gary so it's really kind of a collaboration. Gary is a hunter. I'm not talking about a guy who wears orange gear and rides around in a truck looking for something to shoot at. I'm talking more a mountain man who goes out into the wilderness for weeks at a time miles away from the nearest roads or help, and then packs out meat when he's done. He doesn't just want a electric bike, he wants a mule to get him out to the wilderness and back extending his range. So this build has a very specific purpose. Kind of a dual sport motorized mountain bike. I've never messed with electric bikes before but I'm good with power and have played around with bikes in general. In L.A. there is a art bike scene where people build crazy bicycles then ride them around at huge events. One of the main co-ops used to rent a space next to me and they got me into it. Since I weld aluminum I get to play with aluminum frames that no-one else can work on, so I'm pretty used to playing with aluminum bikes with various funky configurations.
I also dual sport motorcycle mods. My current build is a rally style dirt bike for vintage offroad racing.
So basically there is nothing more interesting to me then inventing my own suspensions or doing frame mods.
When Gary came to me with the idea of his electric bike mule I initially wanted to design him an electric motorcycle with my own suspension design from the frame up. He wanted a bike that still could pass as a touring mountain bike at least from distance, and wanted to play with a standard build kit. So it was a compromise. It needed to be built with the standard stuff but it needed to get him out there, and not fail him if he dropped it or crashed back in the back country. I like the idea of the mid motor but was afraid he'd destroy the gear motor under the frame mount on rocks. So we bought a kit from Luna, but I moved the motor up where I could protect it.
Madness ensued
Part 1 Aluminum.
Gary brought by his donor Diamond back and like with all the best bike mods this started with a sawsall. :lol:
The idea here was to replace the downtube with twin tubes like a MX motorcycle frame. I'd connect to the front at the headtube, and run the rear down to the bottom bracket moving the connection slightly forward to make room for the motor. Since I was using only 6011 T6 aluminum and MIG welding it (lower heat exchange) I could weld it up without blowing the temper or having to heat treat it afterwards. The first thing was to get the forward transition to look right, which meant I had to bend the tubes. T6 can't be bent cold untreated you have to heat it to temporarily remove the temper. I always do this on the stove. You start by marking the tubes with a black marker then heat them.
When the black marker has transitions from dark to brownish gold. That metal is 350+ or temporarily T4 (it re-hardens with time) so it's ready to bend. This is the oldest trick in the book, but I still think it's cool every time I do it. 8)
So I threw that metal in my bender, put a radius in it then cut the ends to make a even transition to the head tube.
Once that was fitted I cleaned up the bottom bracket and then welded the tubes to the front of it then added additional bracing.
Here you can see the added back plate stiffener for the motor mounts.
I considered making my own motor mounts but used theirs out of expediency. As you can see I beefed them up a bit.
With the added bash plates you can see where this is going.
So that is the basic frame, weighing in at mighty 6 pounds.
Part 2 Dubious additions.
Next step was to add the side bash plates to protect the motor and my initial try at a battery mount.
The idea there was the battery would twist in and out and be held by a removable bracket in the front. Unfortunately the battery got stuck. While fighting with it I decided I wanted to cover the battery with metal to protect it anyway so that mount was scrapped though the bash plates remain.
Part 3 the war of the bottom bracket.
I hate to bash people's stuff, but I'll be straight up I had some real problems with the standard cyclone kits ]replacement tapered 68-83mm BB. The right side tried to cross thread every single time I attempted put it in. Both cups were shallow and the left cup was also not deep enough to correctly catch the bearing, and the bearing spacing was not correct to line up the crank arms properly with the motor. Just not cool. The first mod I made was a bearing spacer to get the bearing over.
Even with the bearing moved over the cup still would not thread. After fighting with it the better part of a afternoon, and re-cutting the threads with a die, I gave up and threw a pair of used Shimano cups on the lathe and machined them to the exact tolerances I needed.
That threaded up nice fine but once in place I realized the right cyclone kit bearing was bad. It had a bind or catch in it, so I took the whole thing back apart and replaced the right bearing with a Shimano sealed bearing of the same size.
All Shimano goodness right there.
Since the right side gets the most force and the left bearing seemed fine I just used the left bearing that came with the BB on that side. Hopefully that won't come back to haunt me.
This got me the exact alignment I needed one the crank and drive chain rings.
The crank arms had the proper spacing as well.
Part 4 General refinements and the battery and controller mounts.
Now I needed a way to hold the battery in place, so I modified the first bracket I made.
Chain ring side bash plate, rear battery support, and controller position.
Down tube Bash plate right side full length.
Motor bash plate left side.
Bash plate and down tube left (note the opening for power cable routeing in front of the forward battery stop, all wires from the front will run under the battery.)
Here you can see how the twin tubes line up compared to the original.
Here's the battery position with my initial enclosure (there are still some minor refinements I'll be doing to the enclosure)
As you can see the down tube has been converted twin arm motocross type to give him more protection but also more space for the battery and motor. It also allows space under the battery for routing excess wiring. Best of all it keeps the frames original size with the profile of the frame the remaining same. (stealth factor) The new structure connects at the two fixed (non flexible) points of the frame, but leaves the rest of the frame to flex under load like a normal frame. So the bike itself still feels like a normal bike even with it's gear and power load.
Part 5 ride tests no power.
At this point I decided to assemble it all and check the ride. My take was that if it did not ride well, I needed to know as soon as possible. We are talking the battery and motor in there for weight but not wired, with the rear derailleur installed and working, and the brakes are set up and adjusted. I first tried it with only the motor and it felt like a decent well balanced mountain bike. I could ride it like that all day and never think twice about it being anything but a normal bike. The battery increased the weight, and it alters the center of gravity forward but the bike still rides decent. Straight up no bullshit assessment. Bike rides a lot better without power then I thought it would.
Assembled pics.
Here's a couple of pics my neighbor took of my while test riding it. They are good for scale but you can also see how relaxed I am riding it. Even in tight circles in a confined space behind my shop it felt good. Great low speed stability, bike felt great, very comfortable to me.
Part 6 Wiring the controller.
So I could not find much information about wiring the controller, but gave it a hard look over and basically figured out what I needed. I kinda decided to remove everything else, but then was afraid to do it :lol:
Friday after a long night I took the plunge. I cut off all the wires that I did not need, and heat shrinked them clear with their respective labels inside the controller for further reference.
I then spliced in a new power feed wire for one of the connectors so I could solder it in inside the box.
Connected that wire in when I wired the new power leads, with XT90 connectors.
....and this is the result.
Now there is a mistake there. I used a quick connect for the blue wire underestimating the power that was running through it. It functions but it's overheats. What I really need is a single XT90 connector to solder in there (fixed that last night).
Here's everything in the bike.
I'll post some better pictures later
Part 6 first powered ride test.
Gary showed up a on Saturday and I hooked everything up. Amazingly it all worked the first time. I swear the last thing I said before I plugged it in was: "How much are those control units" :lol:
Road good.
[video=youtube_share;Pl0usfLqOkA]https://youtu.be/Pl0usfLqOkA[/video]
I was pretty impressed. Very fast but very stable even I'd say comfortable at all speeds.
That's not even it's top speed. I was testing it with the 46 chain ring forward, and in the middle of a 11/34 mountain bike cassette rear so probably about a 18 rear. I later made some faster runs with higher gears but started getting nervous when the speeds topped well over 40+. The bike felt fine but I didn't feel comfortable riding at those speeds on something I just built without a helmet. Since I ride both motorcycles and bikes it's almost too accessible. It's not really a bike anymore but does not feel like a motorcycle, it's something in between. What really surprised me was the high speed stopping distance. The disc brakes had plenty of grab but the issue was traction. It's under sixty pounds so it wants to skid when you brake hard. I'm just not used to braking a bicycle at those speeds. It's probably going to eat tires.
So that is where it's at now. I still have a few refinements to do, and it's going to get painted, so I'll be adding more later. You guys are all more experienced then I am. Questions, comments, criticisms or sage advice the time is now :lol: