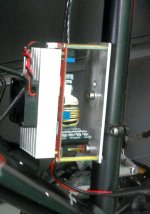
DIY Phaserunner heatsink.

Well then, the/a Peltier Plate is/will be, the Next improvement for getting a cooler operating and Higher Amp operating range for the Phaserunner.

Let me know the results . I would like a Phaserunner for my next build.


Alan B said:
The baseplate is aluminum, the FETs have a low thermal impedance path to the baseplate, that's how the PhaseRunner is cooled. As I recall they're using an anodize layer for electrical insulation, so it is very thin and that should make it a better than usual thermal path.
 
Thanks scooter, the Peltier Plate is interesting, I've never heard of the concept before. I'm interested in using the PR a hot environment.
 
Peltiers are kinda interesting but don't seem to find many practical applications where they are useful for removing bulk heat from electronics.
 
Punx0r said:
Peltiers are kinda interesting but don't seem to find many practical applications where they are useful for removing bulk heat from electronics.

Correct, Peltier's make a lot of sense if you need to remove a fairly small amount of heat from a localized area (like cooling a laser diode, CPU core etc) where you can use it to actively pump the heat to a much larger radiator-like device for dissipation to the environment. But for bulk heat removal they are a terrible idea since they increase the total amount of watts to remove by at least 3 fold. It typically takes about 2 watts of electrical power for a peltier device to pump 1 watt of heat. Say at high amps the Phaserunner has 20 watts to get rid of, to pump this out with a Peltier cooler you would be putting 40 watts of energy to the peltier, which now increases the total amount you need to shed to ambient to 60 watts. Never mind the power wasted just running the peltier which could otherwise be going to bike propulsion hub motor. Really they don't warrant any further discussion in this context.

If you did want to run the Phaserunner to sustain higher currents than a normal finned heatsink allows, then by far the most effective would be to run water cooling through the two 5mm holes in the heatsink as I mentioned here:
https://endless-sphere.com/forums/viewtopic.php?p=1034905#p1034905
file.php


In practice though, if you're at this point you'd probably be much better served by a larger 12 or 18 fet controller rather than the tiny 6 fet PR. To me it would only make sense to consider if you happen to already have a water cooling circuit on your bike (say for the motor stator) so that the cooling hardware is already there.
 
Thanks for the kind comments, Justin. I only wanted to show what is possible with only a vice, a hacksaw, and a drill (of course a drill-press would have made my job much easier, and more accurate). I don't want the significant size of my heat-sink to be taken as a commentary on the Phaserunners limitations...I know I went overboard.

I would like to state that I feel...if the Phaserunner is used at its design amp-rating, additional heat sink mass is likely unnecessary. Only you can find that out if that's true when using it on your loads (your hills might be longer and steeper than my hills). I went overkill on the amount of heat-sink mass because I thought it would be nice to mount it inside a triangle battery case, to cover up any wiring clutter.

It's just a theoretical exercise for me, Kansas is really very flat. AlanB is using two Phaserunners at 72V / 40A, and his 2WD splits the amp-heat, so...he is enjoying great success with no additional heat-sink mass added. Several builders are using the Phaserunner at 72V / 50A on a BBSHD (with np additional heat-sink mass). Although there, that system rarely draws the full 50A due to the ability of a mid drive to shift gears and keep the motor in the desireable RPM range.

The amp roll-back feature (keyed by heat), is a truly wonderful feature, and allows experimentation with less risk.

Due to its small size, slender shape, and its stock voltage/amperage capabilities...I think it is a great design for a large percentage of ebike builders. The water-proofing and shock-resistance (due to potting) are the "way things should be"

I think having a slim baseplate is probably a good idea. If more heat-sinking is needed, its is easy for each builder to add as much as they like (or for 3rd party web-vendors to make a variety of baseplates for purchase). If there was one change I could have, I'd prefer the baseplate to be longer enough to protrude above and below the top and bottom (if mounted on the seat-tube). That way the four stock holes at the corners could be "through holes" and don't need to be threaded. 4mm would be a good diameter, and it might be useful if they could be inset enough that the existing holes could be bored out to 5mm-3/16 inch, or even 6mm-1/4 inch if the builder desired.

In that scenario, the added baseplate would be the part that has threaded holes, or possibly nutserts. I only suggest this as an addition, and the stock threaded holes are useful where they are. Just a thought...

I hope none of what I've written here sounds critical. The Phaserunner is a brilliant product.
 
Justin_le - Such a small controller for high amps. Was that 72V 70A 4-5 minutes?

Cant wait to read the results in the Phaserunner thread.
 
I currently have mine sinking on my long DH handle bars. My motor overheats before the controller for now. When I do get to 120C the difference between handle bar temps are 10C over ambient.

I wonder though whether is efficiency gained in having this cooler?

I am thinking that radial heat sinks would be most suitable for my spot, something like

s-l1600.jpg


I'd just shave out a flat section for the controller and bang $5 of cooling.

I am lucky to have a front hub motor making the phase wiring much shorter too with a lot of breeze up there.
 
markz said:
Justin_le - Such a small controller for high amps. Was that 72V 70A 4-5 minutes?
Cant wait to read the results in the Phaserunner thread.

You can sustain 70 amps indefinitely if it is mounted to a decently sized finned heatsink, but without that using just the stock heatsink it would do ~80 amps for just a minute or two before thermal rollback would drop it down to about 50 amps continuous.

John Bozi said:
When I do get to 120C the difference between handle bar temps are 10C over ambient.
I wonder though whether is efficiency gained in having this cooler?

The mosfet resistance increases a bit with higher temps, but it's not going to have any noticeable effect on your overall system efficiency. They might go from 2.5 mOhm to 3.5 mOm, so that's a total of like 2mOhm increase for the pair. Meanwhile your motor winding will increase by 10's or even 100's of mOhm when it gets hot, which is a much more significant amount. Keeping the motor cool does a lot more for efficiency than keeping the controller cool.

And on that front, if you're hitting 120oC regularly with the hub you should probably inject a bit of statorade to see the effect. One of the bolt holes near the wire exit should be drilled all the way through.
 
spinningmagnets said:
Thanks for the kind comments, Justin. I only wanted to show what is possible with only a vice, a hacksaw, and a drill (of course a drill-press would have made my job much easier, and more accurate).

You're kidding me, you even did all the hole saw drilling to make the tube notches with a hand drill and not even a drill press? I've been spoiled for so long with all the machine tools that I forget what you can do with the basics and a bit of craftiness. It would have been neat to see a picture of two of the fabrication process for others to see.

I don't want the significant size of my heat-sink to be taken as a commentary on the Phaserunners limitations...I know I went overboard.

OK cool, I thought maybe it's because you had some application that was really going to be pushing this requirement. If it does come up that you ever need to say pull a 400lb trailer load of stuff and wind up driving high wattages for long times, then I'll be curious then to see how it behaves.

Just a thought...
I hope none of what I've written here sounds critical. The Phaserunner is a brilliant product.

Well it's fine to be critical too! I agree that having some kind of a 'flange' for mounting is generally easier than blind tapped holes and would have simplified the kind of install that you did here, though the aesthetics of that (especially if not using an additional heatsink) wouldn't be as clean.
 
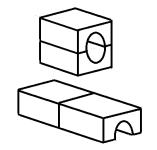
My original plan was to have a two-piece baseplate, and the phaserunner itself would bridge holding them both together. The baseplate would then be attached to a seat-tube by two large U-bolts.

The reason for using two pieces was about cutting the half-moon slot. I've used hole-saws before with success, and a 1-1/4 inch hole-saw would be a hair under-diameter for the seat-tube in question. That would leave just enough meat on it to finish it off with a coarse half-moon hand-file to fit. Of course a machinist could make it a perfect fit straight from the cut.
Phas4erunner.png

Anyways, take two thick aluminum rectangular plates and slap them together with clamps. If the foot-print that the Phaserunner sits on is 3-inches by 6 inches (thickness to vary according to what is handy, with minimum thickness being 1.5 inches), then you would have the shop cut you off two pieces of 3 X 3 inches. Any of these given dimensions can be larger, but I'd say these are useful minimums.

Two 1.5-inch thick plates clamped together face-to-face make them 3.0 thick.

Since the space for the heads of the four bolts that hold the Phaserunner onto the heat-sink would be right in the half-moon groove, those were the first four holes I drilled. First the four 4mm holes, and then the four wider-diameter recesses for the heads of the bolts.

If there's a trick to doing this without a drill press...drill from both ends to the center, since drill bits have a tendency to wander slightly, and it doesn't matter if the pilot hole is a hair off in the center of the piece, as long as the two ends have a fairly centered hole opening. The first pilot hole was probably using a 3/16 drill bit, and once it was drilled from both ends to the center, I reamed it out with a long 1/4 inch bit. Then, I drilled on the mated pieces with the 1.25 hole saw from both ends towards the center, with the pilot hole keeping it fairly close to straight. I had swapped the stock central bore-bit on the hole-saw with a very long bit from McMaster-Carr. Split the two pieces, and the hole becomes two round half-moons.
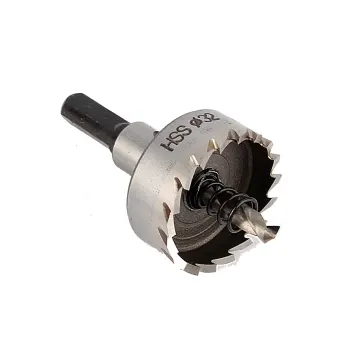
32mm-carbide-stainless-steel-metal-wood-alloy-tipped-drill-bit-hole-saw-tool-7356-0863533-fb461846fb1dc5372e3149a708e13a64-catalog.jpg_340x340q80.jpg_.webp


I couldn't find the aluminum stock I was looking for, and settled on what they had, I think it was 2 X 2 inch square rod, and I had them chop me off four pieces 4-inches long (very cheap, and the width of an 18650 battery pack). Three of them sideways made the baseplate 4 X 6, and the fourth piece was extra, so I converted it into two tube-clamps, instead of just throwing it away.

I used one of my favorite tricks for the threads. I could have tapped threads into the pieces, but I drilled four recesses that were the diameter of a steel nutsert, and just epoxied four of them in. When epoxying a nutsert into a hole, bolt everything together, and the bolts hold the nutserts in the proper alignment while the epoxy dries, plus...grease the bolt and nutsert threads before mixing-up the epoxy (so excess epoxy doesn't weld the threads).

Once the three aluminum pieces were epoxied side-by-side to each other, I could flat-file the sides and top to smooth them out, and also use a half-moon file to clean up the roughness in the half-moon slot. For the final facing of the flat Phaserunner seat, I taped sandpaper on a flat sheet of hard plastic to lap it. Thermal paste would have filled-in any filing marks, but...I had some time on my hands, so why not?

If I was selling Phaserunners, I would just buy baseplates from MrDude_1.

file.php
 
do you know if anyone is selling these kind of heat sinks for the Phaserunner v2? The controller that is normally 40A Continuous will work at 70A continuous with the heat sink according to the PRv2 manual.
 
bobmutch said:
do you know if anyone is selling these kind of heat sinks for the Phaserunner v2? The controller that is normally 40A Continuous will work at 70A continuous with the heat sink according to the PRv2 manual.

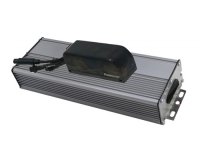
If you lack the tools for a more elaborate DIY heatsink, a simple heatsink could be had by hanging a 5/16" aluminum plate under a rear luggage rack - same size as the rack. Many (most) eBay and on-line metal vendors will cut to size leaving you only with the drilling part. This is a fairly large heat sponge for high current bursts, has a lot of surface area with a thick heat path, and is angled for good air flow. You would lose the conduction to the frame, but...

Even though unfinned, such a plate might have dimensions in the neighborhood of 11" x 6" so 132sqin surface top and bottom or maybe 120sqin after the PR is mounted. The PR could be bolted upside down the long way and off to the side to clear the tire. Shoot it with little Krylon 1602 ultra flat mat black paint, attach it to rack rods with black one-bolt nylon cable clamps, and run the phase wires directly down the rack stay to the motor.

Anyhow, if you are in a bind for fabrication and have or can add a rack, this would up your amp limit in a more or less bolt-on way.
 
Ok thx.
I’ll find a finned heatsink at some major store here in .ca and and mod one and post here. It would be a nice option for you to sell at ebikes.ca I am going to need two of them.
 
This is what I use for my voltage booster. I'd probably mimic this arrangement if I had a phaserunner and wanted to run more than 40 amps through it. Just imagine the phase booster mounted to the back of the heatsink. The brass standoffs could be sized to fit the phaserunner height.


BoosterMount.jpg
 
This is an interesting article on Copper vs Aluminum Heatsink
https://electronics.stackexchange.com/questions/255731/copper-or-aluminum-heatsink

found this on Kijiji for $1 a foot
 
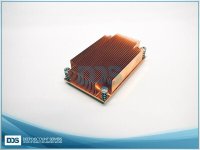
I just used a copper computer cpu heat sink and drilled 4 holes in it added thermal paste and bolt the PHase runner to it.
copper heatsink.jpg

I bent a few fins, but it works fine.
 
The amount of these i see crammed into frame bags still amazes me? Is the consensus that it is acceptable for low power applications or something, Or are these people just in for a rude awakening down the road?
 
Maybe.

My policy is to keep electronics as cool as reasonably possible regardless of maximum design operating temperatures. Heat is the enemy.

Even my lowly baserunner limited to 250W is mounted on about 400mm of 3mm aluminium bar (I needed an L bracket) that acts as heat sink on its own, plus has a pair of 40x40x12mm heatsinks. It always runs cool. It is inconceivable to me to stuff it into a bag.
 
Perhaps some very environmentally conscious people have probably already thought of this option, especially if the PR is replacing an existing controller....

artist rendition -
RRR.jpg

Reduce, Reuse, Recycle :thumb:

And if the ends could be sealed, it could be filled with water and after the ride that could be used to make one of those fancy single drip coffees, instead of wasting the energy.
 
Back
Top