keysersoze310
1 W
I figure it's time I finally post how my first build is going. Hopefully someone will find this info useful and make a few less mistakes than I did 

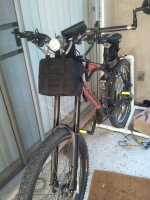
Here's a pic of what my bike looks like right now:
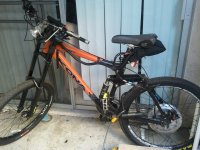
Bike: 2004 Kona Stinky Large
I wanted a full suspension, solid all mouintain bike for my build and the Stinky seemed like a great choice. I got a large frame based on Endless Sphere recommendations to get a bigger bike than usual for electric (I'm 5'6"). The Large was about as big as big as I could handle, and the 2004 frame happened to be the last year that Kona used a larger triangle frame which will be great for mounting some batteries. Full suspension was a must for offroad use, and a used bike was necessary to save $$$.
Motor: Hi-PowerCycles HT3525-ish Custom Crystalyte laced in Alexrims Supra BH DH Rim
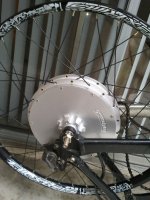
I chose the HPC Crystalyte motor because I wanted tons of torque, light weight, and ability to handle high wattage. This motor should be slightly better than the standard HT3525 at high power levels. It’s advertised as having better Magnets, upgraded phase wires, longer windings, honeywell hall sensors, wider stator, better laminations, and its wound for 55kph at 72V. This motor is a slightly slower wind of the "Striker" motor they are currently selling. I'd guess its probably more like an HT3520. I mentioned being on ES to Hi-powercycles and that I could pick it up locally, and they were nice enough to give me a pretty big discount on the motor. I know they get a lot of flak on this site (some deserved) but for me they have been extremely responsive and helpful. I look forward to doing some testing on the motor and posting results here to see if there is indeed a significant improvement over the standard HT motor.
I had them build the motor into an Alexrims Supra BH DH rim with 13/14g Sapim spokes. I specifically chose a stong heavy downhill rim because I’ll be going off road and don’t want to constantly worry about taco-ing my rims.
Other Wheel Purchases:
Kenda Presta DH Tube 2.4"-2.7" (Super heavy, thickest tube I could find, $12x2 Outside Outfitters)
Maxxis Holy Roller 2.4" Tires (Decently low rolling resistance on road, some traction off road, $64 Outside Outfitters)
Mr. Tuffy Liner Brown (Even more puncture resistance, 15$ Outside Outfitters)
Batteries:
It seems like there are 15 billion different opinions on how to handle batteries/charging on this website. After doing way to much research, I decided that I had no choice but to go lipo for the high discharge combined with low weight and volume. My plan was to keep things as simple as possible to start with and try not burn my house down. Here's what I bought:
5S1P Zippy 8000mah batteries (Qty 4 @ $73 each, from Hobbyking USA Warehouse)
Hyperion 1420i Charger (Amazon $130)
Meanwell Power Supply 24V DC 750W 31.3A CNC Servo Stepper Motor (ebay $69 http://cgi.ebay.com/ws/eBayISAPI.dll?ViewItem&item=270837299730&ssPageName=ADME:L:OC:US:1123#ht_527wt_1084 )
Cell Log 8 (Hobbyking $14)
I am running 20S1P 8AH configuration, which is enough for the short local trips I am doing. Since I am generally keeping it below 30Amps (max discharge of 30/8=3.75C) and this thing is rated at 30C, I should be well within the safe range of discharge despite only using a 1P configuration. I'm going to bump it up to at least 20S2P soon, but I'm taking one step at a time for now.
For charging, I have pretty much the most simple setup possible. I connected the Meanwell to the power outlet by cutting a standard power cable and connecting the wires as shown in the pic below.
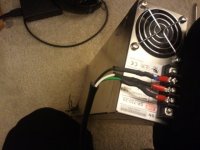
I made no modifications to the Meanwell, as I am not using it to full capacity. Someone please let me know if it needs modifying.
Before charging my batteries for the first time, I connected my Cell Log to the balance connectors to confirm no dead cells. All cells were around 3.6V, so things were looking good. Then I connected two batteries (in series) to the Hyperion charger. I first used the balancing function of the Hyperion to balance the batteries, which took a few hours. Then I selected my charging parameters and charged to 85% TCS. Charging to 85% TCS it stopped at about 4.11V per cell, which was just about perfect. I did my first charge with the batteries in a lipo fire bag, inside of an oven, with a fire extinguisher nearby, just because this site made me completely paranoid regarding lipo. I also kept using the hyperion to check that all of the cells remained in balance many times during this process, but everything went off without a hitch.
Battery Case:
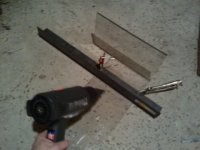
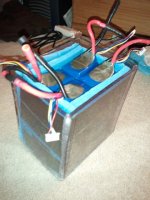
This is still a work in progress. I’m going to sew a triangle bag for my batteries eventually, but for now I’m just putting the batteries in a backpack. I wanted some protection for the batteries so I made a little plastic box for them. I made it using a 12”x24”x1/4”” piece of polycarbonate that I molded using a heat gun and an angled piece of metal. Here’s a pic of the process:
And here is the sloppy but functional end result:
Dropouts:
Doctor Bass Torque arms
3M DP420 Epoxy Black
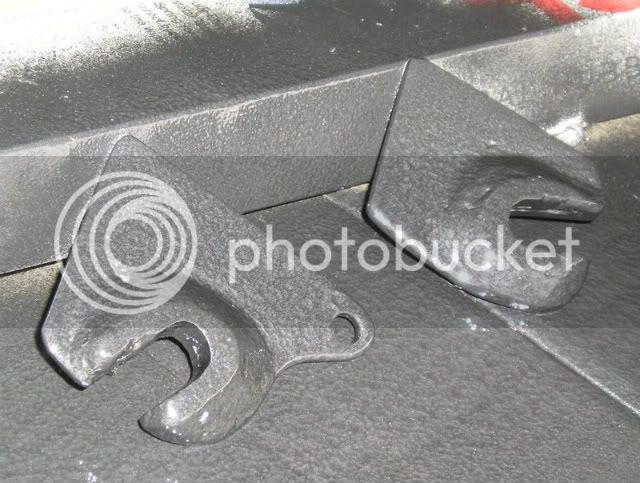
I decided to go with Doctorbass's torque arms for my dropout needs. After ordering his torque arms, I ran into a little snag that you can see in this pic.
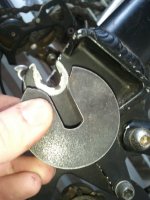
Toque arms wouldn't fit due to that bit of aluminum on the side. At first I planned on cutting the torque arm to fit the available area, but that didnt leave much torque arm left. I ended up deciding to remove the aluminum, and hopefully the steel torque wedged and epoxied in there gives the dropout more than enough support. I used a 4 dollar metal file from home depot to remove the aluminum, and when that left me tired I borrowed a dremel from work.
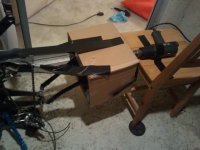
Now the hard part. I borrowed a heat gun from work and made a cardboard box oven to set the epoxy. In hindsight I could have probably used the heat gun directly without the oven, but the oven seemed to work well for getting an even distribution of heat. I tested the oven and the dropouts got good and hot. The rest of the steps: filed the dropouts and removed all the paint, cleaned the aluminum dropouts with alcohol, roughed up the torque arms with my file, cleaned torque arms with alcohol, mixed the epoxy, place epoxy on dropouts, align torque arms on dropouts visually, clamp on torque arms so they don't move, remove any dripping excess epoxy, put cardboard oven back on and cook for a couple hours.
When it was finished cooking, I left it cool for two hours before inspecting the dropouts. They looked great, but there was one problem - they weren't exactly aligned. I couldn't get my motor to drop all the way into the dropouts – they would only go about halfway in. I then filed the dropouts down a bit, which ruined my file. The motor axle would barely fit into dropouts, but it’s still a little misaligned as you can see in this pic.
Unfortunately I think I'm stuck like this. The wheel seems pretty well aligned despite the axle so hopefully this doesn't cause any problems.
Controller:
Got a Lyen 12 FET Infineon Controller with all the extra connectors. I wanted a small controller to fit in the bike triangle that was powerful, and Lyen;s infineon fit the bill. Lyen recommends keeping it under 3500 watts, but that I could occasionally go a little over and not have to worry too much. That seemed about right for me. I even had him install the mini XLR and anderson connectors on the controller so it would directly interface with my motor's hall and phase connectors.
Here’s the list of stuff I got from lyen:
12 FET 4110 MOSFET Extreme Modder Controller LYEN Edition $129
Cycle Analyst connector, external USB-TTL connector for USB-TTL programming adapter, regenerative braking enable/disable jumper $10
USB-TTL programming adapter $15
Three speed switch $15
Thumb Throttle $15
Large Screen Direct Plug-in Cycle Analyst with Speedometer Cable, Version 2.23 $125
Add & install > mini-XLR hall connector and the Anderson for the phase to pair with Crystalyte HT3525 motor $5
Add & install > 15" Cable length extension $12
Lyen was incredibly helpful and answered all my questions. Had a little trouble getting the software on my Win7 x64 pc, but eventually got it working.
Cycle Analyst:
I absolutely love this thing. I have low voltage set to 72 Volts (3.6volts per cell minimum X 20 Cells), tires at 2125mm, limit current to 20-40A depending on how much I want to wheelie, and, most importantly, shunt is 2.65mOhm (verified using multimeter).
Brakes:
The Hayes HFX 9 Hydraulic brake calipers did not have enough clearance and were coming into contact with the screws on the motor. I replaced the rear brake with a 200mm Avid BB7 Mechanical Brake (Amazon.com $66) which has a lot more clearance space. The BB7's have plenty of stopping power, so this should be a good setup.
Freewheel/Chainring:
Got a 11-32t DNP freewheel from San Diego Electric Bikes. Patrick at San Diego Electric Bikes was awesome, and he let me try out a bunch of his bikes. Since I had an 9 speed shifter, this meant I had to “downgrade” to a 7 speed shifter, which is why I got a Shimano Acera SL-M310 from amazon ($14).
Also got a 44t SLX M660 Black 104mm 9spd Outer Chainring Black (Ebikestop.com $27). The Combo 44t front and 11t back works well for 30mph, though I plan on using the 11t gear minimally to reduce wear on the freewheel. Since I was getting new freewheels and chainrings, I also grabbed a KMC X8.93, 6,7,8-Speed Chain. I have yet to dial everything in to where I can get it to shift all the way to the 32t gear. Also, I need to find a cheap 44t bash guard.
That covers the basics of my build right now. When I clean the bike up a bit I’ll post an updated pic. I’m reeeeally loving this bike, it’s an absolute blast. Right now I’m mostly using it on road and as a commuter vehicle, but it will very soon be going off road. I can’t wait


Here's a pic of what my bike looks like right now:

Bike: 2004 Kona Stinky Large
I wanted a full suspension, solid all mouintain bike for my build and the Stinky seemed like a great choice. I got a large frame based on Endless Sphere recommendations to get a bigger bike than usual for electric (I'm 5'6"). The Large was about as big as big as I could handle, and the 2004 frame happened to be the last year that Kona used a larger triangle frame which will be great for mounting some batteries. Full suspension was a must for offroad use, and a used bike was necessary to save $$$.
Motor: Hi-PowerCycles HT3525-ish Custom Crystalyte laced in Alexrims Supra BH DH Rim

I chose the HPC Crystalyte motor because I wanted tons of torque, light weight, and ability to handle high wattage. This motor should be slightly better than the standard HT3525 at high power levels. It’s advertised as having better Magnets, upgraded phase wires, longer windings, honeywell hall sensors, wider stator, better laminations, and its wound for 55kph at 72V. This motor is a slightly slower wind of the "Striker" motor they are currently selling. I'd guess its probably more like an HT3520. I mentioned being on ES to Hi-powercycles and that I could pick it up locally, and they were nice enough to give me a pretty big discount on the motor. I know they get a lot of flak on this site (some deserved) but for me they have been extremely responsive and helpful. I look forward to doing some testing on the motor and posting results here to see if there is indeed a significant improvement over the standard HT motor.
I had them build the motor into an Alexrims Supra BH DH rim with 13/14g Sapim spokes. I specifically chose a stong heavy downhill rim because I’ll be going off road and don’t want to constantly worry about taco-ing my rims.
Other Wheel Purchases:
Kenda Presta DH Tube 2.4"-2.7" (Super heavy, thickest tube I could find, $12x2 Outside Outfitters)
Maxxis Holy Roller 2.4" Tires (Decently low rolling resistance on road, some traction off road, $64 Outside Outfitters)
Mr. Tuffy Liner Brown (Even more puncture resistance, 15$ Outside Outfitters)
Batteries:
It seems like there are 15 billion different opinions on how to handle batteries/charging on this website. After doing way to much research, I decided that I had no choice but to go lipo for the high discharge combined with low weight and volume. My plan was to keep things as simple as possible to start with and try not burn my house down. Here's what I bought:
5S1P Zippy 8000mah batteries (Qty 4 @ $73 each, from Hobbyking USA Warehouse)
Hyperion 1420i Charger (Amazon $130)
Meanwell Power Supply 24V DC 750W 31.3A CNC Servo Stepper Motor (ebay $69 http://cgi.ebay.com/ws/eBayISAPI.dll?ViewItem&item=270837299730&ssPageName=ADME:L:OC:US:1123#ht_527wt_1084 )
Cell Log 8 (Hobbyking $14)
I am running 20S1P 8AH configuration, which is enough for the short local trips I am doing. Since I am generally keeping it below 30Amps (max discharge of 30/8=3.75C) and this thing is rated at 30C, I should be well within the safe range of discharge despite only using a 1P configuration. I'm going to bump it up to at least 20S2P soon, but I'm taking one step at a time for now.
For charging, I have pretty much the most simple setup possible. I connected the Meanwell to the power outlet by cutting a standard power cable and connecting the wires as shown in the pic below.

I made no modifications to the Meanwell, as I am not using it to full capacity. Someone please let me know if it needs modifying.
Before charging my batteries for the first time, I connected my Cell Log to the balance connectors to confirm no dead cells. All cells were around 3.6V, so things were looking good. Then I connected two batteries (in series) to the Hyperion charger. I first used the balancing function of the Hyperion to balance the batteries, which took a few hours. Then I selected my charging parameters and charged to 85% TCS. Charging to 85% TCS it stopped at about 4.11V per cell, which was just about perfect. I did my first charge with the batteries in a lipo fire bag, inside of an oven, with a fire extinguisher nearby, just because this site made me completely paranoid regarding lipo. I also kept using the hyperion to check that all of the cells remained in balance many times during this process, but everything went off without a hitch.
Battery Case:
This is still a work in progress. I’m going to sew a triangle bag for my batteries eventually, but for now I’m just putting the batteries in a backpack. I wanted some protection for the batteries so I made a little plastic box for them. I made it using a 12”x24”x1/4”” piece of polycarbonate that I molded using a heat gun and an angled piece of metal. Here’s a pic of the process:

And here is the sloppy but functional end result:

Dropouts:
Doctor Bass Torque arms
3M DP420 Epoxy Black
I decided to go with Doctorbass's torque arms for my dropout needs. After ordering his torque arms, I ran into a little snag that you can see in this pic.

Toque arms wouldn't fit due to that bit of aluminum on the side. At first I planned on cutting the torque arm to fit the available area, but that didnt leave much torque arm left. I ended up deciding to remove the aluminum, and hopefully the steel torque wedged and epoxied in there gives the dropout more than enough support. I used a 4 dollar metal file from home depot to remove the aluminum, and when that left me tired I borrowed a dremel from work.
Now the hard part. I borrowed a heat gun from work and made a cardboard box oven to set the epoxy. In hindsight I could have probably used the heat gun directly without the oven, but the oven seemed to work well for getting an even distribution of heat. I tested the oven and the dropouts got good and hot. The rest of the steps: filed the dropouts and removed all the paint, cleaned the aluminum dropouts with alcohol, roughed up the torque arms with my file, cleaned torque arms with alcohol, mixed the epoxy, place epoxy on dropouts, align torque arms on dropouts visually, clamp on torque arms so they don't move, remove any dripping excess epoxy, put cardboard oven back on and cook for a couple hours.

When it was finished cooking, I left it cool for two hours before inspecting the dropouts. They looked great, but there was one problem - they weren't exactly aligned. I couldn't get my motor to drop all the way into the dropouts – they would only go about halfway in. I then filed the dropouts down a bit, which ruined my file. The motor axle would barely fit into dropouts, but it’s still a little misaligned as you can see in this pic.
Unfortunately I think I'm stuck like this. The wheel seems pretty well aligned despite the axle so hopefully this doesn't cause any problems.
Controller:
Got a Lyen 12 FET Infineon Controller with all the extra connectors. I wanted a small controller to fit in the bike triangle that was powerful, and Lyen;s infineon fit the bill. Lyen recommends keeping it under 3500 watts, but that I could occasionally go a little over and not have to worry too much. That seemed about right for me. I even had him install the mini XLR and anderson connectors on the controller so it would directly interface with my motor's hall and phase connectors.
Here’s the list of stuff I got from lyen:
12 FET 4110 MOSFET Extreme Modder Controller LYEN Edition $129
Cycle Analyst connector, external USB-TTL connector for USB-TTL programming adapter, regenerative braking enable/disable jumper $10
USB-TTL programming adapter $15
Three speed switch $15
Thumb Throttle $15
Large Screen Direct Plug-in Cycle Analyst with Speedometer Cable, Version 2.23 $125
Add & install > mini-XLR hall connector and the Anderson for the phase to pair with Crystalyte HT3525 motor $5
Add & install > 15" Cable length extension $12
Lyen was incredibly helpful and answered all my questions. Had a little trouble getting the software on my Win7 x64 pc, but eventually got it working.
Cycle Analyst:
I absolutely love this thing. I have low voltage set to 72 Volts (3.6volts per cell minimum X 20 Cells), tires at 2125mm, limit current to 20-40A depending on how much I want to wheelie, and, most importantly, shunt is 2.65mOhm (verified using multimeter).
Brakes:
The Hayes HFX 9 Hydraulic brake calipers did not have enough clearance and were coming into contact with the screws on the motor. I replaced the rear brake with a 200mm Avid BB7 Mechanical Brake (Amazon.com $66) which has a lot more clearance space. The BB7's have plenty of stopping power, so this should be a good setup.
Freewheel/Chainring:
Got a 11-32t DNP freewheel from San Diego Electric Bikes. Patrick at San Diego Electric Bikes was awesome, and he let me try out a bunch of his bikes. Since I had an 9 speed shifter, this meant I had to “downgrade” to a 7 speed shifter, which is why I got a Shimano Acera SL-M310 from amazon ($14).
Also got a 44t SLX M660 Black 104mm 9spd Outer Chainring Black (Ebikestop.com $27). The Combo 44t front and 11t back works well for 30mph, though I plan on using the 11t gear minimally to reduce wear on the freewheel. Since I was getting new freewheels and chainrings, I also grabbed a KMC X8.93, 6,7,8-Speed Chain. I have yet to dial everything in to where I can get it to shift all the way to the 32t gear. Also, I need to find a cheap 44t bash guard.
That covers the basics of my build right now. When I clean the bike up a bit I’ll post an updated pic. I’m reeeeally loving this bike, it’s an absolute blast. Right now I’m mostly using it on road and as a commuter vehicle, but it will very soon be going off road. I can’t wait


