GT's Curious Custom build

Hello guys,

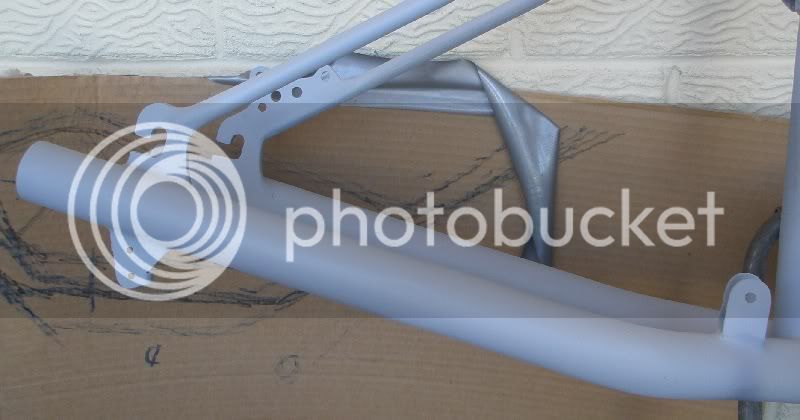
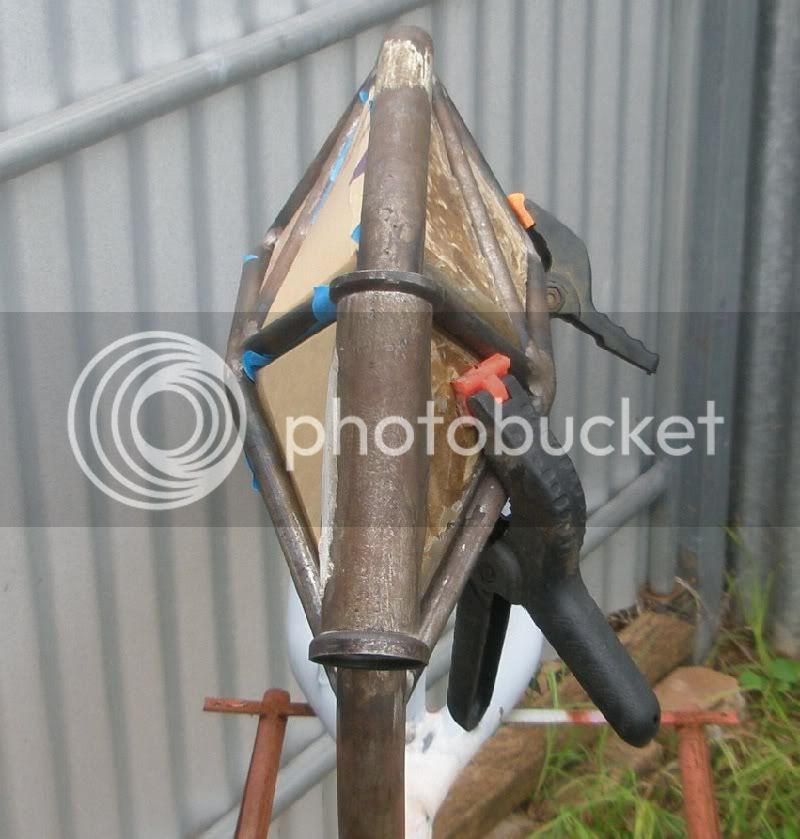
There is a bit of delay in setting up the derailleur as I'm waiting for some small parts to arrive so I decided to setup a sidestand. I recently acquired a 15 speed MTB from a sheila I know and that had an aftermarket sidestand attached, so I removed it and cut it down to suit the cruiser's lower bottom tube height. As the cruiser is front heavy when unladen, the ideal spot for the sidestand is as far forward as possible, however, this is where the frame is 25mm dia, so I compromised by locating it at the transition between the 25 and 38 dia tubes. A piece of 3mm plate was bent to suit the changing dia and taper, drilled a 10.2mm hole, attached a 3/8BSW bolt and nut, and welded the nut to the plate.

View attachment 2
I drilled 2x 14 holes, elongating them to form a slot, then ground the sides out until the nut fitted OK. I then tack welded the bracket to the frame, attached the sidestand and checked that the position and operation was acceptable.

20101230_hole.jpg
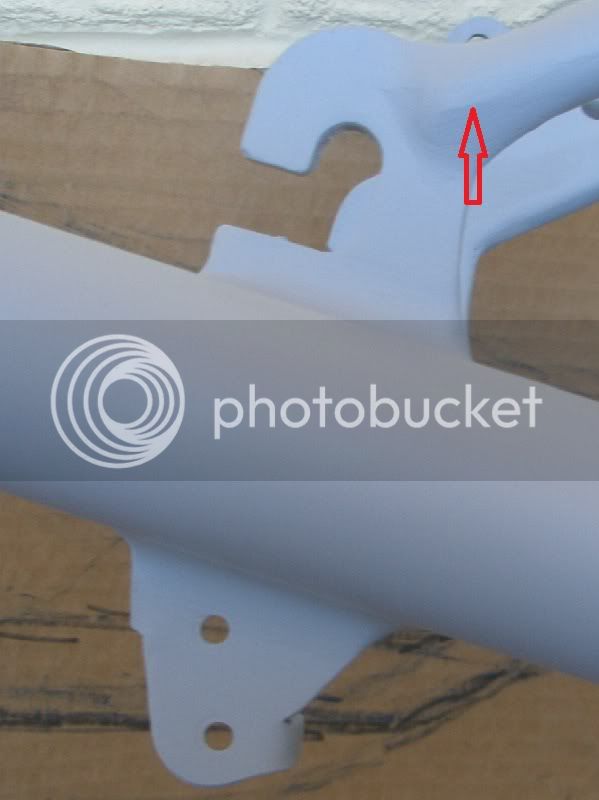
Once confirmed, I fully welded the bracket to the frame. Because the sidestand base only has hole and even if it was done up really tight, it still would have a tendency to move therefore, I cut a piece of 3mm plate and used it as a key to prevent the base from rotating. Arrow points to key edge.

20101230_done.jpg

It is 43oC here right now :oops: hotter in the shed, so I won't be doing any more today - probably next week!

Cheers,
GT
 
20110103_primed.jpg

Getting closer .... parts & batts aren't here yet, so sanded the front forks using a new orbital sander (Xmas pressie from grandkids) and sprayed with etch primer in preparation for applying some fibreglass body filler over the welded areas. Oh, and added a bracket for a 12V50W dichoic quartz halogen spottie as a headlight. This will be powered by 3S4P LiPo 8)

Cheers,
GT
 
Received 12 of these yesterday.
Voltages are as follows:
Cell1 Cell2 Cell3
0.005 0.696 0.701 ***** 1.406Vt - pack noticeably puffed
2.697 3.693 3.541 ****
3.857 3.739 3.861 **
3.730 3.857 3.852 **

3.809 3.859 3.857 *
3.853 3.859 3.855
3.853 3.859 3.844
3.858 3.859 3.846
3.867 3.865 3.864
3.859 3.861 3.852
3.858 3.863 3.859
3.858 3.861 3.857


***** rooted
cell delta legend **** ~1V (0.996mV) ** >100mV * >50mV
RMA 25527-1871804 entered for the stuffed one, return address supplied after entering RMA request is China, even though the popup at the bottom of the page informs the customer that this is NOT correct. I'll wait until I get an Oz address then ship it there. Previous batteries shipped from China were excellent (2off 8S 5800mAh Long packs, with all cells within 10mV).

OZ_popup_not_to_china.jpg
So much for quality control :evil: At the very least, I have the address of the sender, and I'll send the very rooted one back to that address and let them dispose of it :) The one with a cell at 2.697V I am balance charging to storage voltage at 0.1A and we'll see how it goes :?:

Cheers,
GT
 
Hi guys, several updates today.

Firstly, HK came good and credited me with $55.20US for the two batteries and I didn't have to return them, just supplied photographic evidence. Credit where credit is due.

Small parts arrived so I could set up the derailleur bracket. The "nuts" are mounted to a backing plate which has 4 "tits" to prevent the backing plate from turning. Because the derailleur is made from some sort of stainless steel, I drilled 4 recesses for each nut for the "tits" to bite into.

20110123_derailleur_apart.jpg
20110123_derailleur_apart_os.jpg

I made a bracket out of 3mm flat and bent up 2 keys that will prevent the derailleur from spinning This allows the 4mm screws to be relegated to a mounting role only.

20110123_derailleur_ass.jpg
20110123_derailleur_tacked.jpg

Made a bracket out of 16g sheet steel to mount the neoprene roller which raises the return chain off the chain stays.

20110123_idler_bkt.jpg


When I went to add the body filler to the front forks, I realised the fibreglass reinforced stuff was the wrong type. I had some plain body filler available so used that on the front forks. I also used it on the rear forks to correct defects caused by
1. Using second hand tubing
2. Using a pipe bender that just wanted to kink lightweight tube
3. MIG welding

20110123_sht.jpg
 
gtadmin said:
When I went to add the body filler to the front forks, I realised the fibreglass reinforced stuff was the wrong type.

Made the same mistake thought i would give it a try hadn't used it before, the stuffs made more for reinforcing a panel eaten by rust LoL doesn't spread well with the chunks of glass in it does it.

Kudos to HK for the credit and LoLed when i saw the recesses thought the might have been lightening holes or 'speed dimples' hehe...

All the best with frame prep starting it myself this week thankfully all welds are cleaned up already just need some sanding then its paint tim for me also ;)

KiM
 
AussieJester said:
... and LoLed when i saw the recesses thought the might have been lightening holes or 'speed dimples' hehe...
file.php

AussieJester said:
All the best with frame prep starting it myself this week thankfully all welds are cleaned up already just need some sanding then its paint tim for me also ;)

KiM
Thanks KiM, can't wait until I get to the "tank" (not!). Hopefully, mine will turn out close in quality to your work
 
Hi guys, been a while :oops:

I've been struggling with how to fill in the triangulation to form the "tank". Stuffed around with sheet metal for quite awhile, but couldn't get the look I wanted unless I used 16g and panel-beated it. Decided to try fibreglass but had no mould, so am using the frame itself, cardboard and masking tape to form a mould of sorts.

20110320_mould.jpg

Then laid some matt:

20110320_matt.jpg

... and glassed it. This is one side done with the other side masked etc ready for tomorrow to do the same thing all over again Looks a bit like a F-117A (Stealth Fighter, the original) doesn't it?

20110320_f117a.jpg

Cheers,
GT

I'm only going to reload previous piccies by request (damn server "upgrade") :evil:
 
Hi guys, almost got the "tank" up to scratch

20110410_tank.jpg

Needs trimming, priming, spray putty, priming, and colour - matte or flat black. I would like to coat it with a very thin layer of epoxy resin, anyone know how to thin it to spray? And can I put this on the top of the paint, or will the epoxy affect the paint? My gut feeling is I can overlay it.

In case you're wondering, the tank is held in with one screw at the front and by the brake and shifter cables at the rear.

Cheers,
GT
 
Hi guys,

I thought I would quickly mock-up the bike as I'm looking for inspiration on how to mount the batteries. Originally, I was going to use SLA AGMs and arrange them to look like a "V"-twin, but due to a slight miscalculation (by 10mm) and my use of LiPo with the Aprilia, that's changed. Now I think I'll need to mount them similar to how AJ has on his newest build.

The yellow level (for scale) is 1 metre long (39 3/8"), and the red line is at 500mm (about 19 3/4"). The seat base height is 580 (22 3/4") and an overall length of 1970 (77 1/2")

20110417_mockup_sm.jpg

(Photo is for printing and sketchup)

I was also looking for an OZ online supplier of NordLock washers and found this bolt store http://www.bolt.com.au Ordered some rivnuts and quite a bit of SS cap screws also 8) I need to order almost everything online as there are no local suppliers for most of the stuff I want :evil:

Cheers,
GT
 
Hi guys, I have spent the last couple of weekends building my busbars. I looked around but couldn't find an obscure coin to provide scaling (which appears to be the norm for most people on this forum) so a mundane twin scale ruler will have to do! :p Here they are:

20110508_bbarz.jpg


Also, I have added a 4mm "rivnut" to the frame (to attach the "tank"), trimmed the "tank", primed, sanded, spray puttied, sanded, spot puttied and sanded it. Here it is with only a couple of spots that need sanding prior to the next coat of primer.

20110508_tank.jpg


Cheers,
GT
 
Started making my balance lead paralleling boards tonight.

Step 1. Take some veroboard (prototyping board), score both sides of the board to the size of the balance lead parallel boards, and snap them off. I used the knife shown
Step 2. Drill the holes that will be used to mount them.
Step 3. Remove the copper tracks near the mounting holes so that the mounting screws don't short anything. I used a 3mm (or 1/8") drill mounted in a small, "T" tap handle.
Step 4. Push the JST connector pins through the holes in the veroboard. Ensure all the connectors are orientated the same way.
Step 5. Solder them! Bugger I'm blind!
Step 6. Test that there are no shorts.

All up: 22 connectors $16, veroboard $5 (for 5x balance lead paralleling boards)


20110520.jpg


Edit: called then balance boards :oops: when they are balance lead paralleling boards
 
Hi guys, some updates ...

Firstly, a piccie of all the batteries and wires :shock:

20110425_wires.jpg


Ok, so how to mount all these into my frame?

Firstly, grab some certified environmentally sustainable plywood ...

20110426_1.jpg


Shape it to fit the frame (x3), cut out and replace with aluminium where the bolts are going to go ...

20110426_2.jpg


Check that the batteries will fit ...

20110426_3.jpg


Build a frame from 65x19 pine, glue and dowelled together, clamped while the glue dries ...

20110529_1.jpg


Add the batteries and check that everything fits ...

20110529_2.jpg


Jigsaw a cutout into the preglued 3x thick plywood to suit the box, centralise it, keep it in place by using quarter round glued and dowelled ...

20110605_dowels.jpg


Once it was all completed, primed the wood and stress tested it - cook and bottle washer volunteered* so that's about 900N downforce while the assembly is supported at both ends only ...

20110619_stress_test.jpg

* this means she was bribed with a new handbag

Mixed some fibreglass resin, gave it one coat all over, and then added fibreglass cloth on both sides to give the box even more penetration resistance. Once this had all dried, 7x 2mm tabs were welded to the frame to mount the battery enclosure using stainless steel cap head screws and nyloc nuts. Did a very quick mockup ...

20110708_quick_mock.jpg


Prime tomorrow :D
 
AussieJester said:
hrmz...bus bars look familar seen them somewhere before :mrgreen: :p

Battery enclosure looks great mate, keen to see how she comes up when
the paint is done ;)

KiM
Hi KiM, yeah I had always intended to use busbars where there were more than two batteries involved, but I couldn't work out how to solder the connectors. I have a BIG LPG/Air torch which is too big, and several soldering irons which are too small, so I did the aussie thing - left it until I actually had to do it :D Then I saw your post in your thread on using the little pen torches and I knew it'd be alright.

Enclosure is strong and relatively light - I would've done it in ali if I had a TIG - but I don't, so composite it is! Needs a bit of smoothing out and then hit with satin black so should look OK. Edit: Ohh, and silver flaked then coated with polyurethane

Cheers mate,
GT
 
Hi guys, bit more work (OK, a lot: about 20 hours of wet-rubbing here including forks):

20110911_bespeckled.jpg

After priming, there was spot putty, wet-rub, spray putty, wet-rub, spray-putty & finally web-rub again.

20110911_forks.jpg

One coat of satin black (for those interested, it's a Galmet single pack epoxy, thinned by 15% with all-purpose thinners)

20110911_teaser.jpg

Bottom bracket, mounting brackets in red and stainless steel cap screws. This photo does not do the red justice - it is extremely high gloss in the brightest red I have ever seen. 8)

GT
 
Fcuk, turned the frame upside down to spray all the areas that can't be done with the frame upright, and gave it a nice, even coat of satin black. Went to pick up the "hangers" so that I could spin it over without damaging what I had just sprayed, and a "whirly whirly" came through, picked up the frame and chucked it into the dirt

:evil: :evil:

I"M PISSED :evil:

Edit 3 hours later after cooling off :roll: Washed all the crap off once the paint was "almost off", then wet-rubbed it back. Ok to spray tomorrow (weather permitting)
 
I like that girder-over-panel look...you are REALLY tempting me to make my new bike actually look nice instead of the usual ratbike look. ;)
 
Back
Top