jonescg's cylindrical cell build thread

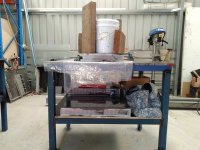
So I am 7/8ths of the way through this battery build and the last lot of busbars are the worst.
They are severely passivated so nothing will stick to them. I found another soldering technique where you can effectively plate the aluminium with copper using FeCl3 solution and CuSO4. It looks like a more reliable connection, and given the whole lot is potted I'm confident it will work better than the engine oil trick.

https://hackaday.com/2020/06/11/solder-to-aluminum/
 
Last module done.jpg

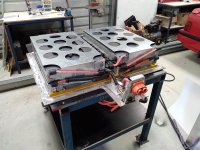
30,000 spot-welds later it's done. A friend came around with a capacitive discharge welder and it was surprisingly bad at welding tabs to the nickel plated busplates. We swapped the two copper rods for the spare hand piece and it simply vapourised the nickel and stuck nothing to the ally! We persevered with the pointy copper rods but it wasn't great. I touched them up with the Sunkko to be sure. My Sunkko deserves a good retirement. He's battered and bruised, but remarkably, did the job!

[youtube]N6nKPmhSE5g[/youtube]

There were a few welds that needed to be soldered as the tabs weren't sticking. I practiced the FeCl3 / CuSO4 approach, and while it makes a surface you can solder to, it's not a strong bond. But critically, it used highly corrosive solutions which would almost certainly rust my cells out should even the smallest bit drip through :shock:

So I resorted to soldering the plates without any pre-treatment. I managed to find some patches that would take solder, so that's all good.

Now, to fill them up with polyurethane!
 
The more I think about it, the more I like the idea of potting the connection ends. You get a more stable structure, electrical connections should be immune from vibratory damage and you realize heat conduction out of the pack. I hope you keep updating this thread Chris as the 10% weight penalty seems it might be a really good investment.
 
I cannot help thinking there is a sound reason why many of the commercial pack assemblies use “Split” tabs to force the weld current to travel through the joint rather than just across the tab .
..but i have never tested the comparasons !
 
It would have probably helped in this case, but surely the equivalent would be putting one electrode on the busbar and the other on the nickel tab. I did this often and it made little difference to the weld quality. I think in future I'll use copper with nickel tabs. And bigger cells so there's less work. It just seems more robust. Still glue the terminations down though - no good putting undue stress on them.
 
It's a product from U-Sheen in China. S8960 as a two part adhesive resin.
1.2 W/mK which is not bad. Fairly affordable too, but minimum order is 20 kg for US $700.
 
Frank said:
Chris, have you shared what type of thermally conductive epoxy you're using? Did you do any testing? (thanks)

jonescg said:
It's a product from U-Sheen in China. S8960 as a two part adhesive resin.
1.2 W/mK which is not bad. Fairly affordable too, but minimum order is 20 kg for US $700.

We do alot with epoxy, buy alot of it. I do wonder what is mixxed in with the stuff that makes it " thermally conductive" ? We use epoxy mainly for structural reinforcement and coating in boats. We buy from a place in Florida called "RAKA INC". Always measuing that mess out and mixxing in wood flour ( glue viscosity, tenacity, filler, ) and graphite (Low speed load bearing, ) and cabosil (hard surface) and stuff. Never really did any major scale thermal or electrical property epoxy.

I have to say, that 20Kg is some kind of expensive. 700/20 = 35$ / Kg? You must have made a typo?

We buy 15 gallons for 800$. Uv resistant, high quality, blushless casting or coating, resin and the hardeners of choice.

At about 9 lbs / gallon, thats 135 lbs. Also known as ~60 Kg.

So about 13$ / Kg. Before cutting it, with fillers, so that it goes farther. Dammit Australian dollars, they must be. ? Right? Ogeeze they aint. US700. Damm.


What makes "thermally conductive Usheen" cost ~2.5x more?


jonescg said:
~ technique where you can effectively plate the aluminium with copper using FeCl3 solution and CuSO4. It looks like a more reliable connection, and given

I have tried the ol wax and or oil trick. lol. Trying to solder aluminum under wax. Lol.
 
Yikes, that is kind of expensive, especially if you have to buy mass-quantities! (cue Conehead reference...)

I've used plain old black RTV before when building a hybrid solar panel (liquid cooled PV using reflectors to increase insolation area) and that worked pretty well as a thermal conductor. I think I used a particular brand which was supposed to minimize any corrosivity.
 
It was actually US$500 for 2x10 kg (parts A and B) but the shipping was another US$200.

I think it's filled with boron trinitride, and almost certainly aluminium oxide. 1.2 W/mK and good adhesive properties is pretty nice.
The fillers make a big difference in price, and thermal conductivity :)
 
The Second Coming.jpg

Battery is in, the car drives just fine and the range is prettymuch right where it used to be. Comfortable 150 km under normal circumstances, 170 km under ideal and 120 km under testing conditions.

The battery puts out ~55 kW, which is enough to get moving smartly, and it takes ~35 kW for 5 minutes as you drive up the hill. Cell temperatures are pretty stable, increasing by about 7'C after a drive up the hill.

If I could afford a couple of cooling plates it would be even better for thermal stability and longevity, but hey, can't win them all.

I like this approach, and with a few modifications (copper busplates, 21700 cells) I think it can be a winner.
 
fechter said:
Nice. Any idea what the total battery weight is?

Each module weighed 33 kg. The rest of the enclosure and all the gubbins added about 25 kg, so the whole 25 kWh pack weighs about 160 kg I guess? Not bad considering the original Leaf battery stored as much energy and weighed about 300 kg.
 
Losing that extra 140 kg should improve acceleration a little. I bet it lasts longer than the Leaf batteries too.
 
Back
Top