Back at it with another project but this time it is for my pops! He has been wanting an electric motorcycle for sometime but nothing out there really caught his eye. I've been showing him the conversions that I've done and he said why don't you build one for me! So we came up with a game plan and here we are!
I bought a 2005 KLR250 frame on eBay with a title so he can register it. Got it for a good price too. Being this was going to be a complete custom I chose to go this route instead of buying a complete bike to just take apart. I could have sold the take off parts but I didn't want to deal with all that.
We are going for a sleek scrambler style so disregard the rear wheel. That is a Ninja 250 rim I had laying around that is just on there for mock up. We will be doing custom 17" supermoto style wheels and some chunky tires.
Front end I have not decided on yet if I want to go stock or put on a nice set of inverted forks off a CRF or something. I also like to convert the rear brakes to hydraulic as well since the KLR 250 uses drum.
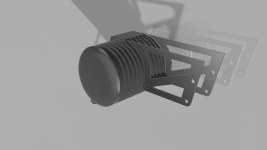
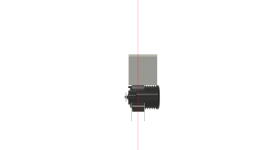
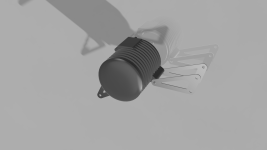
I will be using a 138 70H v3 as you can see. That is the 3D printed mock up and now I am working on mounts. I did two versions for the front. One is just a smaller triangle style and the second version is taller to allow me to have a base for the battery. I will most likely go this route. I have seen others shave off the top motor mount which I also plan on doing as that will critically reduce battery size and make things complicated.
Also not sure yet if I'll go with a square battery shape or have a custom one made to fit into the frames offset angles which I think would be pretty cool. I'll then fab up a box for it all to sit in of course.
Controller wise I will run an EM260. I just have a lot of experience with the Votol's now and the software which makes me feel more confident with going that route.
Also would like to keep the 520 chain setup but possibly go with the traditional 428 that the QS comes with....havent decided yet.
For now just working out mounts and fab work. Next up will be a custom subframe and seat. I'll probably stick the controller in the subframe for air flow too. All the little details!
Thanks for tagging along, I'll be updating this one shortly!
That little blue thing in the background will also be converted soon too...any guesses what it is?")
![IMG_2971[2527].jpg](https://endless-sphere.com/sphere/data/attachments/203/203488-f1e51778d9a412523df44209e53b931d.jpg "IMG_2971[2527].jpg")
![IMG_3218[2529].jpg](https://endless-sphere.com/sphere/data/attachments/203/203489-c9b4ddb2c4037b66e758bb360d111333.jpg "IMG_3218[2529].jpg")
![IMG_3221[2531].jpg](https://endless-sphere.com/sphere/data/attachments/203/203490-c5afa42772b73ab2d5f2cb1ca893b3e6.jpg "IMG_3221[2531].jpg")


I bought a 2005 KLR250 frame on eBay with a title so he can register it. Got it for a good price too. Being this was going to be a complete custom I chose to go this route instead of buying a complete bike to just take apart. I could have sold the take off parts but I didn't want to deal with all that.
We are going for a sleek scrambler style so disregard the rear wheel. That is a Ninja 250 rim I had laying around that is just on there for mock up. We will be doing custom 17" supermoto style wheels and some chunky tires.
Front end I have not decided on yet if I want to go stock or put on a nice set of inverted forks off a CRF or something. I also like to convert the rear brakes to hydraulic as well since the KLR 250 uses drum.
I will be using a 138 70H v3 as you can see. That is the 3D printed mock up and now I am working on mounts. I did two versions for the front. One is just a smaller triangle style and the second version is taller to allow me to have a base for the battery. I will most likely go this route. I have seen others shave off the top motor mount which I also plan on doing as that will critically reduce battery size and make things complicated.
Also not sure yet if I'll go with a square battery shape or have a custom one made to fit into the frames offset angles which I think would be pretty cool. I'll then fab up a box for it all to sit in of course.
Controller wise I will run an EM260. I just have a lot of experience with the Votol's now and the software which makes me feel more confident with going that route.
Also would like to keep the 520 chain setup but possibly go with the traditional 428 that the QS comes with....havent decided yet.
For now just working out mounts and fab work. Next up will be a custom subframe and seat. I'll probably stick the controller in the subframe for air flow too. All the little details!
Thanks for tagging along, I'll be updating this one shortly!
That little blue thing in the background will also be converted soon too...any guesses what it is?