Marin Muirwoods eBike (3RD BUILD)

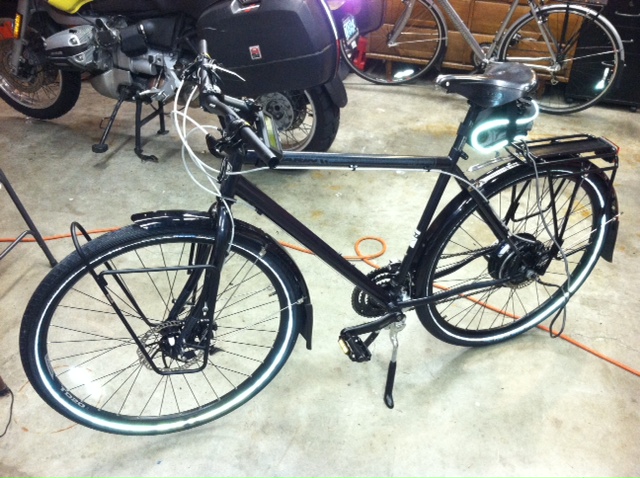
So, I was looking at the bikes I had in my garage...

It turns out that my prior bike, a 2008 Diamondback Century, has a front derailleur that is very compact PLUS, its largest chain-ring is 52-tooth; PERFECT!

I'd asked my LBS what it would cost to have the crank and chain-ring replaced on the Muirwoods with a new crank and a single chain-ring and they said $100+.

Since I have now know I have the parts, I'll take BOTH bikes in and have them do a simple swap of front derailleur, cranks and chain-rings between the two bikes. They *may* have to swap the front shifters, but I doubt it, as both bikes are 3x9, or 27 speeds.

I'll let everyone know how this works, but for right now, being short on time, this is the best solution. Pictures at 11...

EDIT! This didn't work, as there was problem with the bottom brackets. Oh well, a slightly smaller set of tires works. Shoulda gone that way from the beginning...
 
BATFINK said:
That is exactly what to do, I just did the same thing but I did it by choice, what do you want with all those gears? A lot of road bikes are only 2 cranks at the front nowadays and a lot of downhill mountain bikes are being converted to single cranks. You will never miss those gears, you will save a smidge of weight, lose a cumbersome gear changer and make room on the handlebars and also fit your big apples.

Sent using Endless-Sphere Mobile app

What are you using to keep the chain jumping off the chain-wheel?
 
I bought a set of 29x2.0 (622x50) Big Apples yesterday and mounted them. Though the fit is tight in the rear, they still fit and I have adequate clearance when the rear axle (motorwheel) in in place.

Th ebike just looks so much better with the larger 50mm tires compared to the 42mm tires it came with.

photo1.JPG


Now I have to sell two brand-new sets of tires, a set of Continentals and a set of Big Apples...

I also had to take a Dremel to the rear fender to hog-out clearance for the front derailleur so that the fender wouldn't interfere. Managed to finally get that done so I could suck the fender closer to the seat tube and away from the tire.

photo3.JPG


The derailleur hanging off the back of the seat tube is the reason I couldn't run 622x62's on this bike.
 
The cable cover for the wire bundle (harness) coming out of the motor-axle on my rear wheel was already split. Yesterday the wheel fell over and completely split the outer cover, as well as exposed some of the copper in the individual wires that come from the motor:

photo2.JPG


DAMN!

Now I'm going to have to take the 5-way connector off the motor harness, strip the outer cover completely and run shrink-tubing down each one of the wires to insultae them and then a larger piece over the entire bundle.

The end of the axle is sharp, nevertheless I'm still disappointed that the outer insulation for the harness was so fragile that it split so easily. Guess there's no excuse for stupid...

Anyone else had to deal with this? What was your solution?

Tony
 
TonyReynolds can you upload some pictures? might be able to give you some better solutions.
The cable cover for the wire bundle (harness) coming out of the motor-axle on my rear wheel was already split. Yesterday the wheel fell over and completely split the outer cover, as well as exposed some of the copper in the individual wires that come from the motor.

EDIT* I see now you have uploaded some pictures, now it looks crystal clear what the problem your facing is.
 
I've been potting the wires in place w/ some silicone or other sealant to prevent chafing. Also, on one of my builds I basically drilled a diagonal channel trough a black rubber stopper, fed the wires through and just shoved it on to the end of the axle.

Since you are doing surgery on your wires anyways, this could be a good opportunity to add in-line connectors closer to the axle just to facilitate flat repairs, tire changes etc. It may not be an issue for you but I don't like to have to disturb all my permanent wire routing just to change out an inner tube by the side of the road.

DC
 
DCMotorworks said:
I've been potting the wires in place w/ some silicone or other sealant to prevent chafing. Also, on one of my builds I basically drilled a diagonal channel trough a black rubber stopper, fed the wires through and just shoved it on to the end of the axle.

Since you are doing surgery on your wires anyways, this could be a good opportunity to add in-line connectors closer to the axle just to facilitate flat repairs, tire changes etc. It may not be an issue for you but I don't like to have to disturb all my permanent wire routing just to change out an inner tube by the side of the road.

DC

Yes, I like the idea of inline connectors to allow most of the wiring to remain attached to the bike. Any suggestions for which type of connectors to use? I assume some sort of waterproof connection. there's lots of wires, I believe 5 small controller wires and 3 large power wires.

:)
 
Gotta love Marin MTB company. Marin County Calif. was the place that started it all. I know Im from there and was one of the pioneers racing down Mount Tam on old Schwinn Cruisers. Marin Bikes are solidly built. Heres a pic of my Marin Palisades Trail e-bike. Enjoy yours! :D

stuffs021.jpg
 
well, for the last build I just used 5 gold-plated bullet style connectors, available at RC/hobby shops for the low voltage sensor wires and I potted the backs of anderson powerpole connectors with epoxy for the 3 high amp/voltage connectors. To give the set up a bit of "splash protection" I housed all the plugs inside a small rectangular plastic flip lid box that I had cut some snug notches in for the wire bundles to pass though and velcro-ed the whole thing to the frame. not sure where I got that box though. a fishing lure I bought may have been packaged in it, or it was for storing beads? idk. I had it so I used it.

"Weatherproof" connectors exist though, generally designed for automotive ignition systems and such. For my current build I am planning on using something like this:

41pDcjv0XaL._SL500_AA300_3pin.jpg

ACCEL DFI 74813 Weatherproof Electrical 3 Pin Connector

for the hall signal wires and a similar 2 pin plug for the positive and negative sensor wires.

I haven't found a "weatherproof" connector that looks capable of handling the amps for the motor power leads yet so I will probably just stick to sealing the open wire ends of 3 powerpole connectors. I was planning on making a splash guard sleeve by sealing/gluing a plastic tube which extends an inch or so past the end of one side of the plug and attaching an O ring to the other
 
I've made some progress getting the controls and the headlight set up. I just happened to have some RAM parts around from my motorcycle, and the RAM cradle from the Garmin 2720 fits the halogen driving light from Harbor Freight perfectly. U-bolt and RAM mount to the handlebar is rock-solid:

IMG_0943.JPG


Detail shot:

IMG_0941.jpg


Everything's starting to take shape:

IMG_0942.JPG


It was very tricky to fit the throttle with the brakes and gear changer. I tried both side of the handlebars and also looked at the split and full twist throttles I have, but those were 3 pin or 4 pin and my controller is a 5 pin. For now, this is what the whole thing looks like:

IMG_0944.jpg


Left to right: Bell, motor speed switch, CA, throttle

Changing gears with the righthand control is doable, but just.

May look thru the RAM catalog and see if I can find better bits, but so far, this is what I'm going with.

Paul (cell_man) quoted me $160 for a 16s1p A123 battery for the lighting. That's 52v that would require a DC-DC convertor to get it down to 12-14v for the lighting. I think I'm just going to go with a 9.2Ah 16s4p A123 battery split into two equal bricks from him. That would be about $500 shipped, but would give me a total capacity of 20.7Ah. A lot more "reserve" from the lighting pack, which would ride in front panniers, to use if my main triangle pack went to LVC on a commute. More expensive, but more versatile.

Tony
 
I've been investigating batteries for powering my lighting. While I could easily find a 7 or 8Ah Turnigy or Zippy LiPO in 14V that would power my headlight, I would also have to buy a charger/conditioner, plus mess with a different chemistry than LiFePO4. I could get a power tool battery and modify ot for use on the bike, but that's expensive and limited Wh.

I asked Paul (cell_man) for a quote on a 16s1p A123 battery, thinking I could use it for my lights and as a "reserve" e-tank for my motor if needed for a few more miles on a ride, but at $160 plus shipping, I think I'd still be paying a lot for limited Ah's.

I've pretty much decided to ask him to do a split build on his standard 9.2Ah 52V A123 battery, which is 16s4p and $450. It comes with a charger, and I need a second charger anyway. The first 16s1p option would require me to buy a charger separately.

I'd end up with two 16s2p batteries connected by a harness that would easily have enough Ah's to power my lighting as well as be a nice "reserve" for my 11.5Ah triangle battery. I was going to purchase more capacity at some point anyway, and the 16s4p battery allows it to be split equally. The only thing is finding a DC-DC converter that would give me 12-14VDC, and I'm onto a couple that would work.

The DC-DC converter will go in a mess bag on the handlebars and the battery will be split between two front panniers on the front rack. Between the batteries in the front rack, center triangle and motor in the rear wheel, weight will be low and well-distributed.

Thoughts?
 
I'm running 24v for my headlight/taillight/brake light. I just shunted 24v off the 48v battery pack. not ideal but it works.

I recently bought one of these off of E-bay. supposedly can be run off of 24v - 90v.

$(KGrHqVHJBEE7)2UUkWUBP!+qftWkg~~60_12.JPG

http://www.ebay.com/itm/12w-led-head-light-electric-bike-e-bike-motor-white-12-90v-12-36-48-60-72-84v-/150787655548?pt=Cycling_Parts_Accessories&hash=item231ba5077c

but I don't expect delivery for a few more weeks. i intend to use in on a bike I am building which primarily will be run on 48v but occasionally 72v (or vica-versa? not sure how the motor is going to perform that 72v yet).

I'm also currently looking for a switch-mode regulator to supply power to a 36v lighting system from a 48v battery. haven't been able to locate one yet so I was thinking of using an old 48v brushed motor controller and using a potentiometer (or resistor?) to permanently set the throttle at 75% or whatever so the output is around 36v. not sure it will work but i will give it a try.

also, since they are cheap and I have an old bike light housing that will hold 2 of these 24v halogen bulbs

26845-2T.jpg

I was toying with the idea of wiring them in series with maybe a capacitor to smooth out the initial voltage spike.

DC
 
huh. my led light showed up today. a lot faster than I expected. I touched the leads to a 48v pack and it seems pretty bright. not sure how I will mount it yet.

DC
 
That looks like a nice light. I'm using a driving light because I want to shape the beam, especially as regards a horizontal cut-off for oncoming drivers. I tried a LED tower, H-3 eqivalent and it was virtually useless, so I'm stick with using a 25W halogen, at least for now...
 
On my bike I just run the DC-DC off half the pack. The difference is usually 5Wh at most with my magic shine. It takes one pack about 1-2 seconds longer to charge (two halves).

Looking good. I've been looking for alternatives to the big apple because I want something with more protection. SChwalbe makes a 622 bike tire, but it's only like 1.75" wide or something like that--BUT with a ton of protection.I may ride a large 2.35" rear big apple with a smaller one of these bombproof tires in the front to make me feel safer.

I was thinking of coating my controller in black as well, what did you use? I was looking into this:
http://www.brownells.com/.aspx/pid=1119/prcrange=0%7C39.99/Product/ALUMA-HYDE-reg-
 
hillzofvalp said:
On my bike I just run the DC-DC off half the pack. The difference is usually 5Wh at most with my magic shine. It takes one pack about 1-2 seconds longer to charge (two halves).

Looking good. I've been looking for alternatives to the big apple because I want something with more protection. SChwalbe makes a 622 bike tire, but it's only like 1.75" wide or something like that--BUT with a ton of protection.I may ride a large 2.35" rear big apple with a smaller one of these bombproof tires in the front to make me feel safer.

I was thinking of coating my controller in black as well, what did you use? I was looking into this:
http://www.brownells.com/.aspx/pid=1119/prcrange=0%7C39.99/Product/ALUMA-HYDE-reg-

I simply used Krylon primer and paint. I wanted it to be more stealth. Thin coats work best.

Best, Tony
 
TonyReynolds said:
Coming along:

Marin%252520eBike%25252007.JPG


The center stand came in the mail from Velo Orange and is installed (sort of). It looks like it will work, but there's interference between it and the control cables that are routed underneath the bottom bracket. Looks like it's Dremel time... The nice thing about this center stand is that it gets more narrow as it swings into the stowed position, yet is wide when on the ground for good stability.

Hope this ends up being useful for someone.

Hi Tony, how has the VO double kickstand been?

I'm looking to fit a double kickstand for my 2011 Muirwoods and this post has so far been the only source of a successful installation.

I'm looking for a better stability than the lousy rear kickstand that I currently have.

Which model is it from VO and did you eventually have to do some Dremel time? If so, which operations?

Are there any other tips that you could give?

One model I've been considering is Ursus Jumbo, but I am not sure whether it would fit. https://ursuscycling.com/products/jumbo-kickstand

PXL_20220514_073800859.jpg

IMG_20200529_212200.jpg
 
Back
Top