rberger
10 W
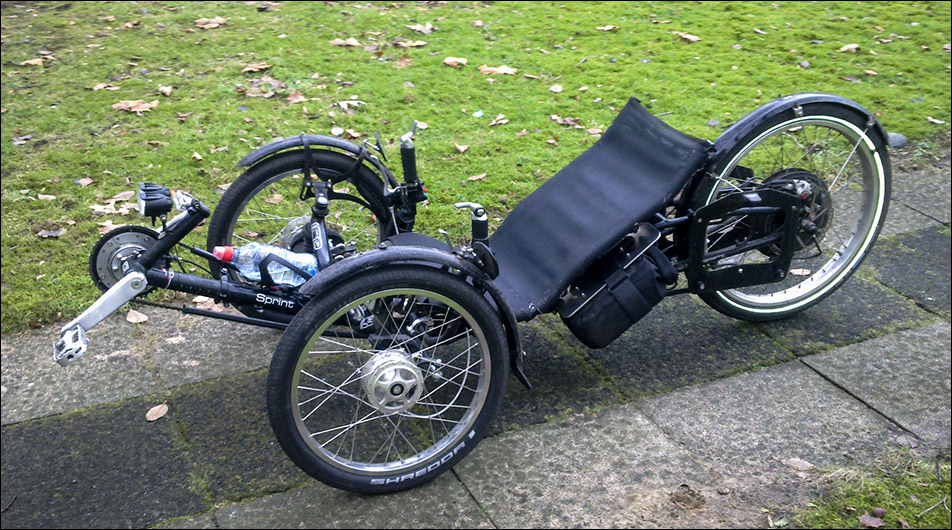
Well I was able to complete my DIY conversion of an ICE Adventure RS Trike to become a Pedalec trike capable of climbing the 2 mile 1500 ft hill that my home is on top of.
This series of posts is my attempt to document what I had to do to make it happen, mainly focused on the elements that were most difficult for me. Plus pictures!
To give some context; I'm a software knerd. I'm not particularly mechanical. I haven't done much with fixing / hacking bikes since my early 20's which is like 40 years ago. So I'm effectively a noobie for everything, not just the motors, batteries, controllers, but all the bike stuff too.
Also want to say that I'm really glad that I got all the electronic and drive components from Grin Tech as they were always helpful when I got stuck. I love all the support they give to the community and they developed the key electronic components I was using. They also took care of lacing the motor to the rim and related stuff. Folks on Endless-Sphere and BentRider were an even bigger help and a huge inspiration as well!
I did get pretty close to my original goals for the components for my ICE Adventure Pedalec conversion. The main differences are:
Spoiler alert: I finally did get things to work in general and I've now had several fun rides as far as 25 miles or so on several different terrains including several scalings of the big hill to my house. But I am still having some intermittent problems.
Follow on posts will document what it took to go from complete noobie to having a mostly working, powerful DD Hub driven pedalec trike, as well as remaining issues that I could use some help/advice on overcoming. I hope to have most of that done in the next several days.
This series of posts is my attempt to document what I had to do to make it happen, mainly focused on the elements that were most difficult for me. Plus pictures!
To give some context; I'm a software knerd. I'm not particularly mechanical. I haven't done much with fixing / hacking bikes since my early 20's which is like 40 years ago. So I'm effectively a noobie for everything, not just the motors, batteries, controllers, but all the bike stuff too.
Also want to say that I'm really glad that I got all the electronic and drive components from Grin Tech as they were always helpful when I got stuck. I love all the support they give to the community and they developed the key electronic components I was using. They also took care of lacing the motor to the rim and related stuff. Folks on Endless-Sphere and BentRider were an even bigger help and a huge inspiration as well!
I did get pretty close to my original goals for the components for my ICE Adventure Pedalec conversion. The main differences are:
- Crystaltye H3540 with statorade instead of EDGE 1500W Motor
- Discovered that more recent Crystalyte H35 series is basically the same as the Edge 1500W. Has 35mm Stator Laminations, Solid Aluminum Stator Core. Plus Grin Tech will ship them already injected with Storade Ferrofluid.
- Went with two 52V 13Ah (for a total of 23Ah and 50A continous power output) batteries in parallel instead of a single massive 72v battery
I also ended up getting a bunch of tools as I didn't have too many metric or bike related tools anymore. Just figuring out what tools to get was itself a journey.
Here's the components I ended up using:
- Direct Drive Hub / Wheel
- Motor: Crystalyte M3540R motor with Solid Aluminum Stator Core, 0.35mm Stator Laminations, Statorade
- Cassette: 9 Speed SRAM Cassette, 11-32 Tooth
- Rim: AlexRims DM24 20 inch Rim
- Tire: SCHWALBE 20x1.75 inch Marathon Plus HS 440 Wire Tire
- Tube: Slime Smart Self Healing Schrader Bicycle Tube
- Main Torque Arm: TorqArm_V4
- Secondary Torque Arm: TORQARM_V2
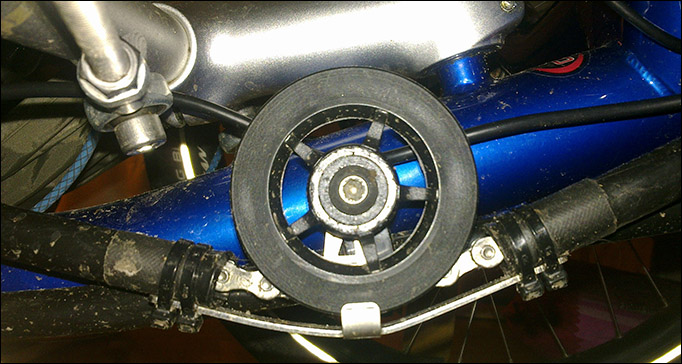
- PAS Sensor: Thun 120LBottom Bracket Torque Sensor
- Battery Stuff
- Batteries: 2 - 52V 13 Ah Downtube Battery with Panasonic GA Cells, 25A Rated
- Cable: 12 Gauge 'Y' splitter with Anderson connectors for parallel connecting batteries
- Charger: CYCLE SATIATOR 72V 5A Charger
- Clamp for Mounting Batteries: 1.0 inch Holder Clamp Aluminum Tube Clamps Mount Bracket horizontal Bar Clamp kit for work light Bar
- Controller Related Stuff
- Cycle Analyst: Cycle Analyst V3 Direct Plug
- Aux Control: Two Button Up/Down Digital Aux
- Throttle: Thumb Lever Throttle
- Temp Sensor: JST-SM Male to Female Extension Cable for Thermistor to CA3
- Motor Controller: Phaserunner V2.0 Compact Field-Oriented Waterproof Motor Controller
- Remote Power Switch: Waterproof Motorcycle 7/8" Handlebar headlight Switch
- Heatsink for Phaserunner (Found at surplus store)

- Brakes
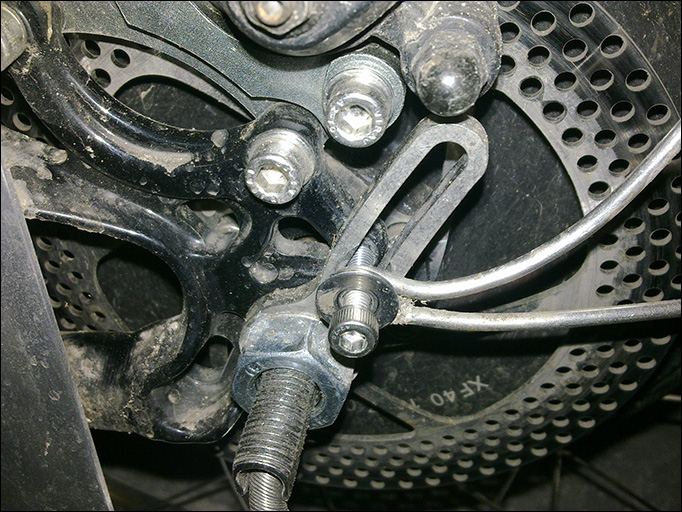
- E-brakes: 2- Magura MT5e 4 Piston Hydraulic Disk Brakes
- Rotor: 2 - Magura Storm HC 180mm Disc Brake Rotor
- IS Mount Adapter: 2 - Magura QM12 Quick Mount Adapter
- Bleed Kit: Magura Small Bleed Kit
- IS 160 Rear Brake Mount Bracket for moving BB7 to rear: 20 IS Avid CPS Mountain Bike Brake Mounting Bracket
- Mini Cockpit T for mounting controls: 2 T-Cycle Mini Cockpit T
- Wire Route Kit: Cable Bundling Kit, includes Spiral Wrap, Zip Ties, and Velcro Sleeves
- The main thing of value in this was the Velcro Sleeves. But I hope to replace them with F6 Split Sleeving. Zip ties you can get at Harbor Supply really cheap. The Spiral Wrap was useless.
- JST SM Connectors: Bag of Small Plastic Inline Connectors (12 pairs)
- This turned out to not be optimal. I needed more of some kinds than others. I ended up ordering more complete sets from Amazon:
- Hilitchi 520Pcs 2.5mm Pitch 2 3 4 5 Pin JST SM Male Pin Header Crimp Terminals Connector Kit
- XLX 560Pcs 2.5mm Pitch JST-SM 6/ 7/ 8/ 9 Pin Male / Female Connector kit
- Hilitchi 560Pcs 2.54mm JST-XHP 2 / 3 / 4 / 5 Pin Connector kit
- JST Crimper: IWISS SN-2549 Crimping Tools for AWG28-18 PH2.0/XH2.54/Dupont 2.54/2.8/3.0/3.96/4.8/KF2510/JST Terminal Crimper
- Anderson Crimper: IWISS Powerpole Ratcheting Wire Crimper Tools for 15, 30 and 45 Amp Anderson Cable Connectors
- Sleeving for finishing cabling: TechFlex F6 0.50 inch split sleeving 25ft
- Tool for inserting wiring into sleeving: Wire Loom Cable Insertion Tool for 3/8" to 1/2" - Model CM08
- Bottom Bracket Tool: Park Tool Shimano/ISIS Bottom Bracket Tool
- Crank Puller: Park Tool Compact Crank Puller
A few things I learned about tools:- I wish I had gotten a crimper for JST connectors from the beginning. I didn't get all the extra connectors and crimpers until after my first wiring attempt. And I had a lot of problems with the first wiring attempt due to bad manual crimping.
- Harbor Supply is awesome for some subset of tools
- Should have gotten a more bike oriented torque wrench or better yet a torque driver that had native metric support
- I still can't find the socket that is open for torquing nuts around cables and hoses that I saw in some bike video
- T-Handle Hex Keys are really nice to have. Home Depot has a nice Husky set much less expensive than Park
- I can't believe that I cant find a walk-in electronics component supply house in Silicon Valley any more
- I was able to get some odds and ends at HSC Supply aka Halted like heat sinks and multi-conductor wire
- Direct Drive Hub / Wheel
Spoiler alert: I finally did get things to work in general and I've now had several fun rides as far as 25 miles or so on several different terrains including several scalings of the big hill to my house. But I am still having some intermittent problems.
Follow on posts will document what it took to go from complete noobie to having a mostly working, powerful DD Hub driven pedalec trike, as well as remaining issues that I could use some help/advice on overcoming. I hope to have most of that done in the next several days.


")