New 14S7P & 14S5P packs need advices (to climb high mountain)

Now back to my triangle 14s7p pack. Just plan ahead.
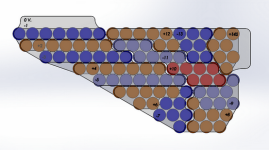
Slide1.PNG


View attachment 4


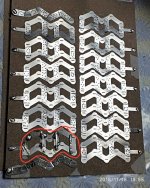
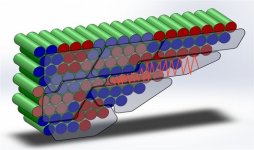
The 0.3mm pure nickel patches layout I did look OK ?

Try to make them big and wide with as little bottlenecks as possible. I agreed with spinningmagnets on termination points that should be able to allow current flow easily and without hotspots / stress spots.
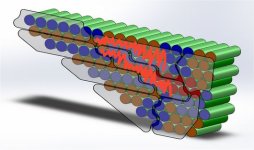
60232.jpg


60231.jpg


So, + and - terminal should be wide, along the parallel tabs.
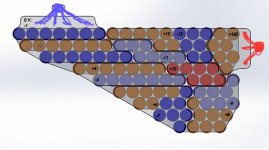


60241.jpg


Again, the orange lines are where I plan to add more conductors. Look OK to you guys ?


Here is the current capacity chart among different materials ES member Matador posted somewhere that I use as a reference when considering current flow. In case anyone would fine it useful - certainly.

Matador's chart :

View attachment 3
 
999zip999 said:
I like the idea of the added buss bars. As I hadthat idea also. Do know of the real benefits ? But I believe.

As we realized, the serial buses will carry the entire pack current up to the highest capacity amperage. So I decided to add more nickels since I still cannot spot-weld copper. For this 14s5p pack, it should be adequate. LG 18650 MJ1 @10A max = 50A. Though my current BBSHD stock controller will draw only 30A max, but there is a chance I might upgrade it to 50A mod.

For a lazy person like me, better prepare at start so don't have to redo it again. Balance charging is also good for the health of the pack but there is currently no easy+cheap+good 14S balance charger in the market (as I know). So I prepare for the splitted-pack parallel balance charge, by splitting the 14s pack into 2 x 7s packs. I am aiming at ISDT 8s charger :

ISDT T8 BattGo 1000W 30A Smart Battery Balance Balancing Charger For 1-8S Lipo Battery Charging for RC Toy VS D2 SC-620
https://www.aliexpress.com/item/Original-ISDT-T8-BattGo-1000W-30A-Smart-Battery-Balance-Balancing-Charger-For-1-8S-Lipo-Battery/32877583241.html?spm=2114.search0104.3.9.337822f2x7R9mu&ws_ab_test=searchweb0_0,searchweb201602_2_10065_10068_10890_5730315_319_10546_317_10548_10696_453_10084_454_10083_10618_5729215_10307_537_536_10059_10884_10887_100031_321_322_10103,searchweb201603_51,ppcSwitch_0&algo_expid=115f77f7-171f-4144-8c2a-518199527261-1&algo_pvid=115f77f7-171f-4144-8c2a-518199527261

Do not know if there is any other better alternatives. Do you have any idea ?

So the wiring is needed to be prepare now and the necessity to opening the pack again will be minimal.

Think I am going in the right direction based on the knowledge I gathered from reading tons of threads on ES forum.
 
Update :

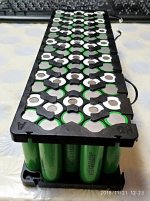
I've roughly finished the 14s5p pack a while ago after long struggling with it for weeks. Waiting for parts, doing it in spare time and etc.

The pack assembly detail will be explained later in a few days when I have more time. I will now conclude the BT BMS part that I use and bought from :

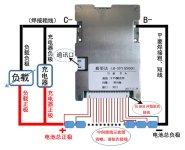
14S Smart Li-ion Battery PCB board Bluetooth Mobile BMS for 48V 58.8VLi-Ion E-bike Battery system with 20A to 60A US $50.80 / piece
https://www.aliexpress.com/item/14S-Smart-Li-ion-Battery-PCB-board-Bluetooth-Mobile-BMS-for-48V-58-8VLi-Ion/32794186005.html?spm=a2g0s.9042311.0.0.27424c4dxQlqTI


1521962163849357.jpg


Since my old BMS was a dumb one in which I never know whether it is working - it has been so quiet all along and my pack sagged like 0.4-0.6 V often, unless I manually balanced some low V groups. This new bluetooth BMS looked very interesting at first and it really works (for my first hook-up).

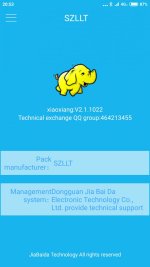
Android software is :

Smart Bluetooth BMS JBD-SP15S001 @14S 60A

for Android APK file xiaoxing V2.1.1022 (latest version from their website as of 2018.12.07) :
http://www.jiabaida.com/home-1.7-info-id-104-catId-52.html

It is in Chinese but we can guess which one to pick. Here is the link to download the XiaoXing software :

http://www.jiabaida.com/uploads/soft/xiaoxiangBMS.zip

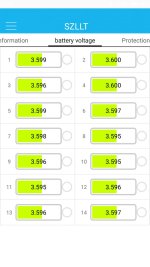
After installing on Android phone, pretty straight forward, and charge the pack. Here what it looks like :


64819.jpg


64820.jpg


The V looks pretty balanced of 5-6mV among the 14S groups which is so good for my brand new spot-welded pack.

Since I just finished up this set a short while ago, we still need to get to know each other for a while.

I'll keep this thread posted once more progress has been made.
 
Cell balance looks great. Not a bad idea to double check those voltages with a good DVM to verify accuracy. See how the voltages look after a full charge.
 
fechter said:
Cell balance looks great. Not a bad idea to double check those voltages with a good DVM to verify accuracy. See how the voltages look after a full charge.

Thanks fechter. That's a good idea to re-confirm with DVM.

New problem is coming up...

My regular Luna charger 58.8 volt is not working with this new pack 14s5p. It's on for 1 second and then off for another 1 minute (from fan sound and charging LED lit on the charger) then it cycled on/off repeatedly. I switched this charger to the old pack that been charged with for over 1,500 km, it acted the same repeatedly for hours with 1-sec ON/1-min Off cycle. The 14s5p pack was @50.98 V. while the 14s7p old pack was @55 V. The charger was set to 100% charge and 1/2/3/4/5 amp alternately - still not charging.

So I suspect the charger just died on me. I do not have a spare charger of 58.8V. - tomorrow will be a big day for bike riding the whole Bangkok. Hundred thousands bikers will participate tomorrow and both my packs are only half charged...
 
I have tested the 58.8V Luna charger with 2x24V halogen light bulbs in series. Still the charger acted the same, 1-sec ON / 1-min OFF. It 's the charger ! Just after 5-6 months of usage, it died on me.

Any suggestion for a new 14S reliable charger(s) ? I put CA Satiator on top of the list (most $$) but it is a big bite for its price. :shock:
 
I found some 14s 7A plain cheap chargers :

https://www.aliexpress.com/store/product/58-8V-7A-Li-ion-Battery-Charger-Aluminum-Case-For-14S-51-8V-Lipo-LiMn2O4-LiCoO2/1728275_32888961073.html?spm=2114.12010612.8148356.66.6b6c7e935OmuzP

and

https://www.aliexpress.com/item/58-8V-4-5A-5A-5-5A-6A-6-5A-7A-7-5A-Lithium-Battery-Charger/32792292319.html?spm=2114.12010108.addToWishlist.2.7ce41cfeGbzmi0&gps-id=pcDetailFavMayLike&scm=1007.12873.83260.0&scm_id=1007.12873.83260.0&scm-url=1007.12873.83260.0&pvid=97165339-d912-44bd-9504-f02aa6abec2a

Both in the range of $55-$60.-, shipping included. Fit right in my penny-wise budget. But they are fix output and non-adjustable for charging current steps.

Can I just add power diode(s) (30-Amp @ about $1.- ea.) serial to the output of this charger to drop down some voltage to simulate that 80%-90% full-cap charge ? Might not be perfect but it works and at 1/5 of the cost of the top-notch charger.

Did I forget anything ?
 
My concern is whether these cheap $50-$60 chargers will last a good while - just like my late Luna
charger's 6-month life span and just died without any prevalent sign. Actually, I paid around $100.- + shipping for it.

May be I'll buy 2 units and use them alternately to extend their longevity.
 
My major frustration here is just I needed this charger badly to charge my new 14s5p pack I just finished assembling today for the big riding tomorrow. Lesson learned, I will always need spare charger. :warn:
 
The following activity is what I mentioned as "the big riding day".

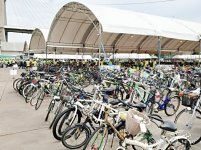
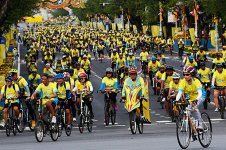
Estimated over half a million bikers joined the event, one of the largest, if not the largest, biking event in the world. Hopefully, it will be held annually.

The main biking route pass near my house, so I joined in automatically. :D

It is called "UnAiRak 2018" as a major bike riding in Bangkok and major big cities throughout Thailand. Here are some pictures :


View attachment 8


65409_resize.jpg


3021114.jpg


View attachment 5


65410_resize.jpg


65411_resize.jpg


FF02EDC797464DC1AA54A29571C1F089.jpg


ซ้อมไบค์-696x392.jpg


some of thte pictures are from social media and internet.
 
Update Build 14S5P (2018.12.31 going into 2019.01.01)

Up to now, this installation is still temporary. I still use rope to fix the pack into position and test ride to see how it feels and how the pack performs. Actual mounting might be 3d printed brackets from my brand-new Creality-10X, it will take a while before I have time to do it.

This aluminum case is super tight for 70-pc of LG MJ1. But it is rigid and durable for the long service life of the cells. I decided to have the BMS outside the case but need to weather-proof it somehow. It won't fit the triangle space though.

I have the 14S5P pack splitted wired with possible future balance charging, who knows I might need one. But I do not have a balance charger now. Normally, it is connected as a 14S by having the +7S and -8S connected outside the pack via a XT-90 M-F connectors that simply bridge the splitted halves together. For balance charging, I will remove this XT-90 out and connect those 2packs (1S-7S and 8S-14S) in parallel to make 7S10P and charge it with ISDT T8 or something similar. I will show this diagram later when time allows (that's an excuse for procastination) .


Pack Testing :

For normal ride on flat, the pack hardly draws 15amps when accelerated. That is only 3amps out of each parallel row of the 5P pack (less than 1C from LG MJ1 of 3.4A). The pack gets upto 34-35 deg C from today's 44-km trip. And I get about 7wh/km with PAS #3-4 pedalling 3/4 of the time. I barely felt any warmth from the pack with back of my hand.

My 14S 7amp new charger arrived and charges fast and quieter than the 6-month-life Luna's one :

YZPOWER 58.8V 7A Lithium Battery Charger for 14S 48V 51.8V Lipo Bicycle Two Three Wheelchair US $59.99 Free Shipping
https://www.aliexpress.com/item/58-8V-4-5A-5A-5-5A-6A-6-5A-7A-7-5A-Lithium-Battery-Charger/32792292319.html?spm=a2g0s.9042311.0.0.25e94c4drXbuyP

With this 7Amp (6.5amp actual when charging) charger, actual charging is 6.5A/5P = 1.3A pereach serial P, that is about 0.4C charging rate which is good. Pack gets to 35 deg C when charing. I normally charge the pack to 4.1V and manually unplug it. Group #8s always charged faster than the rest of about 20+mV. But when unplugged, all the voltage of every group drop back down from 4.1xx V to 4.0xx V. with less than 10mV diff among them. Sounds balanced ?

Thanks to the BT BMS, monitoring is much easier now compare to my old pack. The BT app on my Android phone shows normal V of about 7-8mV diff among the 14S groups.

When I'm near-by (in the same house but may be n different room), I wish that the BT range covered 50-m, not 5-m like it does now. But when I'm away, I really wish, like I posted in another thread :

bluetooth BMS :
https://endless-sphere.com/forums/viewtopic.php?f=14&t=88676&start=825#p1434867

Maintaining the pack is getting more serious now considering resources we put into it and hope it will perform well with longevity. Accident like trazor's can be avoided, if the BMS were equipped with what I mentioned in that thread above.
 
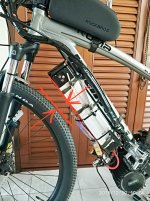
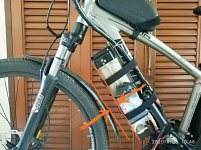
After test installing my new 14S5P in aluminum tube under bike's downtube (there will be another 14S7P in the triangle), here a problem arises :

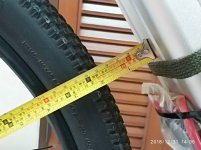
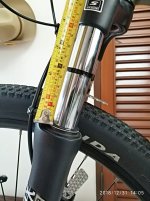
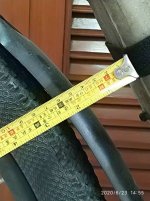
The clearance between the front wheel and the 14S5P case is about 4.5 cm. But when the front fork hit bumps, it retracts to the shortest of 5.7 cm (per my zip tie). That does not even include mud guard (not shown in pic) flapping up/down a bit. So whenever I hit a medium (and above) road bumps, front wheel will grind the batt pack. Plus the BMS is right where the front wheel will directly grind it. Sooner or later, that will become a serious problem. So I have to fix it quickly.

[ I actually lost my mud guard on the sidewalk from this grinding the very first time I went out testing this new set-up, not even 100-m from home. ]


69642.jpg


69645.jpg


69643.jpg


Some of the bike shop mechanics suggested me to replace my existing fork with a new 29" (mine is 27.5") but that another few hundred bucks (my local price). So I think :

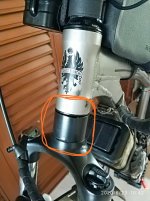
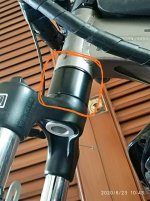
Cheap solution : I might need to add a 2.5-cm spacer (or retainer ring) to the front fork shoulder (under the head tube). And remove few spacers off from above the head tube.


View attachment 1


Questions :

1) Is this possible and appropriate ?

2) Will that affect riding much ?

3) Cause extra wear ?

4) This new spacer should be steel / stainless steel / aluminum machined to fit appropriately where it should be. Not too loose to cause play, not too tight to cause stiffness when turning handle bar.

I can hardly move this 14S5P pack anywhere else. So I need advice from the expert here on ES (where I learn a whole bunch about bikes, e-bikes, batteries, electronics and etc. from)

Note : My fork is : Suntour XCM Remote 27,5" 120mm


Thanks guys !
 
You most likely won't be able to do anything with the bottom spacing on the forks steerer as it will affect the crown race/ bearing seating and smooth operation. The steerer bottom end is slightly flared/tapered to enable the crown race to be a very tight fitting to prevent it spinning.
 
hemo said:
You most likely won't be able to do anything with the bottom spacing on the forks steerer as it will affect the crown race/ bearing seating and smooth operation. The steerer bottom end is slightly flared/tapered to enable the crown race to be a very tight fitting to prevent it spinning.

I thought machine shop might be able to do something about it - looks not very complicated job to me. Anyway, I know very little about bike specific parts - just started to get my hands on last year.

So hemo, you recommend me to replace with a 29" forks ? Just to get another 1"-1.5" more clearance ?

Any decent model (but not too high $$) in mind ?

Thanks.

Any other idea to solve this will be greatly appreciated.
 
I'm in the process of building this with some LG Browns i must say for the sm0l triangle folks like me this design is a marvel of engineering. I bought precut strips of nickel though, planning to add copper plating to it if i can mallate it properly. Will reference this thread if i dont blow the house to smithereens (or get covered in Saharan Dust) :bigthumb:
 
Gizmosis350k said:
I'm in the process of building this with some LG Browns i must say for the sm0l triangle folks like me this design is a marvel of engineering. I bought precut strips of nickel though, planning to add copper plating to it if i can mallate it properly. Will reference this thread if i dont blow the house to smithereens (or get covered in Saharan Dust) :bigthumb:


Gizmosis350k : I think you will achieve what you want as long as you don’t quit before hand


:thumb: :thumb:
 
Been away for a long while...

After workload and the hard time during the past period of life & COVID-19 , I really have had very little time to enjoy participating here in ES, but the rides and tweaks never stop....


:D :D
 
To get a clearance I need for front wheel not to hit batt pack, I added the 35-mm steel bush between the fork bridge and bike frame, shortly after I posted above questions in 2018 (then mileage was less than 2,000km), costed me around $70-80 including new longer steering tube to couple with the old cheap Suntour fork and all the labor.


183215_resize.jpg


183216_resize.jpg


It might be comparable (in $$) to replace with a new longer-tube entry-level fork, but what the heck, it is done and works perfectly for at least 1.5 yrs and over 8,000+km until now (2020.06).


183217_resize.jpg


Ride feeling is smooth just like any normal e-bike (heavy and stable, mine is 35-kg). Proven that this can be done and will last a long time as long as we do it correctly. So you do not have to replace the front fork, just replace a longer steering tube and add a spacer bush as I did here. Of course, you need some tweaks and skills. :thumb:


183228_resize.jpg
 
Re : 14S5P batt pack

I have been using the 14S5P of LG18650MJ1 + 14S60A JBD BMS as my only pack.

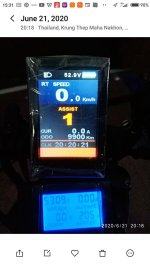
Mileage as of now is 9,900.-km and will soon be 10k+km for my frequent riding route of 30+km and using 250-300wh of power.

I have been happy with it and recommend it highly. I have had no problem with the e-part of the bike whatsoever since 9,900.-km and almost 2yrs ago. Considering it is about 3.6V*3.45A = 12.42wh ea. * 70pcs = 869wh nominal capacity. And that 5P of MJ1 cells can give me 50A burst for acceleration. Note : 50A @ 50+V is approx. 2500+watts ! My factory-default BBSHD has never been that hungry, max at merely 30+ amps. Full-charge range is not less than 70-80 kms depending how heavy on the throttle.


183230.jpg


Final thought, Li-Ion is still the format to choose for e-bike, considering its energy density, $$ and practicality. LG-MJ1 is a nicely balance cell among high energy (12.4wh/cell nom.), good max current-draw (10A), pretty good cycles (400), high wh/liter (530), high wh/kg (250), and $. To me, it is among the best in the 18650s class as of now. After considering those buying factors, I still might use this LG-MJ1 for my next build except for the reason I get bored and just want to try something new.


:D :D
 
Back
Top