• Howdy! we're looking for donations to finish custom knowledgebase software for this forum. Please see our Funding drive thread

new cyclone 3000 w mid-drive kit?

The Avid hydraulic brake handle has 2 hangups or detents when released of which the outward most one interferes with the stability of the ebrake micro switch positioning[when switch is positioned for inner detent] and the handle position when on the outmost detent is kind of far out. After trying several other restraining alternatives this added screw and washer seem very effective in arresting any handle motion beyond the inner detent. No more ebrake switch "ON" when you want throttle.
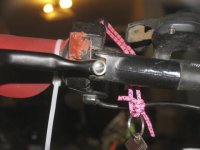
mod IMG_6542.jpg

All part of the process to get a trail ebike to respond just right!
 
DingusMcGee,
After your recent post I looked back through this thread and found pictures of your stiffening system (page 37). I had not seen them before. It appears that both you and I came up with very similar solutions. I would argue though that your shear wall tube forces you to rotate the whole system downward, reducing ground clearance. Additionally, the load path of you "Z" bracket is more convoluted than a straighter path. That being said, you can't argue with results. Especially results that have been through testing. It just proves the old saying "there's more than one way to skin a cat" to be true.
 
Dogman,

I suspect your frame stiffness [because of redundancy of members] is similar to what I have achieved. Maybe stronger?

In terms of straightening out under [max] loading, a good brace design can have only a little bit of length/angle change to stay within a no movement laterally tolerance of the chain to not exceed it's free play within the chain and teeth. Chains can often be a little more forgiving than the free play this teeth-chain gap permits. But not being likely any part of the problem is usually good solution.

I immediately noticed from your post how your approach to a design was similar to mine and you accounted for the effects of the two force/torque inputs. I did have some of my calculations on these loadings posted here but so far they have not been reposted after the Endless board took out a complete section of posts to review for rule violations.
 
Does anyone know of an offset ISIS left crank arm? With the 148 mm ISIS BB shaft, there is not a lot of clearance on the left side of the Cyclone motor housing. Especially when you start adding bracing to that side of the motor. This is not a problem with the square taper bottom bracket shafts which are much longer.
 
Dingus,
My apologies, upon reflection I think your solution is probably stronger, as in stiffer and less susceptible to deflection at high load.

I still think that Dogman's solution is the most elegant so far, in both meanings of the word.

Cheers
Steve
 
There's something wrong with my setup. I haven't used my Cyclone since May, and when I tried to run it, the motor would not turn. It would just make a faint noise and stop. The motor and controller were warm (this doesn't normally happen when the bike is just sitting there). I initially suspected the controller because when I tried my GNG's controller, the Cyclone would turn, but I just tested the Cyclone's controller with my GNG mid drive, and the GNG worked perfectly. I tried the GNG controller on the Cyclone, and now it doesn't turn anymore.

It seems that there is something wrong with the circuitry inside the motor. The hall wires are all securely connected. I haven't made any changes to the hall wiring or battery. I've only used it with a 52V battery and the stock controller. It was working fine in May, a couple months ago. It has been stored in my garage.

[strike]Are there any replaceable parts in the motor? Is there anything I should look for when opening up the motor? I guess I'll have to buy a replacement motor.[/strike]
Just got a reply from Paco that the hall sensors are replaceable, so I will be testing those later today.
 
With 68mm BB is very narrow but I haven't have a problem with it. Does your crank hit the motor?

sather said:
Does anyone know of an offset ISIS left crank arm? With the 148 mm ISIS BB shaft, there is not a lot of clearance on the left side of the Cyclone motor housing. Especially when you start adding bracing to that side of the motor. This is not a problem with the square taper bottom bracket shafts which are much longer.


Sent from my iPhone using Tapatalk
 
robocam said:
Just got a reply from Paco that the hall sensors are replaceable, so I will be testing those later today.

Looks like there was a pool of water that sat inside for a significant amount of time (most likely from when I hosed my bike down to clean it, thinking the motor was at least water resistant). I'm not even going to bother testing the hall sensors. I'll just replace the board to see if that fixes the problem. I plan to drill a drain hole at the bottom to prevent future occurrences. What luck that the board just happens to be at the lowest point.

file.php
 

Attachments

  • IMG_8108-r.jpg
    IMG_8108-r.jpg
    182.2 KB · Views: 1,847
I have my cyclone working for about 3 weeks now ,I love it .It's everything I wanted a Kit to do to my MB make it a Vehicule that can follow the traffic in town and a bit more .

Now I am having a mechanical problem devellloping :The Crank Freewheel is locking up sometimes and make the pedal start to rotate ,usually at the speed it happens my Achile's heal take a hit OUCH! .Sometimes it just bangs up (not a good bang sound) .I am stuck not going more than a slow 20Kph ,seems it's happening less often @ lower speeds

Where can I find a replacement for that Freewheel .I know CycloneTW is selling them ,shipping cost is stupidly high for a piece of steel that is not 1 pound.

Probabbly there is some available in the US or Canada .BTW if the piece you know of is a better quality part,That I would like alots .Or same stuff it's ok to.

Thanks to everyone who psted about Cyclone3K .It is likely that I have read it and with all the knowledge I gained here about it the install was a breeze
NB** With the right tools of course

ColdRider Montreal =D

Hey!! this "sike Bike Part" Crank freewheeel .It do not look like the same as original .It fits right in ? And What about the Motor Freewheel That one too must be weekening I suspect ,Where can I find a replacement for that second freewheel ? Thanks
 
Yeah, sickbikeparts is a place to start.

https://endless-sphere.com/forums/viewtopic.php?f=28&t=69867&p=1192500&hilit=freewheel#p1192453

ColdRider said:
I have my cyclone working for about 3 weeks now ,I love it .It's everything I wanted a Kit to do to my MB make it a Vehicule that can follow the traffic in town and a bit more .

Now I am having a mechanical problem devellloping :The Crank Freewheel is locking up sometimes and make the pedal start to rotate ,usually at the speed it happens my Achile's heal take a hit OUCH! .Sometimes it just bangs up (not a good bang sound) .I am stuck not going more than a slow 20Kph ,seems it's happening less often @ lower speeds

Where can I find a replacement for that Freewheel .I know CycloneTW is selling them ,shipping cost is stupidly high for a piece of steel that is not 1 pound.

Probabbly there is some available in the US or Canada .BTW if the piece you know of is a better quality part,That I would like alots .Or same stuff it's ok to.

Thanks to everyone who psted about Cyclone3K .It is likely that I have read it and with all the knowledge I gained here about it the install was a breeze
NB** With the right tools of course

ColdRider Montreal =D

Hey!! this "sike Bike Part" Crank freewheeel .It do not look like the same as original .It fits right in ? And What about the Motor Freewheel That one too must be weekening I suspect ,Where can I find a replacement for that second freewheel ? Thanks

Yes, get the front standard, heavy duty or ultra heavy duty freewheel from Sick bike parts You decide how much you want spend, im not sure anyones done extensive testing to see which ones best. You'll need a special tool also from sick bike parts to remove your old bottom bracket freewheel. Its a common problem with these Cyclone freewheels, mine did the same thing. Replaced with the ultra heavy duty. I also replaced the motor freewheel while I was at it. If you replace that one, you'll need a new freewheel adapter for the 20mm motor shaft.
 
The Crank arm freewheel removal should be easy with the right tool ,in this case http://www.parktool.com/search?q=FR-6

That what I used a few & was easy .did I mention this "it's easy with the right tool"

Thanks for the freewheel upgrades info
 
Here's what I use. It's half the cost of the Park Tool unit. With an impact driver, it's very easy to remove the freewheel.

http://www.ebay.com/itm/New-Bike-Bicycle-Free-Wheel-Remover-BMX-Fixie-SINGLE-SPEED-Tool-/221100143616

ColdRider said:
The Crank arm freewheel removal should be easy with the right tool ,in this case http://www.parktool.com/search?q=FR-6

That what I used a few & was easy .did I mention this "it's easy with the right tool"

Thanks for the freewheel upgrades info
 
Thanks. I'll try an impact driver. I just failed to get the freewheel off using a 24" cheater bar and the Park tool! Next time I'll install it with anti seize on the threads.
 
Robocam

About that water : how about using some ->http://www.canadiantire.ca/en/pdp/permatex-liquid-electrical-tape-0388015p.html
After you have replaced the part .I have it ready and if I ever have to go in the cyclone motor I will wipe the edges on both side before closing .

And any ideers as to where it found it's way into the motor ? I have one the motor wire cable it has a rubber seal ,when I received my motor I looked it closely and found that this rubber seal was not as tite as I was expecting so I added liquid tape right away
.I hoppe this will save me the trouble you are now having
btw Shake it well before use , it drops @ the bottom.

Played with CA set-up a bit more .no changes .Dang I want that thing to work soo bad ,being the only argument I have if I get pulled over by officials ,that my Cyclone Setup is "limited " & there for "Legal"
I will give this poste more time and maybe one will point me in the right direction to make it go "Zoom Zoom" asap

Thanks All
 
sather said:
Thanks. I'll try an impact driver. I just failed to get the freewheel off using a 24" cheater bar and the Park tool! Next time I'll install it with anti seize on the threads.

I have had to resort to a 4 foot cheater bar before. No joke.
 
Sure thing. You'll probably need one that's at least 18V. This is the impact driver I have. I got it a couple years ago, and after using it, I don't know how I ever lived without one. =)

I'm not sure about putting anti seize on the threads. It could act as a lubricant, allowing the freewheel to be over-torqued. If you use an impact driver or an impact wrench, it should bang it off easily. I've removed mine at least twice this way with no issues.

https://smile.amazon.com/DEWALT-DCF886B-Lithium-Brushless-separately/dp/B00CSDIK9U/ref=sr_1_8?ie=UTF8&qid=1470246709&sr=8-8&keywords=dewalt+impact+driver

sather said:
Thanks. I'll try an impact driver. I just failed to get the freewheel off using a 24" cheater bar and the Park tool! Next time I'll install it with anti seize on the threads.
 
I like your design! It's simple and elegant. I also like how you put shrink wrap on your hose clamps.

For those that want an even simpler solution, just use a single bar on the lower motor bolt (the bottom bar in Dogboy's image below).

file.php


This is based on how my mount deformed (when using a 52V pack) before I added the sideplate. Notice how only the bottom bolt bent. The single bar should be more than enough to keep the motor from rotating.

file.php


Dogboy1200 said:
Just got my Cyclone 3Kw from Luna and mounted it with my own spin on stiffening the mounting. There's been a lot of great ideas on how to do this in this thread that helped me formulate my own plan...
 

Attachments

  • IMG_3742-r.jpg
    IMG_3742-r.jpg
    80.1 KB · Views: 4,521
Haha, you're welcome G! Nice job breaking the barrier. That's scary fast. Are you running all that power through the stock controller? So are your last 3 Cyclones trikes?

gman1971 said:
Well, today it finally happened what was destined to happen...today I just didn't barely inched the 60 mph barrier, today I demolished it with flying colors and let go of the gas at 66 mph; yes you heard it right: 66 MPH, that's a whole load of 106 blazing fast KPH for those who don't speak MPH... and the trike was still pulling... and thanks to Robocam's side plate mod (actually half of it, but 100% thanks nonetheless), so thank you Robocam, I could've not done this without your awesome mod...

Oh, all this on 5.5 kW...

G.
 
Thanks for the tips. I'm not sure where the water entered, but if I were to guess, it would probably be where the wire enters.

I just realized I never posted a reply to your CA questions in the Luna Cyclone thread. Sorry about that. Good thing you brought it up. I'll try to help. Mine's working great.

https://endless-sphere.com/forums/viewtopic.php?f=28&t=79959&p=1209669#p1209669

ColdRider said:
Robocam

About that water : how about using some ->http://www.canadiantire.ca/en/pdp/permatex-liquid-electrical-tape-0388015p.html
After you have replaced the part .I have it ready and if I ever have to go in the cyclone motor I will wipe the edges on both side before closing .

And any ideers as to where it found it's way into the motor ? I have one the motor wire cable it has a rubber seal ,when I received my motor I looked it closely and found that this rubber seal was not as tite as I was expecting so I added liquid tape right away
.I hoppe this will save me the trouble you are now having
btw Shake it well before use , it drops @ the bottom.

Played with CA set-up a bit more .no changes .Dang I want that thing to work soo bad ,being the only argument I have if I get pulled over by officials ,that my Cyclone Setup is "limited " & there for "Legal"
I will give this poste more time and maybe one will point me in the right direction to make it go "Zoom Zoom" asap

Thanks All
 
Being lazy here & copying my own post from another tread :Solved =D CA V3 Works fine .

To Resume my mistakes & solutions in the hope that it will help some one els :

1) Make sure that the pinouts of your Throttles connectors & CA are the same
I solved this one by adding a exta Throttle connector to CA ,With the correct pinout that matched the thumb throttle connector pinouts.I worked with what I had on hand (Used a splitter extenstion one end added to throttle {Spliced on the wires} another added to CA internals,I kept all original connectors I ADDED more , if later I get some JST's I will simply remove those ugly additions .
Best solution would be to use a new JST plug set and make them both match each other

2) At first I connected inside CA to "ThO" Wich is wrong .I realised after fact that "ThO" on the Controller was no match with CA "ThO" where I previously added the extra plug.The Extra plug that was added to CA is now connected to CA "ThI" interals

All this was done using "Teklektik CaV3_UUG_3-e.pdf" That can be found here on ES.

Thank you Tek Your work is much appreciated and do reach the goal of having duds like me achieve the impossible (Read somewhere els that it was not..)

This is to add CA-V3 to Cyclone Luna Kit GL
 
ColdRider
I'm curious. How does the CA3 throttle response compare to the stock Cyclone throttle? On a different 3000 watt motor, I was never able to get the CA3 throttle to be smooth and linear with a Lyen 4110 12 fet controller. On the Cyclone, I use the stock Cyclone throttle and the CA3 with a shunt as Gman recommended.
 
NP Robocam ,with what you typed it made me flash on the solution somehow .

AND-> about the liquid tape :The cable entry on the motor I did apply 3 coats all around it ,On the 1st application I pulled in the opposite direction the cable to have the LT(Liquide tape) enter deeply .Second & 3rd I just added some around the entry point .BTW the brush they have in the can stuck to the cap is total crap and way too big to be usefull ,it good only to make a very ugly spill .used instead some dollar mart paint brush ,they end up being a one time use anyway.i don't want to buy paint thinner to wash them and have to deal with chemical after wards,Mother Earth needs our help anywhere we can :wink:

To anser to Sather about the throttle : Yes there was a slight change ,when riding hitting small road bumps I often moved my thumb (I use the Luna thumb throttle ) and the result was I was accelerating in a "Too Much" way right .So after CA was working even when I do hit bumps and move my thumb the acceleration is not so great that I remove my thumb from throttle anymore .I know there is a place in CA set up where we can set up acceleration in a way that CA will increase throttle output V in a timed way like so many 1/10V per second or whatever .I am still working on set up details slowly as I understand what I am doing .Progress is slower . Edit :BTW I am using the regular cyclone controller to see about heat I did a few 20 Min with WOT and have not seen any heat output that I have to be concerned with ,warm it did get for sure but each time I could put my full hand on the motor & Ctrl & leave it there (Not even hot as a coffee cup after 2-3 min of being done) . With CA working I will also get info on power drain /output ,Enjoy the info if any is worth something .

hope this give you the info you needed .I will add info on the throttle settings I find that works well & safely with out breaking the acceleration feeling that is sooo funn to live out after each stop/red light

Have a great and safe ride y'all :D
 
Water In The Cyclone Motor :Question :

How can I seal the back of the motor ,where we see the shaft ,Robocam posted a pic about water damage .I am trying to figure how to waterproof that entry point ,being in plain sight & a bearing .15-16mm ID I am looking in plumming stuff they may have a rubber plug that would be ideal .But I have yet to find one ,Any suggestion ,anyone plugged that yet ? How did you plug it ?

Thanks
 
Back
Top