QS 138 motor kit not working

Soliman

1 µW
Joined
May 1, 2023
Messages
3
Location
Ohio
Hi All,

My son and I are working on converting a Honda CL450 motorcycle to electric. We have recently purchased a “Siaecosys QS 138 70H 3000W V1 Mid Drive Motor with EM150 Controller Kit” from TAIZHOU SIA TRADING CO. LTD. from Amazon : Amazon.com

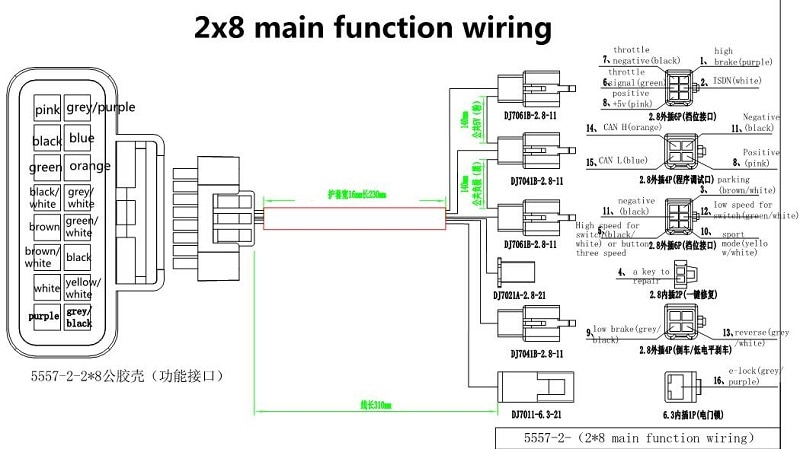
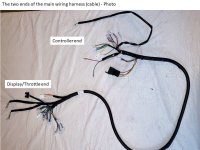
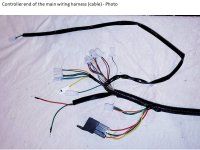
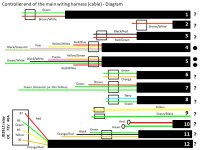
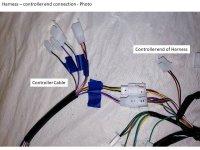
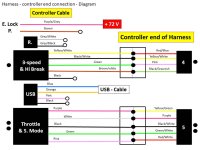
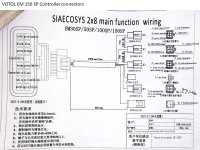
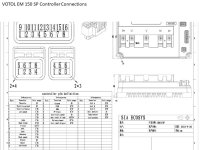
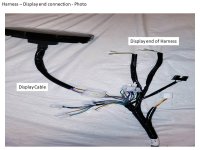
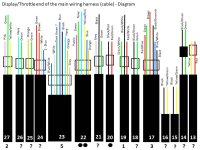
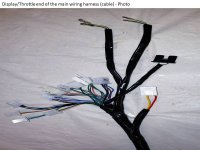
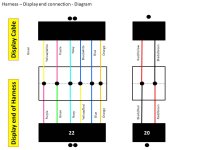
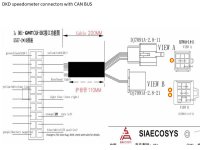
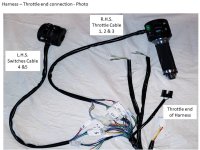
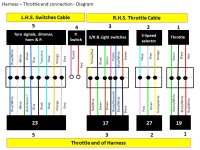
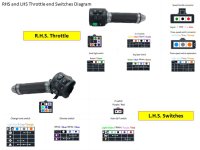
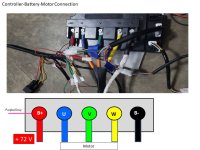
Can anyone provide us a detailed wiring diagram of the main wiring cable (harness) that came with the kit if you ever used it? Nothing worked after connecting the system, no display or response from Motor, not sure what is wrong ,so we thought we would start troubleshooting the harness first.
Thanks.
 
If you can post a diagram of exactly how you have it connected now, by tracing out your wiring and drawing it up, it will help us help you find if there are any connections visibly incorrect. Be sure to show which individual wire is connected to each other individual wire, not just which cable / connector is plugged into which other cable / connector, so that wrongly-wired connectors can be seen and fixed.

It may also let you see an incorrect connection during the tracing out process. If nothing else it gives you a system wiring diagram that you can use for later troubleshooting, once you are certain the wiring in the diagram is correct.

First steps to test for systems that don't power on (which sounds like your system's problem) are:

Test that your battery output has correct voltage on it (is fully charged) for that battery. (noting which battery you used with the system may also help us figure out if it will work on your system).

Test your fuse(s) and/or circuit breakers for continuity.

Electrically continuity and / or voltage test and visually verify the battery cabling and connections all the way to the controller battery input connections, and any fuse that is on the controller itself.

If you have a contactor or precharge setup between battery and controller, ensure they are working and correctly passing battery voltage to the controller.


Note also that this is an FOC controller, which are not plug and play unless pre-setup by the seller for what comes in the kit, so if it doesn't come preprogrammed for the motor, you'll need to run the controller's setup program to input the motor-specific parameters, and tune the system to operate the way you need it to. (you'll probably still end up doing the latter after you get the system working, and you will probably also have to set it up for your specific battery's capabilities, such as limiting the controller DC / battery current to whatever your battery can actually handle, vs the max the controller can suck out of it).
 
There is a huge Votol thread on here I'm sure you can get help there.
Some documentation
H4eed4489c16e43c49809aada716d8a7fi.jpg
wiring.png
 
Last edited:
Thanks for your quick responses.
The battery I'm using is a 72V, 20 AH from Amazon: https://www.amazon.com/dp/B0979383J3?psc=1&ref=ppx_yo2ov_dt_b_product_details
currently it reads 77.5 V. I couldn't find any visible fuses in the circuit, so I'm not sure if I have any at the moment.
I've attached photos of the documentation we created for this project, it has all the wirings as we connected them as well as some diagrams I found online for the connectors. I'm also having problems connecting the laptop to the controller, but I guess that's because nothing is powered up. Thank you very much for your help.
 

Attachments

  • Slide1.JPG
    Slide1.JPG
    93.1 KB · Views: 10
  • Slide2.JPG
    Slide2.JPG
    86.9 KB · Views: 9
  • Slide3.JPG
    Slide3.JPG
    88.1 KB · Views: 13
  • Slide4.JPG
    Slide4.JPG
    103.4 KB · Views: 12
  • Slide5.JPG
    Slide5.JPG
    81.2 KB · Views: 13
  • Slide6.JPG
    Slide6.JPG
    109.2 KB · Views: 11
  • Slide7.JPG
    Slide7.JPG
    92.6 KB · Views: 11
  • Slide10.JPG
    Slide10.JPG
    81.8 KB · Views: 10
  • Slide9.JPG
    Slide9.JPG
    99.1 KB · Views: 9
  • Slide8.JPG
    Slide8.JPG
    89.5 KB · Views: 9
more photos
 

Attachments

  • Slide10.JPG
    Slide10.JPG
    81.8 KB · Views: 8
  • Slide11.JPG
    Slide11.JPG
    55.5 KB · Views: 8
  • Slide12.JPG
    Slide12.JPG
    59.7 KB · Views: 6
  • Slide13.JPG
    Slide13.JPG
    97 KB · Views: 4
  • Slide14.JPG
    Slide14.JPG
    94.1 KB · Views: 4
  • Slide15.JPG
    Slide15.JPG
    61.1 KB · Views: 6
  • Slide16.JPG
    Slide16.JPG
    83.7 KB · Views: 9
  • Slide17.JPG
    Slide17.JPG
    79.1 KB · Views: 13
Back
Top