-REBUILD ONE GOOD PACK OUT OF TWO....18650

waynebergman

100 kW
Joined
May 7, 2011
Messages
1,016
Location
Pender Harbour British Columbia Canada
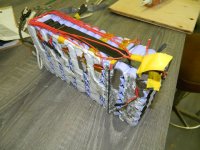
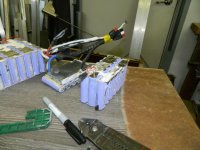
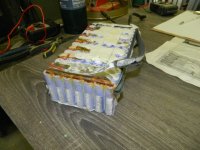
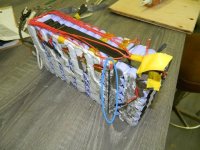
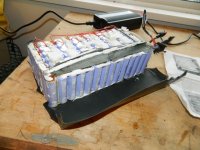
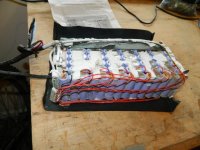
WB03.jpgWB02.jpgView attachment 3I have two 14S 7P, 50V 14.35Ah Samsung SDI Battery Packs that use the SDI ICR18650-22P 3C cells. Had some bad luck with at least one of my packs getting wet and I know for sure there is bad cells in the one....photo attached. The second pack is showing similar LVC symptoms and may also have gotten wet. I will hold off taking the second pack apart to see what it looks like inside until the new replacement pack I have bought arrives in the mail. I would like to put the new pack I have just bought onto one of my bikes and then take the two dud packs to make one good pack out of after isolating and discarding the dud cells.
I have been reading through the thread from DrkAngle on 18650 cells and I can see I have a lot of learning to do here before being comfortable with the tear down of these two packs. I am hoping to start the tear down in the next little while and hoping for some coaching along the way. I have ordered on line one of the little 2 cell 18650 chargers for flashlight batteries so I can charge up the cells two at a time thinking this will help for zeroing in on the recharging and testing of each cell if I take things all apart.
First off I want to say I think these packs are very good from cellman and I feel the demise of these packs was totally my fault as it looks like its a moisture problem shown in the one photo attached. I will be careful to behave myself with the new pack when it comes to water.
So a few things on my mind to start the project. I may as well start the tear down of the first bad pack. I feel there are at least 14 bad cells in it just looking at the water damage. A few points and questions for now....

1. Has anyone taken one of these packs apart? Not sure if I should wait till I take apart the second pack which I feel is in much better shape and may only need to have a few cells added to it from this first pack that has had bad water damage?

2. The second pack actually works fine up until I use up about 5 ah and then it just drops from around 50v under mild loads to quickly showing 40 or so volts and the LVC cuts in and all goes dead. The first pack was so far gone it would barely work for any length of time before LVC.
I will continue to read the DrkAngle thread to learn what I can but I would like to start this thread as a place to get help for the repairing of these two packs. Any input much appreciated........wayne
 
My KISS advice would be to preserve all parallel connections.

Don't remove any tabs, just cut them to separate each parallel string. If possible, don't separate any adjacent strings that are still good. If the pack has a good half, don't cut up that half at all.

So test, then cut out only the bad strings. Then you only need to solder wire to connect good strings again.

Don't even think of separating cell by cell. Later on maybe, but only to build a tiny pack to run lights or cell phone.

Just prying apart the good strings will be hard, sacrifice the bad cells in the chopping up process if possible. You likely will be shaving the shrink off cells in the process. So that will have to be replaced so the cans don't short. You might need to insert cardboard or plastic between parallel strings.
 
Building on what dogman said above I would advise you to do a capacity check on each of the parallel groups separately before you do any cutting. You can charge/discharge each group through the balance sence wires but make sure to keep the current low to avoid overheating the wires.
Carefully remove that BMS board and scrub away as much of the corrosion as you can with a tooth brush. You never know, the whole pack may be salvageable and it may be just the bad connections to the BMS. Just be very carefull to not short anything out.
 
Thanks for this advise guys. Sounds like a good idea not to try and cut anything apart that is not necessary.

Hwy89.....I only have a charger that will bulk charge the whole pack at one time and also the little 2 cell charger that is coming in the mail so not sure if I can charge a separate group through the balance sence wires as you suggest with the charger I have?

dnmum.....I have first suspected that there were some bad cells based on voltage sag and voltage readings at the anderson leads just after charging and shortly there after. It did not take long for the voltage reading to drop very quickly. Then when I took the big shrink wrap off the pack and started pulling apart the foam and stuff I could see the brown nasty stuff collecting on about 14 of the cells. Funny smell inside the pack and all the brown corrosion colouring made me figure there would be some damaged cells in there.

Also as far as the BMS salvage I will wait till I take the second pack apart and see if the BMS in this second pack looks better. I am sure it will look better and this second pack is what I should use I figure with some salvaged cells out of the first pack shown in my photos .
Cellman has also helped me with some instructions so I will wait till the new pack arrives and then take apart the pack that is on my bike now and see how best to patch it all up together.

I will try to check the cell group voltages on the pack. If any are lower than 2.75V, I have been told they are toast. If there are some groups much lower than others, I’d make an effort to separate any cells with corrosion, before the good cells in parallel are damaged by under voltage. I also have been told that once the termination to the cell or group of cells has been cut, current can no longer flow so I should isolate the cell electrically before attempting to remove it from the pack. I will also post some good photos of the two packs side by side with clear markings on the cells I suspect are duds and this should help to get some good direction on what to chop and what to leave alone. I may be best to move as little as possibe from the super bad pack over to the pack that surley has less damage to it. Then bulk charge the repair job and see how it performs before finally bundling and water proofing the fixed pack.
 
It might be worthwhile to get an RC balance charger for this project. An Imax 6s charger or one of it's clones would let you charge, discharge,and measure amp hour capicity on six groups of paralled cells at one time. You could probably accomplish the same thing with the little two cell charger, an amp meter, resistors and a stop watch but unless you have a lot of time and a long attention span a balance charger would be better.
Judging from the amount of crud on that BMS connector I am surprised you were able to charge at all. I have a feeling that the poor contacts from the balance wires have caused the pack to get severely out of balance.
Charge each group up to 4.2V and measure the voltage after 1 hour and then again after a couple of days. Any really bad groups will self discharge more than the others. Bring them all back up to 4.2V while checking amp hours in then discharge them to about 3.5v while measuring amp hours out.
 
Oops. I must have had a senior moment in that last post. A 6s charger will only charge one group at a time or 6 groups in series. Testing one paralleled group (1s) at a time would be the way to start weeding out defective cells.
 
Yeah, do some cleaning and testing before any cutting. An RC charger, even a cheap one will make it easier. It could be just shorts from the gunk causing the self discharge, but more likely if you smell solvent, you have some damaged cells. If you only cut the series connections, you can restore those fairly easy with a big soldering iron. Try to identify a large section of pack that is still ok, and leave it intact.
 
44.jpgView attachment 222.jpg11.jpg
Making some progress with the packs today. The good news is the best block of 21 cells from the worst pack swapped out to the better pack is going to give me one good healthy pack. Awesome! Photos attached show the work from today's efforts. I have a couple of questions still regarding the corrosion shown in the last picture and also please some tips for spot welding the stainless sheet from the two blocks together......


1. Does anyone have any idea why the brown color. My friend that was over that did the work for me to repair this pack was thinking why the brown? He could understand the green colors we were seeing in there from moisture but why the brown? I think it was because of the make up of the battery that he was wondering why the brown and he was puzzled by this. I am puzzled that a battery even works at all so I was glad he was with me to organize the repair job.

2. Second question is for spot welding the two stainless tabs together? This is the two tabs shown between the pack of 21 cells and the balance of good cells from the good pack.I have a tig welder that I could flash up for some quick tacks but if there is any way to do this with out spot welding I would be open to suggestions and I would prefer to a non welding solution if I can. I was even thinking of kind of a finger or box joint like for wood working and kind of folding things over on themselves and hope for some kind of a non welding solution.The last picture here shows the two bent up stainless tabs circled in blue color that will need welding or fastening together.55.jpg
 
at no point in this thread did i see where you actually just charged the pack up and measured cell voltages and then did a discharge test. how did you come to the decision to cut the pack apart?

if your pack got wet, from being submerged in water or rain getting inside, that would account for the rust color inside from the cases of the cells rusting. i did not see the green corrosion you mentioned.

did you inspect the cells to see if they had been crushed in the corners or ruptured at the seams?
 
THanks amberwolf, I will do.

Dnmun to answer a few of your questions below.....

dnmun said:
at no point in this thread did i see where you actually just charged the pack up and measured cell voltages and then did a discharge test. how did you come to the decision to cut the pack apart?

if your pack got wet, from being submerged in water or rain getting inside, that would account for the rust color inside from the cases of the cells rusting. i did not see the green corrosion you mentioned.

did you inspect the cells to see if they had been crushed in the corners or ruptured at the seams?

The first pack that was the worst off if I remember right i only measured pack voltage and it started to discharge so quickly just sitting after a full charge I figured something was up. Also it did not have enough voltage to light up and bring my CA to life.

Dnmun you mention that the cases could rust from the moisture but I am thinking the cases are stainless steel. I am wondering what exactly in the battery would rust with its make up?

And yes the green is there but you would need to blow up a hi res version of the pictures I attached I guess to see it.

An no there does not seem to be any crushed cells in the corners or ruptures at the seems.
 
Ouch! Bad day today.

I was bringing the pack into the city to get the tabs shown in the previous posts photo spot welded. As shown in the previous photos the pack was not yet held together with an enclosure and the cells were also not really tightly held in place in relation to each other. At this point the cells were just siliconed in place until the spot welding was done, then if the pack worked well I was going to weld up a new box enclosure for it and put some foam in and around the cells.

The battery shop that was going to spot weld it for me when they saw the tabs needing welding said they could not do it after all as they thought it was going to be a tab to cell weld and not tab to tab. They figured there spot welder would not work. As I had been told that a heavy tip solder iron and acid flux may work ok for TAB to TAB fastening and the guy in the shop figured he could give it a quick solder job to give it a try so he tried just one quick solder spot and after watching him I lost confidence in his ability to do this and asked him to stop and figured I could do just as well my self at home.

After a brief session on that battery shops bench in town I was returning the pack to the back seat of my truck. When I placed the pack on the floor inside the back of my crew cab I heard a little short go off and with in a few seconds there was a small flame in one corner of the pack. I quickly pulled the pack out of the truck and tossed it about 10 feet from the truck. With in about 10 seconds the pack fire was pretty impressive. The pack was making noise and and bits of fire and odds and ends were popping up into the air and floating back down onto my truck. I guess you call this thermal run away? It burned and popped away for about 5 minutes. It was very scary.

I am not sure exactly the cause as there are a couple of possible things that may have caused its demise and it does not really matter at this point i am just super glad no one was hurt. I am out 500 bucks for the pack and that is a bummer but I am trying to look on the bright side. Amberwolfs story puts things in perpesctive I guess.

Anyways I am curious, does anyone think the soldering job on the tabs (if things got too hot) could have caused the pack to be susceptible to the shorting and fire? I think not and it was just a cause of the cells beeing all tampered with on my part from the repair job and then when I moved the pack some things touched together that should not have touched and ca bang?

Like I say it does not really matter at this point but i am curious as to whether the soldering of the tabs could have helped cause the failure. Long story short I have a new respect for the danger in farting around with these cells and especially if you don't really know what you are doing like me.
 
Sorry to hear this. Luckily you were not out in traffic when it ignited or it could have been much worse.
I doubt that it was the heat from soldering if he was conecting tab to tab and not directly to the cells. It is more likely that something shorted the pack. Either a conductive item came in contact with the exposed cells or one of the wires chaffed through. A short circuit anywhere on the pack would have created enough heat to start a cascading failure melting wires and creating more shorts.
The lesson to be learned is to never transport these things without carefully taping all of the exposed areas and packing it in a padded box.
 
i got careless soldering 2 cells, and the internal thermal fuse blew. i felt stupid at first, but that is the whole point about using cells with a built in fuse. no SHORTED CELL fires to deal with.
the cell barely got warm. POP goes the fuse.
 
The pos. End can short on the tap or neg. Case. Rust can build up I read can short. Used and reworked 18650 cells can cause fire so is not for the girlfriend. Lucky you or the truck were not hurt. Like going for a dounut ect while battery is in the truck.
 
Back
Top