Ryobi One+ Electric Bike Build

Actually it really helps if you put it in the center (in the triangle area). I use to have my battery on my rear rack and it pretty unstable during the cornering. Since the triangle area is lower to the ground, you don't have to fit too much momentum during the cornering to bring the bike upright again. If anything, just add a heavy piece of metal triangle area just to make it more rideable.
 
My GOD! :shock:

I had 10 5ah 20c lipos on my rear rack for 2 rides and i hated it THAT much i pulled it off.

So unbalanced and top heavy.

I mean yeah, creativity award goes to you hands down, but reinventing the wheel is one thing, do you need a building permit for that?
 
Tincan said:
My GOD! :shock:

I had 10 5ah 20c lipos on my rear rack for 2 rides and i hated it THAT much i pulled it off.

So unbalanced and top heavy.

I mean yeah, creativity award goes to you hands down, but reinventing the wheel is one thing, do you need a building permit for that?

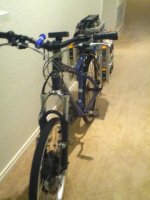
The city inspector refused to grant me the permit. I had to wait for my brother to come by last weekend and help me lift it off the rear rack. :D
 
Tincan said:
My GOD! :shock:

I had 10 5ah 20c lipos on my rear rack for 2 rides and i hated it THAT much i pulled it off.

So unbalanced and top heavy.

I mean yeah, creativity award goes to you hands down, but reinventing the wheel is one thing, do you need a building permit for that?
Funny I like carrying 9 packs but when I run 12 it handles like a boat. only a 6 pound difference
 
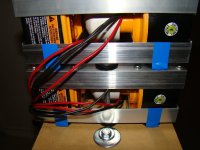
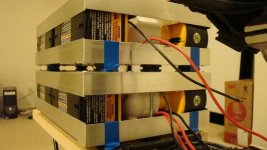
Got the center batteries mounted and gonna try these rubber grommets for shock absorption...although I really don't know if I'll need it with this design. The Ryobi packs are nuclear hardened having experienced dropping one at 20 mph...plus the PVC connectors "ride" with the packs ... ie they aren't bolted down as before.

Shock1.JPG

Shock2.JPG

 
Congrats-you have been a very good sport and have taken quite a ribbing from the gang here while keeping your spirits up and defending your ideas. Kid you they may, but I for one have noted your craftsmanship and attention to detail.
 
I agree with Kent.

When I first saw you building the panniers... well... Let's just say... it wasn't something I'd do. Or if I did... I probably wouldn't have the guts to post a picture of it :oops:

The new setup doesn't look much bigger than a big trunk bag. Kudos! Nice job.
 
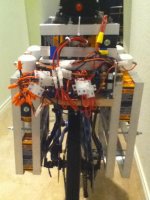
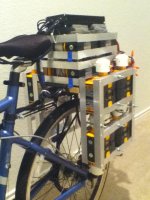
well, my wife is on a trip and took the camera so I had to use my sons IPOD camera, but I will get better pics when my wife gets back. I have two sides hanging down like panniers, each side holds 8 Ryobis and then the top middle holds 8 also. I still need to buy 4 more Ryobis for the right side as you can see they are missing in the pic. That will bring the total to 24 Ryobis which is about 734 Watt Hours of Capacity. The aluminum skeleton frame weighs a total of 9 lbs so I'm very happy with the weight compared to the MDF Spuce Goose.

Front1.JPG

Closeup1.JPG


Here's a shot of the rear. I decided not to use the switch panel and just go with connectors. This means I'm not going to mount the charger on the bike. Instead I will keep it in my back pack and then when I get to work I'll have to hook the charger up to the connectors. Sort of disappointed but it saves space and weight and will keep me from having to design a custom shock absorption system for the charging electronics. Right now you can see its a rats nest but I wanted to try out the bike today so I didn't make the wiring look pretty. Also, I need to probably mount the motor controller in the triangle. It sticks out like a sore thumb on top of the middle rack.

Rear1.JPG


I rode it for 12 miles and averaged 19 mph. It used 327 Watt Hours (about 50% of the total). My fastest point was 45 MPH going down a hill and some straightaways I hit 36 MPH but I didn't try to max it out. Other times I did some peddling, so all in all I am very happy with this test.
 
I don't know why the pics come out rotated. They look fine on my pc. But I rotated them and saved them again and uploaded and they still are sideways. Oh well, I'll take some better ones when my wife gets back with the camera.
 
The EXIF orientation data in your photos needs changed, it depends what app you rotated it in in your PC....try picasa.

It looks pretty damn good actually - I mean, it's still huge for the power you're getting, but now its looking pretty useable.....and as part of your design philosophy was to sacrifice some weight and compactness for the concept of using the drill batteries without modification, then I think its as good as you could get.

And I'll say it again, your handiwork looks very good also....
 
ok, got the pics rotated in the post above.

Yeah, it's turned out really well for the amount of Ryobis back there. I lowered the panniers about as low as I can. This helps getting the center of gravity down alot. Also, using a single layer of Ryobi's on the sides keeps the weight closer to the center line which helps out greatly. As others can vouch, little bits of weight change the handling alot. I would like to get the controller off the top and into the triangle. It's a couple of pounds sitting high in the back. But all in all, it really did well during the 12 mile trip. And it was fun, man that Crystalyte 5303 is a beast! When I was doing 20 MPH, I would hit the throttle and the motor would respond like a tiger. I had 5 parallel strings on there....hitting about 6 amps per string. Can't wait to add the final 6th parallel string. I can tell if the current is available that 5303 would go even faster. Amazing motor!

I really need to start working on the charger. I've been putting it off but charging 20 Ryobis one at a time on my charger was a pain. Takes about 45 minutes per pack. But I needed to do this test so it was the only way.
 
Personally, I'd be a bit uncomfortable with all those exposed brass screw contacts, aluminum frame and metal framed bike and the only insulation to keep them all from shorting each other is air. Just too many opportunities to get zapped in my opinion. But I applaud your creativity! :)
 
Hillhater said:
zap said:
...The new setup doesn't look much bigger than a big trunk bag. Kudos! Nice job.

Ahh, but....that was only one third of the full assembly ( as you will have noticed in the later photo's)
..and it has yet to be enclosed or weatherproofed !


You're dinging me for my setup while other guys on this forum are talking about ordering 60 LIPO hardpacks for their bike. Live and let live man! :lol:
 
I am not aware of anyone on here trying to install 60 lipo hardpacks on an Ebike.? :shock:
..but if there is please let me know i would love to see that too ! :lol:
I was simply pointing out to zap that he was not seeing the completed full pack assembly.
There are several of us i am sure, waiting to see the final incarnation of this "Ryobi Bat-mobile" ! :lol:
 
"Ryobi Bat-Mobile" :lol: That's good! I'm going to have to adopt that name for my bike!

Ok, then here is moving on to PHASE 2 of the Ryobi Bat-Mobile. Playing with the placement for the Ryobi's around the inner triangle. Looks like I can get 8 more in here easily. This will also leave me with a clean bar on top. I'm going to see if I can put the Crystalyte Controller on top of the bar in the middle if my knees won't hit it when I'm peddling. If I can do that, then I'll cut the motor wires down short and then add some monster AWG power cables from the batteries to the controller.

 
Hillhater said:
I hope you are going to lock out that front sus fork before you hit a pot hole and face plant !

Have you ever seen a army tank hit a pot hole and face plant? Well neither have I. :lol:
 
Tank..No ! .. but i have seen a 150kg race moto bike do a forward cartwheel ( several times ) at 150 mph when the front brake locked on unexpectedly !!
Its a fair bet if that front tire gets compressed into those bottom battery's...you can expect a large dental bill ! :eek: :shock:
 
This thread has been Fascinating to follow. Thanks for posting all the pics. And +1 on sticking to your approach (toolpacks). I admire your dedication and creativity.
 
I wish you well on your build and we all have been enjoying the progress. I for one hope that with all these battery packs you haven't overburdened your bike and thus reduced it as a second daily vehicle. Do you want to haul groceries,carry stuff, etc or is it simply personal transport from A to B?
 
Well, I've enjoyed it as well, even if it's been nothing more than entertainment for you guys. :lol:

The last ride really was fun, especially riding on the shoulder of the backroads at about 20 mph and then when a car would pass, hitting the throttle and riding behind them. That was a thrill, watching them look in their rear view mirror. They had that "WHAT THE HECK?!?" expression on their faces. But then they would speed up and leave me behind. I was hitting about 35 mph. I think this rig can do 40 mph but won't find out until I get the batteries setup in the triangle.

Today, I created a mount to put the Crystalyte Controller at the top of the triangle. I simply used a small piece of 0.25" MDF, drilled some holes in it and tie wrapped it to the frame. Then mounted some foam and put the controller on it. I'll be glad when I get my camera back to take some good photos. Also, I'm hoping I'll get a slight boost because now the controller motor phase wires will be much shorter....since the controller sits right above the motor now. Looks like about 1.5 ft of wire now, before it was about 6 feet so I'm sure there was a good drop there. That wire from crystalyte only looks to be about 12 AWG. Also, since now the length of cable from the batteries to the controller is much longer, I bought 6 AWG wire to try to keep the losses down for that.

The main thing is getting the controller off of the batteries in the rear. Looked out of place back there, sitting very high. Now basically the only thing in back will be the batteries with a red/black going to the controller.

As for the usage Kent, this is just to go from A to B. Man, I wish I only lived 5 miles from work. The 8 NiCds sitting in the middle would do that easily and it looks so clean without the panniers. oh well, 25 miles it is. Also, for those wondering about the numbers so far, I'm getting about 2.6 miles/Amp Hour from this Ryobi setup. My Cycle Analyst is saying I'm running about 28 Watt Hours/mile, but I'm not peddling all the time, mostly letting the bike do the work, and also I'm going at about 18-20 mph with a few hills.
 
Back
Top