• Howdy! we're looking for donations to finish custom knowledgebase software for this forum. Please see our Funding drive thread

Scruffman's Bike Build - Battery Reconfiguration and rebuild

So heres a update of my commuting status
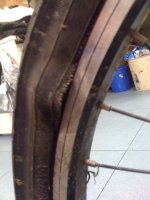
IMG_0441.jpg

So Spoke broke - Nipple Come up into tyre - This is the result. As well as a tube which I replaced enroute and then babied the beast to work the rest of the way.

But positive side is that i have now got some Hookworms coming to replace the broken one.

Also Order another 3 * 4s 5AH zippys to add to my battery pack so ill have a total of 22S for 92 Volts Maximum.

So that is 22S3P 92Volts and 15AH ( 1380 WH ) Woot! 8)

Only issue now is that i dont think i can fit any more batteries into battery box :?
 
Ok So now that we have made a full size Battery box for the frame going for group rides become a real issue. Last one i had to remove both front and rear wheels to get it into my car.

So i have constructed this over the last few weeks.

IMG_0472.jpg

Still need to organise a strap down method but what i think i am going to do is place a bar under the stand mount and bolt it down through there. Just finished making this much tonight and will take it home and bring my bike back to work tomorrow night and complete the mounting.

Its really heavy duty prob weighs around 20Kg all up. Its made of 5mm steel C channel and the bike tyre ( 2.5inch Hookworms ) slot in snuggly in teh channel.

Also received my new LVC monitors

Plan is to make a nice box to hold them all and just show the SMD LED's so i can monitor pack voltage really easily while riding by checking the LED bar graph.
 

Attachments

  • IMG_0470.jpg
    IMG_0470.jpg
    114.8 KB · Views: 3,275
Scruffoid said:
i had to remove both front and rear wheels to get it into my car.
So i have constructed this over the last few weeks.
Nice one, I've been meaning to do the same myself but only have a fairly light duty (195A) mig welder.
That's probably up to the task but I don't want to risk it breaking with my fighter balanced on the back!
If you feel like making another I know a fellow XR6T driver that would like one :wink:

As for strapping the bike down, check out the gripsport one for ideas to ...err, steal
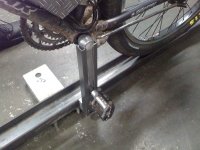
They use an upright that your crank arm slides onto and holds the bike up that way. I wouldn't be inclined to trust it if I came up with the idea myself but it seems to work.

towbar_carrier_double_qr_on_suburu__large.jpg


Perhaps a combination of that and your fold up ramp would work well ?
For a tie down (a single would probably suffice) I'd weld or bolt an eye onto the front of the folding part and one half way along the length and then put a rope/occy strap/ratchet through there to hold it

Those bar graph thingos look cool. I have a plan for them myself but need for a few more bits to arrive before I can put them to use
Got a pic of them lit up next to something else for brightness reference ?
Pity they dont have a beeper on them, then they'd be perfect.
 
They actually have two large pads that are at teh other end to the balance connector and i am thinking of contacting the maker and asking them what they are there for.

Thats a great idea for holding the bike upgright. Will look into doing something like that i think as then you only need 1 tie down point and it will be tops!.

i can easily know up another one how wide is your tow bar tongue. Mine is like 3 inchs. I will bring the rack and bike ( hopefully ) over with me on Saturday so you can check it out in person.
 
Jay the Front section doesnt actually fold down its welded there but after looking at the picture you posted i might do some grinding and make it simpler.

I have already get the metal for phase 2 of my rack sitting behind me here LOL. Its gonna be made out of Alloy this time so that is a lot lighter. Damn i havent even finsihed 1 and im onto the rebuild.

Still work in progress :)
 
Scruffoid said:
Jay the Front section doesnt actually fold down its welded there
Oh right. Well, if you wanted that style I'd be going with a hinge on it and strap it as i said, doubles as a ramp to roll it up (not so much an issue with ebikes as heavier dirt bikes) but yeah, it seems they downhill ones get by without it. I'd probably actually rather one I could roll up with my heavier fighter and crook back.

Let me know when you've perfected it :p
 
Ok latest updates. Here is my bike on the rack on the back of my car.

IMG_0479.jpg

Here is a closer view of the crank holding arm. This works so well its crazy. Bike is rock solid when used in conjuction with the 2 ratchet straps as seen in the top picture.

IMG_0476.jpg

Here is the Rack Mark II which is a much lighter version of the first with a few mods to the design. First unit weighs around 15kg which isnt that heavy overal as my tow bar can take a downward force of 160Kg so with bike weighing 36 Kilos were only at 1/3 of its rating. Will use the crank holding arm off Mark 1 on this one to hold the bike and will modify Mark 1 to hold the bike vertically using a diff method.

IMG_0478.jpg

So I have around 11 hours at work now to go get it done. Will post pics of the finished unit.

In other news. Side covers have been drilled. Phase wires have been upgraded. Controller has been reprogrammed. Smile on my dial has enlarge in proportion. Have now programmed the controller with a expected 45Amps setting which in practice has only given me a small spike to around 40A but mostly it sits at around 35A so will have to go back and reprogram it to get the 45A we know it can take. Jay says hes like my drug dealer handing out the power in slow increments so i keep craving the power jumps. He's not wrong even the jump from 2kw to 3.5kw has been awesome. Bring on teh power i say. Its my precious!

Bike Porn - Both side drilled outer ring of holes visible here. There is a smaller set of 10mm holes closer to the centre on both sides as well. Works well as is.

IMG_0481.jpg

Wayne
 
Scruffoid said:
Jay says hes like my drug dealer handing out the power in slow increments so i keep craving the power jumps. He's not wrong
They don't call me Mr Asia for nothing :lol:

New rack looks good mate, but is that an authorised photoshop use of my name there ? :p
Relocationg the number plate there i a good idea actually, you could leave the rack on most of the time and give you a bit more "buffer" in parking lots from idiots who like to touch park.
 
Hyena said:
Scruffoid said:
Jay says hes like my drug dealer handing out the power in slow increments so i keep craving the power jumps. He's not wrong
They don't call me Mr Asia for nothing :lol:

New rack looks good mate, but is that an authorised photoshop use of my name there ? :p
Relocationg the number plate there i a good idea actually, you could leave the rack on most of the time and give you a bit more "buffer" in parking lots from idiots who like to touch park.

LOL yes that official licence product line that I am now selling from my online store, weluvhyena.com :lol:

The number plate is acutally a NSW bike rack number plate so i still have the one on my car and yes It does make a realy good rear intrusion bar !
 
Ok so didnt take me to long to complete the addition work i needed to do.

Here is the new lighter bike rack

IMG_0482.jpg

Fresh from a spin around my workplace to make sure it was sorta gonna stay together. Will only have full confidence after a few trips on the m5 at 110km/hr to really test the workmanship.
 
Used a piece of Vera board to connect all my Lipo monitors together today. Still going to make some sort of weather proof box to place over the top of it.

IMG_0484.jpg

IMG_0485.jpg

It is great to watch the values as you ride. Can easily see a Cell that is sagging way to much.
 
Weather is now great here in Sydney. Been riding the bike to work.

Have done a couple of little changes to the bike. One forced by the Overvolting of my Hyperion the other out of a desire for better battery monitoring as talk about in previous updates.

This is my finished Battery gauge. It is mounted in a Iphone Holder and is hooked up through a centronics plug into the battery box.

IMG_0498.jpg

I purchased a Balance charge from Jay and it is actually a really good system. I am running 20S so 3 6S and 1 4S and this charger chargers it all at once in parrellel. Takes about 4 hours to charge the 6Ah at 90volts i use on my commute. So more than enough time to recharge for my daily commute turnaround.

IMG_0497.jpg

Still got some littel things to finish off but am enjoying riding it around.

Be Safe

Wayne
 
Motor did go Caput.

Riding to work and just lost power and felt like it was running rough.

Got to work and pulled it all apart and clearly see motor windings that have melted.

So i guess i am now in the market for a new betterer motor :lol:

May the MXUS RIP!

Scruff
 
So After looking at how much replacement motors cost, but more importantly how hard it is to get a hold of one. I have decided to rewind my MXUS so that i can have it as a spare just in case.

I am currently on the search for a HS3540 for a reasonalbe price to add to my bike but i will be rewinding the old motor over the coming weeks/months.

Started the dis assembly last night.

DSCF1072.jpg

Think i better make a warranty claim!

DSCF1075.jpg

All stripped


Was wound 6 strands 9 turns. New wind will be 9 strands and 6 turns. Just to muck around. Copper is cheap so i can redo later if i need to
 
Scruffoid said:
Think i better make a warranty claim!
Yeah sure just put all those windings back into their original position so I can test it and make sure it's not just a bad connection somewhere at the controller :mrgreen:

Where ever will you get a replacement at such short notice ? :wink: :p
 
Just a thought- 8x8 wind is supposedly a magic number- also with less turns, more speed but the motor will be much more prone to overheating.

No doubt Jay will be able to guide you- just hate to see you spend all that time winding the motor and not being happy with the result. My 8T mac burnt out quite quickly, so I went 10T and at the same volts it goes about 2-3k's slower but copes with the heat much better.

The thought these days is go with a slower wind and if you want speed, volt up. 6 turns is going to get you speed but it may not last long.... you burnt a 9 turn as is....
 
Spicerack said:
Just a thought- 8x8 wind is supposedly a magic number- also with less turns, more speed but the motor will be much more prone to overheating.

No doubt Jay will be able to guide you- just hate to see you spend all that time winding the motor and not being happy with the result. My 8T mac burnt out quite quickly, so I went 10T and at the same volts it goes about 2-3k's slower but copes with the heat much better.

The thought these days is go with a slower wind and if you want speed, volt up. 6 turns is going to get you speed but it may not last long.... you burnt a 9 turn as is....

Yeah my thoughts are always all over teh shop with these things.

I am going to be buying 1 Kilo of Winding wire. I am also made up my mind that i will be Doing the 8*8 winding. Well at least im gonna try it.

Mr Asia ( Jay ) has already sorted me out with a new Motor. I am now the proud owner of a HT3525 fully hotroded by Mr asia. My old Motor is now my experimental piece that i can muck around with and blow up as often as i like. Gonna do teh full Phase wire upgrade etc right to the windings and just have some fun with it.

Hopefully i can have my bike and and running again on Wednesday. Gonna be fun as i gotta lace it into a Rim which is something ive never done as well LOL this is all good fun.

Wayne
 
Sounds like you're on top of it! Enjoy winding and lacing- I have a 9c 8*8 waiting to be laced....been sitting on my bench for 6 months now!
 
So after many kilometers of running my bike with the batteries mounted in the custom made frame box. I wanted to go something a bit more stealthy looking.

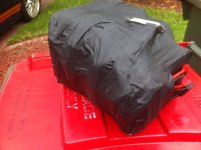
So i have now gone for teh rear mounted topeak MTX rack with a Topeak bag.

My pack fits inside this with plenty of room to spare for spare tubes tools etc etc.

I can easily remove the pack from teh bike while transporting the bike, or charging the battery.

I will say that i dont really notice a difference in the handling of the bike for my entirely onroad commute of 28Km each way.

I always had a huge mess of cables on my pack as can be seen here.

IMG_0559.jpg

Problem is that the large number of connections in a multipack system like this leads to multiple points of failure. So i have decide to reduce the total number of removable connection and beef up the ones that i must have.

This is where im at so far, Balance leads still need to be sorted but i am looking around for the best/ cheapest way of doing this. Got a few ideas gonna experiment.

View attachment 1

This is one pack a 4s3P All the rest of my cells are 6s3P giving me my total of 22S3P 15AH

here is the basic pack will post a completed pic when i do it over th coming days.

IMG_0561.jpg

Regards Scruff

PS. Motor rewind is still happening. I have all the compenonets. Its sitting under my desk here at work on the to do list :roll:
 
Yeah I do remember reading about the white plugs getting hot. The current rating on these ones is 30 amps from memory and I am going nowhere near that 95% or more of the time.

Glad ya like the led display I thought it was brilliant and nobody else seems to have noticed it :)

Works great as a total pack monitor system
 
Finished off my battery pack today.

OMG it takes a lot of work to redo all the connectors properly. All jst-XH connectors have been removed and the balance taps are permanently fixed and all exit into a cenronics style connector. This allows for very quick changing of Running mode, with LED bar graph to charging mode BC-168 balance charger.

Here is pics of how it looks now, also inside the MTX bag so you can see how nice it fits in.

So this a total pack of 22S3P. 3 rows of three 6S packs and one row of 3 4S. So 92V HOC and 15AH. All contained in the rear trunk case. I am very happy with this setup now.

View attachment 3

IMG_0564.jpg

IMG_0565.jpg


I will also add the following about connectors.

Any connector is capable of melting from my point of view. If you dont correctly use the termination point and cause a high resistance in the joint then that resistance is going to cause heat build up (V=IR and P = VI). The other factor is the size of the conductor in the connector itself. If using a properly rated connector and you use it correctly then there should be no problems. All connectors used in my pack are rated to a higher value that is required and all terminations are properly secured and checked.

3nslav3 - The LED's are very bright. Still hard to see during the day when in birght sun i need to shade them to view.
 
Great thread and nice improvements to your bike. I was wondering where you bought those smd led monitors. They do look drop dead simple to see.
 
The led bar graphs are from Hobby King

http://www.hobbyking.com/hobbyking/store/__23773__2_6S_LED_balance_Voltage_indicator.html

They do get warm for some stupid reason but they dont get warm enough to melt the iphone holder there enclosed in.

Thanks for the nice comments

Scruff
 
Back
Top