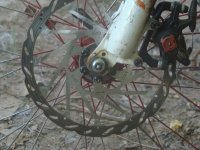
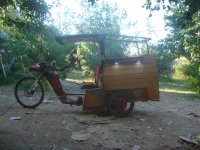
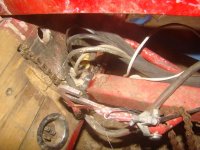
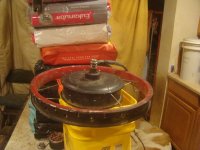
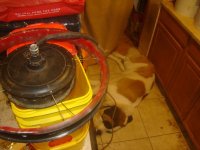
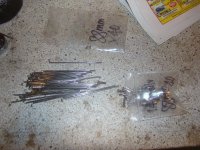
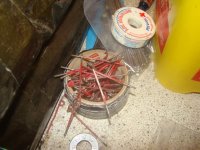
The SB Cruiser : Amberwolf's 2WD Heavy Cargo Trike & Dog Carrier

amberwolf said:
I've started the process of putting the STromer Mountain33 motor into the damaged rim out of the HSR3548 wheel. So far, that's just the stages of unlacing both, and testing with 8 spokes (two on each flange in each of four quadrants) to make sure the 88mm spokes are the right length--they seem to be.

I started to get back to this, but that back problem I started with a number of weeks ago has decided to get much worse. Even the little Stromer motor is very very very heavy under these conditions, and hurts too much to lift to get it onto the bucket for lacing....but before I can do that I need to get it back apart to put the thermal sensor in and change the phase/hall cabling out for the good stuff I got from Grin. Can't turn the puller and hold the motor, so....can't lace it up till I can get that part done. (or else just have to unlace it to open it up to do taht work, which would be pretty stupid). I guess that's the one thing I really don't like with the Ultramotor design, is that it doesn't have "covers", but just shell halves with the spoke flanges built in. :/


Regarding my back, I *think* it's the right side S-I joint,
https://www.spine-health.com/video/sacroiliac-joint-dysfunction-video
but it's intense enough when I move the wrong way it's hard to tell exactly where it is, just feels like the whole internal "quadrant" from the point of my right femur below the hip, across the back of my pelvis, up thru the SI area, and back across to the bottom of the pelvis on that side, has a "toothache". Can't feel any "dislocation" or swelling or anything like that in the area. Dunno what's actually causing it, but it feels like bone pain, rather than musculature/etc.

It's fine in many positions, not even an ache, but some are almost unbearable. Getting up from the bed is "interesting" as there is no good way to do it. The only way that actually works is to get on my belly and back up till my legs are off the bed, then push myself up with my hands till I"m sitting with legs folded straight (not crossed) heels under my butt, and grab the vertical posts of a shelf that's next to the bed (with the computer screen and keyboard/etc on it), then haul myself up with only my arms.

Walking is way easier with the cane, but I can hobble without it if I have to, for shorter distances--but I don't think I could get up off the ground or floor without it if I wasn't near something to grab and haul myself up. Been using the metal cart (which has brakes on two wheels) for my job at work as a "walker" while there; it works ok and lets me still do what I need to, though lifting the heavier stuff (right now, more than around 10-15lbs) is a challenge requiring leverage and cleverness. Normally I'd have little problem with stuff up to 50-60lbs, and could easily wrangle stuff up to 100lbs with the leverage and cleverness, but not now.

I wish I could remember what it was I did just before all this started, but that was so many weeks ago that it's lost in all the events since then. I suspect that helping to lift the SB Cruiser into the back of the guy's truck back when I broke the fork in the crash, and/or lifting the front end and dragging it and the broken fork/etc up to and over the high curb right after the crash to get it out of traffic, were the instigators. But I don't know. I have to do so many things by myself, that I shouldn't do alone, that it could've been quite a few things. There's nobody that can help at home; Raine is worse off than I am right now most of the time, and at work there's usually no one available to help, cuz there's usually just a cashier and a manager, and me (separate duties from the rest of the store these days, much better/more fun than the way it's been for the previous 11 years).


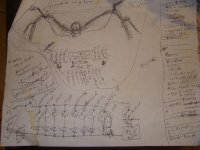
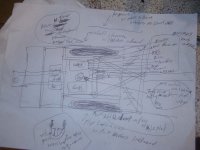
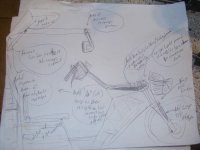
Anyway, enough griping...at least I can lay here and help people on the forum, and continue to draw up the dashboard and wiring stuff.
 
Dramatic failure today, probably related to the crash several weeks back. I had noticed a problem with the trike seeming to have too much slant forward, because the rear deck should be almost level, and it was beginning to look aggressively slanted like maybe a dragster. I'd actually been idly formulating ideas on how to lower the rear to match the front, when I saw this at lunch today.

Pics of stuff tomorrow; cna't find where I left the camera. :/

Anyway, the problem actually started yesterday, but didn't have the worst part till today on the way home.

Yesterday, as I turned into my driveway, the front wheel (whole front end actually) flopped left way further than normal, and actually pushed the wheel sideways so hard that it bent the rim quite a lot (almost the rim's own width out of true!).

Normally there's a little flex as I turn up a driveway curb, if I enter at an angle rather than straight (usualy it's an angle), but it's just enough to feel.

This time it was inches of flex at the "top tube" at the top of the steerer tube, which shouldn't be possible.

So I opened up the cargo box under the seat, and tried to take the air pump out, but it was jammed in place, which also shouldn't be possible.

Went ahead and opend the gate, got the trike in the yard, played wiht the dogs and got their dinner, then went to fix the trike. Jacked up the trike's front end and could *see* the front wheel sag back down...checked all the tubes and the only one I could see a problem with was the one inside the cargo box, which comes from the upper bar of the frontend, a 1" square tube, down at an angle to the 2" square tube that's the main "keel". This broke once before, in a different way, from it being a right angle. So I'd put this one at a 45ish degree angle, further back. Apparently it didn't change the failure much...it broke just above the weld, looked like it started at teh front and kept tearing thru on every bump until snap...when I entered the driveay most likely.


Because there are cables for power and all the controller signals and lighting that pass right next to that spot, and aren't reroutable without disassembling stuff to get some slack, I didn't try to reweld the broken spot. Instead, I added an angled brace that went upward from the rear end of the top of the "keel"s top tube, to the back top tube of teh seatbox, to help temporarily stabilize everything until I could do a real repair this 'weekend" (wed/thurs for me). Didn't do a full weld, just a few tacks, but they held fine.

Then I had to straigthen the rim some, couldn't do much with it, and retension it. Is still pretty messed up; will probalby have to build a new one with the disc hub (only ohter disc wheel I have is a 24").

Closed it allb ack up and went to bed...rode to work fine, though i kept speeds down to 15MPH or less.


It felt odd, kinda wiggly, when I left work, still keeping speed low, so I stopped and put my cargo straps to triangulate the front end, from the steerer area down around the cargo seatbox to the rear wheel triangulation tubes, and tightened it down. THis seemed to stabilize it, but as I went thru various bumpy areas, they seemed to need tightening....which shouldn't be possible.


By the time I got home, it was so wiggly that I was going only around 5mph, and the pedal chain had derailed off the IGH and I coudln't put it back on. How I missed the source of the problem I don't know...but I did.

After getting home and feeding the dogs, I went back to fix the trike, and found the main 2" keel tube snapped right at the junction to the seatbox front edge, right under the IGH, and around 2" of gap!

The only things that were holding the trike together were the chain from the IGH to the rear tranfer axle, and the stubs of the stays to the dropouts holding the IGH, which are welded at the front end to the keel, and the rear to the bottom front rail of the cargo box. If it weren't for that, the tirke would've just dumped that on the ground when it broke and slammed to a stop.

(oddly like the CrazyBIke2 failure that left the cargo pods as the only thing holding the rear end on, several years ago).


It took several hours, and taking all the stuff out of the cargo seatbox (battery, wiring, insulation, etc), taking the IGH out, etc., I eventually got the broken-off front end off the trike, inserted a slightly smaller square tube with very thick (1/8") walls into the keel tube, about 9" long, half into each part of the broken area, and welded them back togehter. Cut off the toptube inside the carbo seatbox, and built a Y to brace it to the keel and the seatbox rear rails both top and bottom. Also used a smaller tube inside this, to reinforce the buttsplices of the joints.

ONce all back together, it still seems to work, and it is much more solid, back to the way ti felt originally, like it hsould.

I am considering adding a triangulation tube down from the steerer tube area down to the lower corners of the seatbox, but I'll have to curve them somehow to clear my feet pedalling (my legs were brushing the cargo straps used as temporary braces). I didn't do this before because I didn't want to have to step over them getting on and off the trike. But I think it might be safer to do it, as it will take certain stresses off the keel tubes.


PIcs tomorrow after work, hopefully.
 
Pics of stuff for the nextfew posts.

The Stromer mountain33 ultramotor, being test laced into teh rim the HSR3548 came out of, and the 88mm spokes / nipples being used from Grin tech.

Background is a few weeks' worth of dog food. (each bag is maybe a week's worth, week and a half at most, depending on the bag size and kind of food).
 

Attachments

  • dsc08286.jpg
    dsc08286.jpg
    44.7 KB · Views: 4,322
  • dsc08288.jpg
    dsc08288.jpg
    44.2 KB · Views: 4,322
  • dsc08290.jpg
    dsc08290.jpg
    59.5 KB · Views: 4,321
  • dsc08291.jpg
    dsc08291.jpg
    53.1 KB · Views: 4,321
PIcs of my sketches of the dashboard stuff, and of some improvements I'd like to make to the trike. And a pic of the bars as they are now.
 

Attachments

  • dsc08301.jpg
    dsc08301.jpg
    38 KB · Views: 4,320
  • dsc08300.jpg
    dsc08300.jpg
    34.8 KB · Views: 4,320
  • dsc08298.jpg
    dsc08298.jpg
    32.4 KB · Views: 4,320
  • dsc08307.jpg
    dsc08307.jpg
    54.7 KB · Views: 4,317
Here's a turn signal / handlebar control unit my brother ordered for his trike. Should really switch those well, don't'cha think? :lol:

I guess you could use them for turn signal indicators, by twisting one back and forth to reflect light into the eyes of whoever is behind you.... :roll:

(Amazon couldn't fix the problem, in fact didn't even seem to understand that there *was* a problem, but did refund the money to him.)
 

Attachments

  • dsc08302.jpg
    dsc08302.jpg
    28.2 KB · Views: 4,319
  • dsc08303.jpg
    dsc08303.jpg
    29.9 KB · Views: 4,319
The shims I put in the fork legs to fix the wiggle in the recycled lowers. They're still working fine.

The disc rotor on the Avid BB7, it gets reeaally hot when braking. Can't seem to get rid of scraping sounds while riding, no matter what kind of adjustments I make to it. But it works great. :)
 

Attachments

  • dsc08305.jpg
    dsc08305.jpg
    49.1 KB · Views: 4,318
The Satiator after replacing the screen and front sticker, and the broken wires at the connector backplane inside. Still working fine so far.
 
amberwolf said:
Here's a turn signal / handlebar control unit my brother ordered for his trike. Should really switch those well, don't'cha think? :lol:

I guess you could use them for turn signal indicators, by twisting one back and forth to reflect light into the eyes of whoever is behind you.... :roll:

(Amazon couldn't fix the problem, in fact didn't even seem to understand that there *was* a problem, but did refund the money to him.)

Well, they inadvertently managed to fix your broken mirror problem.

amberwolf said:
The shims I put in the fork legs to fix the wiggle in the recycled lowers. They're still working fine.

The disc rotor on the Avid BB7, it gets reeaally hot when braking. Can't seem to get rid of scraping sounds while riding, no matter what kind of adjustments I make to it. But it works great. :)

You might have a warped or bent rotor. You use an adjustable wrench to fix that (or you could buy the Park rotor truing tool).
 
Pics of the broken trike main keel, and stages of the repair.

In the first pic, you can see how "bent" the trike looks, and how steeply angled it is from the rear down towards the front--it *should* be nearly flat across the rear deck.

You can also see the huge gap in the keel, just in front of the cargo seatbox's bottom edge, below/behind the IGH.

Ther'es also a pic showing the small gap and crack thru the vertical support inside the cargo seatbox, and the temporary brace I put in the box to help hold that in place.

The keel repair is fully welded at the crack, but I have not yet fully welded the bracing inside the seatbox for the upper tube. Am still thinking about what kind of triangulation I can install, without blocking the IGH from being removed if necessary.

Maybe some thick strips bolted to the sides of the upper and lower tubes, so I can take them off if I have to service the IGH or chains (difficult or impossible if I weld the triangulation on). Just worried the bolt holes might themselves weaken the structure.


Anyway, it's held up fine for the one commute since then, but that's just about 5 miles, so nothing in the grand scheme of things.
 

Attachments

  • dsc08328.jpg
    dsc08328.jpg
    55.8 KB · Views: 4,316
  • dsc08327.jpg
    dsc08327.jpg
    47.9 KB · Views: 4,316
  • dsc08326.jpg
    dsc08326.jpg
    41.7 KB · Views: 4,316
  • dsc08323.jpg
    dsc08323.jpg
    63 KB · Views: 4,316
  • dsc08334.jpg
    dsc08334.jpg
    60.2 KB · Views: 4,316
  • dsc08332.jpg
    dsc08332.jpg
    45 KB · Views: 4,316
  • dsc08330.jpg
    dsc08330.jpg
    47.1 KB · Views: 4,316
  • dsc08329.jpg
    dsc08329.jpg
    54.1 KB · Views: 4,316
  • dsc08335.jpg
    dsc08335.jpg
    52.4 KB · Views: 4,316
  • dsc08336.jpg
    dsc08336.jpg
    46.3 KB · Views: 4,316
  • dsc08337.jpg
    dsc08337.jpg
    51.4 KB · Views: 4,316
RunForTheHills said:
Well, they inadvertently managed to fix your broken mirror problem.
Haha. :) I can't use these dinky 2" (maybe 2.5") mirrors to replace the ones I have, unfortunately. I can probably add them to the front corners of the canopy, as secondary mirrors, though. They're very convex, but being so small I can barely see anything in them--at best they could be used so I could see movement of something and then look in my other mirrors to see what it actually is, or do a head-check.


You might have a warped or bent rotor. You use an adjustable wrench to fix that (or you could buy the Park rotor truing tool).
The scraping is continouous and at the same volume throughout the rotation, whether on ground or off, rather than in one spot, so it's unlikely to be warped or bent, but I'll check it to be sure.

I *think* it's caused by the caliper mount itself, since I had to grind it down I probably didn't grind it completley flat, so it's probably angled a bit and so the pads aren't perfectly parallel to the rotor. :/

I can stop the scraping by adjusting the pads far enough out, but then I can't get sufficient braking force; the lever hits the bars first.
 
Well, the trike hasn't broken in half again yet. :)

My back is not in any shape to do much of anything the trike needs done, though, other than riding it to work and back home afterward. I dunno when (or if) it's gonna get any better; most likely I'll just have to get used to the new level of pains my body dishes out, and then just do what I can still physically do.

Probably gonna have to build a frame that I can wheel the trike under, with pulleys and straps or something that will let me "pick it up" and "roll it over" and put it back on it's wheels again, for all the under-trike work I need to do that requires it be laying on it's side, or even upside down, cuz I dunno that I'm gonna be able to roll it over on my own.
 
Maybe you could build some kind of ramp/stand you could wheel it up on and work under it.

63250_W3.jpg
 
No, I have a motorcycle jack / lift that I could do that with, and stacks of bricks/etc I can put under ends so the dogs can't bump into it and knock it off with me under there, but I can't cut and weld upside down; aside from setting myself on fire :oops: I just can't hold things up like that--but I can rest tools and whatnot on the side or top of something and do the same work pretty easily. (as easily as I can do anything, anyway)

I couldn't use wheel stands, because much of the time the reason I need to work on it is the wheels (becuase of motor problems, since they're made so crappily)

I also can't layout wiring and tie it down if I'm under it, because it won't stay where it has to for me to do it, and it always ends up a mess. (even sideways doesn't work very well, but better than doing it from underneath. Completely upside down so I can just lay wiring, contrllers, etc., all in place and tie and screw them down is pretty easy).

Plus after a short time laying flat on my back my head gets "stuffy" feeling and it's hard to breathe or think.

Another issue is that there are things that at some point I need to cut into that would be required to support the trike from underneath to hold it up, which I can only cut into if it's on it's side or upside down. (so I can completley replace the under frame around the wheels, when I someday get to make the large-diameter hollow tube axles for the motors, to replace the crappy solid / drilled axles tehy came with, that break under the loads, bumps, potholes, and torque this trike's uses puts them thru). (or when I replace the hubmotro wheels with a middrive system, if I ever run into the right parts to do that)
 
crossposted from here:
https://endless-sphere.com/forums/viewtopic.php?f=2&t=97992&p=1479298#p1479298

FWIW, I'm using the Shinko SR-714 (I think) 16" x 2.5" on the rear of SB Cruiser, with thick moped/mc tubes (mostly natural, partly butyl, rubber). I have not measured, but I think between those two there's probably 7-8mm of thickness except in the grooves of the tread, which are a couple mm less than that.

Should be more than that by a few mm but I apparently forgot to put the old tube carcass over the new tubes when I put these tires on. :roll:

Except for a tiny piece of wire out of someone's car or truck tire that made a tiny hole / not-really-slow-leak in the first set of tires last year sometime (or maybe year before, I forget), once the tread had worn completley down to nothing in the middle (probably halving the thickness?) I didn't have trouble with the tires after I stopped trying to use bicycle tubes in them and went wth the MC/moped tubes.

The second set have also been fine, until yesterday, when a thorn over an inch long (probably mesquite, from branches broken off a tree that was near the edge of the road across a sidewalk a while back) made it thru the tire and tube, and gave me a slow leak. Whcih wouldn't have been a problem, just keep airing it back up every few days, but yesterday as I was about to leave work, while reairing it, I thought I'd be clever and pull out the thorn.... (along with a few dozen other much much smaller ones, none of which had made it past the tire itself)

Of course, that deflated the tire in about 10 seconds. :roll: So had to patch it, which was easy enough by pulling just the outboard bead off the rim and pulling the tube out, marking the hole, shaving off the "seam" ridge near it, roughing it up, etc. Been fine since then...but once my back gets better enough (if it does) or I can build a fixture for rolling the trike over on it's side and then back upright, I should take the wheels off and put the old tube carcasses over the existing tubes, to add some thickness. May not help with inch-long thorns like this one, but it'll stop most stuff, given that even just the existing thickness does that.


Only thing I don't like about these Shinkos is that they wear quickly, but they're sticky and give good traction, so I guess it's a compromise. They're no more expensive than bicycle tires that would last less time and give much much less flat protection, so I can live with it.
 
Just for giggles, I took a poke around
https://www.aircraftspruce.com/catalog/mepages/4130square.php
to see what it might cost to buy brand new cromoly tubing to build a new version of the trike, and depending on exactly what kind of stuff is used, and how much of the trike would be made of cromoly and how much recycled junk, it could cost upwards of $2000 just for the tubing itself (not including shipping for it, which I didn't even attempt to get an estimate for, but I'd guess could add another several hundred dollars to that).

So unless I win the lottery, I won't be building a trike out of new stuff.
 
amberwolf said:
Just for giggles, I took a poke around
https://www.aircraftspruce.com/catalog/mepages/4130square.php
to see what it might cost to buy brand new cromoly tubing to build a new version of the trike, and depending on exactly what kind of stuff is used, and how much of the trike would be made of cromoly and how much recycled junk, it could cost upwards of $2000 just for the tubing itself (not including shipping for it, which I didn't even attempt to get an estimate for, but I'd guess could add another several hundred dollars to that).

So unless I win the lottery, I won't be building a trike out of new stuff.

OK, quick sanity check using 1"x1" @ 0.065 wall thickness gives me 129 feet of tubing. @ 0.049 thickness gives me 173 feet of tubing. You've really got more than 100 feet of tubing on the trike?

I gotta figure that with 4130 you could redesign a bit for less tubing and/or changing out some of the lower stressed parts with maybe T6 aluminum. Also, I think round tubing would make for a stronger bike and would cost a lot less. 1.5" inch diameter 4130 tubing is about half the price of the square stuff.
 
wturber said:
OK, quick sanity check using 1"x1" @ 0.065 wall thickness gives me 129 feet of tubing. @ 0.049 thickness gives me 173 feet of tubing. You've really got more than 100 feet of tubing on the trike?
Probably about that; I just did quick guesses on tubing lengths, overestimating and rounding up whereever possible. Probably over-overestimated. ;)

As a guesstimate, sitting here and picturing the trike as it currently exists, section by section, I have:

-- about 6 feet of ~1.5" square thickwall tube as the "keel", and I'd actually prefer that to run all the way to the back end for the hitch to bolt to...but I didnt' have enough. I'd rather use 2" tube for that keel, with thicker walls. Maybe even 2" wide by 3" tall, or 1.5" wide by 2.5" tall, etc.

--about 3 feet of 1" square tube above that as teh "toptube", actually needs to be longer to prevent the break I had a few posts above.

--About 5 feet of 1/2" square tubing vertically on the outside of those (like mixte tubes).

--about 1 foot of round tubing, guessing it's 1.25", from the top of those to the headtube; I'd rather that be square tubing the same as the keel.

--About 8" of round headtube, but this I can get off a bike frame.

--about 2 feet of 1/2" square tube for the headlight/etc mounting frame stuff, but this actually needs redesign to clamp direclty ot the fork tubes

--about 6 to 8 feet of 1.25" round tube for the fork legs; thicker wall.

--About 20 feet of 1" square tubing for the seatbox frame, maybe a bit more.

--About 6 feet of 1" square tube for the triangulation from the seatbox/keel junction back to the outboard ends of the heavy-duty "trike kit" tubing that comprises the cross-trike strength member between the wheels. Most likely in a v2 these would be at least twice as long and go to the rear outboard corners of the deck frame instead, so call it 12 feet.

--about 2 feet of 1.5" thickwall round tube for the main tubes of the above unit, but I'd almost certainly build the rear differently, so this wouldnt' be needed.

--add in about 6 feet of 1" square tube for triangulation from the rear deck cross tube where it meets the longer keel, to the rear outboard corners of the seatbox base frame.

--about 10-12 feet of 1" square tube for "ladder frame" under the rear deck presently, might be able to cut that in half or even less if the above is done instead.

--about 12 feet of 1" square tube for the outer lower frame of the rear deck.

--about 10 feet of 1/2" square tube for the outer upper frame of the rear deck/wheelwells.

--About 8 feet of 1/2" square tube for the wheel well inboard frames.

--about 8 feet of 1/2" round tube for the wheel well triangulation from dropouts to corners

--about 16-18 feet of 1" square tubing for the rear enclosure frame / canopy supports

--about 20 feet or more of thinwall aluminum 1" round tube for the canopy itself, and the "rack" frame over the rear enclosure

I *think* that accounts for all the tubing presently used.

So going with the above, rounding inches up to foot, and using the higher of any variable estimates, and leaving out stuff I wouldn't likely need on v2, it's 6 + 3 + 5 + 1 + 1 + 2 + 8 + 20 + 6 + 6 + 6 + 12 + 10 + 8 + 8 + 18 = 120 feet, not including the 20 feet of aluminum for the canopy (for which I'd probably just use another old cot, as that's easier and cheaper for this purpose, most likely).

There are certain things I might be able to use less tubing for, so I might get 20 feet less out of that estimate, but I'd also like to use different, larger tubing for some other things, so it might be a wash on cost.

--
I gotta figure that with 4130 you could redesign a bit for less tubing and/or changing out some of the lower stressed parts with maybe T6 aluminum. Also, I think round tubing would make for a stronger bike and would cost a lot less. 1.5" inch diameter 4130 tubing is about half the price of the square stuff.

As I understand it, the main difference for round vs square tubing is that *for it's weight*, round tubing is stronger. But for it's *size*, the square tubing is stronger, just heavier. Dunno how universal that is.

I don't know how much weight savings there would be with round vs square of the same diameter and wall thickness, but I suspect it's a few percent.

I didn't do an estimate with round tubing, only square, so I don't have any idea of the cost difference.

I also don't know what wall thickness the tubing I am using now is, only that it is almost all just mild steel, so much less strong than cromoly. I could probably use the thinnest wall stuff just fine...but I would prefer to overbuild than underbuild, given the needs I have for this trike and various factors like what would happen if it did break on the road in the summer heat with a dog in the back, etc. (not that I normally take the dogs out then, but if I had to for emergency vet stuff or whatever....). Worst case stuff. Build for that, and not worry. ;)


For most of the trike, however, the square tubing is preferred because it's easier to bolt things to it, as most of these things are flat surfaced, or flat ended, and using round tubing would require adding spacers with curves on the tubing side and flat on the other side, wherever the tubing meets the object, to get the same mating surfaces to transfer the load/etc, and another spacer on the other side of the round tube of the same shape to let the washer and nut (or bolt head) press the tube surface without crushing it. Don't need those with square tubing, as the perpendicular walls carry the "crushing" load and the parallel walls carry the transfer load.


One problem wiht using aluminum is those parts would all have to be bolt-on, as I cna't weld that to steel. The only parts I can think of that might be able to change out would be the frame inside the rear cargo area, above the deck and wheel frames.

The rest of the frame including the cargo box are load-bearing, even including the wheel wells because those help carry the load of the trike's weight down to the axles themselves. (In my head I see the trike frame move, flex, etc. and transfer loads from one place to another, and according to that, without them, other frame members bend or flex too much under heavier loads and/or bumps/potholes, and would end up folding or breaking).

I *should* find a free stress-analysis program and build the trike in that, and see what *actually* happens as I change the frame design, to minimize the tubing needed to let the trike carry whatever I need it to, and also be able to pull a trailer several times it's own weight without ripping it's guts out along the hitchmount/etc. :lol:


I have a humber of things I'd redesign about the trike, inclduing moving the pedal drivetrain to the front wheel instead of the left rear, and change from 20" hubmotor wheels to middrive thru a differential (and then chain drive from the ends of that to the 26" or 29" wheels wiht axles above that level). But at present, most of those changes are not included in the above "cutlist" of tubing.

Anywya, I can overanalyse and overexplain for pages if I keep going so I'll stop here. :lol: :oops:
 
amberwolf said:
Just for giggles, I took a poke around
https://www.aircraftspruce.com/catalog/mepages/4130square.php
to see what it might cost to buy brand new cromoly tubing to build a new version of the trike, and depending on exactly what kind of stuff is used, and how much of the trike would be made of cromoly and how much recycled junk, it could cost upwards of $2000 just for the tubing itself (not including shipping for it, which I didn't even attempt to get an estimate for, but I'd guess could add another several hundred dollars to that).

So unless I win the lottery, I won't be building a trike out of new stuff.

That's insane. There has to be a cheaper source.. i still see cheap chromoly bikes being built.

But you know, cannibalizing a bunch of cheap/abandoned/free chromoly bike frames from the 90's could probably make for another cheap ride, no? i forget how it is that you built yours.. i imagine that way..
 
neptronix said:
That's insane. There has to be a cheaper source.. i still see cheap chromoly bikes being built.

I'm sure there are plenty of cheaper sources for manufacturers using tons of metal each day. But I don't know that an individual could get access to those places, for a single order of a pittance of metal. They probably don't even have a way to ship such a small amount, as they probably normally do it by the containerfull. ;)

There are local metals places, and I haven't tried to go to any of them in years. I dont' know if any of them carry cromoly; I know for sure they have heavyduty steel tubes in various shapes and sizes, I can see them stockpiled in their yards for the big stuff, and there's probably smaller stuff in their warehouses.

I've pretty much never had the money (not since my first real job went away in the early 90s) to think about getting enough new metal to build a complete trike, trailer, etc., from, so I haven't even tried to price it until now. (I still don't have the money, but at least these days I'm not just barely scraping by, even if I dont' have much that's not pre-allocated to daily living, so there is a *chance* at saving up enough to do this eventually). The hard part is that I end up buying stuff to "improve" the trike (or some other project) that ends up being a dead end, waste of money, often because the quality of the stuff is low and it can't handle the requirments even though it's specs (if it has any) show it should, and/or it is simply expected that it should be able to do so without disintegrating, etc. So I've probably put at least a thousand dollars into dead end junk over the last decade, that if I hadn't, I could've used to buy at least *some* of the stuff to build new. I'm not coutning the money spent on the replacment stuff that *did* work (or keep working).


But you know, cannibalizing a bunch of cheap/abandoned/free chromoly bike frames from the 90's could probably make for another cheap ride, no? i forget how it is that you built yours.. i imagine that way..
Sure, that's more or less how I did CrazyBike2, Delta Tripper, and parts of SB Cruiser. Most SB Cruiser was built out of square tubing recycled from scrapped retail fixtures, which generally don't have to deal with much stress, so are some of the most basic iron-based metal. It's probably some form of mild steel, but I have no idea which one(s), and there are several different sources and types in there.

But a significant part of the point of a new build would be to do it out of all new materials that I don't have to guess at the potential flaws or previous damages/stresses of, that are all the right thicknesses and diameters / etc for the stresses/etc those parts will see on the trike.

(partly would also be to do some of the redesigns that would otherwise require major deconstruction of the existing trike in order to implement them)

I can do the redesign version of the trike with recycled bits, but at some point it would benefit me to build it "new", for the predictability of the materials themselves.
 
FEA software packages,

https://en.wikipedia.org/wiki/List_of_finite_element_software_packages

quite a few are "free", but I'll have to look into them to see which I could actually *use*, and which might be able to do what I want, and if they can build the 3d object within the program or if I have to use something else to do that first (if so, I'll dig out my old Lightwave and set it up on a desktop with a parallel port (the laptop doesnt' have one) so I can plug the dongle in... (I already know LW, so it's easy enough to build things in, and it can export a few different formats).
 
Lightwave creates a wireframe mesh and I don't think that is sufficient for finite element or other analysis. I've never used Autodesk's Fusion 360 for that, but I have used it for building solid elements in CAD and I know it offers structure analysis features. Of course, learning the CAD way of building things is very different than building via wireframe in Lightwave. But it isn't that hard to pick up.

You can import some wireframe models, but I'm not sure that they would be of the form necessary to use in structural analysis. My bet is that they wouldn't be.

https://www.autodesk.com/products/fusion-360/features#simulation

You can use the free trial indefinitely so long as you are doing so as a hobbyist.
 
THanks---I guess that's the first one to try out then. :)


In other news, I figured out what the scraping on the front disc is, and don't know how I missed it before. The rotor is rubbing on the mounting bracket itself (the caliper adapter from the fork to the larger rotor size).

The caliper is *also* is at a very slight angle because I didn't grind the fork's mount quite perfectly.

I should be able to fix both of those problems by regrinding the fork's mounting tabs a bit, but I'll probably have to use the small dremel or a hand file, just so I don't slip and take too much off or screw up the angle again. :oops:

Won't happen till my next day off, middle of next week, at the earliest, but at least it's an "easy" fix.
 
Today, while everything was fine on the way *to* work, when I began my commute home, the PAS via the CA3 suddenly was behaving very weirdly.

It's been bad enough with the other previously noted issues, but this.... The sensor itself is working properly; I can see the response in the CA setup screens and the other status screens when active.

When I'm in preset for 5MPH, it's just about completely normal, but seems to take randomly longer to respond to PAS. Throttle is still normal.

When I'm in preset for 10mPH, it's MUCH more powerful, more instant, response, as it actually is going essentially instantly to full throttle when I start pedalling, even from a stop. This is how it *should* have been behaving all along. Throttle is full response tracking my actual throttle input (previously it had to ramp up slowly, which was undesirable).

BUT: if I stop, and then even barely move the pedals shifting my weight, it tries VERY hard to move the trike forward against the brake, for several seconds, even if I take my feet off the pedals. That's never happened before. ALso, sometimes while I'm riding, below the 10MPH limit, it keeps applying full throttle even after I let off the pedals. Throttle doesn't do that.

When I'm in preset for 20MPH...it's like a broken connection. :/ Sometiems it'll sort of start to ramp up intermittently brrm brrrrrm brm brr b br brrrr rrrm br brm and then when it reaches around 8mph, it'll just cut off. Speed has to fall to zero, complete stop, before it will even start trying again, and it doesn't always even do that. Throttle works as it did before in this preset, it's just the PAS that's different.


So...something in the CA3 has just suddenly changed, probably something in the settings, but I don't know how. Nobody could've messed with it, unless they had a key to turn on the trike, and even if they did, it's pretty unlikely that they would've gone in to mess with *just* the PAS, cuz everything else is working fine. Heck, I don't even know if any PAS setting that is per-preset that could possibly cause that behavior.

I'll have to take the laptop out ot the trike and confirm all the settings, and change back any that are wrong.

Or maybe, just reset the CA back to defaults and reflash to the settings I'd had that "worked" till today.

Better yet, put whatever the latest fw version is in there, and rebuild the settings from scratch. Probably not happening for a couple of days, till my next day off, along with the rotor/mount scraping fix.
 

Attachments

  • SB Cruiser 071519 CA3-14 redo from scratch 000001.zip
    653 bytes · Views: 60
Have had another slow leak in the same tire as the patched thorn hole; takes around two days to get low enough to worry about. But today when I came out to work on the trike it was completely flat (though it was aired up fully just before I left work last night).

Didn't feel anything in the tire that could've poked a hole, nor found anythign with a soapy sponge bath of the tube, so I ended up taking the wheel off the trike (had to use two jacks and stacks of bricks to lift it enough to wiggle the wheel out of the well), to get the tire and tube completley off to check them out better, and not be in the >105F heat. Then i inflated the tube up a ways, and went inside.

PUtting the tube in a sink of water, bubbles out of the patch...and nowhere else, including the valve. So the patch failed...

I checked it out, poked and prodded and pulled at the patch, and it was on there very very solidly. Except for the center, where it would swell each time I squished the tube, bubbling air into the center out of the holes the patch was there to cover, and a teensy tiny rib from there to the outer edge. So I worked for a while to pull the old patch off, ended up having to use a razor blade and trim it off bit by bit; it was bonded very very well, except the tiny problematic bit. :/

Once off, I resanded the area, and used a much larger patch (the rectangular one in the Park Tools kit, which is several times the area of the little round one I started with). It should hold fine. It's inf lated right now inside the tire, just sitting on top of the trike; waiting for me to get bakc out there and put it back on the wheel and the wheel back on the trike, as long as it stays inflated sitting there. If it doesnt', I'll have to figure out why.


I also took off the front wheel (after blocking up the front end with bricks) and took the caliper off, to take some pics of it to figure out where the rubbing comes from and how I might fix it. Looks like it is worse at the bottom by a lot, has actually worn over a mm off the caliper, adapter bracket, and even the washers on the caliper-adapter mounting bolt. When I examine the mounts on the fork itself, they *appear* straight and level. So if they're not at an angle then the only other thing that could be is the axle, which means that one of the legs is slightly higher than the other. Thankfully I can adjust that by loosening the clamp on one side and tapping the top or bottom of that leg until the rotor is "level" inside the caliper again, so I don't need to modify anything or do any filing, etc.

Haven't even started anything else, the heat just got to me too much after the small bit of yardwork (mostly watering) I had to get done. Tomorrw's supposed to be about the same as to day's weather, so I'll have to get done what I need to as early as I can. (was so wiped out from work, stress, etc., that I got up to feed the dogs around 730am, cuz Yogi insisted he was wasting away to nothing...then I went back to sleep until the middle of the day, fitfully as usual, and considered just staying in bed the rest of the day, too, but.... )
 
I guess the wheel stuff was too much for my hip/back; could barely move when I woke up at some point last night, and didn't improve a lot yet today, but I managed in little bitty increments to get the tire / wheel stuff done, and the disc brake stuff, and the CA stuff. I think I'm toast now, cuz I have to work tomorrow so I have to rest up and let it get better enough to do that.

Reverse order of how I did them:

The CA firmware update to 3.14 went easy, as did the redo of the settings via the setup program. WHile I had it hooked up, I played with various settings to see if anything in particular would help out with the dangerous super slow throttle rampup time that happens most of the time (but unpredictably) with either PAS or throttle, where it takes about 8 seconds for it to rampup to full throttle from zero.

Eventually I found that it's caused by the High Range mode. Regardless of the setting for rampup time, the actual time is very slow.

If I change to Low Range (regardless of shunt value), then the rampup works correctly, at the rate set.

So for now I left it set to Low Range, with the shunt set to 50mohm, (instead of 0.5mohm) so the numbers are all shifted past the decimal place, so I don't get confused by the decimal in the middle (where it would be if I left it at 5mohm).

I only did a quick test ride to verify all three presets work; around theneighborhood, but at least it fixes the rampup time issue. It does NOT fix the wierdnesses with the overspeed and underspeed issues, so that will take more troubleshooting later.


Before that, I fixed the disc brake issue, mostly by loosening the clamp on the right side and tapping it upwards a mm or so, retightening the clamp. THen I added a very thin spacer washer between the dropout and the axle face. Between those two, it eliminated the scraping of the rotor on the caliper and mount.


The first thing was to check on the tube repatched yesterday, and left inflated inside the tire (but not on the wheel). The patch had unpeeled at the edge in two places, and one of those back toward the center. I easily peeled the whole patch off with my fingers, so it didn't bond at all. Wierd, since the othe rpatch bonded so well (except for the one spot). So, I cleaned up the area again, and repatched it, then left it out in the sun to heat it up, and am leaving it deflated for a while to make sure it bonds before I inflate it. So I'm using the old bicycle tube off the third rim that is going to go on the stromer motor, and just in case I ordered two new tubes just like the one Ive been trying to patch.

PUtting the tube into the tire, with a "boot" of two layers of old tubes between tube and tire, and mounting it onto the rim, was quite a challenge, and I almost couldn't do it; apparently it takes a number of muscles and ligaments in the pelvis and lower back to use one's arms and hands to mount a tire, and lever it onto the rim. Ones that run thru the SI joint area, and cause great pain there.... :/

PUtting the wheel back into the dropouts was a huge challenge, cuz I couldn't lift it even a millimeter. I thought for a while I wouldn't be able to do it at all, and that I'd be screwed for getting the trike fixed, but eventually I tried using the cargo straps to lift the wheel, and leverage it into the wheel well, then shift it around with wrenches as levers until it was sliding into the dropouts, and then ratcheting the straps a bit at a atime while adjujsting the wheel / axle until it was all teh way up in there, then reassembling the outboard ubolt hardware on that axle, and tightening the clamping bolt on the inboard dropouts. Not sure its' really tight enough, but I did it as tight as i could. I'll find out in right turns if it is.


Anyway, it is all working for now, so at least I can go to work, as long as nothing falls apart before tomorrow. ;)
 
Back
Top