The SB Cruiser : Amberwolf's 2WD Heavy Cargo Trike & Dog Carrier

I haven't used the electric braking on the "new" generic controller much due to the extreme excessive heating (goes up about 10 degrees C every time I use it...peaks have been nearly 70C even when starting at 8C on the last several cold mornings).

I'm probably going to disconnect it from the ebrake line, and put a separate switch on the lever for it that I can use to push if I really need it, and use only the proportional regen of the Grin Tech controller (which is woefully insufficient) on the left rear wheel, and the mechanical front brake.


Other than the braking, and that it has a really "soft" start (very long ramp up on throttle input), it works great, and is VERY VERY quiet.

The only thing that isn't quiet is that it causes the motor to whine very slightly even when completely stopped with zero throttle input. Cant' hear it unless the environment is nearly silent, but under those circumstances, the high-pitched whine (somewhere above 10-15khz) is very annoying.


I still haven't found a good affordable rim to buy to replace the dented one, though.
 
Chalo got me sorted out on new rims. Haven't rebuilt the wheels with them yet; have to do a "spare" first before redoing the one in use on the trike, in case I can't finish before I have to go back to work.

The tube-repair stuff has all finally shown up: box of Rema Tip-Top 1.25" patches, and Rema's Blue adhesive compound in an 8oz can (I'll use some glass bottles to carry some in on the trike), and some generic "motorcycle" tire levers, instead of the screwdrivers I'm using nowadays. (After many years, and dozens of plastic ones, I'd finally found some fairly nice bicycle levers, good steel, nice shapes, but too short and badly shaped at the hand-end for my increasingly arthritic hands/thumbs to properly use even on thin bicycle tires, much less the thicker moped ones I'm using, so I went ahead and got some motorcycle spoon levers by Neiko, just about as good as anything else I found in the same price range).

So I'm working on patching the two good-but-for-the-hole-that-won't-stay-patched tubes, and will then let them sit for a few days, then inflate them and see how long they stay that way. FWIW, the problems with the patches I did before didn't happen until I'd hit a few bumps and potholes, so it's the shock loading/stretching that seems to do them in. Hopefully won't be an issue with the Rema patches and compound, vs the Park Tools VP-1 patches and compound, on these "natural rubber" BikeMaster moped/MC tubes.


I am still avoiding using ebraking, as it spikes the motor temperature up 20-30C almost instantly when it's used. I'm afraid if I keep using it for a whole commute, I'll damage something.

I tried just disconnecting the ebrake from the new generic controller, leaving only the proportional regen on the Grinfineon, but that has so little braking power even at 0v throttle input to it that there's almost no braking force at all, regardless of battery state of charge and current flowing back into it at the time, so it's pointless to use without both of them.

What's wierd about that is that I can feel significantly greater braking force from the Grinfineon side whenever there is *also* braking force applied by *any* controller on the *other* side. I can't figure out what could possibly cause that. :/


In other news, I've started looking at parts sources for wheels, etc., for the new version of the trike to mostly replace SB Cruiser; mostly pedicab stuff for the wheels, fork/headset stuff, possibly transaxle/diff, wheel mount hardware, etc etc. Havne't got a complete design in my head yet, but will begin posting sketches in a thread for it once i start getting ideas on paper vs just my brain.
 
I wonder if those special composition innertubes are similar to the ones I had so much trouble with patching. Latex? They were pink. Tried several brands of patch kits, nothing would ever end up sticking. Ended up having to toss the tubes after much frustration. At least they weren't sew-ups like I had to deal with in the '70s.

Regarding patching, then hanging up the tube to watch it for a few days to see if it holds: I've had better results with a good inspection, quick inflation test, followed immediately by a reinstall and run it. Seems like they need to be run-in soon after patching. Cements the deal. :mrgreen:
 
Hmm... apparently I never did post the pics of the new tail / brake / turn lighting, so this is a photodump post.
 

Attachments

  • 20200723_205353.jpg
    20200723_205353.jpg
    69.3 KB · Views: 2,091
  • 20200723_205359.jpg
    20200723_205359.jpg
    58.8 KB · Views: 2,091
  • 20200723_205404.jpg
    20200723_205404.jpg
    66.5 KB · Views: 2,092
  • 20200723_205405.jpg
    20200723_205405.jpg
    64.5 KB · Views: 2,091
  • 20200723_205511.jpg
    20200723_205511.jpg
    64.6 KB · Views: 2,092
  • 20200723_205617.jpg
    20200723_205617.jpg
    72.5 KB · Views: 2,093
  • 20200723_205618.jpg
    20200723_205618.jpg
    71.2 KB · Views: 2,092
  • 20200723_205619.jpg
    20200723_205619.jpg
    69.5 KB · Views: 2,091
  • 20200723_205640.jpg
    20200723_205640.jpg
    68.7 KB · Views: 2,091
  • 20200723_205701.jpg
    20200723_205701.jpg
    64.8 KB · Views: 2,092
  • 20200726_154740.jpg
    20200726_154740.jpg
    98.4 KB · Views: 2,092
  • 20200726_154742.jpg
    20200726_154742.jpg
    97.4 KB · Views: 2,092
  • 20200726_154846.jpg
    20200726_154846.jpg
    90.4 KB · Views: 2,091
  • 20200726_154902.jpg
    20200726_154902.jpg
    90.9 KB · Views: 2,091
Crosspost from the thread where I asked about new brakes:
https://endless-sphere.com/forums/viewtopic.php?f=3&t=99837&p=1614869#p1614869
Update after almost a couple of years:

The same caliper and rotor are still working, though I've gone thru a couple sets of pads. First set was original Avid that came with the caliper, second was another Avid out of a caliper I havent used yet (havent' rebuilt the rear to hold the calipers yet, so only a front brake so far). Third set I've just started using is "Dymoece" from Amazon:
https://www.amazon.com/gp/product/B07GCW273S/
"Resin,Semi-Metallic,Sintered Metal" version, works fine in dry and wet, but no idea on wear yet.

The rotor itself shows definite wear (is VERY shiny ;) ).

The caliper also has wear, though, because, as it took me a while to find, the mounting tabs on the crappy "Element9" fork that the lowers / dropouts came from for my custom no-suspension fork (as I still haven't had the chance to finish it using the pedicab dropouts with their superthick tabs) bend under load, and after a while stay that way, and bend more, then stay, etc. So it has been diagonally wearing the pads, and cutting into the caliper itself. :(

So I ended up doing a quick fix of cutting the thin tabs off another crappy fork and welding them against the outboard side of the tabs on this fork. Only been two days since this was done, so can't tell yet if this is a good fix or not, but it is still working so far.

Permanent fix is to put the pedicab dropouts on there. I dont' recall their exact thickness, but it's nearly 10mm. :shock: Don't think I'll have a problem with *those* bending under load. :lol:

But the brakes themselves still work great. :)
 
Another thing I had to fix was the left front turn signal wiring--the ground on that side broke at the connection to the harness where it moves the most during fork pivoting in turns. Apparently I had managed to put the wire splice points right at that point, which was silly and could have been avoided with a little forethought. :oops:

So I moved the splice point further up the cable while i was fixing that, so it is bending only where there is just wire, not where there's soldered (stiffer) connections.


I had actually planned the time for the above brake fix and wire fix to be used for replacing the seat bottom (it's been torn for a long time now, and I have the new seat bottom for it since late november or early december I think it was, but haven't had time yet to do it). So...that still needs doing, and until it gets done, there's not any "suspension" in the seat, so I feel every little bump and vibration as I ride right up my butt, upper legs, and back. :/ It should only take a couple of hours (probably ten minutes for anyone else)...but like so many other fixes, the trike is out of service while it's happening, so I have to do it when I am sure I wont' need the trike till it's complete.


Still working out the new trike's design, and still waiting on various people for parts / pricing info (one of them I haven't heard back from in over a year, so I am not expecting any at this point...which means having to build my own "middrive" setup instead of using prebuilt ones. Was hoping not to have to do that.).
 
Brake fix pics, that show the shiny wear on the caliper (had to replace the mounting adapter due to similar wear, but caliper still works this way), and the welded-on tab thickness (which ahs been perfeclty fine since the repair so far, no bending). also of the worn out damaged pads from the caliper ending up at an angle dut to mount bending.

Then pics of the new seat cover that i finally got installed, along with the back from the same seat; the frame is sitll the same one I've been using, so I don'thave ot do the mods to the new ones. alkso of the weld repair to the back frame isnce i couldn't do the weld until i took the cloth off, and didn't want to do that till iw as replaicng the cloth anyway.

Then some pics of the new chair vs the old one, and of the frame of the counterfeit vs the original, and the wide back vs the narrow back (for an experiment where eventually i'll widen one of hte frames and relace the bottom to make a wider more suspendy seat that i don't ever bang my buttbones on when getting on and off, and use the wide back so i don't have ot modify one of the narrow ones or make my own.

some pics also of the worn out/torn bottom and the old original back that's still usable but does hae some tears at the top corners.

pics of the new rims from Chalo along with a hat he included :) and one of the wheels the rims are for to fix the bent/crushed-edge ones.
 

Attachments

  • 20210203_152639.jpg
    20210203_152639.jpg
    64.4 KB · Views: 2,009
  • 20210203_152658.jpg
    20210203_152658.jpg
    73.2 KB · Views: 2,009
  • 20210203_152707.jpg
    20210203_152707.jpg
    67.4 KB · Views: 2,009
  • 20210203_152819.jpg
    20210203_152819.jpg
    55.4 KB · Views: 2,009
  • 20210203_152839.jpg
    20210203_152839.jpg
    43.9 KB · Views: 2,009
  • 20210203_151519.jpg
    20210203_151519.jpg
    47.6 KB · Views: 2,009
  • 20210203_151507.jpg
    20210203_151507.jpg
    66.2 KB · Views: 2,009
  • 20210203_151635.jpg
    20210203_151635.jpg
    67.9 KB · Views: 2,009
  • 20210203_151815.jpg
    20210203_151815.jpg
    72.7 KB · Views: 2,009
  • 20210203_151902.jpg
    20210203_151902.jpg
    40.9 KB · Views: 2,009
  • 20210203_151917.jpg
    20210203_151917.jpg
    47.9 KB · Views: 2,009
  • 20210203_151943.jpg
    20210203_151943.jpg
    53.2 KB · Views: 2,009
  • 20210203_152122.jpg
    20210203_152122.jpg
    67.8 KB · Views: 2,009
  • 20210203_151459.jpg
    20210203_151459.jpg
    61.3 KB · Views: 2,009
  • 20210203_153010.jpg
    20210203_153010.jpg
    66.8 KB · Views: 2,009
Couple days ago I swapped out my jury-rigged right-hand brake-light button (old momentary switch glued across the righthand brake lever, so it had to be pushed wiht one finger while pulling the lever with ohters) with a microswitch (limit switch) with a long lever / wheel on it, mounted at the caliper itself (using silicone, as I couldn't drill and tap mounting holes in the caliper, and no path for zipties could hold it in the correct position and angle).

So now it is activated by simply pulling hte lever just a tiny bit (not enough to start engaging the pads), and hte limit-lever/wheel moves and flexes along the caliper's pull-arm as the lever pulls that arm up via cable, all the way to max braking, keeping the swithc engaged until the lever/cable is released.

Much easier on my fingers, and I don't have to think about the brake light engagement.

20210208_174951.jpg20210208_175447.jpg


The left-hand brake lever automatically engages brake lights while it does ebraking on boht rear wheels, thru a separate relay just for that, and has done so since it was instaleld (a year ago? more?). The same relay is actually what engages the brake light from the righthand lever, too, with it's switch wired in parallel with the lefthand one, but thru a diode so that only the light is activated by the righthand lever, and not the ebrakes (since the righthand lever doesnt' have a COT to pull to control the amount of rear ebraking...just the regular mechanical front brake).


Side note--the magnetically activated reed switch I had used for the brake light swithc on the righthand lever had worked just fine, except that it wasnt' meant to handle mcuh current, and I had mistakenly / forgotten and wired it up directly to control the ligths (bypassing the relay) whcih was much more current than it was designed for, instead of having it control the relay....so eventually the arcing across it's contacts caused it to fail in a way that melted both the glass reed and the plastic housing. I didn't have another I could use at the time, so I kluged up the switch on the lever itself that I had to press...supposed to be a few days' fix till I got a new reed switch, but naturally I forgot, and many months later...here we are. :)


But it's fiksed now, and finners is happeez agin. :)
 
Forgot to mention...the switch is at the caliper rather than the lever because I couldn't find a position where the switch would be mountable without being in the way of pulling the lever while still having it's actuation arm engage either the lever or the bar grip, without having to manufacture something to secure it to *and* another piece to engage the arm.


After I had finished mounting it to the caliper and it was cured and tested, I then realized I could ahve mounted the switch to the lever's mount, forward of the pivot, with the actuation arm held *closed* rather than open by the lever when not engaged, and used the other switch pole instead. Then when the lever was pulled it would have opened the arm and closed the switch. The primary issue with this position is it would be in teh way of the Avid lever's ratio-adjustment knob that lets me adjust the amount of cable pulled for the amount of lever pull. As I don't normally need to adjust that, it's nto a big deal, but anything I don't have to deal with, I'd rather not. So it's better off down at the caliper anyway, where it's not in teh way of any adjustments, etc.


This is not a waterproof switch, so we'll see how it weathers the weather as it gets rainy again in the next few weeks.
 
I have finally (barely) started the actual project of the addons for the Cycle Analyst v3 that will allow torque-sensor-only operation from a stop, and for the torque-steering-assist throttle splitter, over here:
https://endless-sphere.com/forums/viewtopic.php?f=2&t=110497
 
The switch on the caliper is still working even after a few rains.

The Dymoece cheap brake pads work about as well in most conditions as the Avid OEM pads, but they are wearing much faster, and I will probalby have to replace them in a month or two. :shock:
 
I test-installed two of the flexible strip lights like I'll be using on the Cloudwalker Cargo Bike
https://www.endless-sphere.com/forums/viewtopic.php?f=6&t=111081&p=1629082#p1629074
on SB Cruiser today, and they look alright, and work. I could've done a better job of mounting them on the handlebars, but was tired and impatient, so the rightside is not as neat as the left.

Since the doublesided tape supplied on the strips is terrible, I peeled it off (it's really easy and comes off cleanly, which indicates how poor an adhesive it is for the purpose), and used zipties to secure it to the handlebars, and clear GE Silicone I caulk to glue it face-out on the inside of the translucent bush-guards on the handlebars, so that it gives side and front DRLs and turn signals there.


First pic is of front view with no lights at all, then with just the DRLs, then with the turn signal on (this seems to have captured the blank between signals :( ), then a video of the signal in operation. Not shown is that when the turn signal is started, the white DRL automatically turns off to make the signal more clearly visible, and the DRL turns back on when the signal stops. Afternoon sun is directly shining on the front of the trike and the lights from directly behind me as i took the pics and vid.
20210401_171948.jpg
20210401_171959.jpg
20210401_172015.jpg
https://youtu.be/OttJ1IZ8mRw
[youtube]OttJ1IZ8mRw[/youtube]

I'll add pics after dark when I get them.


This is a link to the page I got them from
https://www.ebay.com/itm/2x-White-Amber-60cm-Flexible-LED-Car-Headlight-Slim-Strip-Turn-Signal-DRL-Light/393178503261
and these are some of the pics from that page in case it goes away:
file.php

file.php


These are the brushguards Iv'e been using; for installing these new lights I had to peel off the (slightly) reflective yellow strips.
https://www.amazon.com/gp/product/B017IMZMN2/ref=ox_sc_act_title_1?smid=AOXRGAJU87VIR&psc=1
file.php

file.php
 
Some nighttime pics and vids. I included some side pics here, too, as well as "cockpit" pics of the rider POV. Evertyhing is certainly bright enough.

I had to add some temporary black electrical tape to block out a lot of (but not really enough of) the backwash light from the DRLs on these strips, taht I didn't consider when installing them in daylight. :/ There's also a lot of backwash light off the actual trike frame and the Tiny avatar on top of hte tiller, and that can't be fixed without moving the light (or turning it off at night).

I'll try riding this as-is tomorrow, when I will be returing home in the dark, and see how badly the backwash light affects my ability to see things around me. I suspect it will be problematic. First I'll just turn down the DRLs by at least half, leaving hte turn signals at full brightness. That will probably resolve it. If not, I can make a circuit that automatically turns them on in daytime and off at night, but I'd like to keep them for nighttime too.

So I may have to move the strips. If I do, they will likely go up on the top front edge of the canopy instead, where I already have a white strip (dimmed to half; I forget why). These are longer so they'll wrap around the corners of the canopy a little bit, which puts the DRLs and the turn signals viewable from the side as well as the front. The light will still shine down onto the frame, but not as directly, so it will be dimmer. Additinoally, I can add a "shelf" under the lightstrips to prevent much downward light onto the frame.

Ideally I'd like to be able to light up the frame so other road traffic actually sees the trike itself and not just it's lights...but this is complex, requiring lights pointing at the frame but in a way that doesn't allow backwash light into my eyes, and that doesn't allow direct light into my eyes either. I've not found a way to do it on most bikes easily, and on the trike it's even harder, except on the sides of the cargo box (which has this lighting).

https://www.youtube.com/watch?v=KlGfqOy58og
[youtube]KlGfqOy58og[/youtube]

https://www.youtube.com/watch?v=6iCbUQD7bqs
[youtube]6iCbUQD7bqs[/youtube]

20210401_190357.jpg
20210401_190302.jpg
20210401_190315.jpg
20210401_190424.jpg
20210401_192801.jpg
20210401_192849.jpg
20210401_193010.jpg
 
So...about a month after the above, Kirin died, and then Yogi not long after, so I lost all motivation and reason to do anything for the trike (or anything else) for quite a while.

I'm partly recovered from taht (can't really say mostly yet), so I've started doing some stuff that's been needed for a while.


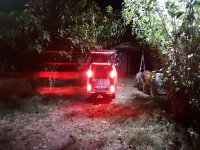
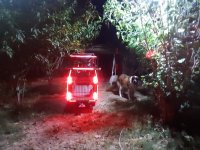
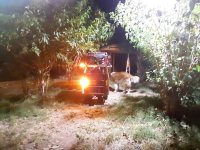
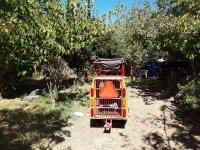
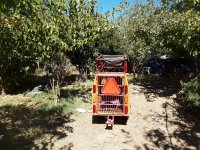
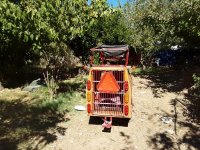
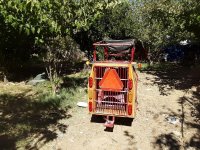
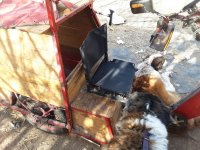
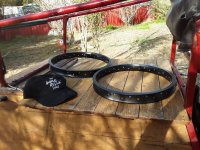
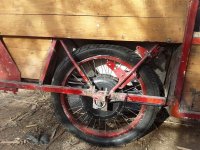
First up is to get the damaged rim on the ex-Stromer Ultramotor replaced. Since I am these days slower at rebuilding wheels (and everything else) and/or something could go wrong in the process, I decided to swap out the whole motor and wheel at least temporarily with this one from Mikebike's old A2B Metro project:
20220325_181951.jpg
20220325_182009.jpg
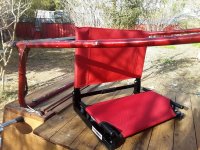
It has an Alexrims DX32 rim, not eyeletted but still a decent rim, and might be 13g spokes (not sure), radial lacing, and a 20"x3" Kenda Kraze.

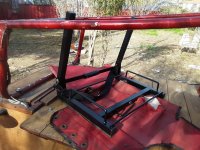
That last meant I had to do some work to push the wheel axle down in the dropouts enough to clear the fender frame, etc., as the Shinkos I've been using are only 2.25". It puts the right side at least half an inch (probably more) higher than it was before, so it feels funny riding it. The Kenda tire, even inflated to only the same 34PSI the Shinkos get, are "bouncy", unlike the Shinkos. I tried varying the pressure up and down and didn't get anything like the behavior the Shinkos give, which is just more...stable...than the Kenda. :/

I'll ride around on it a while before I change it to a Shinko and see if it's greater air volume helps with the other bumps and such.

Not yet having taken it off the rim, I am not sure if it's as thick a tire as the Shinko, or if it's built as sturdily; I think it is a bicycle tire whereas the Shinko is a moped tire (why I chose it). I'll carry spare tube and tire with me for a while just in case it can't handle the load and conditions. (The shinkos I have used for a few years now and I can trust them; never used this Kenda before and have never liked any of the Kenda tires I've ever had, nor had them be reliable...maybe this one will be different). The Kenda does seem sticky enough, at least.


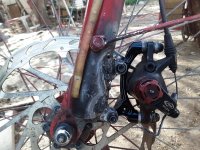
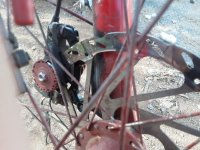
First I just set the wheel up in an old bike frame, and hooked it up to the "generic" controller on the trike that runs the right wheel. Since the controller on this side doesn't bother to use the hall sensors (regardless of how you hook htem up it always behaves exactly the same, so it can't be monitoring them), I just used the phase wires, and it worked first try the correct direction.

I didn't check the RPM of this motor vs the other ultramotor, but I suspect it is faster (since it's built to be in a 20" wheel and the other is built to be in a 26" wheel, but I don't know the relative max speeds of the A2B Metro and the Stromer Mountain33).

Startup torque "feels" about the same, once mounted to the trike and road tested.

Interestingly, there is already a 10k NTC temperature sensor in this motor, between the black and orange wires. I don't know which version it is, but it reads (on the CA) around the same as the one from ebikes.ca that I installed into the other ultramotor when I gutted it's internal controller and wired it for external control. So I didn't have to change the CA temperature sensor settings to use it to get a basic idea of how fast it heated up in use, which is about as fast as the other one does. (I don't think the scaling is right in the CA for the sensors being used, so while it works ok around "comfortable ambient" temperatures, say, 60-90f, it gets farther off the higher up or down the temperature gets.

I haven't tested the hall sensors yet.


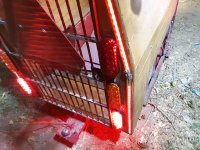
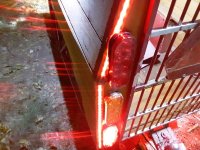
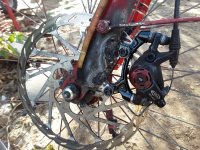
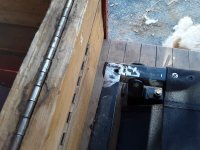
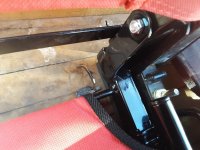
After verifying operation in the frame, I took the ex-Stromer-UM wheel off, and found that the axle had twisted at least 3/4 of a turn in the dropouts, leaving the axle about 90 to the position it should be (threads instead of flats against the dropout faces)! This despite the >1/4" thick tight-fitting outboard dropout with tight nut, and the wide massive clamping dropout on the inboard side (which actually covers the entire length of the axle flats!). The axle cut threads into the dropouts as it spun! If this was a normal "chinesium" axle, it would probably have twisted off, breaking at the axle shoulders or the like. The threads would not likely have cut into the dropout steel this way. But the axles on these Ultramotors are actual hardened steel, apparently. :)

The wiring was wrapped around the axle, but didn't get any apparent damage from this, thankfully.


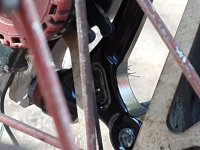
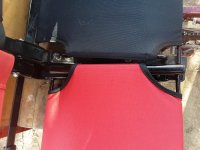
I didn't spend the time fixing the dropout surfaces (which would require welding across the surfaces to fill the cut-into areas, then filing them flat again; at least a day's work), so since I needed to move the wheel down to fit the fatter tire anyway, I used the torque washers off one of the ex-Jump Bafang motors with the tabs "up" to push the wheel down in the dropouts at least 1/4", putting most of the axle flats against still-flat dropout surfaces. I'll just have to be sure not to use regen braking until I can rebuild the dropout faces, at minimum.


Road testing around the block a few times seems to show normal operation. More testing to come before I call it "done".


In the meantime, I'll be swapping out the rim on the other one, then deciding which one to keep on the right side (and whether or not to swap one in for the leftside motor, which is one of the old MXUS 45H's. (which are bigger and heavier than these Ultramotors, but not built nearly as well).


Next stuff probably won't happen this week (when I'm off work for the housefire and all the other bad stuff anniversary, since I am too stressed out from that to handle normality for a while).

If I can get the Ultramotor that Brent_C removed from his Organic Transit Elf, I could then put it in the front wheel of the trike (using the spokes and 26" rim I removed from the old Stromer one), and do what I planned back a couple years ago, to make 3WD with regen in front. (variable regen using the Grinfineon if possible; it's the one presently driving the left rear wheel--regen is very weak on that but it might b stronger in a larger diameter wheel). To do this I'd need to modify the fork to use the beefy pedicab dropouts Chalo sent me, but mounted to be a "rear" spacing (135mm) instead of front (100mm) as it is now.

If not, I could use one of the Jump Bafang motor wheels (already 26", and front style) and not have to modify the fork, other than making the dropouts either beefier or making some good torque arms. No regen braking in front this way, but would have more torque from a stopped startup, whihc would be useful in a number of situations, plus the redundancy of a third motor/controller if i had problems with the other two existing ones (not likely, but....).

Having trouble uplaoding the other pics, will come back and add them as soon as I can.
 
Glad to see you're getting this operable again. It's a good, practical build that can carry heavy cargo, and is likely to serve you well in applications outside of dog hauling. It could be used as a competent mini-truck.

Sucks about the damaged dropouts, but you should have known that it could happen. At least you can fix them. :bigthumb:
 
I didn't actually know it could happen with these dropouts, because I previously used MUCH MUCH higher power with a MUCH heftier motor and controller (each several times as capable as this set), without the axle twisting in the dropouts. The axles broke instead. (typically sheared off at the shoulder where the stress riser is).

So I didn't expect the dropouts to be susceptible to this damage from so much lower torque and power. (only 40A max, if that, and not much in the way of regen braking power either (which I very very rarely use, almost always braking with the front mechanicals simply because I need fine braking control that the on/off regen doesnt' give me--maybe twice a year I'll use the regen along with hard-application of mechanicals for a quicker stop in a rapidly-changing traffic situation).

So here's what they looked like after the removal of the first UM (whose axle, BTW, is completely unmarred by this twisting, unlike every other axle Iv'e ever had twist in dropouts; they usually damage or destroy the threads on the axle, and don't leave much of a mark on the dropouts themselves unless they're aluminum (which usually just break).
img_20220418_151423.jpg

img_20220418_153016.jpg

img_20220418_153022.jpg
 
Motor on bike as test stand:
img_20220418_144022.jpg
img_20220418_144027.jpg


Post-test-ride pics below, including closeups of how tight a fit the tire is in the frame. I had to move my parking-brake up quite a bit (half an inch?) to get it to clear the tire while rolling. Thankfully I never got around to welding or bolting it on, and still just had it hose-clamped, so it was easy to move. Jelly helped by providing masking and scale. ;)

img_20220418_173218.jpgimg_20220418_173233.jpgimg_20220418_173236.jpgimg_20220418_173238.jpgimg_20220418_173302.jpgimg_20220418_173307.jpgimg_20220418_173317.jpg
 
Tested the motor out for a few miles the other day, and so far it's still working like it should, though the Kenda is quite bouncy/basketbally, and pretty annoying on the road surfaces I have to deal with.

I can't lower the pressure or with the weight of me and hte trike it squishes down so close to the rim it'd almost certainly end up with a pinch flat every ride. :(

I'm going to change the tire out to the Shinko as a pre-emptive measure, before I have to go back to work, if I have enough time. (still working on the wheel rebuild for the old motor, and have to change the balding tire on the leftside motor, first).
 
A2B Metro Ultramotor and wheel still working fine; whatever winding it has gives it stronger/smoother acceleration than the Stromer version of the same motor. I really need to hook up the speed sensors to the rear wheels so I can measure their unloaded offground speeds, to compare different ones.

Still using the Kenda tire on it, so trike is still lopsided and tilted to the left (since the Kenda is significantly taller than the Shinko).

At some point I have to change the worn Shinko tire out on the left wheel, so I'll probalby do them both at the same time.

Been so tired from everything lately (not that this is new) that I haven't gotten to moving the Stromer motor over to the new rim for it yet (out of the damaged one); once I do that I could just put it back on the trike...but I plan to put it back on the *left* side in place of the MXUS 450x that's there now (and leave the A2B ultramotor on the right).
 
Turns out today was "some point". :/

Went outside to take the trike for a ride, and that tire was flat. Tried to pump it up, and couldn't get to to fill at all.

So off came the wheel, pulled the tube out, couldn't find a hole or cut, no valve stem damage (metal TR4 type), etc. Has a wrinkled section though, which is strange; as if the tube used was too large for the tire (but it isn't, and it wasnt' like that when I installed it some long time ago).

Hooked up the pump (12v slime-brand, carried on the trike with me all the time to run off the lighting pack) and tried to air up the tube to do the soapy-water find-the-leak trick, and couldn't air it up, but couldn't find the leak, even though I could clearly hear it. At one point it suddenly started to inflate, as I moved it around, and I realized the hiss was coming from the *pump air hose*. :( :oops:

The hose has cracked (from age, it's at least a decade old now; I think I got it used sometime around the housefire, maybe a bit before? who knows how long ago it was actually made).

So....I held the hose enough to inflate the tube some, and the tube stayed inflated...but it *had* gone flat, so there *is* a leak, even if slow. I put the tube back in the worn-out tire (not on the rim) and reinflated it, and took the pump off, and could clearly hear a hiss as the tire squeezed the tube; area it's in is now at least narrowed down and marked. It's in the wrinkly area...no surprise.

So first I went ahead and put the new tube and Shinko tire on the wheel and the wheel back on teh trike, and aired it up holding the hose long enough to finish the job.


These hoses are crimped-on to the pumps inside, and I dont' ahve the tools / parts to properly change them. I have sometimes been able to use tiny hose clamps to secure the non-failed part of an old hose to the pumphead, but if the hose is old enough to crack in one place....

So I dug out an old harborfreight SLA-powered pump with dead battery that Bill gave me several years ago. Always meant to change that out to lithium...but instead decided to cut away all teh plastics except those housing the actual pump, which reduces the size of the thing by two-thirds, and makes it fit easily in the trike's tool area (about as well as, if a different shape than, the slime brand pump). I'ts hose is possibly equally old, but it's still intact for now. Moved the accessory-power cord from the slime pump to this one, and I'll find and install a new hose on the slime one when I can, as a backup.

Wasnt' looking for any projects today (kinda needed to rest) but there we go, a two-fer. :roll:
 
Came out to the same tire being flat again this morning. :(

Gettin' tired of this. Was a brand new tube and brand new tire; didn't even get a week out of it.

Tried slime as a quick fix (don't like it but sometimes it works to get me somewhere till I can spend the hour+ to swap out the tube). No go. Worked for about ten feet, then it puked green all around the bead on both sides. :roll:

Tube has a cut in it near the middle of the tread area, kinda like a glass-slice, but no glass (or anything else) found in tube, tire, or the ex-tube used as an extra layer of rubber thickness between them. No hole found in the brand-new tire either, or the ex-tube, but I can't really stretch them enough to see something that would be a thin cut.

Tried the tube I'd patched and set aside probalby a couple of years ago, but that failed immediately while airing it up. The failure the patch was on "grew" and is now a 2" long split all the way under the patch both directions. :roll:

Haven't gotten the tube that failed Sunday (starting this mess) analyzed and patched yet.

The failure in this new tube is right on the area where there are a whole bunch of raised lines (like a grating) so patching that will require removing those from the area first, so the patch has something to stick to. Used to use a razor blade to shave those off for this kind of repair, but I can't hold them well enough anymore and I'd just slice the tube open, so I'll have to sand them off, which will take a whole lot longer. Guess I know what I'll be doing tonight and tomorrow. :(

In the meantime I'm going to transplant a tube off the narrow trailer (which uses the old tires from the trike as I wear them down on the trike, so it uses the same tubes too), and then pull the tube out of the A2B Metro front wheel I got from MikeBike with the rear motor wheel (which is still working fine on the right side), to keep on the trike as another spare.


Oh, also, the leftside wheel, the one that's causing me tube problems, *also* has a broken spoke. In a quick look I don't see any problems with other ones but I'll need to locate my spare spokes and replace it. I don't remember it being broken Sunday/Monday when I deal with the first flat.... This is still the MXUS 450x motor; I need to get the ex-Stromer Ultramotor relaced into the new rim and swap it out.
 
In my experience, some tubes are just evil* and need to be cast away.

*not really

But suffering the same conditions you describe (persistent leaks despite correctly mounting/dismounting, careful inspection for glass/thorn/spoke/rim defects/etc., even use of sealant, etc.) leaves us with manufacturing defect as the culprit. Another clue is your mention that the area in question is at a seam junction.

Attempting "the usual" repairs to a mfg. defective innertube just prolongs the agony. Best to start fresh with a new one, preferably from a different production run or better yet, mfr. Lately I've been having good results from Specialized brand innertubes.

HTH
 
99t4 said:
In my experience, some tubes are just evil* and need to be cast away.

Those tend to become tire liners, if they're thick enough. If not, they may become vibration padding in one thing or another. ;)


But suffering the same conditions you describe (persistent leaks despite correctly mounting/dismounting, careful inspection for glass/thorn/spoke/rim defects/etc., even use of sealant, etc.) leaves us with manufacturing defect as the culprit. Another clue is your mention that the area in question is at a seam junction.
This was definitely a damage hole, it isn't exactly at the seam, just happens to be in the area where there are a lot of those ridges in one place. (making it a PITA to patch because you have to remove them before the patch has anything to stick to)


Attempting "the usual" repairs to a mfg. defective innertube just prolongs the agony. Best to start fresh with a new one, preferably from a different production run or better yet, mfr.

I already had new tubes (two Bikemaster and one IRC, in the unlikley case it is a manufacturer issue) on order, but they wont' be here for days, and I have to ride to work tomorrow morning, so no choice on the fixing of tubes I already have.

I would've used the tube out of the front A2B tire, but that's a 3" wide tube and it won't inflate properly in my 2.25" wide tires (it just stays wrinkly), so it would just fail from rubbing.

I can't just change the tire to the 3" A2B because the wheel won't fit in the left side frame there, and because of the pedal chain to the wheel being tensioned by how far the wheel goes into the angled dropout on that side (unlike hte vertical dropout on the right side, with no chain), I can't do what I did on the right and just not put the wheel as far up in the (long) dropout. :/

So I'm stuck with fixing the tubes I already have, till the new ones arrive.

I fixed both this one and the one from last Sunday, pulled and the tire and tube off the other Ultramotor wheel that was on the rightside. That tube turns out to be one of the thin ones I'd gotten somewhere along the way, dont' recall the "brand", but it's still working in that tire, so I left it in the tire and pulled the whole thing off that wheel (since I need to do that to relace that motor into a new undamaged rim anyway). Keeping it as-is in the back of the trike, along with one of the repaired tubes placed in the worn tire I'd removed from this left wheel last week when fixing the first flat. Boht of the tubes are left aired up in the tires, so if either has a problem not holding air (at least overnight); I'll be able to see this and know not to try using that one.

Then I put the tube I just repaired in the actual left wheel; it's patch is in a place most likely to stay where it should stay, up against the tread area of the tire. I'll just have to get up way early tomorrow to check it and make sure it's still aired up in the morning, so I have time to swap tire/tube with one of the other two if it isn't.


Lately I've been having good results from Specialized brand innertubes.
Do they make 20x2.5 thickwall tubes with a TR-6 threaded valve stem?

(I have no recall of any experience with their tubes; personally I doubt they make tubes at all, just rebrand them from some other manufacturer like most companies do; every single box I have ever opened with any brand name on it has a tube in it with a completely different brand name on the actual tube, and this brand may change over time even when the exterior box does not).

I've been using BikeMaster moped/MC tubes from here:
https://www.amazon.com/gp/product/B001A6D0R8
and generally they've been just fine. I can't remember which brand is actually in there, but so far they've all been the same.

They're much better than the "Sedona" brand I tried at first for these Shinko tires; the Sedona tubes are very thin (even when marked as "thick" they're exactly the same as the regular very thin versions; at least as thin as lightweight bicycle tubes). They all appear to be the same maker, based on construction and whatnot, but I dont' remember an actual name on the tube itself. The rubber has a wierd "slick" feel to it, and if left exposed to sunlight for just a few weeks, even in winter (I forget what interrupted a tire/tube change back then, been a few years I guess now), begins to change consistency and later will just disintegrate even just laying there on a table in the backroom, uninflated. :(


I replaced the broken spoke in the MXUS wheel (leftside) whiel doing the tire stuff above.

I *was* going to swap out the whole wheel temporarily with the Ultramotor (stromer) previously on the right side...but apparently I built the dropouts on the left side custom for whatever the first motor I used in there was (probably the Crystalyte X5304? can't remember). So they are about half an inch too narrow for the axle shoulders. The MXUS "fits" because when I was fixing the broken axle on it, I apparently also modified it by extending it's axle flats to make a new shoulder farther in to deal with this, to make a larger axle flat area on that side to resist more torque. (I'm guessing; I don't remember why).

So to use the Ultramotor on there (since I won't modify it's axle; it's a *nice* axle, relative to any other hubmotor I've used), I'll have to move the leftside dropout outward by about half an inch. :/ That's way too much work for one day with no time to undo it or fix it if I get something wrong or some other problem comes up, especially without planning it ahead of time.

Maybe next week (probably not for a long while, though).
 
Back
Top