TorqArmRev4 failure

I only found 1/8" angle myself for your clamping dropouts dogman. I'm also using grade 5 bolts. I'm running 88v, 65amps, 140 phase into my HS. No problems so far. I see what you mean about the 1/8" bending a bit when you tighten the clamping bolts to the axle. I can't see any gaps between the angle and the axle along the length.

I'm hoping since the width of the angle iron is 1.5" grabbing the entire axle that will compensate for the angle being only 1/8". Did you have any failure with the thinner angle or did you just change it for the bending when tightening the bolts?

I got doctor bass torque arms and rev 4 ebike.ca torque arms as well and with each there is a small amount of play on my axle and with regen I just don't trust them anymore. I really like your clamping dropout. If I can find thicker angle and get the one side bonded on with jp weld / dp420 or even better welded right to the frame it would be perfect.

Why hasn't someone made clamping torque arms commercial yet?
 
I had double sided .250" SS torque plates that slowly started getting sloppy from regen into 8kW acceleration, screwing up the axle in the process.

Moved to a clamping axle, and I didn't feel the axle rock yet. It's basically mandatory for higher power setups with regen, and a reasonable idea for most everyone else.

7130451133_4cda635809_b.jpg


I'd still like a bit more contact area. Might see if Farfle is up to making me a more extended swingarm with thicker dropouts...
 
i agree with you guys, thicker metal would have been better. it should be fairly easy to modify this in the future if i run into any problems. i also put two small c-clamps right over the axle. this should further prevent any bending/warping of the metal clamping the axle.

electr0n: i might recommend using grade 8 rather than grade 5. i don't know how much of a difference there is. however, on another bike i accidentally used a grade 8 nut on a grade 5 bolt. it went on perfect, but when taking it off the threads must have got out of alignment. this created a bit of torque, but i didn't think it was a problem. i kept unscrewed in when all of a sudden - POP! - the bolt snapped in half. grade 8 definitely seems way more heavy and quality than grade 5 - i can't see snapping 1 of these bolts let alone enough of them to make the dropout fail and possibly injuring myself.
 
Going to keep my eyes open for some thicker angle and grade 8 bolts. I read somewhere the shear strength is in the 10's of thousands of lbs vs the dp420 which many people are using with Doctor bass torque arms which has something under 5000 lbs of shear strength. So far my torque arms are holding up nicely, although I have been avoiding regen unless I'm under 10kph. Regen is a lot stronger in the smaller diameter wheels. I'm going to have to turn it down to the lowest setting.
 
Regen is a big deal if you ask me. I almost never use friction braking. I think I'm running something like 4kW regen, which happens to be right about the point where the rear tire is at about 80% of its capabilities under normal circumstances. Over a small bump or a little grit on the road and it bounces a bit, but still stops well. It's really quite substantial braking power above 30-40 or so.

Build it twice as strong as you think it needs to be and hope it lasts.
 
I agree. Regen really helps with braking. In particular for me since I'm still only using rim brakes. I've found with regen on the highest setting in a 26" wheel it's only helpful above around 20kph. However with the 20" wheel it kicks in with good stopping power even at lower speeds. Problem is it's too strong at higher speeds. I've got it set on medium right now. Going to try the lowest setting and see how that works. For me the power put back into the battery is insignificant as I live in a fairly flat area.

By the way I like your dropout looks way stronger than a typical bike frame. Much cleaner looking than the angle iron. I do like how the angle grips the entire length of the axle though. I've lost the use of my rear deraileur for now. Just need to make it stronger and figure out how to get the chain back on there.
 
Rodney64 said:
I had the same issue with the same torque arms. Made this up its 10mm thick.
Drilled 2 9mm holes then filed it out. An option to made the filing quicker is too use a round file in a drill
3B6D30D8-13FF-4822-9EF7-93A5336785E8-400-000000358C64C056.jpg

Can you show a picture of this arm on your bike? How long is the arm in that picture? Did you have to bend that at all? 10mm thick and how long it looks sounds like a monster of a toque arm.

How would you accurately file the axle hole using a round file in a drill?
 
bowlofsalad said:
Rodney64 said:
I had the same issue with the same torque arms. Made this up its 10mm thick.
Drilled 2 9mm holes then filed it out. An option to made the filing quicker is too use a round file in a drill
3B6D30D8-13FF-4822-9EF7-93A5336785E8-400-000000358C64C056.jpg

Can you show a picture of this arm on your bike? How long is the arm in that picture? Did you have to bend that at all? 10mm thick and how long it looks sounds like a monster of a toque arm.

How would you accurately file the axle hole using a round file in a drill?


The torque arms made of mild steel 30/10/150mm. No i didn't need to bend it for this frame but i do have access to a press if i needed to. The holes were drilled 8mms apart using a 9ml drill bit. Just a matter of filing the hole which is the time consuming part. I used a 15mm flat file and the drill bit file to enlarge the hole enough to get the flat file to finish the hole. Best to use a vernier to check that the holes square.

A63A3B36-B9F6-47AC-B8E7-A3C8BA9B8F18-1006-00000117A8095174.jpg


Edit: I never had torque arms on both sides which I thinks required.
 
Thanks a bunch for sharing, Rodney64. It looks real good. I've wondered many times if a simple hose clamp is strong enough, but so many use them so I assume the answer is yes. Some torque arms have slots for the clamp, I guess you feel that isn't needed. I pretty much feel the same. How did you get the wires from the motor through the hole? Did you splice it through or did your wires simply fit? My motor has some stuff at the end of the wires that make it impossible to remove something like even a washer from the cord unless I choose to cut the wires.
 
bowlofsalad said:
Thanks a bunch for sharing, Rodney64. It looks real good. I've wondered many times if a simple hose clamp is strong enough, but so many use them so I assume the answer is yes. Some torque arms have slots for the clamp, I guess you feel that isn't needed. I pretty much feel the same. How did you get the wires from the motor through the hole? Did you splice it through or did your wires simply fit? My motor has some stuff at the end of the wires that make it impossible to remove something like even a washer from the cord unless I choose to cut the wires.

You must disassemble the Hall connector housing but even Anderson's pass through torque arm slots one at a time. 4mm Bullets, no problem.
 
Ykick said:
bowlofsalad said:
Thanks a bunch for sharing, Rodney64. It looks real good. I've wondered many times if a simple hose clamp is strong enough, but so many use them so I assume the answer is yes. Some torque arms have slots for the clamp, I guess you feel that isn't needed. I pretty much feel the same. How did you get the wires from the motor through the hole? Did you splice it through or did your wires simply fit? My motor has some stuff at the end of the wires that make it impossible to remove something like even a washer from the cord unless I choose to cut the wires.

You must disassemble the Hall connector housing but even Anderson's pass through torque arm slots one at a time. 4mm Bullets, no problem.

Wow, awesome. Thank you. I was considering trying to cut the wires but maybe I'll try and figure out how to take the hall connector housing apart. I had no idea what that part even was. I'll look into taking it apart.
 
bowlofsalad said:
Wow, awesome. Thank you. I was considering trying to cut the wires but maybe I'll try and figure out how to take the hall connector housing apart. I had no idea what that part even was. I'll look into taking it apart.

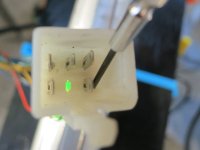
If your connector is like mine, use a small screwdriver to depress the toung on the tab. Slip out the tab. When installing use the small screw driver to put a small gap between the tongue and the locking tab.

Be careful not to break the tab
Make sure you get the color coding right upon re-installation.
Don't let the hall wires come in contact with the series wires because if you accidentally spin the wheel at that moment, the voltage from the series windings could exceed the voltage of your hall sensor tolerances.
 

Attachments

  • Removing hall wires small.jpg
    Removing hall wires small.jpg
    41.7 KB · Views: 1,767
I used a pair of tweezers a moment ago to get the pins out, seemed to work out just fine. I am looking into a better connector type. Some information here seems to suggest a pair of 3 pin JST-sm connectors would do the trick. Instead of needing to take it apart and put it back together again repeatedly, I'd prefer to have connector types that fit through the holes. Seems like it's hard to find a good source for these though.
 
bowlofsalad said:
I used a pair of tweezers a moment ago to get the pins out, seemed to work out just fine. I am looking into a better connector type. Some information here seems to suggest a pair of 3 pin JST-sm connectors would do the trick. Instead of needing to take it apart and put it back together again repeatedly, I'd prefer to have connector types that fit through the holes. Seems like it's hard to find a good source for these though.

Stay tuned - I just ordered some servo connectors from HK. 3 pins each but plan for signal wires on one connector and 5V +/- for another, one unused pin. Never had any in hand and may not fit through the hardware without disassembly but I primarily want something to disconnect closer to the axle. Will waterproof by way of zip-tie inner tube.

Disassembling the standard Hall connector isn't to bad with practice. Just pay attention to the tangs before you reassemble so that they hook into the housing properly. Sometimes add a little bend to make sure.
 
Ykick said:
bowlofsalad said:
I used a pair of tweezers a moment ago to get the pins out, seemed to work out just fine. I am looking into a better connector type. Some information here seems to suggest a pair of 3 pin JST-sm connectors would do the trick. Instead of needing to take it apart and put it back together again repeatedly, I'd prefer to have connector types that fit through the holes. Seems like it's hard to find a good source for these though.

Stay tuned - I just ordered some servo connectors from HK. 3 pins each but plan for signal wires on one connector and 5V +/- for another, one unused pin. Never had any in hand and may not fit through the hardware without disassembly but I primarily want something to disconnect closer to the axle. Will waterproof by way of zip-tie inner tube.

Disassembling the standard Hall connector isn't to bad with practice. Just pay attention to the tangs before you reassemble so that they hook into the housing properly. Sometimes add a little bend to make sure.

I did exactly that, added a bend with a flat head screw driver that fit in the middle space. You saying you plan to waterproof the connection gave me inspiration to do the same. The connection isn't water proofed at all. I was told at some bike shop that zip ties aren't the best route on bicycles because of 'sun rot'. I dunno how long that takes, I assume that bike has to spend tons of time in the sun, years I am guessing. But maybe I'll go with a zip tie, or maybe shrink wrap. Breakin all kinds of cherries in the ebike realm today.
 
bowlofsalad said:
......You saying you plan to waterproof the connection gave me inspiration to do the same. ......

There are plenty of multi-pin waterproof connectors under the hoods of cars in the junk yard near you. you will have to cut and solder wires, but the waterproffing is already available.

:D
 
The torque arm needs to fit tight in the first place otherwise it should be shimmed to make it so. You need a special torque arm when using it to replace worn or damaged dropouts. I have 9K with my share of off road trails on my aluminum dropouts running 2K+ watts at times with a single not so robust torque arm and have never had a problem. I do check my wheel nuts often, just grab the wheel and test for play. Good that you were not injured and the motor wires are OK.

 
bowlofsalad said:
Ykick said:
bowlofsalad said:
I used a pair of tweezers a moment ago to get the pins out, seemed to work out just fine. I am looking into a better connector type. Some information here seems to suggest a pair of 3 pin JST-sm connectors would do the trick. Instead of needing to take it apart and put it back together again repeatedly, I'd prefer to have connector types that fit through the holes. Seems like it's hard to find a good source for these though.

Stay tuned - I just ordered some servo connectors from HK. 3 pins each but plan for signal wires on one connector and 5V +/- for another, one unused pin. Never had any in hand and may not fit through the hardware without disassembly but I primarily want something to disconnect closer to the axle. Will waterproof by way of zip-tie inner tube.

Disassembling the standard Hall connector isn't to bad with practice. Just pay attention to the tangs before you reassemble so that they hook into the housing properly. Sometimes add a little bend to make sure.

I did exactly that, added a bend with a flat head screw driver that fit in the middle space. You saying you plan to waterproof the connection gave me inspiration to do the same. The connection isn't water proofed at all. I was told at some bike shop that zip ties aren't the best route on bicycles because of 'sun rot'. I dunno how long that takes, I assume that bike has to spend tons of time in the sun, years I am guessing. But maybe I'll go with a zip tie, or maybe shrink wrap. Breakin all kinds of cherries in the ebike realm today.


Small bullet connectors and shrink tube werqs well for waterproofing the halls. I takes up less room if once they are done individually you heat shrink the hole group again. I use bullet connectors and heat shrink on anything that I seldom need to disconnect. Makes for a waterproof and stealthy wire loom as well. Stock connectors well, they are stock and most things stock need modded to calm the addiction. ;^)
 
Ykick said:
Stay tuned - I just ordered some servo connectors from HK. 3 pins each but plan for signal wires on one connector and 5V +/- for another, one unused pin. Never had any in hand and may not fit through the hardware without disassembly but I primarily want something to disconnect closer to the axle. Will waterproof by way of zip-tie inner tube.

Disassembling the standard Hall connector isn't to bad with practice. Just pay attention to the tangs before you reassemble so that they hook into the housing properly. Sometimes add a little bend to make sure.

Did you ever end up using/trying the pair of 3 pin connectors?
 
bowlofsalad said:
Ykick said:
Stay tuned - I just ordered some servo connectors from HK. 3 pins each but plan for signal wires on one connector and 5V +/- for another, one unused pin. Never had any in hand and may not fit through the hardware without disassembly but I primarily want something to disconnect closer to the axle. Will waterproof by way of zip-tie inner tube.

Disassembling the standard Hall connector isn't to bad with practice. Just pay attention to the tangs before you reassemble so that they hook into the housing properly. Sometimes add a little bend to make sure.

Did you ever end up using/trying the pair of 3 pin connectors?

Yes, I've pretty much converted all my throttle and motor sensor junctions to those Futaba Servo connectors. I happened to have a crimper that works nicely and either sex fits through axle hardware easily enough. Requires 2qty for the motor Hall sensors of course. One for +5/gnd power and another for the signal wires.

Not waterproof but nothing really is and for motor hall connectors they receive either a silcone tape wrap or chunk of old Tire inner tube to help keep 'em clean/dry. It's nice they fit through the axle hardware.

I didn't need to change throttle connectors but I liked the smaller size of the Futaba and figured why not? Running 2-3 months and no troubles.

Might not be best or for everybody but I feel it's a nice refinement to the usual bulky white connectors used by majority of kits.
 
Back
Top