
You are using an out of date browser. It may not display this or other websites correctly.
You should upgrade or use an alternative browser.
You should upgrade or use an alternative browser.
xKillah - Enduro eBike
- Thread starter BigBlock
- Start date
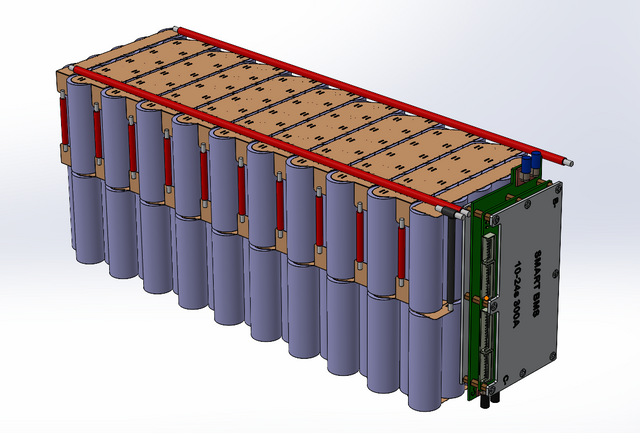
started to machine the billet components of he frame. It will take few weeks to complete. Meanwhile I finalize the battery pack design. I finally go with 21700 cells that are more energy dense than 18650
this is the 20s10p mockup with Molicel p42A - the pack delivers 42Ah @450A max - tot.weight 14Kg
I plan to make two discharge outlets from the case, one through the BMS and another with BMS bypass.

this is the 20s10p mockup with Molicel p42A - the pack delivers 42Ah @450A max - tot.weight 14Kg
I plan to make two discharge outlets from the case, one through the BMS and another with BMS bypass.
handlworks
100 mW
Your CAD is so detailed! Curious - what's your purpose for having one discharge through the BMS and one bypassing the BMS?
I do not like those cheep Cinese BMS when it comes to handle high ampere - I prefer to use a small BMS for charging only and bypass it when I need full torque - I'm designing a custom board to just manage temperature and undervoltage when the BMS is bypassed. When the pack will reach a specific volatge and/or temperature, it will pass the load through the BMS.
Never tried or seen something like this. Hope it works. I will make a try...
Never tried or seen something like this. Hope it works. I will make a try...


Couldnt' wait to do quick pre-assembly to ckeck that everithing fit nice and tight - Quite happy with the result. Only I minor mistake on a single hole tolerance.
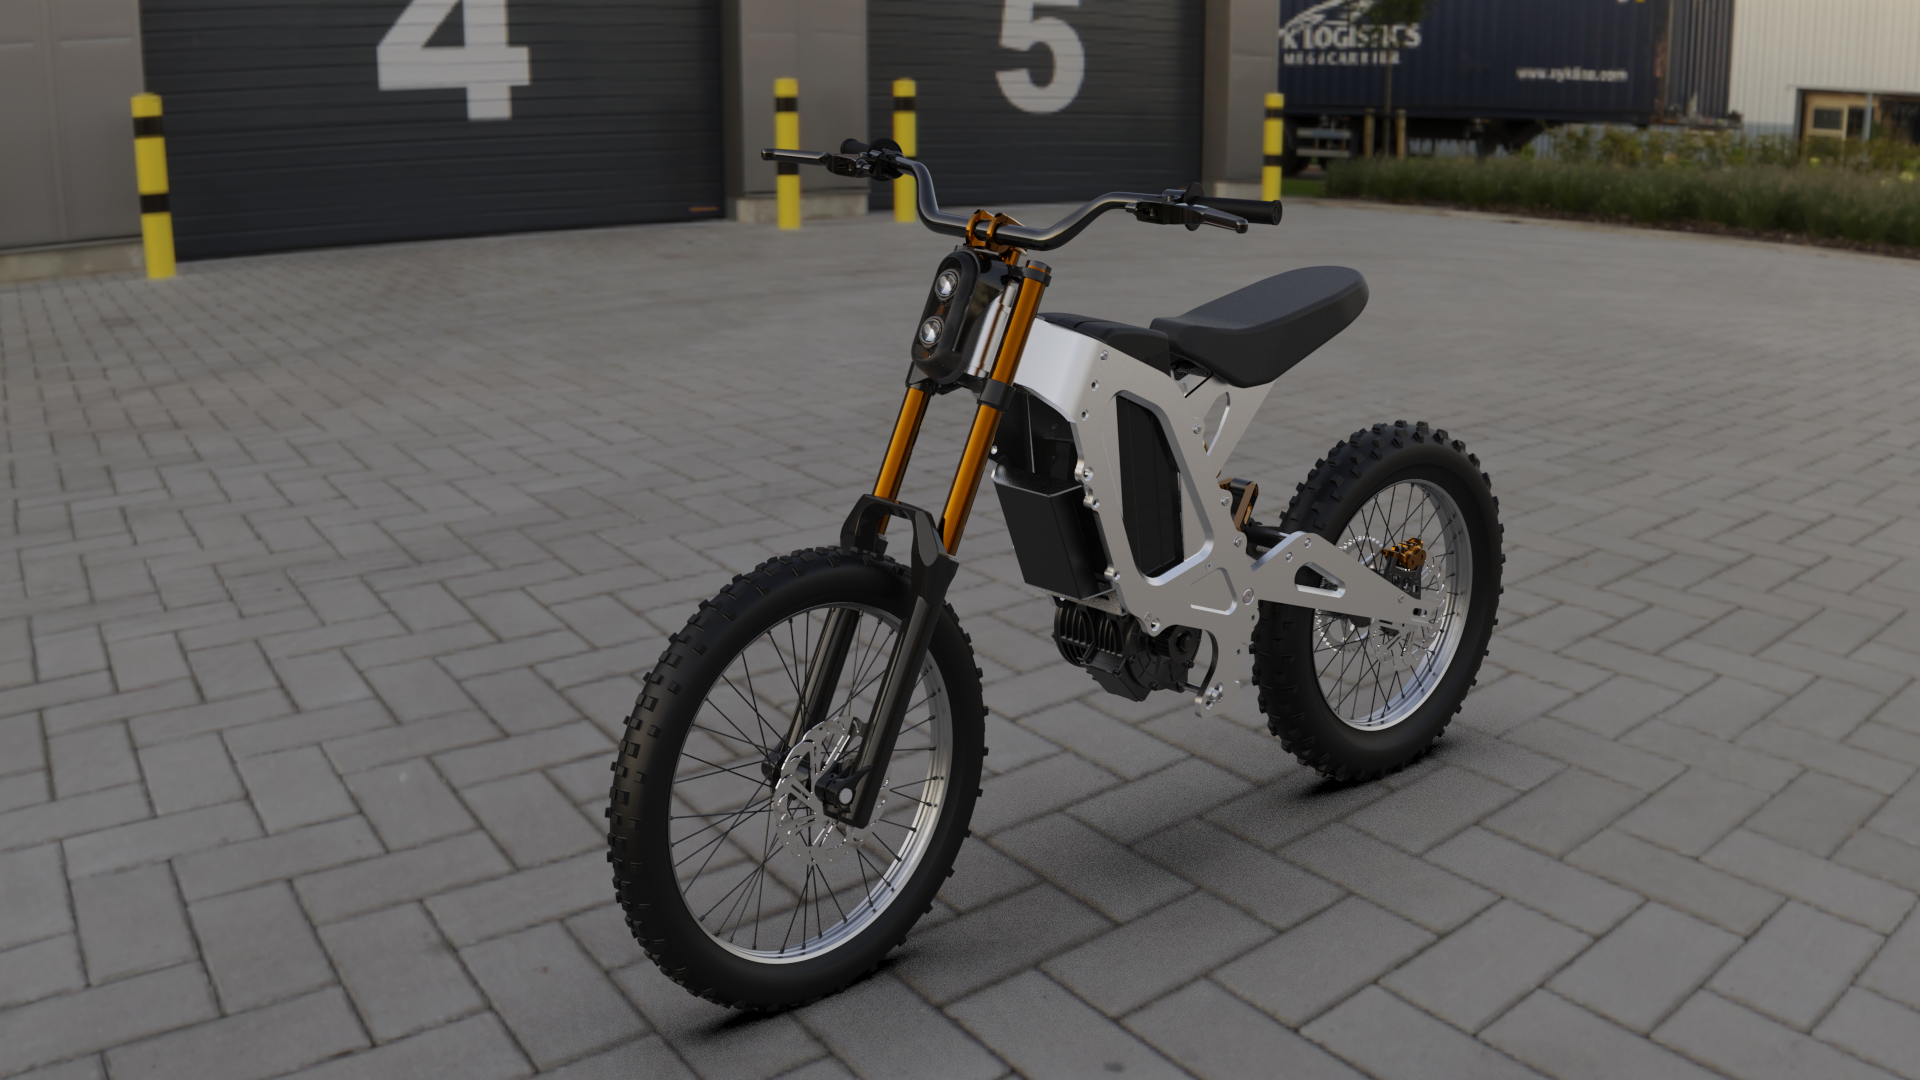
This is how it looks with all frame components bolted. At this stage it weight 20Kg (9Kg frame + 11Kg motor):

This is how it looks with all frame components bolted. At this stage it weight 20Kg (9Kg frame + 11Kg motor):
SlowCo
1 MW
rider63 said:really impressive, do you have your own milling machines?
I have availability of 3 and 5 axis CNC, but for this project I tried to design easier as possible so that many parts can be done just with CNC router or 2D waterjet cutting.
At the end of the build I would like to make the project files available to anybody want to make our own at an affordable costs.
I've slightly changed the design of the battery pack to make it more compact and solid - I designed my own cell holders and use copper threaded rods to connect bus bars on both side as well as keep the pack firm and solid.

3D printed 21700 holders in ABS high temp: (two pieces each, because they exceeded the working area of my 3D printer):

Assembly the puzzle...


Ready to make zillion welding....
3D printed 21700 holders in ABS high temp: (two pieces each, because they exceeded the working area of my 3D printer):
Assembly the puzzle...
Ready to make zillion welding....
Impressive CAD and CNC skills, and design aesthetics. The high tech battlebot look; and who doesn't like milled aluminum...
It could be argued that building projects from exclusively from plate and billet is heavy, expensive, an inefficient use of material, and high fastener part count with semi-permanent construction, but this and your stand up scooter are outstanding examples of that approach. And while I'm more an old school TIG guy, whatever floats your boat I say.
It could be argued that building projects from exclusively from plate and billet is heavy, expensive, an inefficient use of material, and high fastener part count with semi-permanent construction, but this and your stand up scooter are outstanding examples of that approach. And while I'm more an old school TIG guy, whatever floats your boat I say.
APL
100 kW
- Joined
- Aug 6, 2018
- Messages
- 1,113
Love this design! :thumb: Interested in how it turns out. The big advantage with a CNC frame is that it can be reproduced as many
times as you want, by any machine shop, and shipped in a small box. Also easily changed and evolved with the keyboard.
Love your DIY CNC mill too. Keep up the excellent work!
times as you want, by any machine shop, and shipped in a small box. Also easily changed and evolved with the keyboard.
Love your DIY CNC mill too. Keep up the excellent work!
Mourningstar
1 mW
- Joined
- Jan 2, 2022
- Messages
- 15
Just a thought. Add the mounts that surron has to put pedals on the frame? I am so stoked about this project.
APL said:Love your DIY CNC mill too. Keep up the excellent work!
Maybe you confuse, this is me who have DIY CNC mill (look my thread). Big block use professional mill. :wink:
I decided to finish the 3D printed battery box using car body process (epoxy primer, sanding, painting) - It's my first time on a PLA part.
I guess I could have even better result with a couple of sanding steps more, but I finally decided to keep it as you see below:

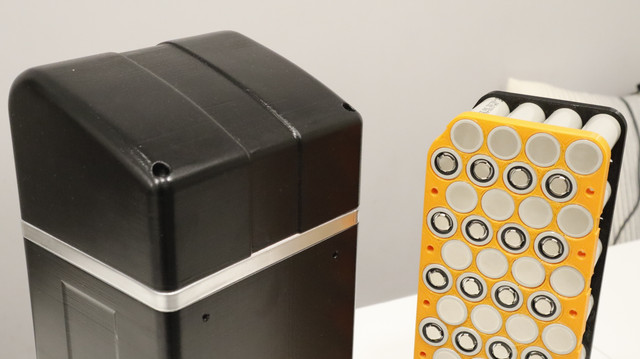
I integrated a cable pass through in the 3d printed cap to make more weather resistant:

I guess I could have even better result with a couple of sanding steps more, but I finally decided to keep it as you see below:
I integrated a cable pass through in the 3d printed cap to make more weather resistant:
Barncat said:Impressive CAD and CNC skills, and design aesthetics. The high tech battlebot look; and who doesn't like milled aluminum...
It could be argued that building projects from exclusively from plate and billet is heavy, expensive, an inefficient use of material, and high fastener part count with semi-permanent construction, but this and your stand up scooter are outstanding examples of that approach. And while I'm more an old school TIG guy, whatever floats your boat I say.
I agree - It would have been easier for me to weld parts togheter (I have my Dynasty 400 sitting just in front of me...). But my aim is to make it replicable and easy to assemble with DIY tools and skills. CNC machining is becoming more and more popular and accessible . It wouldn't have been the right choice if I would have be going to mass build this bike. But for a single build (me or anybody else doing its own) the more cost of CNC is compensated by don't need a welding jig and a stress relief process to avoid distorsions.
Mourningstar said:Just a thought. Add the mounts that surron has to put pedals on the frame? I am so stoked about this project.
yes -I tried to make the frame compatible with as much Surron parts as possible just because you can easily find it cheap on the market. It does not mean you have to, but you can. The Surron parts are cast aluminium (with CNC rectified post processing) so they tend to easily crack.
Mourningstar
1 mW
- Joined
- Jan 2, 2022
- Messages
- 15
The battery box turned out really nice!
BigBlock said:I'm still recovering from a recent crash during a MX race, so I decided to spend some time to improve my rendering skills.
KeyShot!! Nice!
Mourningstar
1 mW
- Joined
- Jan 2, 2022
- Messages
- 15
Any updates on the bike? Any test rides or changes you made to the frame?


SlowCo
1 MW
That is looking awesome 
Great work so far!
Great work so far!
Similar threads
- Replies
- 4
- Views
- 2,134