2WD Semi-Recumbent Recycled-Parts Cargo eBike: "CrazyBike2"

Considering the application this lamp came from that sounds like a strong probability. Wouldn't want to melt the tapes, or damage the camera between the lamps, etc. No fan on the robot arm itself, but there probably was air circulation thru the library of tapes.

Interestingly, though both bulbs are otherwise identical, the one I didn't yet use off the arm does not have a glass in front (the one I did does). I saw no trace that one ever was on there, either.

The scooter bulb does have one, but the brown ones do not (and actually their bulb tips stick out from the reflector a bit, preventing one from being used at all).
 
The light worked out fine on the ride tonight, and definitely helps light the way further along than the CFL, but it also scatters way too much light close to me, increasing the problem I have of my eyes being desensitized by that, and not being able to see outside the lighted zone of road surface at all, into the darker areas further down teh road or along the sides.

So I gotta setup somethng that focuses the light some and also eliminates (shades) the side lighting. I'll try the lens assembly I previously attempted to use with the higher-wattage halogen and see what happens.


Also annoying is that the repurposed battery-spring being used to hold the Honda brake lever (for brake lights) unactuated keeps collapsing; it's just not really a very good spring. I have another better suited I will try later, but if I can get the microswitches working on the actual brake arms it will be a much better setup, and I can either use two (one for lights and one for ebrake) or use a 2-pole relay activated by just one.


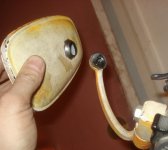
Tonight as I was unloading dog food off the bike, I knocked it over on the left side; I daren't try to catch it or I'd've probably hurt myself, so I let it fall. It broke the mirror off it's mounting arm and badly bent the arm itself, too.
DSC04408.JPG
The arm *should* be much more horizontal than it is. You can sort of see how upward it is bent, but it's kinda hard to tell unless you know what it was before. I don't dare bend it back for fear of breaking it. (and I'm probably not strong enough with bare hands).

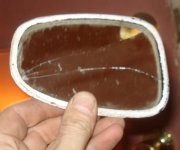
Miraculously the mirror itself didnt' break, until I began to lift the rubber gasket that holds it into the shell so I could get in there and fix the mounting bolt back to the arm. As soon as I started to lift it up, it cracked the mirror all the way across in two places. :( :oops:
DSC04409.JPG
Oh, well, at least it still stays in the gasket so I can keep using it. I might be able to cut the glass on one of the car mirrors off that LTD to fit this one, so I'll take them off of there too, along with a bunch of other little parts, before I sell the carcass for scrap (since the city won't let me keep it anymore, even covered, because it's non-functional).

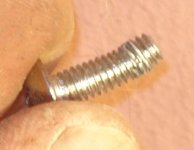
The screw that held the mirror shell onto the arm was badly bent, and actually pulled a couple of the threads out of the arm.
DSC04410.JPG
I found a similar but very slightly larger and longer screw in some stuff salvaged from an old 1" Sony VTR, and used that to replace it. Mirror now works fine, except for the two huge cracks in it.

Actually a bit better than before, as now it is tight enough to stay in place when moved, and not wiggle around (previously I had to wrap small rubber bands under the joint betweent the arm and the shell, so it wouldn't jiggle under heavy vibration).
 
And I forgot to post the trip data. Since I had 5 bags of food to bring home but only one cargo pod (since the other is still replaced with the Vpower pack), I had to make two trips. So the first data includes my to-work commute, then the trip home with my backpack/tools/work stuff plus two 15lb bags of food. The second data is just three 15lb bags (all the other stuff stayed home), but is the same path as the first.

The data was collected as cumulative, becuase I forgot to reset the CA between trips as I had meant to (but it's all on the same batteyr charge anyway).

19m 48s trip time
4.763miles
22.3mph max
14.4mph avg

29.1Wh/mile
2.718Ah
142.14Wh
61.68Amax

59.4Vstart
52.9Vrest
47.4Vmin

3.0% Regen
0.0822Ah Regen
-8.48A peak Regen


39m 23s trip time
9.521miles (4.758)
22.3mph max
14.5mph avg

27.3Wh/mile
5.131Ah (2.413)
268.43Wh (126.29)
61.68Amax

52.9Vstart
52.7Vrest
47.0Vmin

3.2% Regen
0.1687Ah Regen
-8.48A peak Regen

Charge data I've gotta go get off the CA when I am not so wiped out (was doing yard work and moving stuff all day today, and it's HOT out there, 102F peak and still 85F! Got lots more to do tomorrow).

Oh, also, whatever caused me to see nearly double the Regen Amps before, has not happened again, no matter what combination of operation of ebrake and throttle I have tried, at any speed from 0 to 20MPH, and SoC from full down to the above (just past half empty). I thought it was caused by throttling up while holding ebrake, as that's what I thought I saw, but it doesn't happen now, doing that, so I dunno. I really want better braking out of this. :(


During a break in early afternoon I went to goodwill and the grocery store with a friend, and I got a few things:

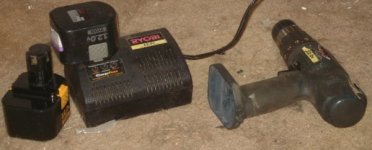
Ryobi power driver set, has everything and works, but batteries (NiCD) are pretty worn out. When time permits will pull and test some from the DeWalt packs of sub-Cs I have a box full of somewhere, and replace as needed.
DSC04424.JPG

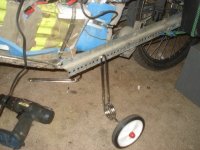
Training wheels for a bike, but spring-type. Never saw this kind before. I am going to put them on CB2 and see if they will help me not fall over while I have to sit and wait in traffic; with the springs they will more easily bend out of the way so will do less holding but they will allow me to turn with them still in-place. Might help act as a kind of stand for the bike, too, but I doubt they can hold up the whole bike's wieght (esp. plus mine).
DSC04426.JPG
I'm sure I'll need to replace the wheels, but I have some wheelchair wheels with bearings that should fit on them in place of the existing ones, that can take the kind of wear I will put on them using them on the road, at least for a while (unlike the existing ones).


An interesting motor/reduction gear setup:
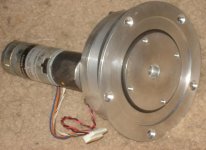
DSC04427.JPG
It's about 10lbs, maybe less, but is cnc'd aluminum housing, steel gears (straight cut), what might be 6 or 7 to 1 gearing at a guess. Appears to be good bearings, big ring bearing on the front of the output gear, and samll regular bearing on the rear of it's shaft.
View attachment 7
Gearing shell is open, and appears unlubricated but probably does have some sort of lube. Motor is 12V and has a 24V brake unit bolted on it's far end, along with a tachometer opto output.
View attachment 6
The motor itself is far too weak to drive a bike from, but the reduction gearing may well serve a good purpose with a different motor on there.


Motorcycle helmet snap-on face shields. Both were completely unopened and brand new, one clear one shaded. I will now see if I can find snaps I can attach to my bike helmet to use them, and to the MC helmet (which has a flip-up shield).
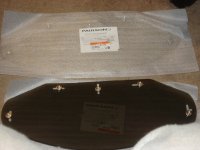
DSC04437.JPG

Four 50W 12V halogens, by GE, 30-degree spot. They are exactly the same housing shape/size as the 20W I have on the bike right now, incluidng the glass sealed fornt cover.
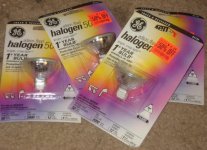
DSC04432.JPG
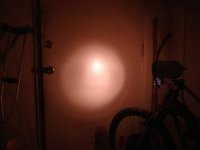
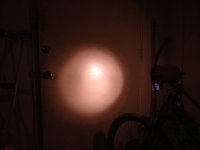
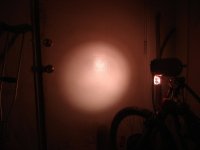
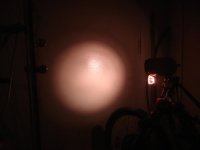
I tested one in comparison with the 20W below, using ISO1000 mode on the camera (which is supposed to disable the auto-brightness but doesn't, but is still better for comparisons than the regular mode). First is 20W + CFL, then just 20W. Next 50W + CFL, then just 50W. I can CLEARLY see the difference in the room, at least twice as bright (looks like 3 or 4) with the 50W vs the 20W, but it's not really that visible on camera. :(
DSC04433.JPG

DSC04434.JPG

DSC04435.JPG

DSC04436.JPG
 
I should probably do that, since I do have two identical moutning fixtures for these bulbs.

Just havent' had time (barely had time to swap bulbs, trake pics, and post). Spending almost all my time at home right now either sleeping to rest my leg and other injuries, or sorting, trashing, packing, and cleaning up all my stuff to get the city off my back. Spent almost all of yesterday and today trying to get the space for the shed cleared, then assembling the tin shed with several friends' help (they actually did almost all the work, as most of it I couldn't physically do right now).

Just got the shed 99.9% assembled tonight just before dark, and now need to find or make a solution to replace the broken plastic door hanger/slides, put them on, and start packing stuff in there so it isn't "items stored outside visible from beyond the property". :roll: Shed is mostly under the north side of a (mulberry) tree, so it has lots of shade and some wind protection, with teh door also facing north, for much much later when I can use it as a workshop. Probably months down the line, at the earliest, possibly a lot longer.

I'm hoping to get the training wheels put on CB2 tomorrow before work, but probably won't be able to do that until Monday afternoon/eve after work, unless it's cool enough outside to drag more stuff around, in which case I'll be doing more cleanup.

I'm so wiped out right now, and badly sunburned despite protection of clothing/hat/etc., that I dont' think I will be up to doing any of that tomorrow even if it is cooler. :( I figure I'll doze off while reading or posting soon enough. :)
 
I have 32 of those 50W MR16 halogen bulbs in fixtures in my house. I am converting all (300+ bulbs) in my house to LEDs. There is no commercial MR16 LED bulb that puts out over 1/3 the light of those 900 lumen LED bulbs, so I am building my own LED replacement fixtures for them.

I got to test my Bridgelux LEDs last night on an integrating sphere light meter. Their raw output is spot on to the specs (try that with a Chinese LED). Unfortunately, you lose about 25% of the light in the beam forming reflector and front glass once you mount them in a fixture.
 
I'd love to run just LED on this stuff (especially the ones you've got!), but at the moment I don't have the money to spend on the LEDs, so I'm working with what I have (mostly, and *extremely* cheap on the stuff I am buying) to get me a light to see better with, since I'm beginning to have trouble seeing just by the road/ambient ligthing in a lot of places at night.

For now I am planning on replacing the CFL's screw-in fixture with the MR16 mount, inside the pig's lipstick shell. ;) Then I'll put a black rim on the inside of the shell; that will reduce side-spill which causes my problem to be worse. Wastes a lot of light, but best I can do just now, without the time (and possbly money) to spend on better solutions.

I still haven't had time to finish building the LED turn signal boards that I *do* have the parts for. :lol:
 
We seem to live parallel lives or something. The village had caused me a lot of grief because of appearances and I wonder how much else I could have gotten done over the years if I could have focused on doing more work that matters. As the fossil fuels run out and the economy continues to decline, I wonder if things really will be more like madmax with the utility of set-up being the important thing or will things revert back to the pastoral type of feudalism with everyone having almost nothing. There is a mulberry tree by my oldest shed and I let some branches block its visibility a little.
 
I'm mostly wanting the shade from the tree rather than blockign view, but anything that helps. :)

I've been lax about data collection last few days. :oops: Today's ride data includes a roundabout side trip on my way home, thru side streets because there were more than the usual idiots on the main roads during the time I needed to be on them, and I declined to be target practice for them, just in case. Especially since it was just after dark set in, and as usual, a small but significant percentage of drivers hadn't yet turned on their lights. :roll:

So my trip data is pretty low average speed, as I decided to just toodle along on the back streets, observing what my "new" 50w halogen headlight did and didn't light up well enough to see by, with and without the CFL (which tends to just light up very close things).

It is definitely easier to see without the CFL, using just the halogen. I do wish it had a better beam, but I can live with it as it is for now. It's much better than the CFL, though I expect the CFL is easier for others to see me by.

There is one anomaly in the data: The "Fwd Ah" on the regen screen does not match with the Ah on the main screen. :? It has before, and it's close this time, but not the same. So I put the Fwd Ah reading next to the regular one, with an *.

34m 52s trip time
7.679miles
21.5mph max
13.2mph avg

25.7Wh/mile
3.892Ah / 4.016Ah*
203.58Wh
60.44Amax

59.4Vstart
52.7Vrest
47.1Vmin

3.1% Regen
0.1237Ah Regen
-8.49A peak Regen

So I still haven't duplicated the near-double peak regen A I had seen before, nor figured out any reason it wouldn't be doing it now if it did do it before. :?
 
Indeed, good shade from a mulberry tree , especially down there. I used to do more under the shade of mine, but you know how the mosquito's can get. I sometimes reminisce about the time before the tiger mosquito got introduced into the states. We seem to be on the northern edge of mulberry tree range. Their leaves bloom later in the spring and drop later in the fall than most other trees around here.

I was coming home from the produce market a couple of months ago and was met with a lot of incivility from a passing car. i think it was the local troublemakers that've hopefully got arrested by the police by now.

It'd be great if a cheap LED flashlight were bright enough for a headlight...maybe several of the head units from them taped together? I wonder how many of those watt-hours were used by the halogen light. Keeping the battery charge from dropping is good for longevity, so the regen might help there, too. :)
 
The halogen (and turn signals and brake light) are all fed from a separate 12V NiMH pack right now, though the CFL headlight and taillight are off the main pack. The 12V pack at lower current draws probably has about 6-7Ah capacity, out of the 13 it originally had. That should be enough for at least a few hours operation, and typically my night rides aren't that long.

LED flashlights are ok, but the ones I already have aren't good enough by far, even combined, and buying enough new ones or bright enough single one to fix that would be more than I can afford ATM. And that's assuming I could focus them all well enough to give a good beam down the road where I need it.

Eventually I want to use LED on evertyhing on all the bikes, but for now I use what I have. ;) I do have a bit of money still set aside for shipping some lights an ES member has been planning on sending me, but I have to continue to wait until he is available to do so, and I have no idea how long that will be. So in the meantime I'm just coming up with other solutions that will do at least part of what I want, either with stuff I already have or with very cheap solutions that are also adaptable to many other uses (or have resale value).
 
After a couple of trips I remembered to recharge the 12V pack, and it toook 8.98Ah, so I was probably nearing it's capacity limit. :oops:

While I had the meter out, I put it between the 50W halogen and the 12V pack, and it reads about 59.5W, at about 4.41A, at 13.3V (which jumps up to 13.8V with no load).


Got called in to work this afternoon, so didn't get the halogen moved to the fixture, so planned to do that after work. Was tired, so laid down for a nap, and turned on a box fan I use to both move air around and make "white noise" to help me sleep. Didn't seem like it was as loud as usual, but too tired to think about it, so dozed off. Woke up for no reason I could figure out, till I realized I could barely hear the fan.

Thinking the dogs might've knocked it over, I got up to find it barely spinning (but not knocked over). Thinking back, it's been getting slower and quieter for several days or more. This time, it was noticeably odiferous and quite warm to the touch.

Took the plastic grilles off and found the motor would barely turn by hand (without the fan for leverage), and opened hte motor up to find it has NO oil or grease left in the bushings. It uses brass (or something) bushings with a cloth disc (presumably to hold oil, but it looked really clean to me, and smelled only of hot metal) pinned in place by what amounts to a star washer. I filled the little cups at each end with the gear oil I use on lots of things, which is a lot thicker than motor oil, but still fairly runny at room temperature.

Now the motor spins freely, and runs cool, and is something like several times as loud and fast as it was earlier tonight.

I wonder what, if any, oil they originally used, or if they just used oil-impregnated bushings hoping that they'd last the warranty out...but this thing came from freecycle so who knows how old it is. :lol:

Works now, probalby for years again, but we'll see. Now back to that nap....
 
If they had been NiCads, that would have been good to run them all the way down.

That was strange with that fan compared to how they used to fail as I remember things. The bushings would get worn and sloppy, causing the rotor to turn slow and squeal.
 
That's how previous ones have failed, though they were also due to no oil for too long (before I got them from their previous owners, since I like to do periodic maintenance on motors like these--with it they last what seems like forever, and without it they might go months before failing).


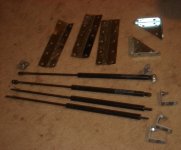
I got some more parts for one or another bike project today, from work. There was an old version of a product display being scrapped, and I asked for the hardware (and was told yes). Unfortunately I couldn't get all the hardware off the huge heavy fiberglass display sections, so all I got was this:
DSC04441.JPG
There were three more hinges and two more corner brackets, and three more end-mounts for the struts, as well as four heavy L-brackets and some other bits, that I couldn't get enough screws loose to be able to remove them, even by prying. :( Really coulda used those parts, especially the hinges (for my cargo pod lids and maybe battery doors on the new bike).

The struts are gas lifts, and I can compress them by hand if I use both hands pushing down on one end with the ohter on the ground, but only just. Not sure what I'll use them for, but possibly steering stabilizers. I was also thinking I could use them as some sort of lowering-mechanism for some side-wheels (like training wheels) but I don't think they'd have enough push to really help hold me up. If they did, I'd have a bit of trouble leaning for a turn, probably.

Anyhow, more bits for the bucket. :)
 
If it happens for you much like it did for me, there comes a time when it seems salvaging things happens much less often. :)
 
Mostly because I have less time to do it, and there is less stuff *to* salvage, with all the scrappers picking stuff up everywhere. Every day around here there are several trucks that go thru my alley looking for stuff, and they take anything not nailed down. Heck, some guy had to chase down a truck a few weeks back to get his lawnmower that he'd had on the sidewalk while he went to his shed for more gas. :roll: He came out and they had just tossed it in the back on top of a pile of scrap metal and were driving off....

(some even steal things on purpose, like metal lawn chairs and ornaments, etc, just to scrap them for a bit of cash. Some people, like Evoforce, actually have to chain down stuff in the front yard to keep that from happening!).


Speaking of salvage, today (well, yesterday now, since I had another involuntary nap when I was typing this up) I took out the headlights and wiring harness for lights and sockets on the front end of the LTD:
View attachment 1
The taillight lens assembly is one of the pair I got from Goodwill a bit ago, simply there as I was testing the fit of the bulb and socket in it (not perfect, but close enough). Also some more hose clamps I'd missed in my first run on the engine compartment a long time ago.

I forgot to take a pic of them, but I also pulled off the mirrors, both side rearview and the windshield-mounted one, as well as the vanity mirror in the passenger visor (which has lights built in). I got one more door-window motor and a lock solenoid, all the blade fuses, and some assorted bolts.

Was working on getting the radiator out and some other bits but I can't quite get them loose right now. Need to get some help getting the serpentine pulleys off the crankshaft and oil pump. Gotta get the tail and sidemarker assemblies out, and have to take the bumper off to get the front markers/turn signals out of it. Not sure if I can even get the bumper off with tools/strength that I have.

I would like to get the entire AC system out intact if possible, but taht will need help holding it all up while it's taken out and stored, so I don't rupture any lines/etc. I expect I will not be able to get it out without undoing the lines to the cooling assembly, though, as I think that's inside the dash and won't be able to go thru the firewall. I don't even know if it still has any freon in it, as it hasn't been run in several years, and I didn't know it's status even back then (never tested that).


After taking the pic above, I was picking up around the bike, had to move it to reach something, and shockingly noticed this:
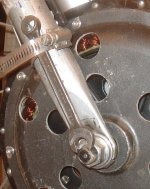
DSC04445a.JPG
Sometime in the last couple of weeks (I haven't been paying attention at least that long) the wrench has wiggled loose and been pushed upward, while the axle rotated a bit counterclockwise (viewed from right side of bike). This is not good.

Other torque arm is holding fine, but if this were the only one....

The nuts are still so tight that when I unclamped the wrench and put it on the axle, then tried to use it to lever the axle back to upright position, I could not even budge it a tiny little bit. Even when I stuck a tube on the end of the wrench as a 2-foot-long lever, I couldn't. So I guess it's not going anywhere.

To fix it, I left the apparently very tight nuts alone, and just flipped the wrench over, so it's angled end still allows the wrench to clamp parallel to the fork leg in almost exactly the same position it used to be in. I was going to put a second clamp on there using one of the ones I just salvaged, but I seem to have lost them already, having put them away just a few minutes before fixing this. :roll:
 
Little trip this morning while it was still cooler to thrift stores/etc, looking for hardware bits to fix things up around here. Only found one fix-up bit, a mounting clamp for a garbage disposal for $2 (which I hope fits but have to *find* the GD first, as I got it off Freecycle more than a year ago, possibly two, without the hardware).

No problems with the bike during the trip, and no sign of the wrench loosening again yet.

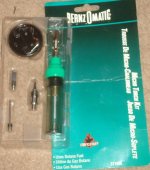
I did find one nifty item that I have wished for for a while: A portable pocket butane torch / soldering iron / etc. This one is by Bernz-O-Matic, and is completely unused, AFAICS. I filled it and tested it ok. Was only $3.50. :)
DSC04447.JPG
I have another much larger "pocket" torch, but it is *only* a torch, and has no way to attach fittings for other things. Plus it slowly leaks out all the butane over a couple of months, so I don't fill it till I'm about to use it now (making it kinda useless for keeping in a toolkit ready to go, for instance). It's at least 10-15 years old, IIRC, by "Syntax", and I've never found any info about it on the web. Been very useful, especially in mass-desoldering operations ;) for component salvage off of dead electronics, but not hot enough for any big jobs (and too hot for most really small jobs).

It's two main advantages over the BOM are that it has it's own lighter built in, and it's got a metal tank instead of plastic, so it has survived some drops that I doubt the BOM would. But it's heavier and harder to hold in a particular position, as it only really operates correctly when upright, while the BOM works in almost any position AFAICT.

This new one, the st150k, comes with a medium-point/flat soldering tip, foam/etc cutting tip (looks like a basketball-airing-up-needle), and general heat-cutting tip (like a wedge soldering tip but with the wedge along the edge rather than the end). Plus the regular torch tip. Has other accessories that can be purchased for it (assuming they still make them, haven't checked), if I ever need them.

I forget the temperature it said it gets up to, something like 1700C. (should be the same for both, since they use the same fuel) Anyway, it will be useful on test trips of bikes (when I expect electrical issues) once I get another hardcase for tools, so it's plastic tank is protected. Also for soldering small things around here away from outlets, that I don't want to drag out the extension cord and soldering station for (not uncommon when doing bike wiring).
 
Sometimes, for heavier soldering jobs, I hold a butane lighter flame on the tip of my cheap soldering iron to give it a heat boost.

Speaking of looking for parts, yesterday I looked for my original loose coaster brake hub so as to have it to hold it onto the tire to test a friction drive idea. I couldn't find it so had to use the other one that came off of the bike that I got last summer from Goodwill.

It spun OK without too much resistance, but it made more noise than I expected. That was with nothing but the coaster hub by itself. I held it by its torque arm and pressed it against the wheel as I pedaled.

I have decided that I have about 8 old pieces of stereo equipment to give away, that an enthusiast might enjoy repairing, along with a 13" TV, which I believe should work. I also have about ten new unused timers for operating automatic plant watering equipment that I may as well give away, too. I forgot to look for a bunch of really cheap LED flashlights that I could give you if you wish. Those use the more primitive bluish LEDs, and I seem to recall having about 100 of the same type of new LEDs in a bag that I don't think I will be using, too, that you're welcome to have.

I wonder if a piece of wire could go from the end of the wrench down to the wheel nut to keep it from working itself away.
 
I can always use the LED stuff (and shipping shouldn't cost much, so I can probably afford that).

At one time I would have called myself an enthusiast about old stereo equipment, but I dont' even find time to use what I have, or even compose music (which used to be so central to me that if I didn't do it every day I'd literally feel sick).


The wire on the wrench/nut sounds like an interesting idea that I may well try.


I had an idea (which I think I've had before, it has that deja-vu feeling) about disc brakes on the hub motor:

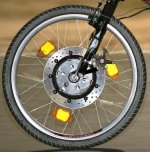
If I were to take a motorcycle disc brake rotor, and lathe out the center, so that it is exactly the same inside diameter as the outside diameter of the bubble part of the 9C side cover, I could drill holes in it and bolt it (with spacers as needed) to the hub's cover mounting holes. Then put some disc-brake caliper mounts higher up on the front or back of the fork leg, so that they line up with the rotor and clear the whole 9C hub.

I could do the same thing with the Fusin geared hub, but I might be able to do that with a regular bike rotor, if I have one large enough (I don't htink I do, not sure).

Now I just have to find a MC rotor the right diameter, and preferably thin enough to use with bicycle calipers I already have.
 
It's OK for you to not worry about the postage. I might even think of something else to add to the box. If you could PM me your mailing info, eventually I should be able to send a box over. I'm thinking of padding the inside with some styrene foam food trays that are used for packaging discounts at the produce market. I reuse them for all kinds of things.

It seems pretty common that interest in music wanes with age. I was pretty addicted to audio for many years.

I wonder how feasible it could be to machine a rotor from scratch, in case that would be a possibility. I guess that it would be relatively hard, stiff, and rust resistant metal.
 
If I had a lathe large enough to fit the diameter rotor I'd need, it'd be easy. I could even take a car rotor and machine it down, if I had to, but I'd rather start with a MC rotor. I just need to find one on CL or Freecycle being given away or sold really cheap, once I figure out what diameter I need.


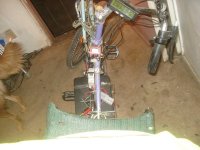
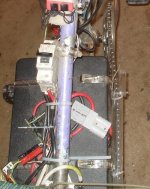
Today I "officially" changed CrazyBike2 over to the Vpower pack. I'd been running just that, but bolted over on the left rear in place of the cargo pod, and the NiMH was still in place in case the Vpower failed while I was out and about. It's proven dependable enough so far that I think I can risk it now, given the weight of batteries is at least doubled with the NiMH still on there.

So now it looks like this:
DSC04455.JPG

DSC04448.JPG

It handles a lot better now, with the weight only in the center, rather than in center *plus* hanging off the left rear. Even with the cargo pods both in place it's still better, although as expected it' still wallows when they're full (like earlier tonite with the groceries filling them both completely, and the backpack up on top of the left one). Plus being a bit lighter it feels better with more weight in front (well, actually less in the rear).


It did take some modifications to fit that box in there, though. I had to take out the old SLA brackets I'd made out of the bottom of a UPS case, which were also used to secure the NiMH packs to. Doing this kinda committed me to using the Vpower pack (or welding the brackets back on).
DSC04458.JPG

To move the case back far enough to *almost* clear the cranks,
DSC04459.JPG
and crowd my knees less, I had to cut off a couple inches or more of the square tube under the seat, that is part of the cargo pod rails, but wasn't actually being used to support anything anymore (I forget why I orignally had them stick out like that, but there was a reason back then, I think).

Because of the width of the case, I also had to trim a couple of inches off the tubes used for the seat side rails, which have always been a source of bruising under some conditions, and have needed to go since I built that seat. I could actually stand to trim back at least another inch. Now my thighs wont' get beat up by those ends, since my legs have to spread out a bit more with that big box in there.
DSC04460.JPG

Unfortuantely I cant' even quite center the box, because the crank chainline is in the way:
DSC04461.JPG
By over an inch. :( I put some plastic tubing on the chain so it will not catch on the box's clamps as it passes them in reverse, when I back up the bike. Since I'm not pedalling now (can't yet), it doesn't matter that it won't work in the forward direction, but I will have to solve that before I can pedal at all, now.

I expect the only good solution is to move the box out to the left more, so it can clear at least the large chainring (preferably also the middle one). Lengthening the righthand side of the BB spindle is another option, I guess, but I'd really want to do it symmetrically, and end up adding at least two to three inches to the width of the BB. That's an awful lot of work, considering I intend to replace CrazyBike2 as my daily ride with the new one if I ever get to finish it.

There is enough room to put both halves of the Vpower pack where the NiMH halves went, but only if I first secure them in individual boxes, rather than in this large wide one.
DSC04454.JPG
I was hoping for the narrow Kydex boxes, but that probably isn't going to happen anytime soon, if ever. So I'll need to build some myself, once I figure out what materials and how to fasten them together. And what padding to use, since I still have not found more than a couple of those old mousepads that use that kind of closed-cell black foam I want to use in this.


Ride data from toda's work commute and the store trip on the way home. Note that the FWD Ah is again different from the regular main screen's Ah. In this case, subtracting the regular Ah from FWD Ah *almost* equals the Regen Ah, but not quite. :( So I dunno what the deal is.

28m 35s trip time
6.042miles
20.8mph max
12.6mph avg

26.3Wh/mile
3.077Ah (3.1744Ah)
163.73Wh
61.4Amax

59.4Vstart
52.9Vrest
48.5Vmin

3.1% Regen
0.0961Ah Regen
-7.72A peak Regen
 
That's good news about the batteries.

Knees, indeed. I have moved the drive assembly on mine from behind and under the seat to the main frame area behind the front wheel. I didn't even give thought to the possibility of my knee or foot hitting it while pedaling. It seems OK now that i have placed it forward as far as possible. It still turns the cranks when powered up, but at least now there is more rear luggage space.

I keep wondering how that is on the joints when the distance between the pedals is widened from longer crank spindles. It seems there comes a point where it can get uncomfortable due to the spread.
 
Wider BB/pedal distance will eventually affect your joints; they're not made for heavy-duty repetitive operation at those kinds of angles; just look at the way you use them when walking/running most efficiently (do this on a beach or mud and look at your footprint spacing).

If the joints are already messed up like mine, it'll be even worse, probably. But if I were to keep this solution as-is, I wouldn't have much choice.

There is one other possible solution I didn't think to try, and that's to turn the box sideways, 90 degrees from how it is now. That would clear the cranks and pedals, but it might not clear my heels and calves. Depending on fit over the cargo pod lower rails, it might not go back far enough for that, either. If that's the case, rotating it 90 degrees from upright, with the lid forward, might work.

But doing the above will mean it will stick out quite far to the left, in order to clear the chain. Probably still better than bolting it back to the side (though under the chair side rather than where it had been), but we'll see.

Fortunately I have a second box, empty, that I can use for positioning tests, so I don't have to keep moving the heavy battery-filled one around. :) But it will be tomorrow at earliest before I can play around with this, as I have to finish getting ready for work soon.


I should also test fit the box in my other frame, the one that will replace this bike eventually. I have a feeling it won't quite fit in there as-is.
 
I expanded on the crazy disc brake idea for hub motors in a new thread:
http://www.endless-sphere.com/forums/viewtopic.php?f=2&t=28410&start=0
where I chopped some pics together to make an "idea pic":
Crazy Disc Brake Idea.jpg

If anyone reading this has any ideas about it or opinions for or against, take a look at that thread and reply there. :) Thanks!
 
Back
Top