Lebowski
10 MW
Maybe regen is not possible in the beginning because it would overcharge the battery ?
Lebowski said:Maybe regen is not possible in the beginning because it would overcharge the battery ?
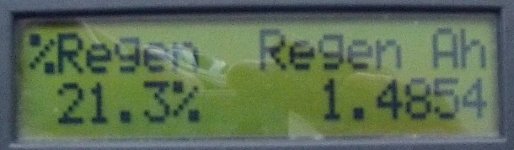
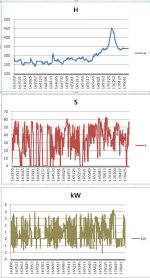
hjns said:In other words, the first 10 minutes I can activate the E-brake all I want, but it only shuts down the throttle without activating regen. After those first 10 minutes, when I brake the regen is also activated, applying a very nice braking force and very nice regeneration of energy (5%), which is great. [/list]
Anyone any idea?
methods said:Just like the controller has an overall pack LVC to stop you from a gross over-discharge the regen feature also has a pack HVC to stop you from over-charging your pack on Regen. The controller can not see "regen current" and it controls regen only by PWM calculation on the mosfets and R12 voltage. To get your regen to work the entire time you need to modify R12.
R12 is the lower leg of a voltage divider that comes from system voltage. Just like soldering the shunt fools the controller into thinking it has less current when it has more... lowering R12 does the same thing for pack voltage. Be aware that this will have the side affect of raising up your LVC.
If you go back to my 100V/100A 18 fet thread you will see that I calculated a max regen voltage of 90V back in the day and modded R12 to be the desired value to get that. This was back before we knew we could push the 4110's harder... today I would mod to 100.0V
Good luck
-methods
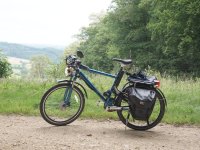
hjns said:First, let me introduce my Cromotor Commuter ("CC") to you:
Very sneaky. I also did not even catch the rear shock on first glance.
What you see is the following:
- Cromotor hidden behind the pannier bags, laced into a 26" HALO SAS rim with black 14G Sepim spokes from JRH
- Lyen 18FET 4110 controller behind the seatpost
Turn it up to 11!
...- Touring steering bar, with DOT-approved 12V MoFa light and two blinkers. On the left hand side I have the 3-speed switch, regen, brake-light, mirror. On the right hand side I have the blinker activator and the throttle. In the middle is the CAv2 with current throttle hardwired. You can also see the GoPro (movies to follow).
mmm.... I like lights. Have a look at the euro-standard housings. They throw a flat beam that is very attractive - flat across the middle and up on the right.
- Rear pannier bags (completely watertight) are attached to the sideframes of a Freeload frame that is attached to the frame. Therefore, they do not benefit from suspension, and I need to be careful when hitting bumps. The rear light / brake light and the rear blinkers are also attached to the Freeload frame. A 74V-12V DC converter is attached to the underside of the Freeload frame, as well as a strobe for the blinkers.
- Single speed freewheel with chain tensioner, and attached to the 44t front cog. Front and rear derailleur have been removed.
Sometimes you can find a 54T or bigger for nothing on ebay. I presume you are still running your front derailer - if you are not - put it back on and it will help solve your chain issue. Also - with my bikes I just look down the line and bend the rear derailer a few mm until it lines up with my front chain-ring. I know that is ghetto - and higher end derailers probably have an adjustment for this - but I rarely change gears so I just throw whatever I have on the back.
Look that chain over for a weak link for removal. Procure a chain-break and remove a fist-full of links from that chain. This will force the rear derailer to articulate and put more spring tension on your chain - this too will keep it on the front chain ring. I use an 11T on the back and a 54T on the front so I just measure it out to maximize spring tension and shorten.
Dont be cheap like me and skip out on the nice chain-break pieces. SO nice to have at any cost. Learned that with my miss-step into chain drive with the Cyclone. (EDIT: I am talking about the links you put into the chain for breaking it by hand)
...
To do list:
- Finalize the battery box
- Post pics of the build and make some nice vids
- Get the CAv3 that is still stuck in customs
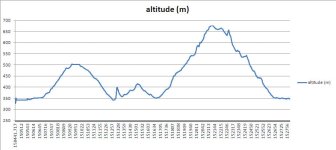
- Attach the temp probe and start logging temps when going uphill
- Increase current limit to insane levels

hjns said:Yes, I looked for a 54T on Ebay and on the local Swiss version of Ebay. However, they only offer them for 5-bolt crank systems, not for my MTB 4-bolt system. And at this moment I don't want to change the complete Bottom Bracket (Shimano Hollowtech 2).

SweKen said:Did it happen when you where accelerating or regenerating? If i was going to use this kind of method i would probably drilled two holes thru the plates and thru the drop outs, fixating them with stainless recessed hexagon heads, with the nut facing outwards.
gensem said:Im betting that it was during regen...
Im using moped wheels and tires and regen is really hard on the dropouts with such a heavy wheel.
hjns said:[*] I love living here and being able to do these kind of things after a days working.