Freewheel crank resources

Yes, agreed, we need to try some of these things out.

I am sure I will go through alot of grief setting up my mountain bike this winter. Its all good, though! :wink:

Matt
 
No kidding. A decade from now people will be laughing at our current "High Tech" projects.

I can see it now.......................

"Man, look at these old pics of these early E-bikes. Talk about crude crap!"

That is probably what will be said of our bikes years from now.

But, without all of us pushing the edge, figuring things out, technology would not advance. :)

Matt
 
Hi Miles,

Miles said:
The problem is that (for our use) torque levels at the crank are around 3 times greater than at the rear hub - so you need a good quality freewheel.

The best ones seem to be the ENO (White Industries) and the Tensile (Onza).

The ENO 22t is a particularly convenient one to adapt because it has 5 circumferentially milled slots which can be used to bolt to.

The White Trials FW are supposed to be stronger. If the center is drilled out of a large #25 sprocket so it fits on the shoulder of the FW would it be significantly harder to bolt the sprocket to the FW by putting bolts between the teeth on the FW?

Miles said:
Mitch,

You're right, I misunderstood you. Jackshaft vertical displacement shouldn't affect efficiency. In what way do you think it might?

The exact ratios used will depend on a lot of factors. I was assuming that the jackshaft would be at nominal wheel rpm.

If you only use the motor occasionally (for hills etc.) pedal drive efficiency is important.

Talk about "vaporous". It just seemed to me that two chains pulling in a direct line would be more efficient. If it doesn't make any difference I'm happy to hear it :D.

I was assuming that the nominal wheel rpm would be roughly twice crank rpm.

I didn't think the 2-4% would be a big deal but:

  • 1. I might be wrong (I have not pedaled two bikes that are identical except for an extra chain).

    2. It might be strictly a matter of opinion. Probably some people wouldn't notice the difference but some people would
    consider it totally unacceptable.

It sounds like (thanks Safe) two well maintained chains would be about the same as one poorly maintained chain and most people probably don't keep their chains properly cleaned and lubricated and don't mind the difference, so worst case if you properly maintain the chains it should be OK.

Thanks!

Mitch
 
MitchJi said:
If the center is drilled out of a large #25 sprocket so it fits on the shoulder of the FW would it be significantly harder to bolt the sprocket to the FW by putting bolts between the teeth on the FW?

That would certainly be doable - though you'd still need a backing ring on the other side of the teeth.

It can be a bit misleading to talk about efficiency in percentage terms because the percentage figure will vary with the torque throughput. Anyway, that works to our advantage :)
 
MitchJi said:
It sounds like (thanks Safe) two well maintained chains would be about the same as one poorly maintained chain and most people probably don't keep their chains properly cleaned and lubricated and don't mind the difference, so worst case if you properly maintain the chains it should be OK.

An interesting logic :mrgreen:
 
Hi Miles,

Miles said:
MitchJi said:
If the center is drilled out of a large #25 sprocket so it fits on the shoulder of the FW would it be significantly harder to bolt the sprocket to the FW by putting bolts between the teeth on the FW?

That would certainly be doable - though you'd still need a backing ring on the other side of the teeth.

Would you please explain what backing ring is and why its required?

It's roughly 3:30 am in the UK. Don't you ever sleep :eek:
 
Although I personally like the ENO FW approach, with the modified chainring adapter, I found this FW adapter while looking around: http://www.electricscooterparts.com/sprockets.html#fw It is designed to fit a number of their #25 and 8mm sprockets. I don't know anything about the quality of these, but it would give a bolt-together solution for somebody looking to use a smaller pitch chain for noise reduction. This is something I'm considering in order to cut down the racket on my Cyclone 1000W setup.

-- Gary
 
Hi,

I contacted several machinists/shops about making FW adaptors for 1/2" shafts. I found someone (Google) who said he would do it for about $11 each. The cost would vary depending on the material you want him to use. I told him I thought one setscrew would be sufficient.

I sent Matt a PM with the contact information in case he wants to go with 1/2" FW adaptors for his drive.
 
Thanks Mitch! I called Jason. I am ordering 30 steel and 30 aluminum adaptors. Big expense, but it should pay off.

Anyway, I need this thing drawn up in CAD. Anyone up to the task? :wink:

Matt
 
Hi Miles,

MitchJi said:
If the center is drilled out of a large #25 sprocket so it fits on the shoulder of the FW would it be significantly harder to bolt the sprocket to the FW by putting bolts between the teeth on the FW?

Miles said:
That would certainly be doable - though you'd still need a backing ring on the other side of the teeth.

MitchJi said:
Would you please explain what backing ring is and why its required?

Miles said:
I mean something like this:

With a sprocket something like the following, with the center drilled out to snugly fit the shoulder of a FW and bolted to either the teeth or the slots on a 22t Eno why is the backing ring required (sorry if this is obvious to everyone else)?
127-3_sp-100.jpg

http://atv.trinketssales.com/store/products/127-3_sp.html
47 Tooth Sprocket Used With #25H Chain...
Inner Diameter: 29 Mm (1.14 In.)

recumpence said:
Thanks Mitch! I called Jason. I am ordering 30 steel and 30 aluminum adaptors. Big expense, but it should pay off.

Anyway, I need this thing drawn up in CAD. Anyone up to the task?

Matt

Gary and I plan to use 2 FW adaptors back to back, one with a cog and one with a FW. If using these FW adaptors would place the teeth further apart than necessary it would be nice to get a couple with some minor tweaks to get the teeth closer. Would help me figure out what changes would be required and then either see if you can negotiate a good price as part of the order or let me know so I can talk to Jason about it?

This is so obvious I'm hesitant to mention it but it might be a good idea to check one of the 5/8" adaptors with a White before finalizing the specifications.

Why steel and aluminum? Will aluminum be strong enough?

Thanks!

Mitch
 
MitchJi said:
With a sprocket something like the following, with the center drilled out to snugly fit the shoulder of a FW and bolted to either the teeth or the slots on a 22t Eno why is the backing ring required (sorry if this is obvious to everyone else)?

For the ENO22t slots it would work fine. Teeth on freewheels and sprockets are relieved towards the tips, so the nuts for the bolts would only be partially seated, meaning they're more likely to work loose. You might get away with it, with thread locking, but a backring would be a proper solution. Of course, with 2 chainrings sandwiching the sprocket, it wouldn't be needed.

MitchJi said:
Why steel and aluminum? Will aluminum be strong enough?
Yes!
 
Yes aluminum is strong enough without a doubt.

Jason and I talked about it at length. Steel is nice because I could (in certain circumstances) weld the adaptor to the shaft if needed (I can think of a couple instances that might come in handy). Aluminum is much lighter and can be more easily machined for changes if needed.

One thing I am kind of green on is, I know there are two thread sizes (diameters) on BMX hubs. I know the larger side is the most common. Is the larger thread what we are looking for? Is the smallest tooth count freewheel for our purposes 11 tooth?

Also, I want this adaptor as narrow (least shoulder width) as possible.

Matt
 
recumpence said:
One thing I am kind of green on is, I know there are two thread sizes (diameters) on BMX hubs. I know the larger side is the most common. Is the larger thread what we are looking for? Is the smallest tooth count freewheel for our purposes 11 tooth?

11t? You used to be able to get 12t freewheels for the BMX metric thread but I think the smallest now is the Odyssey 13t.

The smallest freewheel for ISO standard thread is the AC Racing 15t.

How about making an adapter for 30mmx1mm with a threaded add-on adapter to step up to ISO 1.375" x 24TPI? An adapter for the adapter.... :)

One thing to bear in mind is that BMX has mostly gone over to cassette now, so we don't know for how much longer the smaller thread freewheels will be readily available. Anyway, at the moment, the Odyssey is a good choice - it's available LHD, too.
 
There are tons of cog and freewheel choices for the ISO 1/375" 24 TPI version, so why not just pick that for the 1/2" adapter?

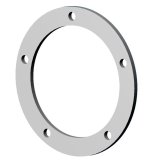
Getting back to the freewheel crank version, what about doing an aluminum adapter plate that would go from a standard 130mm or 110mm BCD, down to a hole that would fit over an ENO 22T FW that could be used with trials cranks? That would eliminate the need for having to drill out the Cheese Monkey adapter shown below:

BCD adapter.jpg

I have a 3rd folding bike, which is a Dahon 16" Curve D3 that has a 3-speed SRAM hub (similar to the Nexus-3, but with slightly different ratios...) that I'm thinking of going the modified crank route with, using a single-stage eDrive and my Hacker A60-18L. There's not much room for a series drive option, which is why I'm looking at the modded crank route.

The Hacker should work out fine with a single belt drive reduction of around 6:1. On the eDrive output shaft, I can use an 11T cog on one of these FW adapters, and then drive a 56T chainring. Without changing the existing 44T/13T front-to-back pedal setup, it should still provide enough reduction that the torque level is pretty high in low. I don't care about what the top-end does, as I'll never get there on something this size, but my spreadsheet model says top speed in 1st (using 50V as the max, and with the motor kV of 149...) will be about 24-25 mph, 32-33 mph in 2nd and 43-44 mph in 3rd. By comparison, on my current 20" Cyclone 1000W 50V setup, which actually has too much low-end torque, the top speeds are about 20-21, 28-29 and 38-39 mph, respectively.

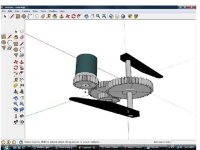
Using the Hacker, with the crank drive, actually brings me full-circle, in a way. My very first ebike build attempt was actually using this same Hacker with a simple drive reduction, based on using large RC helicopter parts. Here's what it looked like:

eBike-Hacker-01.jpg


I mounted the whole assembly on the downtube on my Townie 21, using the water bottle mounts. I set the front deraileur to use the middle chainring, and then drove the largest one from the motor. This setup didn't las long, however, as at the time I didn't know enough about how the freewheel setups work to know that I needed one on the front crankset. The pedals moved with the motor. Also, like the Cyclone setup, this was pretty noisy (small motor sprocket/chording problem...), and as soon as I put a big load on it, the glass-imprgenated hard plastic gear was stripped clean. :mrgreen:

Anyway, after this "learning" experience, I got into big Clyte hub motors. Now, along with many here, I'm ready to revisit making use of highly efficient RC-based setups in much lighter ebike setups.

-- Gary
 
Hi,

Miles, thanks for the backring explanation.

Miles said:
recumpence said:
One thing I am kind of green on is, I know there are two thread sizes (diameters) on BMX hubs. I know the larger side is the most common. Is the larger thread what we are looking for? Is the smallest tooth count freewheel for our purposes 11 tooth?

11t? You used to be able to get 12t freewheels for the BMX metric thread but I think the smallest now is the Odyssey 13t.

The smallest freewheel for ISO standard thread is the AC Racing 15t.

How about making an adapter for 30mmx1mm with a threaded add-on adapter to step up to ISO 1.375" x 24TPI? An adapter for the adapter.... :)

I would like to use White FW's (supposed to be the best) and they use the 1.375" x 24TPI.

Would there be a substantial savings by having adaptors made for the adaptors as compared to just making 2 types of adaptors?

recumpence said:
Also, I want this adaptor as narrow (least shoulder width) as possible.

Perfect (if threaded 1.375" x 24TPI). :)

Gary, very nice job on the Hacker for a first build.
 
Miles said:
Nice compact set-up, Gary. Swap the spur gears for a synchro belt and you could re-use it...

I thought about doing that, but I'd have to move the output shaft away from the motor a bit, in order to get a 72T 5mm HTD pulley to fit. I'd also need a 12mm-10mm bore reducer, but SDP-SI has those. The shaft is hollow, and 10mm in diameter. It is from a Raptor RC helicopter, and it has a one-way built-in, although I wouldn't use it with the big pulley.

Matt's eDrive is a much more elegant solution, but since it is still going to be awhile before he is ready to ship anything, I might just order up a couple of pulleys/belts and do some testing.

I have no idea where I got the sprocket on the output shaft from, I remember I had to drill it out to fit the 10mm Raptor shaft. The flanged bearings I got from BocaBearing, a higher-end RC supplier, and the collars came from the Raptor as well. Anyway, I want to replace the sprocket, which is 9T, I think, with a larger cog/FW adapter setup (12T?), to get the "chording"-induced (I learned a new word, thanks Miles... :)) noise down to a minimum. I wish I could remember where I got the 9T one from, because I remember they had larger ones as well. In any case, I will order a couple of the 5/8" adapters, and try it with a 5/8"-10mm bore reducer.
 
I like the gear drive idea a lot GG. That's what I've been thinking about for the past couple of weeks. Were the gears noisy in your setup or just the chain portion? I've read a bit about how lowering your pitch angle to a 14 can quiet the gears a bit.

I have also been planning a dual freewheel on the crank except I'd like to use a a spur/ring gear instead of chain drive. I don't think it will be a big problem to enclose the first two stages of gears to keep the noise down; however I'm unsure of what the driven gear connected to the crank would sound like. Does the pitch of the gear affect the noise level, I'm thinking something in the 20 pitch area would be good for what I'm doing, but before I order I'd like to see if someone else has "gear" experience and might know of some ways to keep the noise down.
 
This may help a bit as far as what I was thinking about.
 

Attachments

  • trans3.jpg
    trans3.jpg
    34.6 KB · Views: 4,091
I don't think using gears is a viable option. The large one I used is made from very hard glass-impregnated plastic, and it didn't last a minute, before the teeth were striped clean. Using all metal won't work either, as metal-on-metal causes excessive wear. I think the 15mm HTD belts will work fine as the first stage, using most any RC motor I know of, but with the extra torque the input to the next stage will have, I don't think the same sort of belt drive can handle the power. If it is a two-stage version of a drive like Matt's, a chain drive is warranted, I think.
 
Hi All,

gary, thanks for posting that picture, very impressive indeed imo.
looking at your hacker gb does make me think that i certainly could get a dual stage behind my seatpost :D
what are the measurements on that unit? - all i would need is another shaft reversed and i'd be set - that shows a 6-1 reduction yes? so if im using 2 x 4-1 i would guess that is doable in not much more space?? i think it's very very good, did you build it yourself??
if i could get matt to make me a gb in that exact fashion id be a happy bunny - do you think it could use that exact setup but be made compact in a width sense? it may help with the output shaft flex issue also if a third wall was added?


Cheers,

D
 
This was a one-of, test unit, that I made out of aluminum plates. If I was doing it again, though, I'd use U-shaped stock. The ratio is 6.33:1. To get close to the same with an HTD belt drive, I will need to move the shaft over about 1-1/4". I'll probably try doing this, just to have somethig to test, but the "permanent" solution for me is still to use Matt's unit, which is a much more elegant design and doesn't take up any more space.

I still think a two-stage version of Matt's unit, "unfloded", will easily fit behind your seatpost.
 
Back
Top