Lambretta conversion

Lammy

10 mW
Joined
Feb 12, 2023
Messages
20
Hello everyone, new member first time posting to introduce myself, serial tinkerer and restorer of old things, coffee machines, houses, computers and scooters. Literally zero technical knowledge of anything but a keen student of specialist forums to gain the answers and ideas to undertake the latest obsession.

I have a new project in mind which is to convert my Lambretta series 3 scooter to electric power.
I bought the scooter as a wreck fro Italy 20 years ago and had a lot of fun restoring it to its original glory. It has sat now unused for many years and I had decided to sell it as a polluting 60 year old 2 stroke motor is neither a practical, ethical and or even legal mode of transport. But then the thought struck me that if I could convert it to electric power, it would be the perfect way to keep it on the road.

The original specs are:
Capacity 125cc
Power 5.5hp @ 5200rpm
Weight 105kg
Speed 80kph

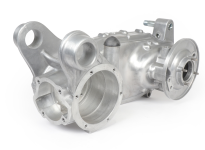
The simplest solution is to purchase the Retrospective Scooters hub drop in kit which is a hub motor in a custom swingarm, but it is very expensive, not very pretty and also not really much of a project. I may end up opting for a hub motor solution but it is my least preferred option as it loses the looks of the aluminium gearbox and the enjoyment of having gears.
Instead I am wanting to explore 4 ideas all of which are impacted by the limited space available and which will also require varying levels of new component fabrication/ alterations to the existing scooter.

1- Motor mounted in the flywheel location in line with the crankshaft.
2- Motor mounted in place of the cylinder running parallel to the crankshaft a belt or chain transfer to the end of the crankshaft.
Or more left field ideas:
3- Motor mounted in place of the cylinder perpendicular to the crankshaft with a bevel gear drive to the crankshaft.
4- Motor of a small enough diameter to sleeve into the crankcase and directly drive the primary chain sprocket.

I am drawing up a very basic GA drawing of the space available but already it is very clear that that finding a suitable motor that is compact enough to fit in the available locations is going to be a challenge.
I will post my drawing when I have finished it as well as some photos and will hopefully be able to talk to some of you about how to find a solution.
 
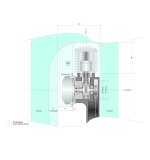
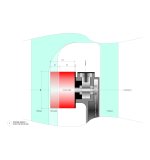
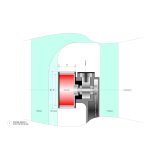
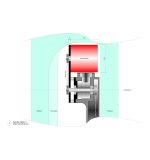
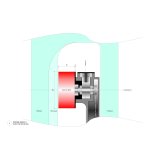
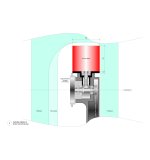
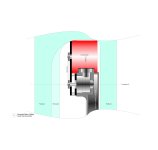
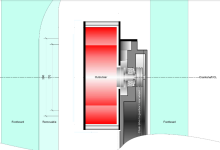
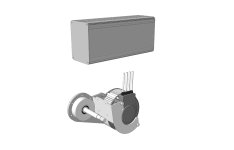
I have got a bit further with working out the basic spec and mounting options for this conversion. Below are 6 very simple plan views, the first shows the existing engine, gearbox and surrounding body work and the dimensions of the available space, the 5 others show different options for mounting various types of motor and the maximum size available in the position shown.

Sht-1-Sheet Title.JPGSht-2-Sheet Title.JPGSht-3-Sheet Title.JPGSht-5-Sheet Title.JPGSht-4-Sheet Title.JPGSht-6-Sheet Title.JPG

Because the goal is to retain and use the existing 4 speed gearbox and clutch I am looking ideally to match the power and rpm range of the existing ICE. Also in the UK a 125cc class motorbike can have a maximum power of 11kw or 0.1kw per kg, as the bike weighs 100kg a motor with a rated output of 10kw would be my preferred choice. I would also definitely prefer to avoid having to ‘overclock’ the motor to achieve the required specs and would like to be able to utilise readily available and user friendly controller and battery options to provide the power and range.

Based on this and the available spaces I am beginning to look at a list of dimensionally suitable motors:

Neumotor 4420
Plettenberg Nova 15 or 30 (hard to say which as the power ratings claimed are peak output)
KO R/S blue (Sur Ron upgrade)
Heinzmann PMS150
Axial flux type motors e.g. Embrax 188 but a lower power option.
A general spec of Outrunner type motor approx diameter 150 to 180mm. E.g. Freerchobby MP 15470.

Obviously the first 4 motors on the list are not cheap , I was hoping that either the QS 180 or the Golden motor 10kw would work but I can’t make them fit in the available locations. The other lower cost option appears to be an the outrunner motor, affordable, lightweight easy to source but is it suitable for the continual acceleration, deceleration and general shocks of road use as opposed to powering a paramotor or drone?

If anyone would like to chime in with their opinions and thoughts, I would be really interested and very grateful.
 
Scooters of this type have precious little room for the battery and controller. As a result, most of the conversion examples are a hubmotor, as you noted.

Unfortunately, this means there will be few examples of a non-hub conversion. Your project is definitely worthwhile, but you may be "on your own" for most of it.

Best of luck. If I may make a suggestion, seriously consider 48V or 52V, since they can run a "48V" nominal inverter, to provide 120V AC during a power outages.

If yes, choose the remaining components for high amps.
 
The transmission and the drive train were needed to produce a range of speeds from the narrow torque and rpm range of the IC engine. The beauty of DC motors is their ability to produce power over a wide range of rotational speeds.

Seems like the gear train might only be a source of mechanical loss. Why do you want to retain it? I can see retaining the final drive if it moves the motor from being un-sprung weight to sprung weight, but I'm not seeing the value of multiple transmission ratios? I'd be looking to lose that weight.

The performance of a 5.5hp IC engine should be able to be duplicated with ~4 kW DC motor. I would think a look at the torque curve vs. rpm range of candidate motors would guide the drive train design. I'd also start making some preliminary calculations of range vs. battery capacity and try to get a rough idea of the mass and volume of that component. I'd want to plan how to address this early in the design process.

We can still license and ride our 2 stroke Lambrettas here in the USA, but they are rare, and command a good price, even as hulks. Indeed, brand new 2 stroke scooters were still being sold here as recently as 2009.
 
If you want to go mid drive then look up the QS165 motor. You can bypass the gearbox and use a single speed reduction gearing that suits your use case and top speed.
 
Thank you all for your replies.

Although the hub option is the practical one, I really want to preserve as much as possible the aesthetic of the scooter and to me the lovely cast aluminium transmission / swingarm and rear hub are very much part of that.
I agree that room is limited in a scooter for batteries and a controller. The most obvious is the fuel tank and tool box area - I used to be a prototyper / modelmaker so I would like to fabricate a vac formed case that resembles these.
Another option is that I have a spare wheel carrier, this can either sit behind the rear saddle or replace it, I could fabricate a suitable case to attach to this which could be as basic as carrying a spare pack to swap in on longer rides or could be wired in permanently.
Also there used to be a market in storage compartments that fitted to the inside of the leg shields again this could be an option.

Re the gearbox / clutch I had considered this from the perspective of low speed control with the original ICE a Lambretta is a bit unwieldy at low revs and judicious use of the clutch and gears is needed in traffic etc, however I agree that with the right motor and a well set up controller maybe it would be more efficient to simply run a 1:1 set of gears on the rear selector trees. Or even completely remove the gear plate at the back end and run a direct chain or belt drive from the primary to the drive shaft.

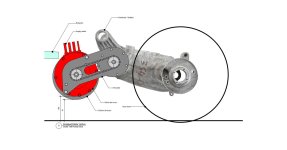
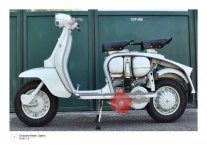
I have made a bit more progress with motor exploration, I am discounting the flywheel location as it is too tight and will load a lot of weight off the centreline of the scooter. The issue I have had with the location in place of the cylinder head is the limit this places on motor diameter. This is why I was looking at the Plettenberg / Neumotor options as they offer some smaller diameter inrunner motors with the right Power, Kv, Voltage and Amp specs. However with a bit of further exploration I think I can partially drop the motor below the footboard so its bottom edge will sit at the same height as the bottom of the exhaust this will allow me to accommodate a 190mm + dia motor which opens up a lot of more affordable options from QS or Golden Motor. PS this isn't my scooter shown below - although mine is identical but mine is stuck in the garage so I couldn't get a good side shot.

I should point out that although I have shown the chain link from the motor to the crankshaft as 1:1 this would be where I could tailor the reduction ratio to the RPM of the motor depending on KV and Voltage etc.
001.JPG002.jpg003.JPG
 
One can't butcher the case and mount the motor further inboard with its axis on the existing crank location?

Like this?:
1676752882180.png
 
One can't butcher the case and mount the motor further inboard with its axis on the existing crank location?

Like this?:
View attachment 330424
Unfortunately not, as the mounts that attach the case to the frame are cast in at this location so removing so much of the casting here would leave little or no attachment. I did look at using an outrunner there due to the narrowness of them but I'm not convinced at all that it would be suitable.1676905596607.png
 
Last edited:
As a direction of travel, bearing in mind that at this stage I haven't even dropped the motor out of the scooter:)
I am going to go with the Sur ron / Sur ron based solutions as this gives me an ecosystem for headlights, 'throttle' control, brake lights etc as well as several options for motors and controllers.

The cheapest but lowest powered option is the second hand motor and controller off ebay route.
Next up would be to source these new.
Next would be a QS 165 and a KO Nano controller.
Most expensive a KO RS motor with a KO Nano controller.

I want the option of a removable battery pack for charging at my desk and slotting this through the tool box door, into the space made available by removing the tool box / air box and fuel tank. Sadly the toolbox door is 20mm too narrow for either the standard or an upgraded Sur ron type battery pack so instead I could use an off the shelf aluminium electronics enclosure cut to custom length to house the pack.
I have sourced one online that would give me an aprox battery volume of 120mmW x 180mmHx 360mmL.

As a starting point to explore the battery pack options, here are the basic specs for the KO Nano controller (which works with either the stock Sur ron, QS or KO motors). I will contact the UK distributor for more detail.

NOMINAL BATTERY VOLTAGE - 60 & 72V
MAX PHASE CURRENT - 520A
MAX CURRENT 210A
PEAK OUTPUT POWER - 17KW
INGRESS PROTECTION - IP67
OPERATING TEMPERATURE - -25—80℃
MAXIMUM EFFICIENCY - >95%


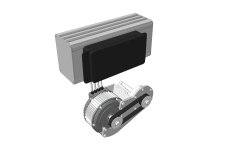
I have begun to work up the componentry for the motor, controller and battery in 3d to work out the packaging, I wish someone had a 3d cad model of the series 3 frame and engine casing, but this will allow me to make a very basic physical mock up to test.

P2-Sheet Title.JPGP4-Sheet Title.JPG
Beleo
 
Last edited:
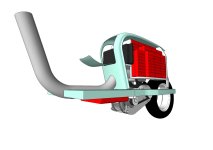
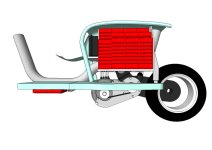
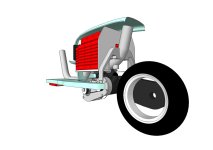
Hi I have spent a little while finalising the packaging of the components. I found some original frame drawings for the Lambretta and in combination with my own measurements have been able to rough out the envelope that I have to work in. Short of 3d scanning the body work (why didn't I get the iphone with LIDAR) I have to work on a conservative estimate as to the volume available but I'm pretty happy.

For the pack, I realised that my pipe dream of a slide in battery box would be woefully low in volume, so instead I hope to use Agniusm's 8P 3d printed modules for 18650 cells. It's a more costly option with less density, but it will allow me to self build the modules and to assemble them to suit the space available, defined by the suspension mounts, frame and the body panels.

So far I have been able to accommodate 50 x 8cell modules within the main body and I have the option if it will work connections wise to house 8 more 8cell modules beneath the floorboards. In theory this gives a total of 464 cells which is nearly 20KG!
The Nano controller as described in my previous post is mounted in front of the main battery assembly which gives access from the tool box door, I think there is also space there to mount the BMS.

So now that I have had my fun working out where to put everything, I realise how little knowledge I have of electrical theory. My starting point is to say that with the motor and controller I have chosen I would require between 60 to 72V and power output of 8 - 10KW and that I have 50+ modules of 8 cells connected in parallel (I assume).
I guess the lazy option here is to ask can someone tell me what brand and model of cells to buy and tell me how to connect up the modules to give me the combination of watts, volts and Ah that works in which case I might as well pay Retrospective Scooters to fit their hub drive conversion for me and be done!

What I would really like to get to is an understanding the how and why of it, so please anyone who wants to take the time to suggest any good learning resources or even better to explain the theory behind batteries and motors I would be really grateful. Front 1.jpgSide 1.jpgRear 1.jpgBelow 1.jpgBatteries 2.jpgBatteries 1.jpg
 
Just a quick investigation of 3 possible battery configurations using NESE modules by Agniusm.
Looking at 3.6v Li - Ion cells in different combinations of the NESE parallel modules to give a range of Ah and Amps. These parallel modules would be connected in 20 series to give 72V
I have also factored in 2 different cell types for a cost comparison.

Definitely would appreciate any feedback.

Cell Options;

Samsung 30Q / 30Q6
3.6v 3000mAh 15A 48grams
£3.78 www.cellsupply.co.uk

LG MJ1
3.6V 3400mAh 10A 47grams
€3.35 www.eu.nkon.nl

OPTION 1: 16p (2*8p modules) x 20s = 320 cells

40 NESE 8p modules = £478

Samsung: 16p x 3000mAh = 48Ah / 240A / 15.4kg / £1296

LG: 16p x 3400mAh = 54.4Ah / 160A / 15kg / £944

OPTION 2: 18p (3*6p modules) x 20s = 360 cells

60 NESE 6p modules = £631

Samsung: 18p x 3000mAh = 54Ah / 270 / 17.3kg / £1360

LG: 18p x 3400mAh = 61.2Ah / 180A / 16.9kg / £1062

OPTION 3: 20p (4*5p modules) x 20s = 400 cells

80 NESE 5p modules = £802

Samsung: 20p x 3000mAh = 60Ah / 300A / 19.2kg / £1512

LG: 20p x 3400mAh = 68Ah / 200A / 18.8kg / £1180
 
Last edited:
Your system voltage is your constraint how many modules you can fit. For 72V nominal it is 20 modules in series and you can do multiples of that, so 20 or 40 or 60 and so on. 40 will be 20s16p with 8p modules 60 modules will be 20S24p etc.
 
You started out by doing math to determine what different configurations would cost, weigh, and perform at max spec. Additionally, I encourage you to look the other way and determine the minimum spec you need from cells.

To do some math:

Peak output power required, per above: 210Amps.

210A peak / 16 parallel cells = 13.1A per cell peak

That rules out the LG MJI, which is rated at 10A per cell.

The 30Q is somewhat notorious for voltage leak and balance issues, and I’d be reluctant to use those cells in a big pack. Ditto because the 30Q also ages rather rapidly towards 70% capacity after about 250 cycles, if memory serves.

I’m assuming you are committed to the 18650 form factor since you want to use the NESE modules?

I can’t comment what the very best cell is for you — but ES members have had good luck with the 20A capable Samsung25R cells. Granted, it’s an older cell and maybe there something better for your application.

Fitting more than 16 cells in parallel looks like it will open more options for you, including the option to use cells that are more energy dense and less power dense. But you do have a few choices with the 20s16p configuration.

Lastly, I have never used and don’t have much knowledge about the NESE modules. But my first impression is that I don’t feel great about building a pack of this size that will pass 200A plus through those snap-together modules. I’m not trying to write them off or discredit them — maybe I’m misunderstanding how capable those modules are. But it seems like building a large, powerfully battery out of 40 separate modules with 40 bolted wire connections leaves much room for mishap.

My two cents! Keep it up- I’m curious to see where this goes for you, whatever you decide.
 
Thanks for your thoughts. I think I should point out that I am learning to walk while at the same time resisting the urge to enter the 100m sprint final, it's just enthusiasm on my part! That is why I am so keen to get as much input and feedback as I can as I iterate the design.

I have been putting a bit more detail into understanding the criteria for this conversion.

A Lambretta 125cc produces 4kw of power @ 5000rpm geared to turn those little 10" wheels for a top speed of 71kph
I would like for the cost of the conversion to match the standard specification of say a TV175 or GP 200
so an output closer to 8kw @ 4500rpm geared for a top speed of 100kph.
So for 8KW I was thinking of a motor running at 72V and 120A continuous, the Lightning Rods XXL matches this spec with a Kv of 62RPM allowing me to get close to the reduction ration available from top gear in a TV or GP/. The motor weighs 8kg.

In terms of range, the hub motor conversion from Retrospective Scooters claims a range of 100+km with a 4kw motor and a 72V 58Ah battery pack so my aim would be to get close to that in terms of pack Ah, although with a higher draw from the motor I wouldn't expect that sort of range.

I did a bit of a weight loss calculation and losing various ICE components as well as fuel tanks, toolbox etc there is a 38kg reduction in weight.
I would like to avoid exceeding that with the battery, controller and motor.

I have the fabrication and design background to be comfortable with the mechanical build aspects, but the battery pack assembly theory and practice is daunting, hence the preference for the NESE units - on face value they eliminate the QC issues that I would face spot welding a large battery pack together, as well allowing me to test each module as I assemble it. They also perhaps lend themselves to a rigid and secure packaging solution which in itself can help to reduce mechanical fatigue and stress? I also wondered about the idea of soldering the screw connections as a threadlocking measure.

The risk management calculation for the battery pack seems to distil down to:
1- Trying to spot weld a pack of this size, tried and tested but is it within my skill set?
2 - Purchasing a custom built pack from a 3rd party supplier of unknown quality.
3 - Using an alternative build method such as the NESE modules and putting as many safeguards as I can into how I mount and package them.
I guess that is another thing I need to put more research into.

Can I ask regarding the peak Amp draw of the motor is this something that I can put an upper limit on through the controller setup to balance the Amperage requirement of the cell specification?
 
Last edited:
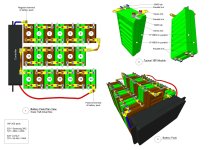
This is my initial attempt at a pack design, I would be interested in any thoughts regarding the general layout and very definitely the correctness of the theory. The green and brown colours are simply to show that each pair of NESE modules is a 16P cell. The middle row of modules is raised up in order to clear the central frame tube.Battery GA.jpg
 
Last edited:
You started out by doing math to determine what different configurations would cost, weigh, and perform at max spec. Additionally, I encourage you to look the other way and determine the minimum spec you need from cells.

To do some math:

Peak output power required, per above: 210Amps.

210A peak / 16 parallel cells = 13.1A per cell peak

That rules out the LG MJI, which is rated at 10A per cell.

The 30Q is somewhat notorious for voltage leak and balance issues, and I’d be reluctant to use those cells in a big pack. Ditto because the 30Q also ages rather rapidly towards 70% capacity after about 250 cycles, if memory serves.

I’m assuming you are committed to the 18650 form factor since you want to use the NESE modules?

I can’t comment what the very best cell is for you — but ES members have had good luck with the 20A capable Samsung25R cells. Granted, it’s an older cell and maybe there something better for your application.

Fitting more than 16 cells in parallel looks like it will open more options for you, including the option to use cells that are more energy dense and less power dense. But you do have a few choices with the 20s16p configuration.

Lastly, I have never used and don’t have much knowledge about the NESE modules. But my first impression is that I don’t feel great about building a pack of this size that will pass 200A plus through those snap-together modules. I’m not trying to write them off or discredit them — maybe I’m misunderstanding how capable those modules are. But it seems like building a large, powerfully battery out of 40 separate modules with 40 bolted wire connections leaves much room for mishap.

My two cents! Keep it up- I’m curious to see where this goes for you, whatever you decide.
I think I see what you’re saying here, if I look at it with perhaps less focus on max voltage and a more balanced equation, why not look at 21700 cells with a higher energy density which would allow for higher peak draws from the battery and also provide the same wattage of power output at lower voltage i.e less series connections required? Smaller, less weight and probably a similar cost for the cells. Although I do then run into the issue of the kv of the motor x lower voltage dropping the rpm.
 
I’m not advocating that you drop the voltage of your system— if anything, I was trying to indicate that the MJ1 cells you first mentioned are not up to spec if you need to draw 210 peak amps from 16P cells.

Moving up to 21700 cells presents some good options. Many people have had good luck with Samsung 40T3 and Molicel P42A cells. I think you need to decide how the pack is going to come together / where it will come from before diving into the specific cell choices… or rather, these two decisions can happen together.

To answer one of your questions: Most controllers of the size, spec, and capability you’re looking at (handling 8kw) will allow you to put a cap on battery amps.
Yes I just did a basic calculation using the Samsung 40t cells, just using equivalent overall cost as the denominator a 16p 20s pack built around 40t would offer 64Ah and 560A and not much extra cost, although an extra 5kg of weight. Alternatively if I want to stay at 15kg, 12p 20s is still a reasonable 48Ah and 420A. It’s also quite a bit cheaper and saves a bit of space.
Obviously the cost calculations are all dependent on available stock at the right supplier, because prices really do seem to vary a lot.
 
There is no difference in capacity 18650 vs 21700. Its same lithium cell in a different package. If you would use NESE, then you look at what will package best in your given space and even then its very close. There are great cells in 18650 and 21700 are the most deviating from the standard dimensionally. Since you have outrunner, you can gear it the way you like. Hub motors are harder to manage and are tied to your system voltage. I built a bike for my brother, for farming, going arround electric fences, its 12S but its a beast. We had to put smaller sprocket to tame it down:
20150513_165433.jpg


Its easier to work with lower voltage if you can package it for desired wh.
Regarding NESE power, i have 18650 20S7P sony vtc6 battery on my bike which does 75kph and i pull no more that 140A peak. Its a heavy bike and my crew makes it even heavier(i dont drive past 30kph with kids and trailer :) ):
FB_IMG_1653467638081.jpg
NESE can put out lots of power if you build it right and do occasional maintenance, like checking bolts yearly, using Loctite etc.
I would check that motor curves and see where its most efficient and go with that voltage for my system if battery packages well into that space given you can play with your gearing.
 
Last edited:
There is no difference in capacity 18650 vs 21700. Its same lithium cell in a different package. If you would use NESE, then you look at what will package best in your given space and even then its very close. There are great cells in 18650 and 21700 are the most deviating from the standard dimensionally. Since you have outrunner, you can gear it the way you like. Hub motors are harder to manage and are tied to your system voltage. I built a bike for my brother, for farming, going arround electric fences, its 12S but its a beast. We had to put smaller sprocket to tame it down:
View attachment 330825


Its easier to work with lower voltage if you can package it for desired wh.
Regarding NESE power, i have 18650 20S7P sony vtc6 battery on my bike which does 75kph and i pull no more that 140A peak. Its a heavy bike and my crew makes it even heavier(i dont drive past 30kph with kids and trailer :) ):
View attachment 330826
NESE can put out lots of power if you build it right and do occasional maintenance, like checking bolts yearly, using Loctite etc.
I would check that motor curves and see where its most efficient and go with that voltage for my system if battery packages well into that space given you can play with your gearing.
Two very different but both awesome bikes! I bet your crew enjoys that. Thanks for your thoughts, i think it is all a compromise between space, weight, cost, power, range etc, I just need to work out what I want to prioritise. I have a more refined layout designed around the NESE housings, I will export it and post it here, if you have time to look at it I would be interested to hear what you think.
 
You can contact me via email as you did with cad files you have for space and i could take a look and give you my 2ct
 
I have an ASI controller that I want to protect from in rush when connecting the battery. To do this the manufacturer recommends using a 250 ohm 30watt resistor wired in parallel with a circuit breaker. So with the circuit breaker open the battery can be connected, the resistor prevents a sudden surge of current damaging the controller then the breaker can be closed to allow the full current to the controller.

The circuit breakers I have found rated at peak amps of the pack 350 amps are only rated for a maximum of 48v the pack is 20s so 72v.
I would rather rely on a fuse to protect the controller and rely on the breaker only as a switch to isolate the pack.

My question is I assume that the sensible placing of the fuse is between the battery pack and the breaker and for a 20s pack with a nominal peak discharge of 350amps what specification of fuse and holder should I be looking for
 
So, this response is kind of long, and indirect, but that's because fusing / etc can be complicated. The first part covers the precharge stuff, with math.


I have an ASI controller that I want to protect from in rush when connecting the battery. To do this the manufacturer recommends using a 250 ohm 30watt resistor wired in parallel with a circuit breaker. So with the circuit breaker open the battery can be connected, the resistor prevents a sudden surge of current damaging the controller then the breaker can be closed to allow the full current to the controller.
That's one way to design it.

You may not need a huge high wattage resistor. How long will the precharge current flow?

Realistically you have basically reached full voltage by the time five or six RC time constant periods have passed. RC time constant - Wikipedia
The RC time constant, also called tau, the time constant (in seconds) of an RC circuit, is equal to the product of the circuit resistance (in ohms) and the circuit capacitance (in farads), i.e.

τ = R C \tau =RC [seconds]
It is the time required to charge the capacitor, through the resistor, from an initial charge voltage of zero to approximately 63.2% of the value of an applied DC voltage, or to discharge the capacitor through the same resistor to approximately 36.8% of its initial charge voltage.

We'll call that RC constant T. The current will change smoothly in a curve over the entire time, but for the math below we will assume it drops in steps to make it simple (and it will give a worse-case result, so you will actually have *less* power dissipation need than the math implies).

Let's say your ASI has 2000uF of capacitance (could me a lot more, or a lot less; you can add up the uF on all of the capacitors that are across the battery + and - bus lines to get this number).

T = 2000uF x 250ohm = 500000us = 500ms = 0.5s.

How much current is actually flowing?
It gets complicated at this point:
A = V / R
(ant sees the vulture over the rock)
84v is the full charge of 72v, and is the difference in voltage between battery and controller at connection.

84v / 250ohm = 0.336A = 336mA for the first T, or the first half second.

The second T the voltage difference is only 36.8% of 84v, or 30.912; we'll call it 31v.

31v / 250ohm = 0.124A, for the next half second.

36.8% of 31v = 11.4v

11.4v / 250ohm = 0.046A

36.8% of 11.4v = 4.2v

4.2v / 250ohm = 0.017A

36.8% of 4.2v = 1.55v

1.55v / 250ohm = 0.006A

It's basically at full charge at this point, and honestly wouldn't have significant difference even after just 2T, or one second.

How much power is that?
W = V x A

84V x 0.336A = 28.2W
31V x 0.124A = 3.8W
11.4V x 0.046A = 0.5W
Etc.

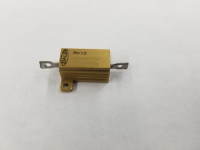
So with that, you could probably use a 5W or 10W precharge resistor, hard-mounted to something that will help pull the heat out of it (metal frame, etc) or that is in open air to dissipate the momentary high heat from the first half second (really less than the first tenth or two). One of the little metal-encased types with screw mounts is easiest.
Random google find
1690837993377.png


The circuit breakers I have found rated at peak amps of the pack 350 amps are only rated for a maximum of 48v the pack is 20s so 72v.
I would rather rely on a fuse to protect the controller and rely on the breaker only as a switch to isolate the pack.

My question is I assume that the sensible placing of the fuse is between the battery pack and the breaker and for a 20s pack with a nominal peak discharge of 350amps what specification of fuse and holder should I be looking for.

For this situation, the breaker will then need to be rated so it will only pop at a higher current than the fuse, so the fuse is all that will ever break the circuit for an overcurrent. You'll have to check the datasheets for each one you pick to see that the trip current vs trip time will always be higher on the breaker than the fuse.

Fuses and breakers don't just pop or trip at their rated current--they take time to do this, more time the lower the current is vs that rating. It can take dozens of times that current to "instantly" trip; the datasheet for one will show this curve so you can pick the response you need.

A datasheet from a specific model from a specific manufacturer only covers *that one*, so if you don't have a datasheet for a fuse you want to use, like generic aliexpress/etc stuff, you cannot know what it will do without testing it yourself under real-world conditions. :(


The fuse will need to be rated for a minimum of 84v (highest voltage the pack will charge to). You can choose one that's much higher if you have regen braking so that in the worst case event of a severe overcurrent event (blown controller during regen, etc) during braking it will still open the circuit. (braking can create much higher voltages than full charge, which is how it forces current back into the battery--the controller should regulate this but in some failure modes it does not--sometimes the lack of regulation is what blows the controller).

The fuse (and breaker) should be rated for at minimum the max current the system will ever normally see, so it can never blow under normal usage.

Normally you would rate the fuse to protect your wiring, so above the max current but below that which would damage your wiring, connectors, etc., to prevent a fire. If there's a direct short in the system from B+ to B- somewhere past the fuse, for instance, and the wiring wasn't limitng the current by it's resistance to below what the fuse quickly blows at, the fuse would just pop. If it's a higher-resistance short that still draws more than the wiring can handle, so it would overheat, the fuse may take longer to blow, but should still be rated to blow reasonably quickly (before insulation could fail/ignite), yet still above what your system will normally draw.

What it should be rated for above that point depends on the level of protection you want and the specific fuse (and breaker) ratings. Usually you want it to blow really fast in case of a high enough overload, so that it can't damage your wiring. Electronics will usually have already failed and be *causing* the overload, and would usually need ultra-fast-blow fusing to protect them anyway, rated below their maximum current ratings, which may interfere with your usage of them (since most of the controllers/etc appear to be rated right up around the max their parts can handle, rather than leaving large 25-50%+ margins that good engineering practices would normally suggest).


The "pack amps" max rating should be what the BMS itself will turn off at. Some BMS are programmable for this, if you need less current than it's max setting allows. But the fuse wouldn't need to be protecting at that current level, so would be rated to not blow there.

Some BMS are improperly rated, where they use the max tolerance of the FETs/etc, so that operating them at or above that risks FET failure (usually shorted, stuck on), and a fuse rated far enough below that level to quickly protect against this...but such failures could happen fast enough the fuse may not protect unless it's pretty aggressively rated.
 
Well, I don’t think I have ever received such a comprehensive explanation in reply to a question. Thank you for taking the time to set all this out. I have to be very honest and admit that it will take a bit of repeat reading for me to fully appreciate the detail of your answer, but the salient points are pretty clear.

So based on my understanding of what you have written, I think the question here is actual vs claimed ratings, The real world requirements of my set up and wether an underrated breaker is of any benefit or is potentially a hindrance.
The BMS I will be using has a maximum stated current of 350amps and the nominal maximum discharge rate of the cells in the pack is also 350amps, however the ASI controller in combination with the motor won’t be drawing that amount of current so a maximum figure that I would want to work towards would sensibly be more like 250 amps, which gives me some headroom, my inclination at this stage would be to use a known quantity fuse sourced from Mouser or Farnells with a curve that corresponds to 250A 100vdc as the upper end.
With a fast acting fuse in place I think the use of a breaker is both hard to achieve in terms of finding a suitable specification above the fuse ratings and also is to a degree redundant. Instead for the parallel set up to “load” the resistor, I could perhaps use an either battery isolation switch or simply make the physical connection with an anti spark connector such as a QS8 or QS10. I imagine that with a programmable controller and contactor set up this could be an automated process whereby the resistor could be “bypassed” once the microcontroller is instructed that the capacitors are at full charge, but I think for my purposes counting to at least three elephants should suffice🤞.
Unfortunately a little knowledge is a dangerous thing but by asking questions of people like yourself I’m doing my best to become less dangerous!
 
Well, I don’t think I have ever received such a comprehensive explanation in reply to a question. Thank you for taking the time to set all this out. I have to be very honest and admit that it will take a bit of repeat reading for me to fully appreciate the detail of your answer, but the salient points are pretty clear.
If you have a question, just ask and I'll try to clarify with as few words as I can manage. :oops:


So based on my understanding of what you have written, I think the question here is actual vs claimed ratings, The real world requirements of my set up and wether an underrated breaker is of any benefit or is potentially a hindrance.

Yes. Unfortunately the ratings thing is a common problem, and you can really only trust that they didn't overrate the stuff, and sometimes just add yourself a margin on there and say "don't use this part", to be sure when you aren't otherwise.


The BMS I will be using has a maximum stated current of 350amps and the nominal maximum discharge rate of the cells in the pack is also 350amps, however the ASI controller in combination with the motor won’t be drawing that amount of current so a maximum figure that I would want to work towards would sensibly be more like 250 amps, which gives me some headroom, my inclination at this stage would be to use a known quantity fuse sourced from Mouser or Farnells with a curve that corresponds to 250A 100vdc as the upper end.

That sounds reasonable, as long as your wiring in the path can all sustain that current indefinitely.


If you don't find a 100VDC fuse, you can always use a higher rated one.

(many fuses have both an AC and DC rating, but they are usually very different levels because AC has a zero-voltage point many times per second so has a greater chance of extinguishing any arcing that occurs.)


With a fast acting fuse in place I think the use of a breaker is both hard to achieve in terms of finding a suitable specification above the fuse ratings and also is to a degree redundant. Instead for the parallel set up to “load” the resistor, I could perhaps use an either battery isolation switch or simply make the physical connection with an anti spark connector such as a QS8 or QS10.
If you are not disconnecting the battery from the system very often, the separate connector would work fine.

Normally there's no need to disconnect the battery from the controller, just turn controller off via it's KSI / lock / etc input to disconnect it's internal power supply from the battery. If you have a DC-DC, and the keyswitch that controls the KSI can handle it's current, it can also be switched on/off by that, without need for precharge in most cases (they don't usually have big caps in them unless they're big DC-DCs).


If you have to disconnect the battery for (reasons) then a breaker still works, given the considerations noted before.

A battery cutoff switch works, too, as long as it can handle the current. (voltage doesn't really matter because you'll never switch it when current is flowing so it will never arc; at the pack voltage you have even a "12v" one would probably separate its' contacts enough when off to not allow an arc across them. If you had a high voltage pack it might be different).

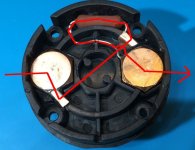
Also...someone here once posted a thread on modifying a disconnect to integrate precharge. For whatever reason they deleted their stuff out of it, but I saved an image before they did:
convert battery cutoff switch to precharge switch.jpg


I imagine that with a programmable controller and contactor set up this could be an automated process whereby the resistor could be “bypassed” once the microcontroller is instructed that the capacitors are at full charge, but I think for my purposes counting to at least three elephants should suffice.

The automated contactor setup would be easy enough. It's been built before....just remember that a contactor requires a separate voltage supply to run it's coil, that is available to it even when the main contactor is open and the rest of the system is disconnected from power. They make contactors with coils rated the same voltage as their contacts, so they can run off the main system voltage, to simplify this and not require a separate battery or DC-DC to run a lower-voltage coil.
 
Back
Top