
You are using an out of date browser. It may not display this or other websites correctly.
You should upgrade or use an alternative browser.
You should upgrade or use an alternative browser.
72v PSI leggo - X5304 Chopper
- Thread starter Ypedal
- Start date
liveforphysics
100 TW
For straight cuts on thin acrylic, the hot ticket it to score it using a straight edge and a razor knife, then bend it along the score line over the edge of a table, and SNAP! You get a nice clean cut if your score was clean.
When doing glass or plastic, NEVER re-score the line. You get one shot to drag the blade through, you need to go fast, with a lot of pressure, and never go back over the score line, or you end up getting a jagged break line.
For making curved cuts and things, put a 1/8" pin cutter in a router table, and slide the sheet through it.
If you gotta make tons of straight cuts, a "tripple-chip" carbide table saw blade does a good job.
Thans for the tips ! 8)
I have a router and bits, but no router table yet ( easy to fab, i know.. but not there yet ! ) .. the table saw with a high tooth count worked very well, it's not a purpose blade but will work for now..
Sometime this winter i'd like to build a small CNC in the garage, a 36" table would be awsome !!.. yet another project to work on.. gulp..
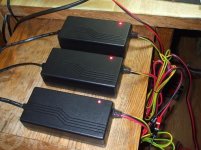
Hey.. can anyone tell me if i can hook up chargers in series ? i have a box of soneil 24v 5 amp chargers, 3 of those in series would make my 72v, otherwise i have to rig taps at the 24v points in the pack, possible but more wires and not as clean in the end..
I have a router and bits, but no router table yet ( easy to fab, i know.. but not there yet ! ) .. the table saw with a high tooth count worked very well, it's not a purpose blade but will work for now..
Sometime this winter i'd like to build a small CNC in the garage, a 36" table would be awsome !!.. yet another project to work on.. gulp..
Hey.. can anyone tell me if i can hook up chargers in series ? i have a box of soneil 24v 5 amp chargers, 3 of those in series would make my 72v, otherwise i have to rig taps at the 24v points in the pack, possible but more wires and not as clean in the end..
slayer
1 kW
Yes you can,
just find your polarity with a voltmeter the reading in plus or minus you will now wich is wich then join them in series check the voltage with the meter as you go along to make sure you got it right and voila
just find your polarity with a voltmeter the reading in plus or minus you will now wich is wich then join them in series check the voltage with the meter as you go along to make sure you got it right and voila
Sacman
10 kW
Ypedal said:Hey.. can anyone tell me if i can hook up chargers in series ? i have a box of soneil 24v 5 amp chargers, 3 of those in series would make my 72v, otherwise i have to rig taps at the 24v points in the pack, possible but more wires and not as clean in the end..
That's the way I charged up my 48V LiFePO4 pack the first 20 cycles while waiting for the real charger from China. I had three 18.5V laptop chargers and put them in series for 55.5V
boostjuice
10 kW
As long as both output leads are 'floating' then your good to go. Sometimes the charger-ve lead is referenced to mains ground for safety which means they will not 'stack'. You could test for this, but seeing as though quality chargers all have short cct protection, the easiest way is to just stack them and see if they go into current limiting protection mode.
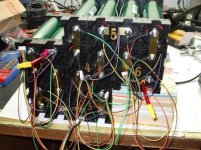
PS....I - Nice pack, very proffessional. You are the ES pioneer of so many custom battery pack fabrication techniques that i am sure has inspired ideas for many others to follow, including myself. Your DIY's kick ass!
Im glad to see you followed my electrical tape layer trick!
PS....I - Nice pack, very proffessional. You are the ES pioneer of so many custom battery pack fabrication techniques that i am sure has inspired ideas for many others to follow, including myself. Your DIY's kick ass!
Im glad to see you followed my electrical tape layer trick!
rkosiorek
100 kW
Lexan would have been about 1/2 the price. scratches easier though. lexan is easier to cut and drill as well.
the soneil 24s10 chargers you have can be connected in series and work very well with this VMS. even though they are set for a 29.2V CV. the reason being that this VMS triggers it's balancing act at a lower 3.5V setting. i.e it was designed to work with SLA chargers. the only issue with the Soneil chargers is that they have a reverse battery polarity protection circuit on the output. the battery needs to be connected for them to start working.
for drilling plastic sheets especially brittle crap like Plexi you may want to invest in a couple of special drills though. a poplar line is imported and sold by Craftics.
http://www.craftics.com/products.cfm?Category=87
same drills but a cheaper place to get them:
http://www.rplastics.com/plasticdrill.html
i wonder why the importer is more expensive than a distributor?
and then there s a pro source that has a much larger selction of sizes including metric:
http://www.thefabricatorssource.com/products/06drills.htm
the first site (craftics) also has these neat "Silicone Strip Heaters" you plug it into 110 and lay this 24" long rubbery strip on the plastic sheet. wait about 3 or 4 minutes. and it will heat the plastic sheet enough for it to bend in a nice straight line. Drape it over the edge of a table and you can make a very sharp bend.
wish i had found out about the strip heaters before i wasted a pile of time and plastic using heatguns and crap.
rick
rkosiorek
100 kW
oh yeah.. i you do invest in the plastic drills do not use them on anything other than plastic. metal will destroy them because the cutting edge is actually too blunt for metal and wood will burn them.
rick
rick
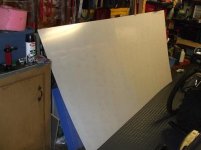
Well, what's worth doing is worth doing in excess huh.. 
Got my hands on a full 4x8 sheet of 1/8" thick polycarbonate, the acrylic was cheaper at 80$ for a 3x8 ft sheet, the lexan was 200$ +tax, .. but i like having extras, this stuff will be usefull in the future, no doubt..
I"ve had good sucess with heat guns and angle iron strips clamped in a bench vice, but thanks for those links, i am ordering a strip heater right now !!! seen some videos on youtube using those.. makes life alot .. ALOT easier..
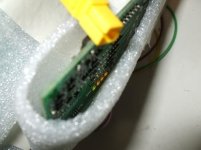
Individually charged each cell with single cell chargers to 100%, am just about ready to hook up VMS for the 1st time !!!
Got my hands on a full 4x8 sheet of 1/8" thick polycarbonate, the acrylic was cheaper at 80$ for a 3x8 ft sheet, the lexan was 200$ +tax,
I"ve had good sucess with heat guns and angle iron strips clamped in a bench vice, but thanks for those links, i am ordering a strip heater right now !!! seen some videos on youtube using those.. makes life alot .. ALOT easier..
Individually charged each cell with single cell chargers to 100%, am just about ready to hook up VMS for the 1st time !!!
Attachments

rkosiorek
100 kW
whoops!!!! my mistake. lexan is more expensive. but more durable and easier to machine. it is what they use for airplane canopies after all.
but those strip heaters work a charm on 1/8" material. 1/4" is a bit trickier. you have to heat both sides of the plastic by flipping it over every 30sec or so.
i also got pretty good results using one i built using part of the heating element from a hair dryer, a decorative aluminum "C" channel and MDF. the idea came from the "mp3car.com" website:
http://www.mp3car.com/vbulletin/fab...-heater-strip-bend-acrylic-30-bucks-less.html
i use my adjustable bench power supply to heat the wire.
rick
AndyH
10 kW
Beautiful work so far! I can't wait to see the finished battery!
You have the 'standard' VMS with the more capable 200mA 'shunts'.
I can report that a cheapie soldering iron makes quick (and stink-free) holes in the assembly blocks. The holes clean up quickly with an x-acto knife (outside) and a quick spin of the drill (inside). It's quick and very controllable.
You have the 'standard' VMS with the more capable 200mA 'shunts'.
I can report that a cheapie soldering iron makes quick (and stink-free) holes in the assembly blocks. The holes clean up quickly with an x-acto knife (outside) and a quick spin of the drill (inside). It's quick and very controllable.
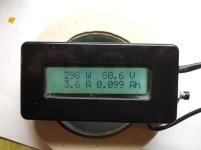
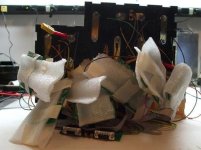
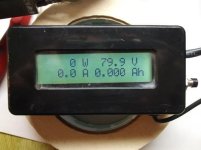
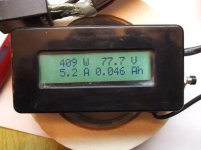
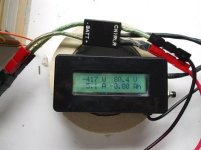
I was connecting the battery on the " CNTRL " side of the CA, and the charger on the " BATT " side.. today i hooked it up leaving the battery on " BATT " and lookie here !
Can anyone tell me why the charger can only push 3.x amps thru one way on the CA and 5 amps on the other ?
Can anyone tell me why the charger can only push 3.x amps thru one way on the CA and 5 amps on the other ?
Attachments
Another observation... When i plug in the charger, the LED"s wake up, but not always on all boards.. i know that if a cell or group of cells have below 8v( 4S ) the BMS will not wake up, but all cells are well above 3v so they should. Somestimes they do.. sometimes they dont.
I have not yet gotten the buzzer to kick in on Overvolt or Undervolt, i plan to drain a deep DOD tomorrow and confrm that it will trigger..
I'm not sold on this VMS thing yet, cell voltages are not ballanced with variance way wider than No BMS that i have been doing on a 48v pack.. but it's early still.. a pile more cycles on the bench and i will either start to see a pattern or dump this VMS and bolt up a Gary and Richard unit !
rkosiorek
100 kW
is this a Cycle Analyst? or is it actually the orignal Drain Brain? my guess is that this is the Drain Brain and not the Cycle Analyst. Hmm?
the Drain Brain uses a different processor and a different algorithym for measuring amps. rather than setting the Value of the shunt resistor you set in a "Scaling Factor" to calibrate the Amp reading. there are TWO scaling factors accessable from the Advanced Setup Menu. kP for Positive Amps and kN for Negative Amps. like as not the kN scaling factor is incorrectly set to properly read negative amps.
rick
Correct ! Drain Brain 1.0.5 ! ( backlit with speedo ) .. i even have the original DB with regular lcd and no speedo option !!.. and a red DB.. don't know how i could survive without them on my bikes..
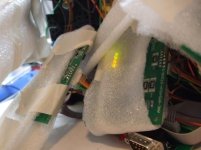
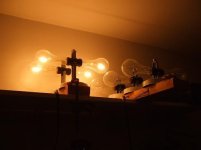
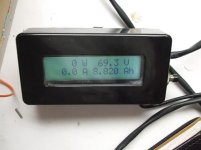
On Sunday night i fully charged and let the pack sit overnight, last night i went for a deep discharge to confirm the buzzer works .. and it does !.. The VMS bleeds off a significant amount of juice, brings all cells to 3.33x volts. Got 8.8ah before i shut down the test.
On Sunday night i fully charged and let the pack sit overnight, last night i went for a deep discharge to confirm the buzzer works .. and it does !.. The VMS bleeds off a significant amount of juice, brings all cells to 3.33x volts. Got 8.8ah before i shut down the test.
Attachments
rkosiorek
100 kW
Ypedal said:Correct ! Drain Brain 1.0.5 ! ( backlit with speedo ) .. i even have the original DB with regular lcd and no speedo option !!.. and a red DB.. don't know how i could survive without them on my bikes..
sometimes i amaze myself. you just have to go into the advanced setup options and setup the "kN" scaling factor so the displayed (-) amps match the displayed (+) amps. depending on which way the thing is hooked up.
Ypedal said:On Sunday night i fully charged and let the pack sit overnight, last night i went for a deep discharge to confirm the buzzer works .. and it does !.. The VMS bleeds off a significant amount of juice, brings all cells to 3.33x volts. Got 8.8ah before i shut down the test.
Don't do this often. but i need to cheer myself up a bit. "I TOLD YOU SO." there i feel better.
did you also get the "72V Active Cut-Off Board" for the VMS from PSI? or are you just going to use the LVC signal from the BMS to trip either the throttle or e-brake line of the controller?
rick
Similar threads
- Replies
- 18
- Views
- 2,799
- Replies
- 7
- Views
- 1,192
- Replies
- 39
- Views
- 15,301
- Replies
- 3
- Views
- 1,418