Bachetta Giro 20 E-Bike - My First

Les Phelps

1 mW
Joined
Jan 27, 2017
Messages
15
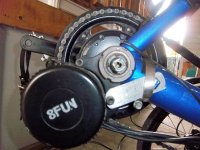
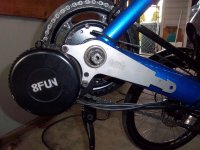
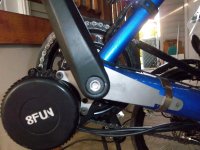
Yesterday, I added a Bafang BBS02 to my Bachetta Giro 20 recumbent.

I'm a complete newbie to E-Bikes. My experience before this week was a 5 mile test ride several years ago.

My wife and I SnowBird in Green Valley located in the Sonora Desert in South Central Arizona. The part of Green Valley where we stay is quite hilly and Southern Arizona is windy during the months we stay here. We normally bring 4 bikes with us. We love riding in Southern Arizona, but there are more days we can't or don't ride, due to high wind or hilly terrain, than days we do ride.

I recently decided to motorize one of the recumbents I brought with me, to expand riding options. As I mentioned above, I just finished motorizing one of my Bachettas.

I test rode it today and WOW! Todays wind was strong enough that I wouldn't have ridden a normal bike. I headed toward some hills that I don't normally ride for a test ride and my decision was vindicated. What an awesome bike.

A note to potential recumbent e-bike builders. You need extension cables for a couple of the sensors and possibly for the power supply, depending on where you place it.

Electric_Bachetta_Small.jpg

Regards,
Les
 
I've ridden the Giro... it's a neat bike. The people at Bachetta have always been very responsive and helpful to me. The only thing I didn't really like is that there wasn't a headrest on the one I rode.

Did you use the existing friction plate to mount? Did the motor move at all on the end of the boom? California Ebikes (Doug) has a bracket that you can use that acts as a sort of torque arm. This has been my concern with the Bafang Mid Drives. That and any shifting on the boom or twisting on the boom.

It's fun being able to ride on windy days and not worry about hills. I've almost been knocked off my bike however from really strong gusts hitting me from the side.

I wonder if Terra Cycle has a mount so you could hang the battery below your seat?
 
Yes, I used the existing friction plate. I originally mounted it with the motor facing forward. I tightened is a much as you reasonably can with the Luna tool. When I first fired up the motor, it immediately rotated where the motor housing is facing up and resting against the tube that sticks up from the front of the frame. I believe it will stay there, held in place by the torque of the motor. When the motor is not running, the friction plate will keep it in place.

The problem with mounting the battery under the frame is the part of the frame that the idler assembly bolts to. I would have to mount it spaced below that. Then there is the chain on the right side of the frame. It might not be possible to center the battery under the frame.

I ordered some panniers. I may just drape the panniers over the battery and leave it on the rack. Alternatively, I may put it in one of the panniers.

Anything more complicated than that will have to wait for spring. My tool bench is 2,000 Northeast of where I am spending the winter.

I'm a fan of Bachettas. I was looking for a recumbent several years ago. I found a guy who was selling two Bachettas. He was switching to Catrikes. I only intended to buy one, but his asking price was so good I bought both. I also have a Strada that will remain unmotorized. It is an awesome bike as is.
 
Les,

These racks are perfect.

http://t-cycle.com/easy-reacher-underseat-racks-c-12/bacchetta-rack-p-116.html

If you put a 500 Wh pack in a pannier on one side, and your tools and stuff in one on the other, You won't feel any imbalance. Or a battery on each side, for real range. Even a single battery, on one side alone, will be barely noticeable to balance, and much easier to deal with than a battery on a rear rack.

Warren
 
Warren said:
Les,

These racks are perfect.

http://t-cycle.com/easy-reacher-underseat-racks-c-12/bacchetta-rack-p-116.html

If you put a 500 Wh pack in a pannier on one side, and your tools and stuff in one on the other, You won't feel any imbalance. Or a battery on each side, for real range. Even a single battery, on one side alone, will be barely noticeable to balance, and much easier to deal with than a battery on a rear rack.

Warren

$10 of hardware and I moved the battery under the left side of the seat. In that position, it actually provides a good counterweight for the drive train hardware on the other side of the frame.

I rode this puppy around 45 miles yesterday and today and still had a fair amount of battery left. My range, it seems, will far exceed my expectations of 35 miles.

Giro_20_Small.jpg
 
Les, that looks nice with the battery mounted low. One concern I've mentioned before is the weep holes built into the BBS02 controller area. They are drilled next to two of the screw heads and when the BBS02 is oriented down on a standard bike they are at the bottom. When mounted on a recumbent boom the way yours is now these weep holes are oriented up so any moisture that collects inside by the controller could be trapped. I have a wimpy torque arm on mine to keep it down because on the very first test it rotated up. It's been fine for two years now, but I'm going to look up that bracket mentioned above from California Ebikes. Another possibility would be to drill additional weep hole(s).

Edit: I ordered the bracket.
 
Hi Les. Congrats on adding an assist to make your cycle more useful. And going safer too as a recumbent. (`Cept yer missing yer tall poles and banners/flag/etc re visibility. ;) )

So winds "got to yah"? Where's yer windscreen? I've been accumulating coroplast plastic election signage to add a detachable shell and plan to add whalebone corset frame support. All to go at least semi-"velomobile" shell body. VERY "aero" doncha know... In "ebike terms" to lower watt-hours "burned" per mile per charges still further (but also can also serve to protect from stuff like strong sunshine and rains and hale and sleet and snow... and etc.) (Also can preserve your drinks and drink holders... etc. Cabin heat anybuddy? Air vents... and etc. And etc.) Lately I've been suggesting folks customize (think unique to your vehicle) to help make it more "less unstealable". See also GPS tracking re security, etc. Don't carry and deal with any locks `round here myself.

Cheers
L

(BTW? kidding about the whalebones but think stuff like a model wood fab w/cloth covering and glue, padding, pockets and mountings... etc). I built tons of plastic models as a kiddo, and imagine taking a similar approach.)

PPS. Yer trike is missing a wheel.
 
Rassy said:
One concern I've mentioned before is the weep holes built into the BBS02 controller area. They are drilled next to two of the screw heads and when the BBS02 is oriented down on a standard bike they are at the bottom. When mounted on a recumbent boom the way yours is now these weep holes are oriented up so any moisture that collects inside by the controller could be trapped. I have a wimpy torque arm on mine to keep it down because on the very first test it rotated up. It's been fine for two years now, but I'm going to look up that bracket mentioned above from California Ebikes.

Edit: I ordered the bracket.

Rassy,

I didn't see a recumbent specific bracket on the California Bikes website. Which bracket are you talking about?
 
This one:

https://california-ebike.com/product/bsb-1-bafang-stabilizer-bar-bbs0102-bbshd/

It's not made specifically for a recumbent boom, but does give you something to get a hold of, and should be a lot stronger than the little piece of aluminum I used which only attaches to one of the BBS02 bolts.

When it gets here and I figure out how to make a solid attachment I'll come back and share a picture.
 
Rassy said:
This one:

https://california-ebike.com/product/bsb-1-bafang-stabilizer-bar-bbs0102-bbshd/

It's not made specifically for a recumbent boom, but does give you something to get a hold of, and should be a lot stronger than the little piece of aluminum I used which only attaches to one of the BBS02 bolts.

When it gets here and I figure out how to make a solid attachment I'll come back and share a picture.

Yes, that will work. I'll have to bend it in and drill a new hole, but it will bolt to the upright "headlight bar" on my Bacchetta.

Unfortunately, that will have to wait until I get home in mid April. I don't have the tools for metal working in Arizona.

On the other hand, it's really dry in Arizona. I should be ok, until I get home.

Thanks.
 
Warren said:
Les,

The battery looks great! What hardware did you use to mount it? Hose clamps, U bolts?

Warren

The frame for my stock seat has a vertical plate below each side of the seat, with two hole about 3 3/4" apart. They appear to be designed for adding things below the seat. Way to go Bacchetta!

I got two L plates and four bolt/lock nut combos. I bolted the L plates to the seat bracket, creating horizontal holes. I bolted the battery to the brackets, using the holes provided in the battery cradle.

The battery is upside down, compared to it's intended purpose, so I added a couple of sturdy zip ties, to reduce stress on the battery cradle locking mechanism. It feels plenty sturdy.
 
If you choose to add the Easy Reacher rack - a beautiful thing - you can use existing threaded holes and a little creativity to mount your battery offset to the port side but within the rack, leaving both sides available for panniers. Gives you a little more stealth and an even lower center of gravity.

That's the way my Giro 26 is set up.

C.
 
Really, the battery should be way lower on the bike, preferably right under the seat. It will immeasurably improve the ride, and not so hard on the bike with fallover risk.

I have e-converted all of these and experimented with multiple battery positions...

Vision R40
EZ sport Sun
Rebike CLWB recumbent
EZ1 Sun CLWB
Actionbent Trike
Catrike Road

I have observed that the battery should be as close to the centre of mass of the bike as possible, otherwise ride quality is compromised.
 
Les, I got the bracket from California Ebikes and here are some pictures. First picture is my original torque arm that hooked over the original shifting cable guide and was clamped tight against the boom. Next is the bracket attached to the Bafang BBS02, and last is the bracket secured to the boom with a hose clamp. There's some thick rubber under the clamp, and 3 thicknesses of the rubber behind the bracket, which is pulled tight against the same shifting cable guide and bends in slightly where the hose clamp is. I could drill a hole in the bracket so that it would slip over the shifting cable guide, but I don't think it's necessary.
 

Attachments

  • 100_0750.JPG
    100_0750.JPG
    205.6 KB · Views: 2,142
  • 100_0752.JPG
    100_0752.JPG
    169.6 KB · Views: 2,142
  • 100_0753.JPG
    100_0753.JPG
    171.3 KB · Views: 2,142
Rassy said:
Les, I got the bracket from California Ebikes and here are some pictures. First picture is my original torque arm that hooked over the original shifting cable guide and was clamped tight against the boom. Next is the bracket attached to the Bafang BBS02, and last is the bracket secured to the boom with a hose clamp. There's some thick rubber under the clamp, and 3 thicknesses of the rubber behind the bracket, which is pulled tight against the same shifting cable guide and bends in slightly where the hose clamp is. I could drill a hole in the bracket so that it would slip over the shifting cable guide, but I don't think it's necessary.

Raspy,

I ordered and recieved the California Ebike bracket. I probably won't install it until I'm home in late April. I have limited tools where I am wintering.
 
crichman said:
If you choose to add the Easy Reacher rack - a beautiful thing - you can use existing threaded holes and a little creativity to mount your battery offset to the port side but within the rack, leaving both sides available for panniers. Gives you a little more stealth and an even lower center of gravity.

That's the way my Giro 26 is set up.

C.

Your Giro 26 seat is higher off the ground. My Strada is the same.

I'm not sure panniers under the seat on a Giro 20 would have adequate ground clearence.
 
chvidgov.bc.ca said:
Really, the battery should be way lower on the bike, preferably right under the seat. It will immeasurably improve the ride, and not so hard on the bike with fallover risk.

I have observed that the battery should be as close to the centre of mass of the bike as possible, otherwise ride quality is compromised.

The battery is right under the seat. I had it on the back rack first. The bike seemed to ride fine, but cargo space was reduced.

With the battery under the left side of the seat, the right/left balance of the bike is near perfect. The two Bachetta I own have fairly loose steering due to the majority of rider weight carried by the rear wheel. The weight on the front wheel of my E-Bike Giro 20 is now heavier, due primarily to the motor mounted all the way forward. This has tightened up the steering a bit, creating a better steering feel.

Overall, I'm delighted with the ride. If anything could stand improvement, since the conversion, it would be a beefed up braking system to handle the extra weight and speed.
 
The image below is my Bafang BBS02 display. It shows a full battery and 58 miles traveled. My battery is 52 volt 13.5 ah.

Guesses:
1. The battery meter shows full at 48 volts and empty at 41 volts.
2. Because of my battery voltage, the meter starts to show less than full when I have somewhere around 50% left.

If that is true, I have perhaps a 100 mile range the way I am riding the bike. Basically, I put some effort into the ride, but don't break a serious sweat at speeds between 13 mph (steep hill and strong headwind) to 25 mph (slight downhill / tailwind). There are 5 pedal assist levels programmed into my controller. So far, assist level 3 is the highest I've used and then only for steep hills.

Heck, even if the range winds up to be 60 miles, I'm smiling. I was expecting a range closer to 35 miles.

The above 58 miles included a number of serious hills and some stretches of strong headwind.

IMG_1902_s.jpg
 
I didn't see what the chemistry of your battery is, but for some chemistries the Bafang fuel gauge will not be of much value. For instance, a LiFePO4 battery maintains an almost constant voltage during discharge and then drops off fast at the end, so the fuel gauge, which is just a voltage meter, will show full or almost full throughout the discharge cycle and then all of a sudden the battery shuts down at LVC.

A better fuel gauge is a Watt meter, such as a Watts Up or even a cheaper version, or something on the high end like the Cycle Analyst. These meters show the total AHs and total Watt hours used, either of which will indicate how much of your batteries capacity you have used and thus how much capacity you have left.

You can find a lot of good discussions on this subject in the forum.
 
Rassy said:
I didn't see what the chemistry of your battery is, but for some chemistries the Bafang fuel gauge will not be of much value.

My battery is a Luna LifeP04 bottle battery 52v 13.5ah GA version.

Thanks. That's helpful. At 58 miles, the top bar on the battery indictor was flicking on and off. If it runs out shortly after that, my range is around 60 miles, max.

I'll look into the meters you mentioned.

Les
 
Warren said:
Les,

Those Panasonics are not LiFePO4. The battery would be over 12 pounds, and 14s would be 45.5 volts. I assume they are NMC.

Lithium Manganese Cobalt Oxide = Lithium ion NMC. Got it.

There are a lot more types of Lithium batteries than I was aware of.
 
Back
Top