appleseed123
1 W
After tens of hours of researching and building, I finally believe my ebike is finished enough to post it up on ES. I'll go over every detail I can remember, and post enough pics. I hope that this build will help some noobs out there the way many threads helped me. Feel free to PM with questions anytime, even long after this thread has been posted. I want to keep this thread relatively short, since long threads are overwhelming for noobs.
Short story
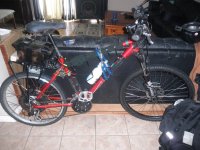
-Kona fire mountain hardtail 26" bike with dual disc brakes and trigger shifters and adjustable front suspension fork
-HS3540 motor from ebikes (and ebrake)
-CA from ebikes too
-Lyen 12 fet sensorless controller (and throttle from him)
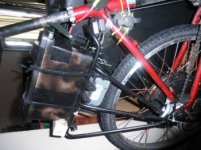
-Disc brake back rack to hold batteries
-4 Turnigy lipo 6s 5amp 20c batts from hobby king
-Imax b6-ac balance charger
-2 meanwell s-150-24 psu
-various connectors, wires and other things
SPECS (like top speed/acceleration) COMING SOON
Top Speed: 46 km/h no pedaling
Able to do a wheelie from a stop or slow start with no pedaling and sitting on the seat (no huge weight shift needed)
Acceleration: 1km/h to 30km/h in 5 seconds. Faster if you can stay stable and not wheelie during take off. (i timed from a roll, the numbers may be off by 10% or so)
Bike
I found this bike on kijiji for $325. It was lightly used and was a steal. I wanted to go hardtail for I feel more in control with it. The bike has dual disc (which hs3540 supports) and trigger shifters making room for the throttle, so both shifters work (but only the front one is used really)
Motor
I wanted a Direct drive hub motor since it is less maintenance, quiet, regen, reliable, and can be overpowered easily. Ebikes offered the 9c or hs3540, hs3540 being the more powerful one, so I chose it. I heard the 9c is good too thou.
I siliconed the motor on both sides around the outside plates. This helps to seal the motor (very well but not 100%). I drilled a small hole and filled the motor with 500 ml of mineral oil (baby oil). This helps cool the motor, keeps water out, and lubes the bearings/other stuff. Since it leaks a few drops a day, I refill fill it every now and then and silicone over the refill hole to seal it. Some people cut holes in the plate, this method I find works better. I also sprayed red insulation (got mine at electric motor rewire shop for $16) all over the motor just because
The motor is in a 24" rim. The rim is 24" not 26" because, smaller rims are stronger, and give more torque. The tire options are limited but its ok. I still recommend 24" since the difference in feel of the bike (over 26") is negligible and the added strength is really needed (I put a flat spot in a rim with my SLA batteries, one the second one now with lipos). I use ebikes stainless steel torque arms to keep the motor in place, 1 on each side
Monitoring
I bought the CA as part of a package with the motor and a sensored controller. Since I went sensorless (more on this later), the CA doesnt tell speed (unless you get standalone more for more $ i believe). I mostly rely on it for voltage and power usage. Both can be measured with a watt meter from hobby king if you stay under 60 volts.
Controller
Man, I HATE hall sensors. I went through 12 trying to get them to work. Each blew one at a time on the first or second run. I tried heat shrinking/taping the wires to protect them, and various other methods to help, but no go. I went sensorless. Now I fully believe sensorless is the way to go by FAR. Main problem is there is no speed sensor to measure km/h, unlike sensored, and there is a lack of options for sensorless controllers. Fortunately, the Lyen controller supports me very well, and I can afford it easily.
So i ripped out the hall sensors. While I had the motor open, I replaced 2 phase wires with magnetic wire since magnetic wire has smaller insulation. I heat shrunk/taped the 2 phase wires (about 11 gauge worth of 21 gauge wire, so 10 wires), and they ended up smaller than hobby king silicon wire. I soldered the 3rd phase wire to the hub motor after scrapping some paint away. I covered the wire with spray able red insulation paint. I connect the 3rd phase wire from the controller on the axle by soldering it to a big washer and adding another washer beside it, and tightened with a nut. This system works very well. I could even upgrade the 2 phase wires out of the hub motor to 8/9 gauge if needed, but I am only running 50/60 amps at the moment.
Programming the Lyen controller is so easy and helpful. Being able to limit phase amps really helps with cutting back on accidental wheelies. Highly recommend getting the program cord. I modded the controller by adding copper braid to the traces and using silicone to seal the controller full of mineral oil. The mineral oil does leak abit at the wires but after a few days it stops with quite abit of oil still left in it. The controller is mounted under the bike rack so it is close to the batteries and motor. I dont think I can get the phase wires closer really.
Battery Rack
Some people hold batteries in the triangle. I like having my water bottle there and air pump. Using a bike rack was a very easy way to hold batteries. Nothing needed to be manufactured in order to position the batteries in a secured but slim way. The 4 lipos fit in a tupperware bin strapped to the rack with zip tie or hose clamps when needed and held snug with a piece of wood pushing the bin against the bike seat. The batteries arent going anywhere.
LIPOS
Orginally I went SLA. I decide to use them to just get up and running. If I knew how easy lipo were, and how light, small, and powerful they were, I would have went with them first. I bought 4 6s 5 amp 20c lipos. Wired in 12s2P. I dont need more than 48 volts since I can go about 43 km/h. I almost can keep up with traffic. The power at take off is strong enough to do wheelies easily. Since 32km/h is the legal limit here in ontario, having 48 volts means I can get to 32km/h very quick without hitting max power yet (amp draw still at 50 amps).
I wrapped the lipos in a spare sheet material to help keep them warm during the winter. Come spring this will be gone
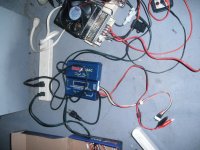
Balance charger
I decided that undoing all the batteries every time to charge them is a PITA. I bought a small but reliable charger to charge any lipo I wanted up to 6s. The Imax b6ac did that, was reliable, and worked off ac current and dc, instead of just dc, so no extra psu needed. I went for a bulk charger for the majority of my charges.
Bulk charger
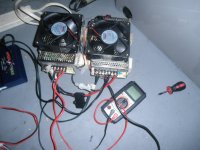
This took me a long time to decide. At first I was thinking meanwell HRP series, but it is CC limited at over 100% rated current. And since it has a fan, adding another may not help much. In order to change this, I needed to solder 2mm wide resistors, which I cant since they are too small and I need to buy 1000 units from jameco not just 1 or 2. I looked at the rsp series, but mostly the rsp-750 since it says on the pdf that it can change its CC limit to below 100% rated. I ended up choosing 2 s-150-24 since they are cheaper and less complicated than the rsp series.
http://endless-sphere.com/w/index.php/Standard:_S-XXX-YY This link should show you how to mod them. I find that if you mod for lesser voltage (say 15 volts) that the voltage tends to not be steady and actually drops to 8 volts for some reason. I will look into it if ask, or when needed. I modded the CC, the voltage pot.
I fitted two 12 volt 1 amp fans to the CC limited modded psu (CC limit set to 6 amps). I series-ed two of them to put out 49 volts at 5 amps. I added a fuse for the fans and another fuse for the bulk charge between the positive and negative of the 2 psu's. I also added a 60 amp diode with heat sink in order to further prevent any problem from coming up.
The voltage drop over the diode means I need to increase the bulk charger another .83 volts. Be careful since this voltage drop may decrease when the battery reaches full charge.
I only bulk charge to about 4.03 volts per cell, so I have lots of head room from 4.2 volts per cell. The psu stay cool to the touch with the fans going, so i could turn up the amps quite abit. When the fans are not running, the back (the heat sink really) gets hot running at 6 amps. Since I am not in a rush mostly, 5 amp charge is fine for the price. I could parallel the psu's with diodes and buy two more to have 12.5 amps, but charging in 30 minutes less isnt worth it to me.
Various
I bought a bike speedometer that I am trying to wired up to tell speed (legal limit and all) work in progress. I lost the key to the switch I added, (gonna fix) but having a key is recommended. A side mirror is a MUST for riding on roads. Nice soft silicone grips are recommend, especially if you dont have Full suspension. Using puncture resistant tire tubes and tire slime is recommend to prevent tire pops on the rear hub motor (it takes me 40 mins to change a tube). Carry spare fuses. I tape mine to my bike. Use fuses on your bike lol. I bought some nylon fabric (i believe) to wrap around my ebrake/CA wires to make it more clean and hidden from rain/snow/people. Recommended if you want it stealthy, plus it was cheap like $5. Zip tie in place (use reusable ones, they are a god send). Bring a mini air pump with you, I bolt mine to my other water bottle holes. I need to add a temp sensor in the motor. I bought 4 from hobby king and all of them broke. Can someone recommend me one?
Cost (guessing/rounding)
Lipos-$200
Bulk charger-$100
Balance charger-$40
Bike-$325
Bike Rack-$50
Controller-$150
CA-$130
Motor-$350
Various-$300 (rough guess)
Total $1645 (seems low really but I bought SLA batteries, sensored controller, spare rim, and other stuff trying to prefect my bike. Thats a easy $400)
Short story
-Kona fire mountain hardtail 26" bike with dual disc brakes and trigger shifters and adjustable front suspension fork
-HS3540 motor from ebikes (and ebrake)
-CA from ebikes too
-Lyen 12 fet sensorless controller (and throttle from him)
-Disc brake back rack to hold batteries
-4 Turnigy lipo 6s 5amp 20c batts from hobby king
-Imax b6-ac balance charger
-2 meanwell s-150-24 psu
-various connectors, wires and other things
SPECS (like top speed/acceleration) COMING SOON
Top Speed: 46 km/h no pedaling
Able to do a wheelie from a stop or slow start with no pedaling and sitting on the seat (no huge weight shift needed)
Acceleration: 1km/h to 30km/h in 5 seconds. Faster if you can stay stable and not wheelie during take off. (i timed from a roll, the numbers may be off by 10% or so)
Bike
I found this bike on kijiji for $325. It was lightly used and was a steal. I wanted to go hardtail for I feel more in control with it. The bike has dual disc (which hs3540 supports) and trigger shifters making room for the throttle, so both shifters work (but only the front one is used really)
Motor
I wanted a Direct drive hub motor since it is less maintenance, quiet, regen, reliable, and can be overpowered easily. Ebikes offered the 9c or hs3540, hs3540 being the more powerful one, so I chose it. I heard the 9c is good too thou.
I siliconed the motor on both sides around the outside plates. This helps to seal the motor (very well but not 100%). I drilled a small hole and filled the motor with 500 ml of mineral oil (baby oil). This helps cool the motor, keeps water out, and lubes the bearings/other stuff. Since it leaks a few drops a day, I refill fill it every now and then and silicone over the refill hole to seal it. Some people cut holes in the plate, this method I find works better. I also sprayed red insulation (got mine at electric motor rewire shop for $16) all over the motor just because
The motor is in a 24" rim. The rim is 24" not 26" because, smaller rims are stronger, and give more torque. The tire options are limited but its ok. I still recommend 24" since the difference in feel of the bike (over 26") is negligible and the added strength is really needed (I put a flat spot in a rim with my SLA batteries, one the second one now with lipos). I use ebikes stainless steel torque arms to keep the motor in place, 1 on each side
Monitoring
I bought the CA as part of a package with the motor and a sensored controller. Since I went sensorless (more on this later), the CA doesnt tell speed (unless you get standalone more for more $ i believe). I mostly rely on it for voltage and power usage. Both can be measured with a watt meter from hobby king if you stay under 60 volts.
Controller
Man, I HATE hall sensors. I went through 12 trying to get them to work. Each blew one at a time on the first or second run. I tried heat shrinking/taping the wires to protect them, and various other methods to help, but no go. I went sensorless. Now I fully believe sensorless is the way to go by FAR. Main problem is there is no speed sensor to measure km/h, unlike sensored, and there is a lack of options for sensorless controllers. Fortunately, the Lyen controller supports me very well, and I can afford it easily.
So i ripped out the hall sensors. While I had the motor open, I replaced 2 phase wires with magnetic wire since magnetic wire has smaller insulation. I heat shrunk/taped the 2 phase wires (about 11 gauge worth of 21 gauge wire, so 10 wires), and they ended up smaller than hobby king silicon wire. I soldered the 3rd phase wire to the hub motor after scrapping some paint away. I covered the wire with spray able red insulation paint. I connect the 3rd phase wire from the controller on the axle by soldering it to a big washer and adding another washer beside it, and tightened with a nut. This system works very well. I could even upgrade the 2 phase wires out of the hub motor to 8/9 gauge if needed, but I am only running 50/60 amps at the moment.
Programming the Lyen controller is so easy and helpful. Being able to limit phase amps really helps with cutting back on accidental wheelies. Highly recommend getting the program cord. I modded the controller by adding copper braid to the traces and using silicone to seal the controller full of mineral oil. The mineral oil does leak abit at the wires but after a few days it stops with quite abit of oil still left in it. The controller is mounted under the bike rack so it is close to the batteries and motor. I dont think I can get the phase wires closer really.
Battery Rack
Some people hold batteries in the triangle. I like having my water bottle there and air pump. Using a bike rack was a very easy way to hold batteries. Nothing needed to be manufactured in order to position the batteries in a secured but slim way. The 4 lipos fit in a tupperware bin strapped to the rack with zip tie or hose clamps when needed and held snug with a piece of wood pushing the bin against the bike seat. The batteries arent going anywhere.
LIPOS
Orginally I went SLA. I decide to use them to just get up and running. If I knew how easy lipo were, and how light, small, and powerful they were, I would have went with them first. I bought 4 6s 5 amp 20c lipos. Wired in 12s2P. I dont need more than 48 volts since I can go about 43 km/h. I almost can keep up with traffic. The power at take off is strong enough to do wheelies easily. Since 32km/h is the legal limit here in ontario, having 48 volts means I can get to 32km/h very quick without hitting max power yet (amp draw still at 50 amps).
I wrapped the lipos in a spare sheet material to help keep them warm during the winter. Come spring this will be gone
Balance charger
I decided that undoing all the batteries every time to charge them is a PITA. I bought a small but reliable charger to charge any lipo I wanted up to 6s. The Imax b6ac did that, was reliable, and worked off ac current and dc, instead of just dc, so no extra psu needed. I went for a bulk charger for the majority of my charges.
Bulk charger
This took me a long time to decide. At first I was thinking meanwell HRP series, but it is CC limited at over 100% rated current. And since it has a fan, adding another may not help much. In order to change this, I needed to solder 2mm wide resistors, which I cant since they are too small and I need to buy 1000 units from jameco not just 1 or 2. I looked at the rsp series, but mostly the rsp-750 since it says on the pdf that it can change its CC limit to below 100% rated. I ended up choosing 2 s-150-24 since they are cheaper and less complicated than the rsp series.
http://endless-sphere.com/w/index.php/Standard:_S-XXX-YY This link should show you how to mod them. I find that if you mod for lesser voltage (say 15 volts) that the voltage tends to not be steady and actually drops to 8 volts for some reason. I will look into it if ask, or when needed. I modded the CC, the voltage pot.
I fitted two 12 volt 1 amp fans to the CC limited modded psu (CC limit set to 6 amps). I series-ed two of them to put out 49 volts at 5 amps. I added a fuse for the fans and another fuse for the bulk charge between the positive and negative of the 2 psu's. I also added a 60 amp diode with heat sink in order to further prevent any problem from coming up.
The voltage drop over the diode means I need to increase the bulk charger another .83 volts. Be careful since this voltage drop may decrease when the battery reaches full charge.
I only bulk charge to about 4.03 volts per cell, so I have lots of head room from 4.2 volts per cell. The psu stay cool to the touch with the fans going, so i could turn up the amps quite abit. When the fans are not running, the back (the heat sink really) gets hot running at 6 amps. Since I am not in a rush mostly, 5 amp charge is fine for the price. I could parallel the psu's with diodes and buy two more to have 12.5 amps, but charging in 30 minutes less isnt worth it to me.
Various
I bought a bike speedometer that I am trying to wired up to tell speed (legal limit and all) work in progress. I lost the key to the switch I added, (gonna fix) but having a key is recommended. A side mirror is a MUST for riding on roads. Nice soft silicone grips are recommend, especially if you dont have Full suspension. Using puncture resistant tire tubes and tire slime is recommend to prevent tire pops on the rear hub motor (it takes me 40 mins to change a tube). Carry spare fuses. I tape mine to my bike. Use fuses on your bike lol. I bought some nylon fabric (i believe) to wrap around my ebrake/CA wires to make it more clean and hidden from rain/snow/people. Recommended if you want it stealthy, plus it was cheap like $5. Zip tie in place (use reusable ones, they are a god send). Bring a mini air pump with you, I bolt mine to my other water bottle holes. I need to add a temp sensor in the motor. I bought 4 from hobby king and all of them broke. Can someone recommend me one?
Cost (guessing/rounding)
Lipos-$200
Bulk charger-$100
Balance charger-$40
Bike-$325
Bike Rack-$50
Controller-$150
CA-$130
Motor-$350
Various-$300 (rough guess)
Total $1645 (seems low really but I bought SLA batteries, sensored controller, spare rim, and other stuff trying to prefect my bike. Thats a easy $400)