Intermittent no power problem

rick_p

100 W
Joined
Feb 16, 2021
Messages
260
Location
Los Angeles
Hello,

My ebike, which is powered by a BAFANG RMG06 48 volt 750 watt rear hub motor, sometimes works normally and sometimes it doesn't. When it works normally, it's fast, powerful, and quiet. Here are the symptoms when it acts up. With a fully charged battery I turn the bike on and everything lights up like normal, except there is no power to the wheel via throttle or pedal assist. Here is what is strange, if I roll the bike backwards a foot or so and then hit the throttle, it tries to go, you can feel a little pulse from the motor but then it cuts off immediately. If I repeat this process, but instead of using the throttle I just start peddling, it will try to kick in but it makes a growling noise, at which point I pull the brake lever to kill the power to the motor because that is, it can't be good for the motor. The bike doesn't have a throttle only mode by the way, only pedal assist and throttle mode together. If I give up on trying to get the motor working and just simply peddle the bike, it will sometimes kick in at some random amount of time, and from that point run normally. My first thought was it has a bad controller, but when I discovered the rolling backward thing I started questioning that thought and starting thinking it's a motor problem. Has anyone experienced any of these symptoms? All thoughts and suggestions welcome of course.

Thanks, Rick
 
TommyCat said:
Do you have the same low voltage on BOTH sides of the BLUE wire hall sensor connector? If no, you have a bad connection.
Ah, I did not test for this, and that is a good point, I should test one more time before replacing the controller. It would be a waste of time and money to simply miss a bad connector.
I ran this test today, and when there was low voltage, it occurred on both sides of the connector. So, what I decided to do next was to test just the controller. I disconnected the motor from the connector and turned the power on, then I put the negative probe into the ground wire receptacle and started checking the voltage on each of the Hall (yellow, green, blue) wires, and after I inserted the probe in each receptacle, I wiggled the wire to see if I could locate a bad wire. Low and behold, no issues from the yellow and green wires, but as soon as I wiggled the blue wire it lost power completely.

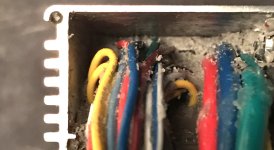
So then, I powered down and removed the controller from the bike. I used the voltmeter in ohms resistance mode to see if there was resistance between the ground wire and a hall wire through the controller, and there was, so I repeated the wiggle test on all three wires. Same results, only the blue wire would zero out when I wiggled it. Through further testing (dozens of tries) on the one blue wire, I was able to determine that it wasn't really the "wiggle" as much as it was the "slight tug" on the wire. I had hoped that there was a break inside the sheathing on the exposed portion of the wire outside of the controller's casing, no luck there, the loose connection is not only definitely inside, it's way in there. As you'll see the picture, I even tried digging out some of the waterproofing material to see if I could reach the bad connection, no luck. It's going to hurt to spend $100 on something I know I could fix if I could get at it, but I gave it hell, I even tried slipping a thin piece of sheet metal around the outside of the waterproofing material to see if I could remove the circuit board from the casing, but it's tough stuff.

inside-controller-wires.jpg
 
First, by "zero out", do you mean "OL" on the screen? I ask because OL means open-circuit, or very high resistance, which implies a broken wire, while "zero out" and similar things typically means a short circuit, or very low resistance, which would implies a blue wire shorting to ground, which is somehting you could actually see, most likely, with damaged insulation exposing the conductors and rubbing or touching on the metal casing, etc.

If you're going to replace the controller anyway, try this:

Giving yourself at least an inch (or otherwise enough to strip and splice to the end of) of that blue wire from inside the ocntroller potting to where you can still get to it, cut into the insulation and measure there, instead of at the end of the wire. Then do the wiggle/etc., and see if it still fails. If it does not, then all you need do is splice a new bit of wire from there to your motor hall, and away you go. ;)

I suggest this because the most common place a wire breaks is where it bends and/or flexes, which is at the exit from the controller itself, or the back of a connector. It's unlikely to be inside the potting (though it could be), so it's worth a check.
 
I'd say with the potting anchoring the wire insulation making a stress focus, then the harness getting yanked on during assembling, it makes maybe breaking some strands up in there at the solder joint seem not unreasonable?
 
amberwolf said:
First, by "zero out", do you mean "OL" on the screen? I ask because OL means open-circuit, or very high resistance, which implies a broken wire.
By “zero out” I meant I got 0.L on the screen, which meant as you said, a broken wire or faulty solder joint at the circuit board. I was so sure it was the latter I didn’t try the test you suggested.

Voltron said:
I'd say with the potting anchoring the wire insulation making a stress focus, then the harness getting yanked on during assembling, it makes maybe breaking some strands up in there at the solder joint seem not unreasonable?
Boy, you guys are good, you were both right in a way. Don’t ask me why, but I decided to attempt removing the controller from the casing, and succeeded, but I do not recommend this as it was a little dangerous, I had to slip a thin piece of sheet metal under the waterproofing material from both sides, top and bottom until I could push it out using a short piece of wood against the circuit board.
controller-extracted.jpg
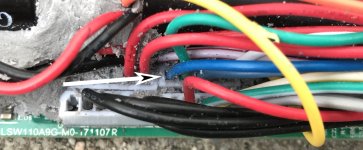
Once I got it out, I could trace the blue wire to the circuit board...
blue-wire-traced.jpg
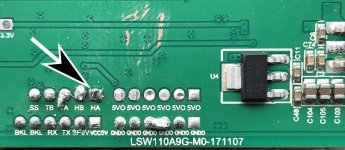
And I was able to positively identify that the loose connection was where the blue wire connected to the circuit board. So, I applied pressure on the wire side while I floated in a touch more solder from the other side...
solder-point.jpg
After re-soldering the connection point to the circuit board I could wiggle and tug on the wire and did not loose connectivity.
However, there was some collateral damage sustained during the removal process...
collateral-damage.jpg
I floated some solder over the exposed wire and then applied two layers of shrink wrap over it. I don't know what to do about the scratches on the circuit board. So, would I be crazy to attempt to use this thing after all this? Do you think it's safe?
 
Measure resistance from each hall signal wire to ground and make sure none of the solder joints are shorting. The scratches in the green solder mask won't matter. That stuff is there just for the soldering process in the factory.
 
Voltron said:
After what you've gone thru to figure it out, you'd be crazy NOT to try it! 🤣
TommyCat said:
+1!

Perhaps a bit of electrical black tape to cover the board scratches...
Yeah, I was thinking that myself, but I’m glad to get affirmation from pros. Before I put the controller back in the casing, I cut two thin pieces of plastic to go above and below the controller, the top piece will protect the wires and the bottom piece will protect the circuit board and solder points. It was overkill because the circuit board fits into a groove to keep it away from the bottom of the casing, and the fit is so tight the wires can’t really move to rub against the top, but it took all of five minutes to make the assurance.

fechter said:
Measure resistance from each hall signal wire to ground and make sure none of the solder joints are shorting. The scratches in the green solder mask won't matter. That stuff is there just for the soldering process in the factory.
Thanks for the tip. It was the first thing I did after putting the controller back in the casing, mostly to make sure my repair was good, but checked all of them for good measure. :)

I just took it for a test ride, so far so good :D
 
I’ve been riding every day, sometimes twice a day for over a week now, and no issues. I think we can call this case closed. There’s no possible way I would have figured this out without the help of all the great folks on this forum. A huge thanks goes out to @Voltron, @fechter, @TommyCat, @amberwolf, and @E-HP. :bigthumb:
 
Back
Top