Long Term testing of an ATS Speed Drive

MattyCiii said:
My next setback: Utah Trikes just notified me their shipment from ATS did not contain any spanners, so I have to wait at least another month for their next order/shipment.
To be clear, my intent in the quote above was not to bad mouth Utah Trikes. The Schlumpf/ATS drive is not very easy to come by, and I'm delighted stores like Utah Trikes, Cyclemonkey, and EbikesSF - stores who support the Speed Drive - are out there. All three have been a pleasure to deal with, are flexible, and charge what I believe to be a very fair price.

As luck would have it, Cyclemonkey reached out to me yesterday to say there was a delay in the parts I sourced through them - and the package would go out later that day. On a chance, I called them up (it's a very small company, possibly a one man shop) and asked if they carry the spanner tool I need. Neil (the owner) actually broke up a $49 tool kit to sell me just the spanner (and one other tool) I'm looking for at a very good price (basically the same price as the spanner I ordered from Utah). Having found a supplier of the spanner, I called Utah Trikes and cancelled my spanner order, which they did right away.

This is a good news story all around. Utah Trikes kept me informed about my order to keep my expectations realistic, based on events outside their control. A quick "sorry for the delay" e-mail from CyclMonkey turned into an opportunity for me and a sale for them. And of course none of this would be possible without ES User Accountant (who I purchased the Speed Drives from) and EbikesSF, who rented me the BB milling tool.

It sounds complicated - because it is. Again, this is a very small niche product. If I wanted simple I'd use a derailleur setup, like 99.9% of the other bikes out there, and be able to source tools and expertise from just about anywhere.
 
My Speed Drive is installed!
Pictures and story to be added soon.

My first impression is this will be a great addition to my workhorse, pedal-only commuter. Over the last year I've gotten into good enough shape that the 360% gear range of the NuVinci is not enough. I hit the top end more often than I'd like, but I don't want to raise the whole range. There are still some hills where - if going uphill and there's a headwind - I cannot handle.

So, I dropped the hear range just about 20%, and added the Speed Drive. Normally I'll use it in 1:1 ratio, where per my initial impression there's no more drag on the drive than a standard BB. But in places where I have a decent downhill, or tail wind, I'll pop the button and use the 1:6 ratio and its higher gearing.

Here's the finished bike - it really looks no different than it did when I started, of course.
DSCF3114.JPG


When in overdrive, you can definitely feel the gearing. Meaning not just that I can feel the amplification of my stroke, I can actually feel mild vibration from the planetary gearing. We'll see if that remains so after a few hundred miles, maybe the gears will "break in". Since I ride about 200-300 miles a month on that bike, maybe my best move is to leave it in overdrive unless I need the low end for the first month.

Anyhow, I'll be doing a write-up of the rest of the installation - but I wanted to get my first impressions out there right away!
 
The rest of the install:

First remove the existing BB. This was easy because I just had the BB off a few weeks ago, to machine the BB shell. 6mm allen wrench takes off the crank bolt:
DSCF3070.JPG


Easy as pi
DSCF3071.JPG


This crank removal tool was one of my best impulse buys in recent memory
DSCF3072.JPG


Make sure the inner piece is backed way out. Then thread it into the crank all the way until it bottoms, then back off a half turn.
DSCF3073.JPG


Now use a 6mm allen key and tighten the inner piece. Some crank parts have left threads on one side and right threads on the other, such that you tighten them as pedal. Not so with these bolts, they're the standard right hand thread on both sides. With this tool the crank arm comes off really easily.
DSCF3076.JPG


Now go find your BB removal tool. This was about $20 at the LBS.
DSCF3081.JPG

DSCF3082.JPG


I had to wiggle it a bit to get it to engage, tight and square. You don't want to torque on this thing with it half engaged, the aluminum on that BB collar feels like it would shear right off if all splines not tight
DSCF3083.JPG

DSCF3084.JPG


It's counter-intuitive to me, but to loosen, I had to lift the handle of the spanner from the position it's shown in. Same would be so for the drive side (the BB threads are left/right as mentioned above)
DSCF3085.JPG


I took a lot of pictures
DSCF3086.JPG


Here it is with non drive side collar removed
DSCF3087.JPG


Next, do the same steps on the drive side:
DSCF3088.JPG
 
Out comes the bottom bracket. I just had this thing replaced in the fall so it's in pretty good shape. Off to the spare parts bin...
DSCF3093.JPG


Here's what delayed me: The stock cone washer on the left was too narrow for a snug installation. The 2mm cone spacer is on the right
DSCF3095.JPG


The 2mm cone spacer was too tight of a fit, so I spent a few minutes sanding down its inside diameter so it would fit in place. Now the Speed Drive is placed into the BB
DSCF3096.JPG
 
Preparing to install the BB nut on the non-drive side. See the narrow threaded rod sticking out if the spindle? The Schlumpf tool set includes an aluminum spacer you place over that thing when using a crank removal tool. Betcha ten bucks I forget to use the spacer and ruin the drive when the time comes to remove the cranks...
DSCF3098.JPG


That spacer I was talking about. Store it somewhere safe.
DSCF3110.JPG


I put a dab of automotive anti-seize lock on just about everything that has threads. Months/years down the road I won't have to learn new swear words while disassembling this thing.
DSCF3106.JPG


The BB nut hand threaded on a couple of turns. A little grease, in red, to help with installing.
DSCF3099.JPG


BB nut, Hand tight
DSCF3100.JPG


That Schlumpg spanner I keep talking about
DSCF3101.JPG


Spanner in place, ready to tighten. The worlds oldest torque wrench on the ground between my feet. I had to go back to the ebikessf.com install video to get the torque specification (140 newton meter) then convert it (103 foot pounds)
DSCF3102.JPG


There it is, torqued to spec. Look how the splines that mate with the install/removal spanner machined off just a little more aluminum from the BB cup.
DSCF3104.JPG


Clean all threads before applying anti-seize and installing
DSCF3105.JPG


No show stoppers so far... I'm waiting for the other shoe to drop as I tighten the 14mm crank bolts. I had to tighten them way down, if the cranks are not seated fully, they sit too far out and you can't push the "shift" buttons down fully.
DSCF3107.JPG

DSCF3108.JPG
 
There it is, with the shift button in place. This was before I got the cranks fully seated, so the button is an "innie"
DSCF3111.JPG


Edit: Do NOT thread loc the buttons! They'll be impossible to remove! (original text: "I hear these buttons tend to fall off, but usually only when you've got your bike sitting over a storm drain. So, use thread loc")
DSCF3112.JPG


One more shot of the button with its set screw installed Edit: Do NOT thread loc the buttons! They'll be impossible to remove! original text: "also thread loc'd"
DSCF3113.JPG
 
Three outstanding issues:
  • First, I didn't have a perfect combination for chainring and sprocket, so I'm going to get a new sprocket with one less or one more tooth. This will keep me from having to put a half-link on the chain. Right now my Surly Singleator is keeping up the slack, but I have it tuned to max spring tension to do so.
  • Second, I went from a chainring with an outer bash guard to one without. I'd like to buy/install one, hope they're not too hard to find. But in the mean time, my chainring bolts are too deep. I have four spacers, so I'm running the bike on 4 out of 5 chainring bolts.
  • EDIT: Ignore this statement, see Alan B's post belowThird, I think I've blocked the grease port for the drive. See the phillips head screw on the top of the last post? Yeah, the crank might be too close to it for proper access, we'll see. If so I'll be glad I haven't lost that aluminum spacer for the crank removal tool, won't I?
 
Alan B said:
To clear the oil port, engage the gearing and spin the cranks. They turn at different rates, so the port will be clear at times.

:oops: Palm collides with face yet again!

Alan B said:
Is there oil in the gearcase, or does that need to be added?

The maintenance guide recommends "MoS2-grease" every 2k to 3k miles, but advises a few drops of bicycle oil is OK instead. They go on to warn that the seals are not designed for an oil bath so don't over-lube.
 
One week in/about 50 miles pedaled, I've got some thoughts:
I'm starting to get a feel for the Speed Drive. At first I would look down to see which way "the shifter button" had to be pressed, and would look to see my heel was lined up to push it. I've started to get the hang of it: If riding is butter smooth, I'm in 1:1 ratio and a kick with the right heel will shift to overdrive. Conversely if the gears are engaged, I feel a slight lumpiness/grinding, so I know I change with the left heel.

In my last couple miles I started to get comfortable pressing the button without looking down. Just wait till the foot is fully forward, and kick inward. Training the muscle memory, the same way one learns to get into and out of SPD pedal clips without thinking about it. Once I'm finally acclimated this drive will totally rock.
 
Some thoughts on the installation - things to consider if you get yourself one of these drives:

For the Dahon Jetstream pictured in this thread, my goal was to get even more gear range than the 360% range of the NuVinci. I wanted to drop the low end about 15%-20%, but also expand the high end. I figured I'd be spending most of my time in the low end - where the ATS drive simply acts as a standard BB (i.e., there are no additional friction losses related to the planetary gears). Here's what I did/learned:
  • I made a spreadsheet table of gear ratios. Sprocket size in rows, chainring in columns. Where they intersect is the ratio. I looked up where my starting chainring/sprocket fell in this table... My original bike had a 1:2.6 ratio. Since I wanted to make my gears about 15%-20% more torquey with the install, so I shot for a 1:2.2 ratio.
  • There are of course multiple combinations of sprocket/chainring to get to about 1:2.2 Watch out though, because:
    • if you don't plan well you end up having a chain that needs a half-link. To avoid this, count the number of teeth on your current sprocket plus chainring. If this number is even, you want your new chainring + sprocket to stay even, if odd stay odd.
    • Chainrings come in different "BCD" sizes. The ATS drive needs 110mm BCD.
    • Also make sure you buy a chainring with the right width for your chain. Most people use 3/32, but 1/8 is a close second. Be careful to buy the right size.
    • Chainrings in some sizes are harder to find. If I recall correctly it's easier to find them in an even number of teeth (e.g., 44t, 46t) than in the odd sizes.
    • I'm using a NuVinci for rear gears. As a result the minimum sprocket size is 16t. You might have a minimum size restriction of your own. That reduced my palette of options some.
    • Several combinations get me to 1:2.2... [35t front/16t rear, 37t front/17t rear, 40t front/18t rear...]. I went for the 35t/16t combination, and suffered an unanticipated side effect: the chain line runs too close to the chain stay, so the chain slaps the chain stay (since the radius of both gears get smaller...). Now I'm shopping for a 37t/17t combo or 40t/18t.
 
Quick update:
Do not use thread loc when installing the buttons. If you do it'll be near impossible to take the shift buttons off, and this it'll be impossible to remove the cranks (say you want to install shorter, or longer cranks). I edited the steps above recommending thread loc to indicate this update.
 
Hello there Matty, i received my Schlumpf from accountant, unfortunately two of the lips are bent, the lips with the hole to mount the chain ring, did you have a problem with this as i read it somewhere on ES that someone had the same problem, now I'm scared to try and bend anything incase i ruin my drive, very disappointed just now. can you look at my thread please:

http://endless-sphere.com/forums/viewtopic.php?f=3&t=40296&p=598675#p598675
 
Sorry away from real Internet just now. But I think it was Alan B's Croborg build where the chainring flange was bent. I'll look when I get home to see, there was definitely a thread about that
 
Thread resurrection/update!

Yesterday it was frightfully cold up these parts. It seemed every time I shifted from overdrive to 1:1, the clutch would skip. My pedal would slip with a snap! about 1/8 turn. Not enough to lose control, but enough to be disappointing.

I've never oiled the system per its maintenance recommendations, I'll have to crack open the manual and see what is recommended and when. And use whatever viscosity oil is suggested for cold weather operation!

Before yesterday, this drive has been basically bullet proof
 
MattyCiii said:
Thread resurrection/update!

Yesterday it was frightfully cold up these parts. It seemed every time I shifted from overdrive to 1:1, the clutch would skip. My pedal would slip with a snap! about 1/8 turn. Not enough to lose control, but enough to be disappointing.

I've never oiled the system per its maintenance recommendations, I'll have to crack open the manual and see what is recommended and when. And use whatever viscosity oil is suggested for cold weather operation!

Before yesterday, this drive has been basically bullet proof

Holy Thread Resurrection! It's been more than 3 years!

Well, the above info - it turned out to be worn rear cog and chain slipping. Yeah, I know, pretty mundane. The ATS drive had nothing to do with the symptoms I described. I let my chain get so worn down it damaged the rear cog, and if I recall correctly I had to replace the chain, rear cog and chainring. But the ATS drive was perfect...
 
March 2016: I found that as I pedaled the bike - whenever I mashed the gears (starting from a dead stop in a high gear; accelerating fast) there would be some "slipping" feeling. At first I thought it was the NuVinci N360 in the hub, but no... it was in the ATS drive.

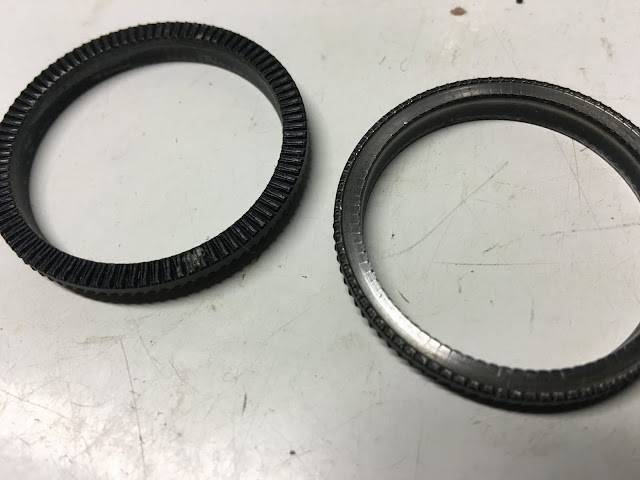
Any planetary gear system has 3 forces: An input, and output, and a force to keep things fixed. The Schlumpf/ATS drives need a tight friction fit to the bottom bracket, or else it can't turn your pedal force into (speed or power) amplified chainring output.

To make a tight friction connection, they supply a "cone ring". Part friction amplifier, part spacer, they come in different metals (Aluminum for steel and titanium frames, steel for aluminum frames). They have knurled serrations or interlocking features to mate with the ATS drive on one side, and serrations to mate with the bottom bracket on the other.

This is what failed on my bike. In the image below (if you can see it) I have an original cone ring and the part that failed on my bike. In the failed part you see nothing but polished steel - no serrations. I've lost about 10/1000ths of an inch of metal compared to the original part.

The lesson being: Torque your bottom bracket to specification, and check it every 4-6 months. If you ever sense any "slipping", stop using the bike and check the cone ring/re-torque right away. I let mine wear down and now it's junk.
Personally, I have the spare so I'll be back on the road soon. But it's $20 in parts cost lost, and several days of riding...

IMG_0921.jpg
 
Alan B said:
Glad you were able to fix it.

Thanks Alan!

I had a spare as you see in the pic, but with this failure I wanted to replace the spare. I was able to buy the last knurled type steel cone ring from Cycle Monkey earlier today.

Seems retailers of the Schlumpf/ATS drivers are rare and getting more sparse over time. Too bad, it's such a great system.
 
Im looking at a drive for the front of my Greenspeed Magnum trike---- Patterson looked way eaasier than this--- i dont think it has to be chamfered.... they are about the same price as ATS--- lot cheaper than Schlump....

ANyone know of any negatives to the Patterson?
 
Has anyone used an OVAL chainring supposed to be more efficient on your power stroke when peddling? if it could be adapted it would be great I don't think ATS offers an oval chainring. unless there is a specific bolt pattern that fits?

 
Back
Top