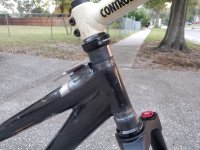
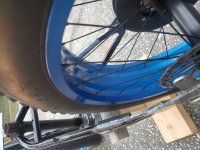
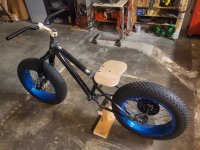
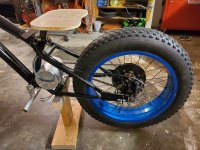
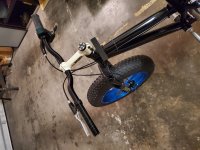
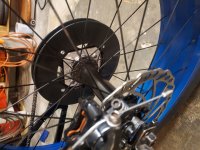
Mongoose Pug on/off road

Barncat said:
Disc brake mount done.

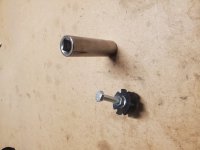
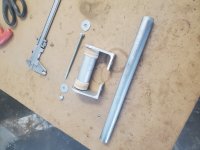
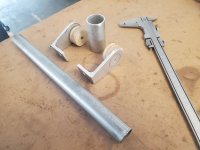
I am stuck on the headtube mod. Trying to accurately file the ID of a short length of steel tube out by .084" is insanity... a lousy 10 minute job on my lathe that's in NY :evil: Have to find some hobbyist with a lathe here.

Are you reaming it so the fork steerer tube fits, or to prepare it for the headset? (sorry, trying to follow along).
 
Barncat said:
You'd have to read most of the thread again.

Ya, I missed the post on the previous page where you figured out that the adapter doesn't exist. I think I'm caught up. Also got all mixed up between head tube and steerer tube (at first I thought you were replacing the fork's steerer tube).
 
Yes it's a tad confusing. I think a year ago you could still get a nominal 1" steerer on a fat bike fork but I'm not seeing anything now. A 28.6mm (1-1/8) steerer still clears the 30mm ID head tube, so it's a matter of adapting a 1-1/8 headset with machined welded on rings top and bottom.

I've devised a work-around by ordering a piece of 1.5 x .083 tubing, which = 33.9mm ID, a good press fit onto the head tube and for the bearing cups. 5 more days for that to arrive..................
 
Barncat said:
Yes it's a tad confusing. I think a year ago you could still get a nominal 1" steerer on a fat bike fork but I'm not seeing anything now. A 28.6mm (1-1/8) steerer still clears the 30mm ID head tube, so it's a matter of adapting a 1-1/8 headset with machined welded on rings top and bottom.

If you could find a salvage/broken/wrecked steel frame with a 1 1/8" head tube, you could do a transplant of just the head tube. After seeing your first post, I started looking at the wallyworld mongoose steel frames, because they also have rear disc mounts (I've only seen a couple of steel frames with disc mounts, there's a canadian bike maker, and maybe one other that i've seen). It looks like they have a few steel bikes with both a disc mount and 1 1/8" head tube.
 
E-HP said:
If you could find a salvage/broken/wrecked steel frame with a 1 1/8" head tube, you could do a transplant of just the head tube.

That was my first thought too. Mitering it to fit the frame straight and at the desired angle would be exacting work, but not complicated. Which approach would be better is a matter of what tools and aptitudes are available.

In any case I'd spray the rear extension with the brittlest lacquer I could find, so it would crackle and flake when the frame is giving up.

(Edited to fix a phone-imposed typo.)
 
Chalo said:
E-HP said:
If you could find a salvage/broken/wrecked steel frame with a 1 1/8" head tube, you could do a transplant of just the head tube.

That was my first thought too. Mitering it to fit the frame straight and at the desired angle would be exacting work, but not complicated. Which approach would be better is a matter of what tools and aptitudes are available.

I'm any case I'd spray the rear extension with the brittlest lacquer I could find, so it would crackle and flake when the frame is giving up.

I'd slice the existing head tube vertically so maybe leaving 25% of it still attached, and weld the donor on to that. That would keep the head tube angle close to the same, and help mate and align the parts.
 
E-HP said:
I'd slice the existing head tube vertically so maybe leaving 25% of it still attached, and weld the donor on to that. That would keep the head tube angle close to the same, and help mate and align the parts.

It would also provide more thermal mass to lessen the likelihood of blasting holes in the tubing.
 
Chalo said:
E-HP said:
I'd slice the existing head tube vertically so maybe leaving 25% of it still attached, and weld the donor on to that. That would keep the head tube angle close to the same, and help mate and align the parts.

It would also provide more thermal mass to lessen the likelihood of blasting holes in the tubing.

For $20, seems like an easier option:
https://www.bikefabsupply.com/head-tubes-machinedhead-tubes-machined-50/48-44mmhs-ec44-zs44
 
Yes, finding a steel 1-1/8 donor head tube was always an option, but a hassle and absolute last resort. I have a 4ft length of tube on the way for 23 bucks shipped that will solve my problem. Only needed an inch and a half but for that price who cares... at any rate, it's very frustrating to not have all my tools and capabilities in this location.

Mongoose does make some oddball bicycles that can be turned into interesting ebikes.
 
Last edited:
A bit of a slog to get the head tube modified to accept a new 1-1/8 cartridge bearing headset and the new fork. Not going to bore any spectators with the details... painted myself into a corner- now I'm out. Need to cut the fork and install the star nut tomorrow.

It's mocked up. Nice burly look as planned. Added a couple gussets to the upper chainstay/dropout junction, the weakest link in the back end. The weldments on the top tube are battery mounts. May try some sort of leaf or torsion spring seat mount.
 

Attachments

  • 20221212_143924.jpg
    20221212_143924.jpg
    6.4 MB · Views: 402
  • 20221214_130037.jpg
    20221214_130037.jpg
    3 MB · Views: 402
  • 20221214_172301.jpg
    20221214_172301.jpg
    5.6 MB · Views: 402
  • 20221214_172313.jpg
    20221214_172313.jpg
    5.4 MB · Views: 402
  • 20221214_172420.jpg
    20221214_172420.jpg
    6.3 MB · Views: 402
  • 20221214_172454.jpg
    20221214_172454.jpg
    6.7 MB · Views: 402
  • 20221214_172712.jpg
    20221214_172712.jpg
    6.5 MB · Views: 402
Barncat,

Are those 20 inch fat tire wheels?

The rear drop out extension, did you cut em by hand or have them laser/waterjet cut?

You do mind sharing what welder you use pls,

those factory knobby tires are very thin unfortunately.
 
Yes they're 20" wheels/tires. Actual tire OD is 23". The rear tire tread will wear rather fast on pavement, but short of going to a street tire I've not looked for alternatives yet.

I do all my small metal parts freehand on the DIY bandsaw rig pictured. Harbor Freight Bauer brand, works great. Plus a 4x36 belt sander for shaping, and bench grinder with a wire wheel on one side.

Welder is a Lotos ac/dc tig- was around 600 bucks new a few years ago. I like my old Lincoln square wave unit a bit better but that's at another location.
 

Attachments

  • 20221215_113457.jpg
    20221215_113457.jpg
    4.2 MB · Views: 372
  • 20221215_113523.jpg
    20221215_113523.jpg
    2.3 MB · Views: 372
All the close tolerance work is successfully completed.

I opted not to cut the steerer, as I usually use a tubing cutter, and the cut would've been too close to the end for that. Just added a couple spacers to adjust the stack accordingly. I drive the star nut with the common items pictured, after grinding the nut to 1mm over steerer ID. Don't let it get out of plumb or you'll be sorry.

I popped the headset cups back out and measured the vertical span of the welded collars from top to bottom at about 8 places around the circumference with my verniers. This is the only way to manually face the collars for alignment. I had an expensive reaming facing set back in the day but sold it. I had flattened the collars prior to welding, but long story short I dusted a few thou off part of the top collar with a flat file to optimize headset alignment. Not bad for all manual work. Pleased to report the front wheel turns like "butta" :thumb:

The Pug will share my 20s battery pack pictured in background on the OCC Stingray.
 

Attachments

  • 20221215_171935.jpg
    20221215_171935.jpg
    4.3 MB · Views: 350
  • 20221215_172308.jpg
    20221215_172308.jpg
    6.3 MB · Views: 350
I guess I'm not trying anything fancy with the seat... did my standard issue seatpost mod with 1/2" plywood base. Needs paint, carpet tape and a layer of foam.

The "cockpit" layout and geometry is all comfortable and as planned. 42-1/2" wheelbase. It'll be quick handling on single-track but stable and will laugh at any pavement irregularities save for a missing manhole cover.

Will fab some foot pegs, then paint, assembly, wiring, and it's done.
 

Attachments

  • 20221216_200131.jpg
    20221216_200131.jpg
    6.2 MB · Views: 320
  • 20221216_195957.jpg
    20221216_195957.jpg
    4.3 MB · Views: 320
Foot pegs finished that make use of the bottom bracket, are strong enough to support full body weight +, and can pivot backwards a bit in the unlikely event I ever hit something on a trail. For the record, I have nothing against pedaling and paid my dues for decades when younger. What I build now is motor-only. Should be riding this in a few days.
 

Attachments

  • 20221218_112435.jpg
    20221218_112435.jpg
    6.2 MB · Views: 284
  • 20221218_111920.jpg
    20221218_111920.jpg
    5.7 MB · Views: 284
  • 20221218_120632.jpg
    20221218_120632.jpg
    3.3 MB · Views: 284
I like the design of the foot pegs,
I see how you offset the handbars forward to get more knee room, I was thinking of a 20 inch before I bought the 26 inch mongoose myself, I could not fit my knees in the factory 20 inch.
Thanks for sharing the welder/tool details.
 
Yeah, these bmx frames are pretty small, hence stretching the back end and adding the taller air fork. I'm 5'11" 175lbs, much over that wouldn't be a good fit. Bought it for the wheels, and adapted the frame... there's a Mongoose Ledge on Craigslist for cheap nearby- aluminum front triangle decent rear suspension. Haven't pulled the trigger since it also has a 1 inch headtube.

Painted the frame yesterday, assembling today, wiring and riding tomorrow.
 
Assembled, with brakes adjusted which takes a bit of fussing. Nice to have disc's.

Controller attaches inside triangle with two U-bolts and battery goes on top tube with zip ties at corners. Should be riding tomorrow.
 

Attachments

  • 20221219_180656.jpg
    20221219_180656.jpg
    4.2 MB · Views: 228
  • 20221219_180827.jpg
    20221219_180827.jpg
    3.3 MB · Views: 228
  • 20221219_180846.jpg
    20221219_180846.jpg
    4.3 MB · Views: 228
Took me until this afternoon to finish the wiring. Was raining yesterday anyway and today is the winter solstice, so a more memorable end date.

As expected, bike performs perfectly right out of the gate. It would've been done 10 days ago if not for the headtube/fork swap issue. Simple controls: on/off key, throttle with V indicator, 3 speed switch on left. I did mod the controller shunt with a bit of solder- probably adds a bit of torque. Top speed is 45mph downwind, with 12T/80T sprockets driving the 23" diameter rear tire. Acceleration is brisk with my 20s Barncat Battery. Will use an 11T for trail riding.

Nothing else to do to it other than tape a piece of foam on the seat and put a 60A Littelfuse on the battery. There are reflections in pics off Lexan battery covers...
 

Attachments

  • 20221220_112527.jpg
    20221220_112527.jpg
    3.5 MB · Views: 199
  • 20221221_160545.jpg
    20221221_160545.jpg
    6 MB · Views: 197
  • 20221221_160724.jpg
    20221221_160724.jpg
    6.6 MB · Views: 199
  • 20221221_160829.jpg
    20221221_160829.jpg
    5.6 MB · Views: 199
Put 10 or 12 test miles on it. The shunt mod is definitely adding torque over stock and seems to be the right amount of solder. Consequently, I was getting an occasional nasty clunk out of the back end, which I correctly attributed to the crappy 2 pawl freewheel that comes with a Razor type rear sprocket. The pawls were skipping on the ratchet teeth. Wasn't a big surprise. Figured I'd try it before doing my "patented" Origin8 Hornet freewheel mod that's described in my thread in the Mechanical & Structural section. All good now, with near instant engagement.
 

Attachments

  • 20221223_164945.jpg
    20221223_164945.jpg
    6 MB · Views: 128
  • 20221223_164958.jpg
    20221223_164958.jpg
    3.8 MB · Views: 128
What a fun thread! Thanks! I wish my welds were 50% as good as yours. But hey horticulture guys ain't welders... We sold MANY kits to users that essentially pitched all but the mongoose frames, and I've never seen any documented frame failures
 
Thanks tomjasz. Given that I've not welded anything for about 10 months the results were adequate cosmetically. No concerns structurally. TIG is an artform- you don't forget but you need regular practice to keep your chops up...

Welding on a bike frame is not a beginner project. Odd shaped joints, tight circles, difficult reaches, out of focal length welds, standing not seated, fighting paint contamination etc... And any mods need to be tacked up very accurately to maintain good frame and drive train alignment.
 
A couple of observations after the first 100 miles...

The stock semi knobby tires on these bikes are crap, and don't really do anything well. Loud on pavement, inadequate for trail riding, and they wear out unbelievably fast. So since basically all the riding I'll do at this location is street, I swapped on tires pictured. They look cool but the subtle center ridge doesn't transition as well as I'd like to the shoulders in tight high speed cornering. This will probably improve as they wear a bit. Still experimenting with tire pressure. 20psi max, and the lower you go the more rolling resistance. [Edit update- street pressure needs to stay above 18psi especially on the front or handling and steering suffers].

Truth be told, these 4 inch tires are sort of ridiculous for a bicycle, and a tad disappointing in terms of shock absorption. None of which comes as a great surprise but I'd never test ridden such a setup before, and certainly not in the mid 40mph range. Sure gets a lot of looks and thumbs up though...

Have some 1 inch yoga mat arriving soon to cut up for seat padding, which it needs. [Since installed, works great].
 

Attachments

  • 20230104_100855.jpg
    20230104_100855.jpg
    4.2 MB · Views: 56
Looks awesome :thumb:
Not sure how long your arms are but it looks like having the handle bar that far forward gives a very stretched riding position?
 
Back
Top